
Login

Shoutbox
You must login to post a message.
renatoa
07/26/2024 3:49 PM
Bill grubbe and Jk, 
allenb
07/26/2024 5:15 AM
Spiderkw Welcome to HRO!

renatoa
07/24/2024 8:31 AM
ramiroflores and John123,

 ?
?
?renatoa
07/21/2024 1:18 AM
 , Luislobo
renatoa
07/19/2024 11:28 AM
Koepea,
Forum Threads
Newest Threads
Background Roast Iss...Skywalker roaster mods
Hello from Arkansas
TC4ESP
Green coffee reviews
Hottest Threads
| Skywalker roaster... | [374] |
| TC4ESP | [115] |
| War on Farmers by... | [47] |
| Adventures in flu... | [26] |
| Hello! (soon) Roa... | [17] |
In Memory Of Ginny

Donations
Latest Donations
dmccallum - 10.00
JackH - 25.00
snwcmpr - 10.00
Anonymous - 2.00
Anonymous - 5.00
dmccallum - 10.00
JackH - 25.00
snwcmpr - 10.00
Anonymous - 2.00
Anonymous - 5.00
Users Online
Guests Online: 3
Members Online: 0
Total Members: 8,393
Newest Member: Bill grubbe
Members Online: 0
Total Members: 8,393
Newest Member: Bill grubbe
View Thread
Who is here? 1 guest(s)
 My KKTO BUILD...
|
|
| Pretzal |
Posted on 09/05/2014 9:01 AM
|
|
Newbie  Posts: 7 Joined: August 13, 2014 |
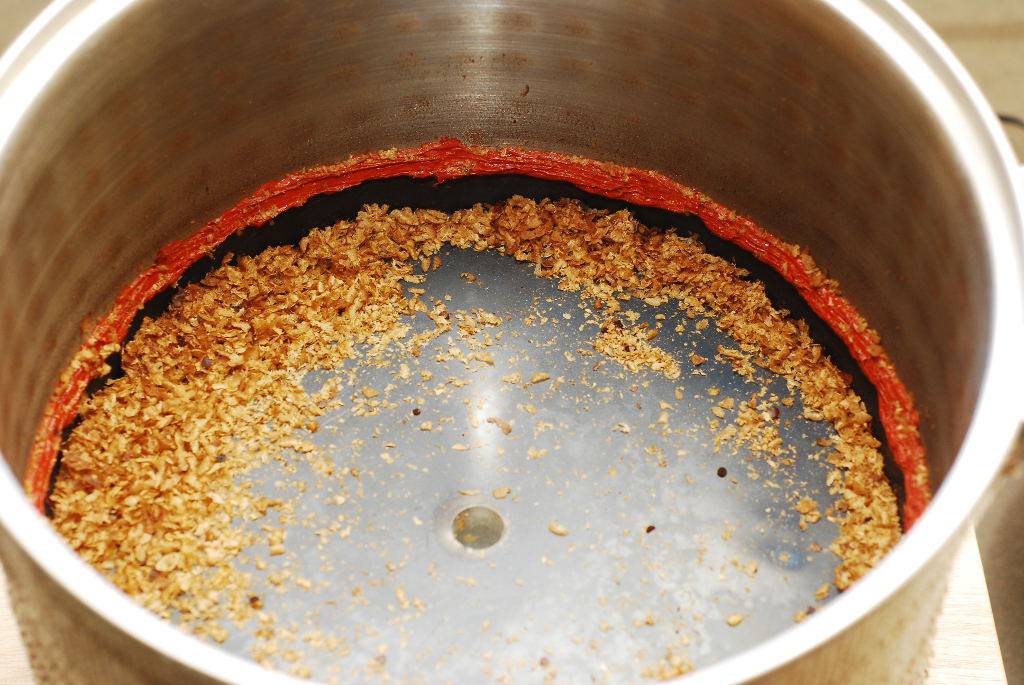
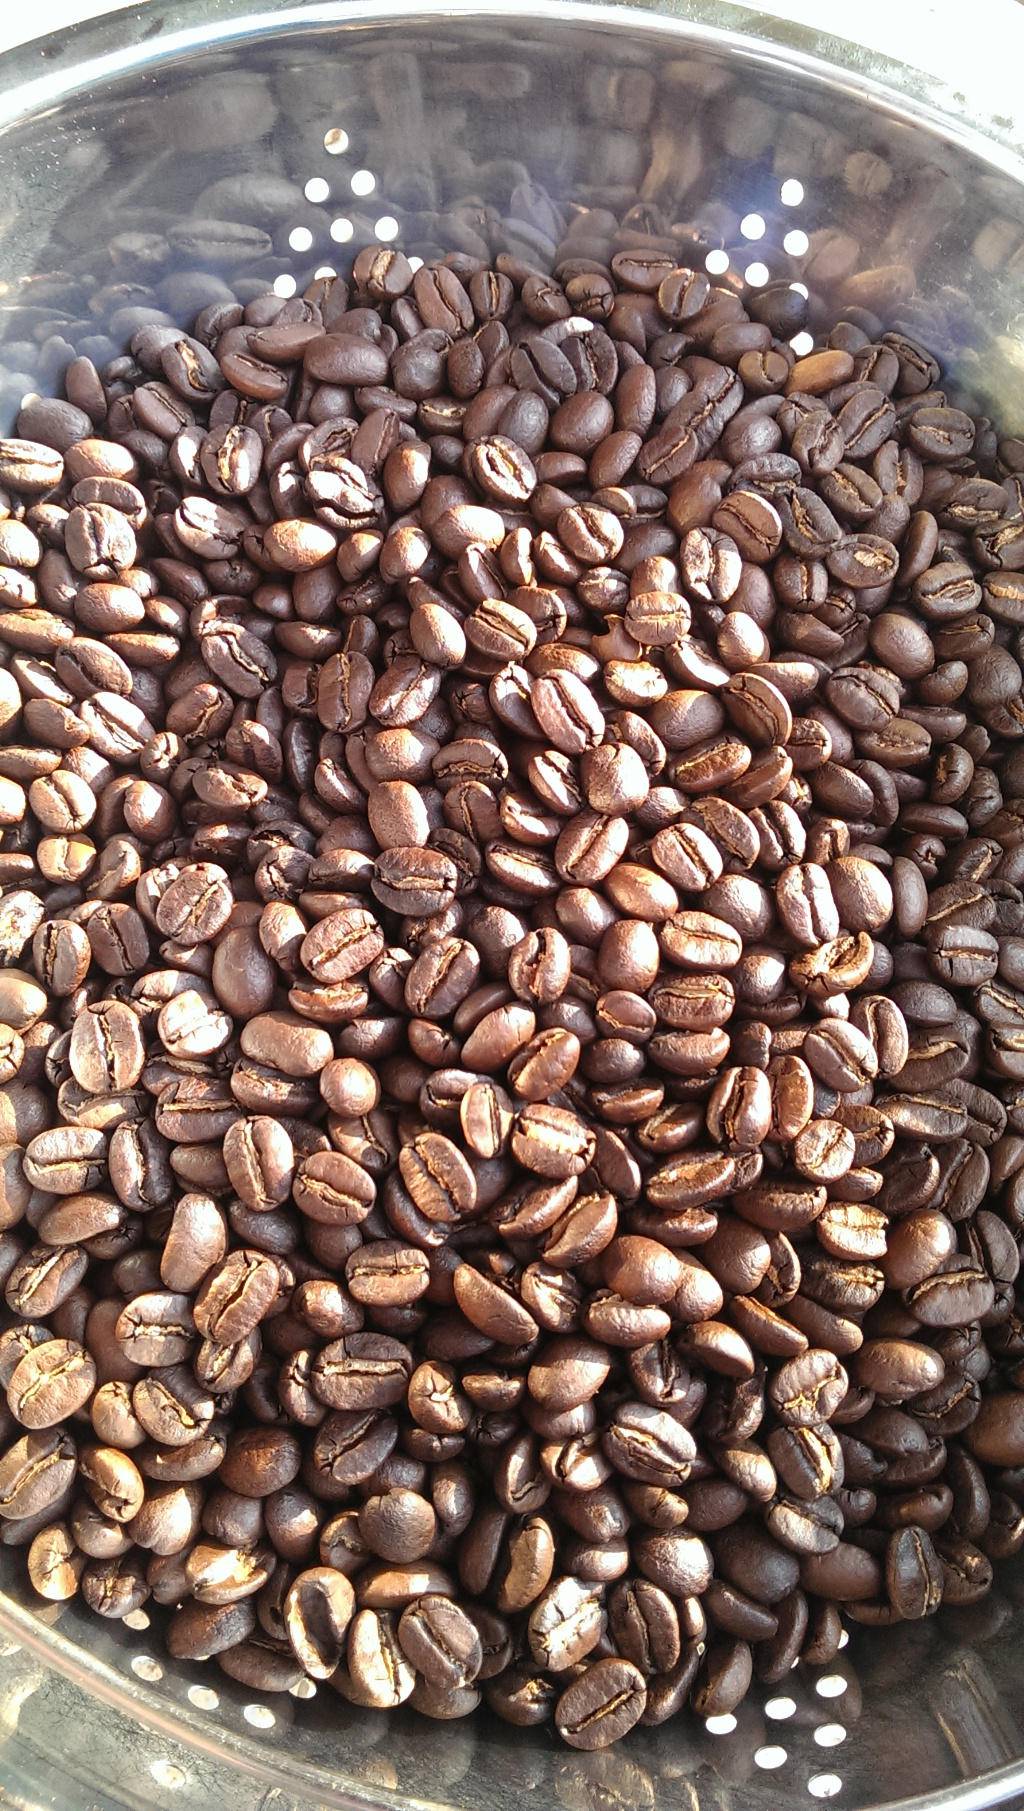
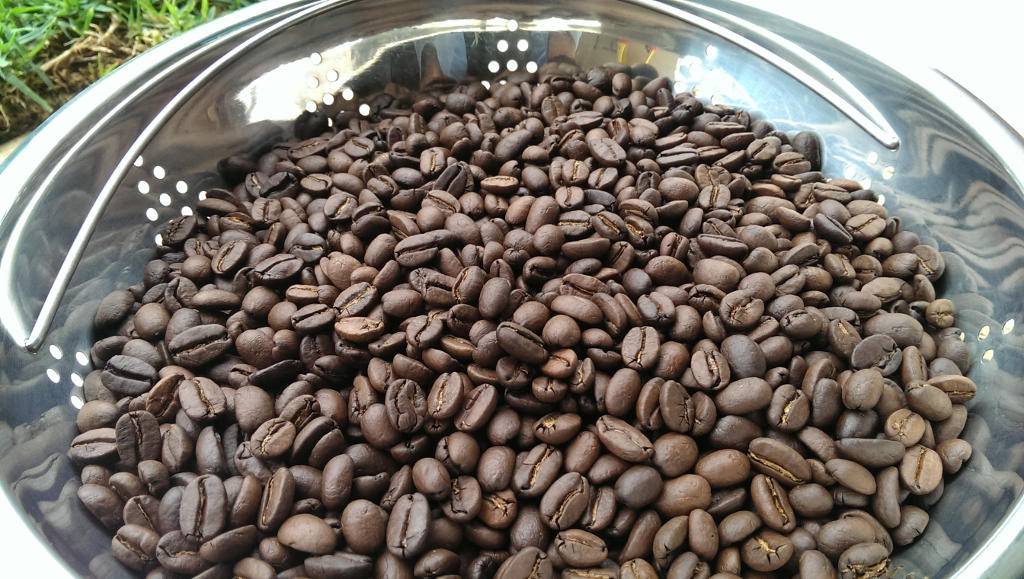
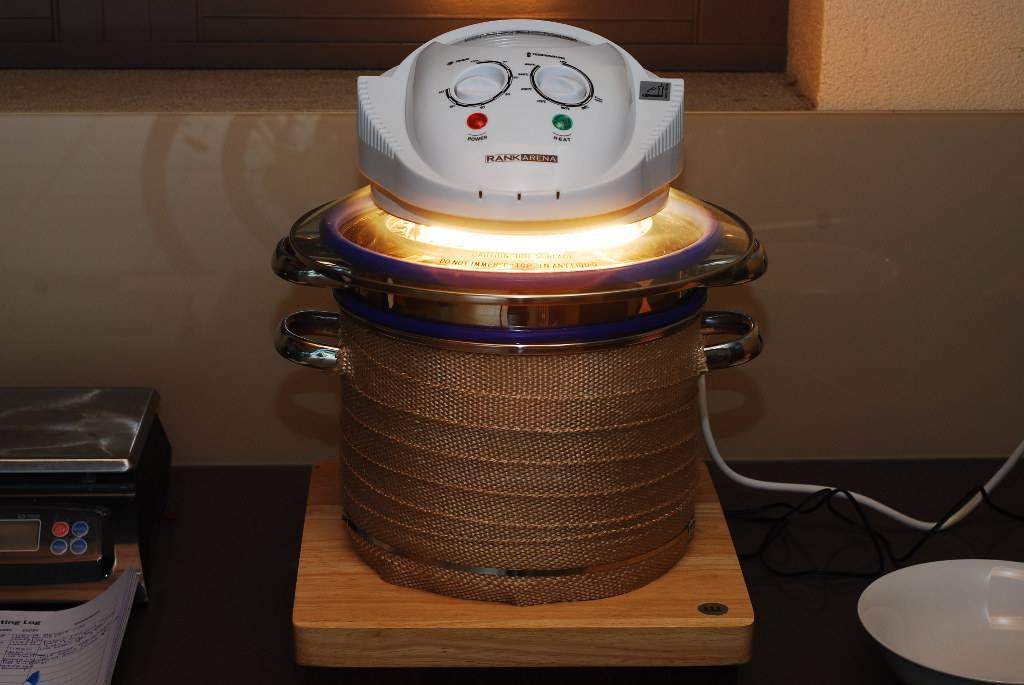
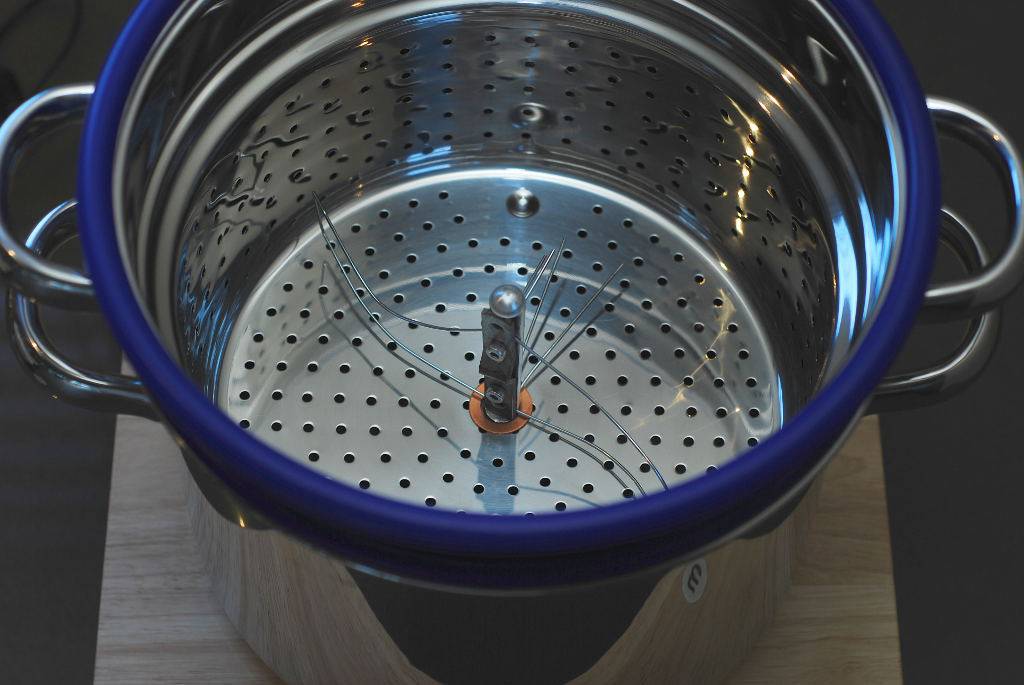
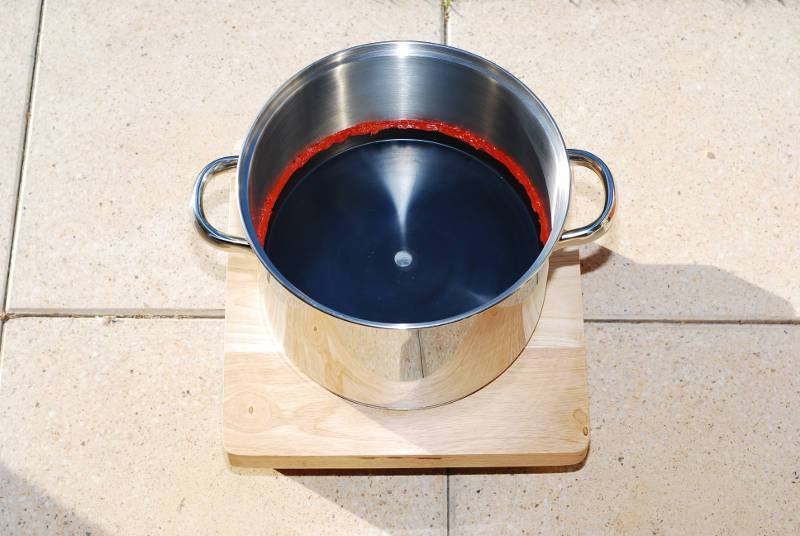
Hi, After my recent introduction about a month ago I have decided to go ahead and build a KKTO roaster. I was initially a little hesitant about the concept as I wasn't too enamored with the home-made style roaster concept. However after quite a bit of investigation, I finally decided to give it a go. Very happy so far I did. Firstly I would like to put out a HUGE thank you to Koffee Kosmo - he has provided a LARGE amount of offline help including phone calls, emails (LOTS!) and texts that have been instrumental in making it happen. He has also provided many of the parts required and has been very reasonable with costs - mostly just covering his expenses. It truly is a special person who gives so much without expecting anything in return - Koffee Kosmo is one of those people. So a big thank you! So with that it mind - on with the build! Initially I investigated getting KK to make one for me, but I felt I would be missing out on a lot of fun and satisfaction of doing it myself. Very happy with my decision and have enjoyed the process immensely. Fortunately I was able to source the recommended Arcosteel pots from eBay without too much trouble. Other items sourced from there were the 240cm pizza tray (for the false bottom), thermocouple, 10m roll of fibreglass exhaust wrap (for external insulation) and multimeter/datalogger. The wooden chopping board was sourced locally (Big W) and a few bits an pieces from Bunnings (hardware shop). The motor, false bottom insulation, agitator, drive shaft, wiring loom and silicon sealing were provided by Koffee Kosmo. The dremel, step drill, file, gasket maker and various other tools were required. Nothing is overly complex and can be completed with a little attention to detail. Below is a couple of photos during construction, the thermocouple and photos of the first and second roast plus also the bean cooler I made. Pretty impressed so far. It's going to take a little bit of experimentation and getting to know the roaster but the first 2 roasts have been fairly solid. I'm also very happy with the bean cooler - it means I don't have to tip the hot roaster to eject the beans and cools them down to a 'touchable' temperature in less than 30 seconds.
Pretzal attached the following images:


|
|
|
|
| JackH |
Posted on 09/05/2014 10:07 AM
|
 Administrator Posts: 1809 Joined: May 10, 2011 |
It looks great! Nice to see another KKTO roaster build. KK (paul) was a tremendous help to me during my build and many modifications. It is great to have him here. I see you are using the wire wisks for stirring. I added them to my roaster last year and it is working very well. It is looking great and you have some nice roasted beans there. ---Jack
KKTO Roaster. |
|
|
|
| MikeW |
Posted on 09/05/2014 2:53 PM
|
|
1/4 Pounder  Posts: 50 Joined: April 14, 2012 |
That's very nicely thought out and tidy. You mentioned you don't have to tip the hot roaster to get the beans out, how does that work? Are you vacuuming them out? Great work. |
|
|
|
| Koffee Kosmo |
Posted on 09/05/2014 5:02 PM
|
 Administrator Posts: 1621 Joined: December 31, 2008 |
Excellent work and a couple of excellent looking maiden roasts  My roaster has roasted it's butt off on 2000 + roasts and still going strong So you will have a long and productive life ahead of you on your roaster Happy Roasting KK I home roast and I like it. Designer of the KKTO
Roaster Build information https://homeroast...ad_id=1142 https://docs.goog...lide=id.i0 Blog - http://koffeekosm...gspot.com/ Bezzera Strega, Mazzer Robur Grinder, Pullman Tamper Convex, (KKTO) Turbo Oven Home Roaster. |
|
|
|
| Pretzal |
Posted on 09/05/2014 5:46 PM
|
|
Newbie Posts: 7 Joined: August 13, 2014 |
Yes Mike I'm using a cheap wet and dry vacuum I bought. You can see the black vacuum hose attached to the base of the bucket. I went to the hardware store and bought the grey 1 metre pool hose then some plumbing fittings that would mate with the hoses. I ensured the fittings had lips on them so they would be easy to attach and retain in the bucket. Have to say I'm really chuffed with the results - it functions perfectly. As far as the roaster goes, the 2 roasts I've done so far have been 600grams with a 200 degree Celsius preheat. First crack about 11.30 and second crack 14.45 ish. The insulation seems to be doing its job pretty well as I can touch the outside and keep my hands there for a little bit during the roast. |
|
|
|
| Barrie |
Posted on 09/06/2014 10:35 AM
|
|
Pounder  Posts: 504 Joined: April 10, 2012 |
Very nice indeed, Pretzal. I use a different roasting device, but have made various attempts to jerry-rig a cooling/chaff-removal arrangement like yours. I have a similar colander and bucket setup, but have yet to come across a colander with just the right-sized holes that permit good chaff egress, especially the larger pieces, while not letting the beans through. I am coming around to thinking about drilling to enlarge them. Have you (or anyone else) solved that hole-size issue? If you wouldn't mind telling us, what did this cost you, other than in terms of your own time and tools? Barrie (San Diego, CA)
"So much to learn, so little time." Hottop 2K+., Artisan, Jura Capresso ENA 3 (i.e. espresso). |
|
|
|
| Pretzal |
Posted on 09/06/2014 5:29 PM
|
|
Newbie Posts: 7 Joined: August 13, 2014 |
I'm sure the build could be done a lot cheaper than what I did it for depending on what parts could be sourced cheaply. I prioritised aesthetics and function over cost so what I spent is not indicative of what would be an average. All up roaster an cooler I spent about $500 but everything was new except for the power supply which I recycled from a battery charger. The bean cooler could be done quite cheaply. I bought the vacuum cleaner new ($47), the bucket was $8 and the fittings/hoses about $20. The colander was part of the pot set which was $47 including $20 delivery. To be honest the bean cooler doesn't handle that much chaff, I'm pretty amazed at how well the roaster retains almost all of the chaff which collects on top of the false bottom (under the perforated pasta insert). I notice some have cut small vertical slits in the pasta insert to draw away extra chaff but as yet I haven't felt the need to. The photo above shows the chaff remaining in the roaster. I can measure the holes on the colander if you like and I am happy to further breakdown the costs I spent on the roaster if that would be of benefit to you or anyone else. |
|
|
|
| Barrie |
Posted on 09/06/2014 9:26 PM
|
|
Pounder Posts: 504 Joined: April 10, 2012 |
Thanks for the info, Pretzal.
Barrie (San Diego, CA)
"So much to learn, so little time." Hottop 2K+., Artisan, Jura Capresso ENA 3 (i.e. espresso). |
|
|
|
| Koffee Kosmo |
Posted on 09/08/2014 8:45 PM
|
|
Administrator Posts: 1621 Joined: December 31, 2008 |
Now that the beans have rested / degassed can you please post some taste impressions of your roasts KK I home roast and I like it. Designer of the KKTO
Roaster Build information https://homeroast...ad_id=1142 https://docs.goog...lide=id.i0 Blog - http://koffeekosm...gspot.com/ Bezzera Strega, Mazzer Robur Grinder, Pullman Tamper Convex, (KKTO) Turbo Oven Home Roaster. |
|
|
|
| Pretzal |
Posted on 09/09/2014 12:21 AM
|
|
Newbie Posts: 7 Joined: August 13, 2014 |
Sure can KK, The first roast, although it looked ok in the photos was well into rolling 2 crack and had a small handful of beans that was a little past good drinking. I removed those beans but the rest had a hint of ash in the cup and the beans themselves when split open were a little charred. So I will chalk than one up to experience. It is difficult to know exactly how long it will take one's own roaster as all of them are unique in their build and insulation properties, not to mention humidity and temperature variables on the day. The second roast was I obviously intended to roast for less time, however they were different beans (I like to vary the beans I drink and didn't want to have one particular type for too long). These beans were roasted just into second crack (I think as I'm still discerning the sounds of the roaster). The result visually was much better. There were no toasted beans and internally the beans looked fairly evenly roasted. There was a particular note that I don't quite love between roast #1 and roast #2 but I can't quite isolate exactly what it is. I can hypothesise that it may be one of a few causes ( KK might be able to shed some light here): 1. The both had the same preheat temperature of 200 degrees Celsius which may be too high. 2. The roaster is still being seasoned? 3. Both roasts still may have been taken too far into 2nd crack for my palates liking and have taken on the roast flavour. I think we are still getting to know each other that's for sure. Roast #2 is still very drinkable, but I reckon there is some room for improvement in the way I roast using it. The datalogger should arrive soon so I will most likely wait for that to arrive before roasting again as it will provide more guidance and a little bit of extra science to the process. |
|
|
|
| Koffee Kosmo |
Posted on 09/09/2014 1:11 AM
|
|
Administrator Posts: 1621 Joined: December 31, 2008 |
That's not uncommon and it happens to both professional or home roasters when new machinery is introduced Consider yourself on L plates at the beginning and after a few roasts under your belt you will archive better results KK I home roast and I like it. Designer of the KKTO
Roaster Build information https://homeroast...ad_id=1142 https://docs.goog...lide=id.i0 Blog - http://koffeekosm...gspot.com/ Bezzera Strega, Mazzer Robur Grinder, Pullman Tamper Convex, (KKTO) Turbo Oven Home Roaster. |
|
|
|
| Barrie |
Posted on 09/09/2014 8:53 AM
|
|
Pounder Posts: 504 Joined: April 10, 2012 |
Quote Koffee Kosmo wrote: Consider yourself on L plates at the beginning and after a few roasts under your belt you will archive better results KK Great comment, KK, except that we do not have L (learner) plates on cars in the US. That is not to say that it wouldn't be a good idea.  For those not familiar with that scene in the UK and down under, one has to put "L plates" (big red L on white background) on any car being driven by someone yet to get a license ("drivers ed" stage). Barrie (San Diego, CA)
"So much to learn, so little time." Hottop 2K+., Artisan, Jura Capresso ENA 3 (i.e. espresso). |
|
|
|
| Koffee Kosmo |
Posted on 09/11/2014 9:06 PM
|
|
Administrator Posts: 1621 Joined: December 31, 2008 |
Quote Barrie wrote: Great comment, KK, except that we do not have L (learner) plates on cars in the US. That is not to say that it wouldn't be a good idea. For those not familiar with that scene in the UK and down under, one has to put "L plates" (big red L on white background) on any car being driven by someone yet to get a license ("drivers ed" stage). Its a good idea for sure Barrie So are you considering a KKTO build Barrie ? we need a few more members in the owners group KK I home roast and I like it. Designer of the KKTO
Roaster Build information https://homeroast...ad_id=1142 https://docs.goog...lide=id.i0 Blog - http://koffeekosm...gspot.com/ Bezzera Strega, Mazzer Robur Grinder, Pullman Tamper Convex, (KKTO) Turbo Oven Home Roaster. |
|
|
|
| Erichimedes |
Posted on 10/23/2014 10:16 AM
|
 1/4 Pounder Posts: 58 Joined: August 07, 2013 |
Pretzal, that looks like a great build! Keep us updated on your roasts and how they come out. I'm in the process of building a turbo oven roaster, so this is great to see! One question I have, is that you seem to be using the same blue tubing (?) for sealing the pots to eachother and the turbo. What is this blue stuff that everybody seems to be using, and where can I find it? |
|
|
|
| JackH |
Posted on 10/23/2014 6:43 PM
|
|
Administrator Posts: 1809 Joined: May 10, 2011 |
This is the tubing I used for my build: http://www.usplas...;catid=799 Silicon tubing good to 500F. I cut a slit length wise and fit the pot rim. The size I used is 3/8" ID x 1/2" OD and it fits my outer pot rim. There are many sizes available. ---Jack
KKTO Roaster. |
|
|
|
| Koffee Kosmo |
Posted on 10/23/2014 11:37 PM
|
|
Administrator Posts: 1621 Joined: December 31, 2008 |
Quote JackH wrote: This is the tubing I used for my build: http://www.usplas...;catid=799 Silicon tubing good to 500F. I cut a slit length wise and fit the pot rim. The size I used is 3/8" ID x 1/2" OD and it fits my outer pot rim. There are many sizes available. On my builds that utilise the 2 pot system I use the larger size on the rim where the Turbo Oven contacts, and a smaller hose in the pot to pot connection point One can see that in the photos for reference KK I home roast and I like it. Designer of the KKTO
Roaster Build information https://homeroast...ad_id=1142 https://docs.goog...lide=id.i0 Blog - http://koffeekosm...gspot.com/ Bezzera Strega, Mazzer Robur Grinder, Pullman Tamper Convex, (KKTO) Turbo Oven Home Roaster. |
|
|
|
| mkane |
Posted on 11/14/2017 9:20 PM
|
 1/4 Pounder Posts: 151 Joined: October 23, 2017 |
I 'm going to start collecting parts for a build like this.
Always learning
|
|
|
|
| Koffee Kosmo |
Posted on 11/15/2017 3:06 AM
|
|
Administrator Posts: 1621 Joined: December 31, 2008 |
Quote If you have any questions Just post on any relevant thread Myself and any builder/owners will help out KK I home roast and I like it. Designer of the KKTO
Roaster Build information https://homeroast...ad_id=1142 https://docs.goog...lide=id.i0 Blog - http://koffeekosm...gspot.com/ Bezzera Strega, Mazzer Robur Grinder, Pullman Tamper Convex, (KKTO) Turbo Oven Home Roaster. |
|
|
|
| mkane |
Posted on 11/15/2017 6:44 AM
|
|
1/4 Pounder Posts: 151 Joined: October 23, 2017 |
Thank you very much.
Always learning
|
|
|
|
| mkane |
Posted on 02/09/2020 8:49 PM
|
|
1/4 Pounder Posts: 151 Joined: October 23, 2017 |
It's starting, finally
Always learning
|
|
|
|
| JackH |
Posted on 02/10/2020 8:02 AM
|
|
Administrator Posts: 1809 Joined: May 10, 2011 |
Great to hear! Keep us posted.
---Jack
KKTO Roaster. |
|
|
|
| mkane |
Posted on 02/10/2020 10:03 AM
|
|
1/4 Pounder Posts: 151 Joined: October 23, 2017 |
Were off to Hawaii for a few days. I'll start a build thread when we return. The TO has been ordered.
Always learning
|
|
|
|

| Jump to Forum: |
Powered by PHP-Fusion Copyright © 2024 PHP-Fusion Inc
Released as free software without warranties under GNU Affero GPL v3
Designed with ♥ by NetriXHosted by skpacman