
Login

Shoutbox
You must login to post a message.
renatoa
07/26/2024 3:49 PM
Bill grubbe and Jk, 
allenb
07/26/2024 5:15 AM
Spiderkw Welcome to HRO!

renatoa
07/24/2024 8:31 AM
ramiroflores and John123,

 ?
?
?renatoa
07/21/2024 1:18 AM
 , Luislobo
renatoa
07/19/2024 11:28 AM
Koepea,
Forum Threads
Newest Threads
Skywalker roaster modsBackground Roast Iss...
Hello from Arkansas
TC4ESP
Green coffee reviews
Hottest Threads
| Skywalker roaster... | [376] |
| TC4ESP | [115] |
| War on Farmers by... | [47] |
| Adventures in flu... | [26] |
| Hello! (soon) Roa... | [17] |
In Memory Of Ginny

Donations
Latest Donations
dmccallum - 10.00
JackH - 25.00
snwcmpr - 10.00
Anonymous - 2.00
Anonymous - 5.00
dmccallum - 10.00
JackH - 25.00
snwcmpr - 10.00
Anonymous - 2.00
Anonymous - 5.00
Users Online
Guests Online: 7
Members Online: 0
Total Members: 8,394
Newest Member: Bill grubbe
Members Online: 0
Total Members: 8,394
Newest Member: Bill grubbe
View Thread
Who is here? 1 guest(s)
 Presto PopLite mod w/ chaff collector
|
|
| ChicagoJohn |
Posted on 06/15/2015 1:35 PM
|
 Pounder  Posts: 513 Joined: June 15, 2015 |
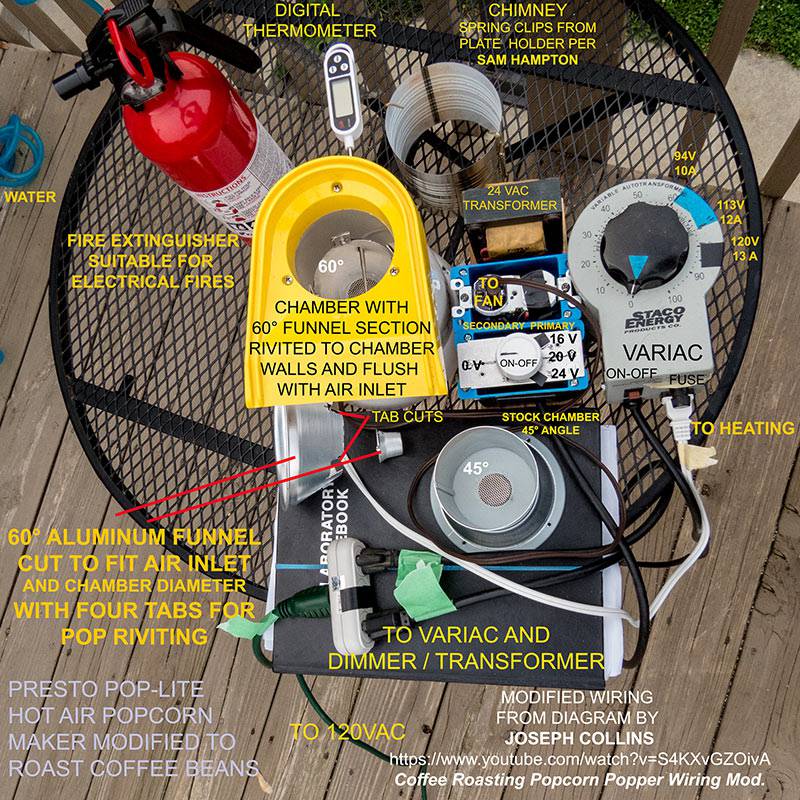
I'm new to this forum and to coffee brewing and roasting, but I completed a popper modification to have a place to start. I thought I'd share it, and I'd be happy to hear any comments or answer any questions on it. I'm working on a passive chaff collector for it now. Presto PopLite with single, bottom hot air inlet (~$17 on Amazon) Chimney 4" diameter tomato puree can Spring hooks for chimney - small plate hanger, Menards, cut into two pieces ineedcoffee.com/p...e-roaster/ Angle at bottom of chamber increased from 45 to 60 degrees by addition of a section of aluminum funnel held in place with pop rivets. This increase in angle of repose facilitates circulation of the green beans without stirring or tilting the unit, especially when 91 grams are used. Rewiring PopLite: www.youtube.com/w...4KXvGZOivA This modification by Joseph Collins separates control of the fan motor and the heating coils. For blower motor control: I used two plastic wall receptacle boxes duct-taped together. Holes drilled in walls of boxes for wiring. One side with an incandescent dimmer switch on the primary of the 24 VAC transformer (min. 2 amp). The other box has a receptacle with separation - one end transformer primary, other (taped) the secondary The brown plug goes into the separated secondary part of the receptacle and is wire-nutted inside the popper housing to the two AC leads to the motor. The motor is a DC motor that comes with integral full-wave diode rectifier; under full load 1.6 A. I marked the dimmer to show transformer secondary voltages from 16 - 24 VAC. The design voltage is 20 VAC but the motor can be slowed or sped up within the 16 - 24 VAC range. Note that the dimmer is connected to the primary of the transformer but the voltages shown are the output from the secondary (16 - 24 VAC). Heating coils: As shown in the You Tube link, I connected the two, parallel heating coils with returns combined on the return wire nut and the hot coil connection wire connected to the hot wire on the cord without bypassing the two overheating safety shut-offs. The main heating coil is 11.4 ohms, the second coil at 50 ohms is used to drop the input voltage to 20 VAC to power the motor via the diode bridge. After modification, the 20 VAC nominal is supplied by the transformer (16 - 24 VAC transformer secondary from the dimmer control of the transformer primary). The two parallel coils then have a combined resistance of 9.4 ohms for around 1500 watts of heating at 120 VAC. The actual voltage is varied between 80-110 VAC from the variac to adjust heat input during roasting. Fan speed is adjusted separately The white zip cord/plug was supplied with the unit and it plugs into the variac. This is wire nutted to the opposite ends of the two coils. The variac is always off until after the fan has been powered up, and the variac is always shut off before the fan is shut off. Otherwise overheating will occur and the aluminum fuse will fail. Example Operation for Colombia Supreme Beans: If the heater is operated without adequate air flow, temperature will quickly exceed the 240C aluminum thermal fuse within the popper. Therefore, operation begins by turning on air flow at 24 VAC maximum velocity and adding 91 gm of beans (20% of 1 lb). Then the variac is powered on and set at 60. This sends about 96 VAC to the heating coils and raises the temperature reading on the digital probe to around 180C in about 6 minutes. Then the variac setting is increased to 70 (109 VAC) and temperature continues to rise to over 190-195C at 7:45 and 1st crack occurs here for this variety and continues through 2 minutes until 202C (with dimmer and variac adjusted manually to maintain temperature). The 2nd crack starts at 209C at 9:45 and cooling was initiated at 10:30 at 215C. 50C was attained by 13:00 and the product was discharged. (The Joseph Collins link shows an alternative to the variac I used.) Cautions in operation: Plugging the cord going to the BLOWER MOTOR into a standard 120 VAC outlet will immediately DESTROY the coil and could cause a fire. The motor wires can only be plugged into the secondary of the 24 VAC transformer - voltages between 20 and 24 VAC! This voltage is controlled by the dimmer switch connected to the PRIMARY of the transformer. Plugging the white plug to the coils into a 120 VAC receptacle or otherwise powering it up without adequate fan speed will quickly raise the temperature of the board over 240C and blow the aluminum fuse, disconnecting heater power from the coils.
ChicagoJohn attached the following image:
Edited by ginny on 06/21/2015 4:34 PM |
|
|
|
| ginny |
Posted on 06/15/2015 2:42 PM
|
 Founder Posts: 3476 Joined: October 24, 2005 |
John: welcome and thanks for joining us here on HRO. you have a super build here and I appreciate that you took the time to share it... we have many popper roasters here that will enjoy this unit. again welcome, ginny  |
|
|
|
| JackH |
Posted on 06/15/2015 2:44 PM
|
 Administrator Posts: 1809 Joined: May 10, 2011 |
It looks great John! I did a similar mod on a Poppery II a while ago. I like the fire extinguisher addition.... 
---Jack
KKTO Roaster. |
|
|
|
| ChicagoJohn |
Posted on 06/15/2015 3:05 PM
|
|
Pounder Posts: 513 Joined: June 15, 2015 |
Thanks ginny and JackH. I really appreciate your help in getting started here!! They don't call you "Super Admins" for nothing  I'm sure this mod is old news for many, but it's new to me and I'm looking forward to learning and discovering many new things here. |
|
|
|
| ginny |
Posted on 06/15/2015 3:28 PM
|
|
Founder Posts: 3476 Joined: October 24, 2005 |
John, no mod is an old mod. you have done some great stuff here and we are here to help. thanks for sending me the request when you saw my news item. have yu sent me your setup picture yet?? ginny |
|
|
|
| ChicagoJohn |
Posted on 06/15/2015 6:20 PM
|
|
Pounder Posts: 513 Joined: June 15, 2015 |
I think I sent your my set up picture via e-mail this morning but I will re-send. |
|
|
|
| ginny |
Posted on 06/15/2015 6:44 PM
|
|
Founder Posts: 3476 Joined: October 24, 2005 |
just got it, thanks, for some reason my net connection is slow today... -g |
|
|
|
| ChicagoJohn |
Posted on 06/19/2015 8:16 AM
|
|
Pounder Posts: 513 Joined: June 15, 2015 |
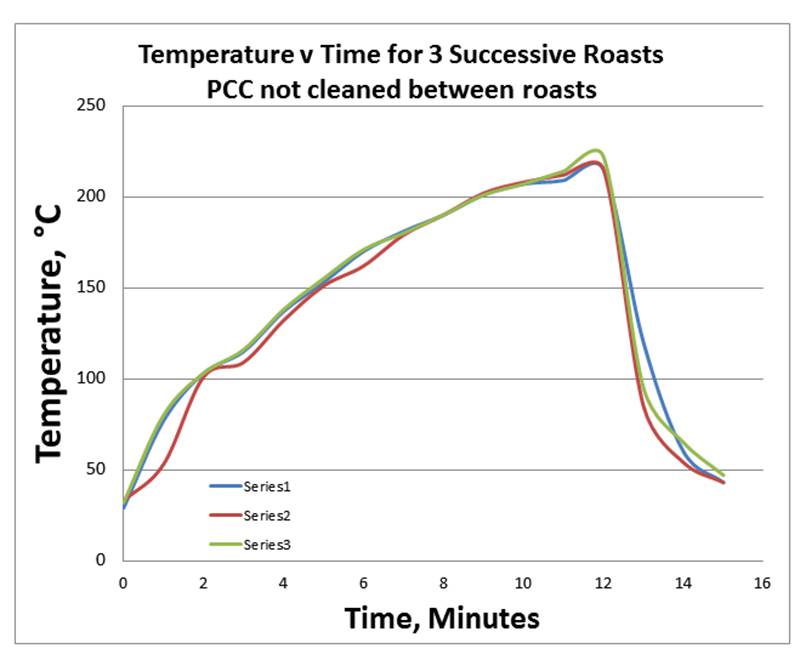
I've attached time-temperature plots for three trials. Two are intended to be replicates with the open "chimney". The third used a prototype of a chaff collector. The up-down temperature variations are a result of my "over-steering" using the variac and fan speed controls. The change of open chimney with chaff collector did not significantly change the response of chamber temperature to input settings, but I did purposively try to push this one to get significantly into the 2nd crack before switching off heat and cooling to 50C. Since I'm very new to this whole area, I would very much appreciate any comments those who have been roasting for a while could offer; specifically with regard to timing to rolling 1st crack, interval between 1st and 2nd crack, and suggestions of points to consider stopping the roast to achieve differing results that would show up in taste, aroma etc. I'm sure I'll get better with the variac and fan settings as time goes on, but to me it seemed like trials 1 and 2 were reasonably similar. Let me know if that perception is wrong.
ChicagoJohn attached the following image:

|
|
|
|
| ChicagoJohn |
Posted on 06/21/2015 1:57 PM
|
|
Pounder Posts: 513 Joined: June 15, 2015 |
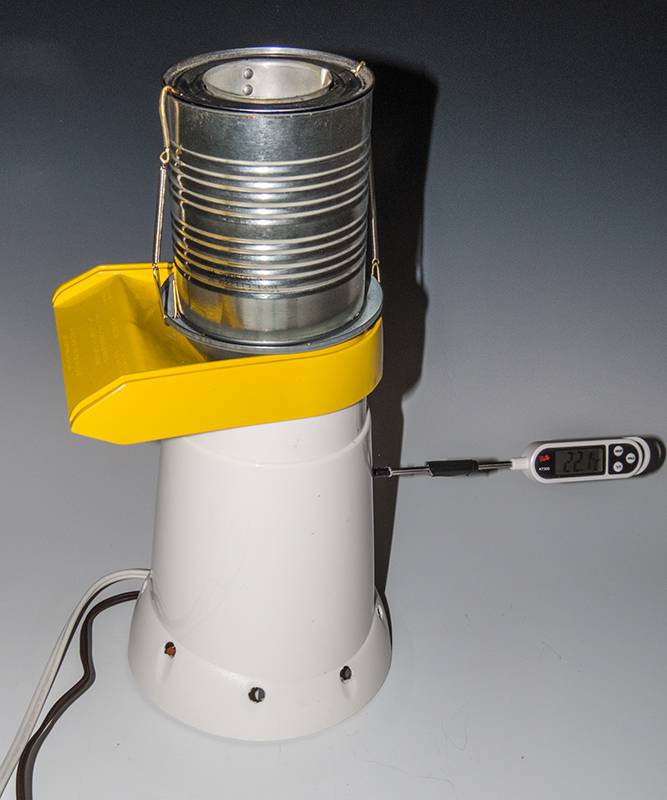
Passive Chaff Collector (PCC) for Presto PopLite Conversion While I?m sure this can be improved, it fulfills my objectives: (1) easy to place and remove, (2) traps virtually 100% of chaff, (3) inexpensive to make and clean. The pictures I have attached should help explain the text. Let me know if you have any questions. Parts and tools: - Chamber base from 2nd PopLite, - Large can (3 7/8? dia X 4.5?) (9.8 X 11.4 cm), - Small can (2 7/8? dia X 4?) (7.3 X 10.2 cm), - 3 inch glass disk, - copper kitchen scouring pad, - aluminum 1/3 c measuring cup. ? small plate hanger with springs Aluminum tape. Dremmel with cutting wheel. . Cup Measure ? remove bottom with Dremmel. Large Can ? use Dremmel to remove base except for ?? tabs. Cut hole in top to fit measuring cup with base removed. Drill two small holes along edge in top 180? apart (for spring holders) Small Can ? de-rim one end to fit into slot in extra Presto chamber base. Cut hole in other end to hold glass. Cut eight ports in side of can to direct exhaust gas in a clockwise circular pattern. Bend out. Use aluminum tape to cover tops of notches and to hold glass disk in place over viewing hole in can top. Chamber Base ? (I had to buy another unit because I accidently plugged the fan motor into 120VAC instead of the 24VAC transformer secondary and fried the motor coil instantly.) Use Dremmel to cut out center of base. Copper Scouring Pad ? form donut shape and wrap with thin copper wire to hold form. Plate Hanger ? cut center to form two spring retainers. Adjust wires on ends of springs as needed. Assembly ? (1) fit small can cut end into grove in inverted chamber base. (2) fit copper ?donut? to inside of large can end with hole for cup measure. (3) with large can inverted, position chamber base with small can into larger can using tabs on large can to fit into edge of chamber base, (4) invert assembly and attach spring holders from holes in large can edge to existing holes in inverted chamber base. (5) insert measuring cup in top of large can. This assembly can now be fit into the yellow plastic top of the PopLite (I believe this to be a melamine urea thermoset plastic that is highly heat resistant.) Operation of Modified PopLite with PCC ? (1) with variac off, set fan to highest speed (24 VAC) and turn on. (2) add 91 gm of green beans to chamber modified with 60? funnel sides. (3) place PCC assembly on yellow top opening. (4) Set variac to deliver about 90 VAC and start timer when variac is switched on. While I only use sound to assess bean motion and crack times, with roasting done to temperature-time profiles, a flashlight can be used to observe the beans in the chamber through the measuring cup and glass disk. (5) After profile is achieved, shut off variac, set fan at high speed and cool down for two minutes or until bean temperature is less than 50?C. (6) remove PCC assembly from popper (warm to touch) and pour product from roasting chamber into suitable storage container. (7) Repeat this operating sequence up to 3 times without disassembly and cleaning PCC depending on quantity of chaff generated. (I usually do 2 batches at a time) Additional Comments: I have monitored exhaust air temperature within the PCC throughout a cycle in which bean temperature reached 230?C, and in the area chaff collects it reached 200?C. I would estimate auto ignition temperature of chaff to be somewhere around 245?C, and the chaff temperature will be well below that. However even if it should ignite, it will be contained within the cans where there cannot be pressure build up. So I do not consider this an issue. If you decide to try it, you should decide how often you want to disassemble and dump out the chaff that collects at the chamber base between the large and small can walls. For any given variac voltage to the coils, the power in watts is (V x V / I) where I is 9.3 ohms in this case since the parallel resistors (heating coils) are 11.4 ohms and 50 ohms. So for a variac voltage of 100 VAC, the watts of power dissipated in heat is 100 X 100 / 9.3 or 1075 watts. At 120VAC it is 1550 watts (13 amps). I generally stay in between these two values. The motor at highest speed uses about 40 watts more. The PCC assembly when mounted on the popper as described is electrically insulated and isolated from the roasting chamber and all electrical components below. While I have never needed to stir beans with the PopLite modification using 60? funnel walls, I have seen videos of people stirring inside their roasting chamber using metal implements. I consider this practice to be potentially dangerous as it is at least theoretically possible for a ?hot? wire to come in contact with metal inside the popper. So any contact with the chamber when the popper is plugged in should be via electrically insulated materials such as a wooden spoon. I am also operating my equipment via a ground fault circuit interrupter (GFCI) receptacle since the appliance has been modified and is being used for something other than making popcorn and at high temperatures. A GFCI monitors amperage going to and coming back from a load and it breaks the power if it detects a discrepancy of more than a few milliamps (typically 4), long before a non-GFCI household circuit breaker would trip. As it takes 75-100 mA to cause the human heart to go into fibrillation, this could be a life-saving choice in the event of an electrical malfunction. Given the rather extreme operating conditions, it would also be prudent to disassemble the electrical portion of the popper periodically to inspect wiring insulation and integrity of all connections. The large can I used contained tomato puree and the small can (lidded only on one end) contained pumpkin pie filling. It is necessary to remove the small can lid completely so that the metal edge will fit securely into the inverted chamber base grove. I?ve had no problem hearing the beans moving around and 1st and 2nd cracks through the PCC assembly and only used the glass window once when I didn?t know what to expect. If I did this again, I would omit it to simplify things.
ChicagoJohn attached the following images:


|
|
|
|
| Lawnmowerman |
Posted on 06/21/2015 4:39 PM
|
 Pounder Posts: 546 Joined: March 14, 2012 |
I like the chaff collector. I have also used the base portion from a poplite because it worked for what I needed it for. I see an area of possible concern. That is the outlet vents. They need to be not restrictive at all. Have you made sure if this?
Bad coffee prevails when good coffee roasters stand by and do nothing.
|
|
|
|
| ginny |
Posted on 06/21/2015 8:59 PM
|
|
Founder Posts: 3476 Joined: October 24, 2005 |
Jon: that is one fine looking collector you have made I may give this a try on one of my roasters. ginny thanks for posting all this great stuff... |
|
|
|
| ChicagoJohn |
Posted on 06/22/2015 5:33 AM
|
|
Pounder Posts: 513 Joined: June 15, 2015 |
Quote Lawnmowerman wrote: . I see an area of possible concern. That is the outlet vents. They need to be not restrictive at all. Have you made sure if this? That was a concern for me too. I agree that the assembly as a system - vents cut in center can and copper weave at top -- must be non-restrictive, otherwise air flow into the roasting chamber would also be restricted and the effect would be the same as reducing the fan speed; increased rate of temperature rise at any given voltage input to the heating coils. Since the air flow also removes heat from the coils, the temperature there could also increase. I assessed this possibility with side-by-side comparison of time-temperature plots using the fully open "chimney" versus the chaff collector assembly, and I did not see any effect. On that basis, and upon several batches I've run using the assembly, I'm confident there is no meaningful "back pressure" in the chamber as a result of attachment of the collector assembly. There are eight "flaps" at about 1 X 1" on two sides. In an initial trial, with the "flaps" only marginally open, chaff lodged in the openings and there was still no measurable effect on time-temperature profile. (In the profiles I posted earlier, I used a higher voltage input from the variac to assess the effect of a faster rate rise using the collector. The side-by-side plots were the same). Another way this question could be investigated, at constant fan speed and with temperature off, would be to measure average air speed across the "chimney" opening and across the smaller "measuring cup" opening at the top of the collector and then calculate air volume per unit time for each using speed X area for volume. If I can borrow a velometer/anemometer I will try that and let you know the results. (It would also be interesting to quantify air flow versus voltage from the transformer secondary / dimmer setting.) But again, I don't see evidence of it in the batches I've roasted with open chimney versus chaff collector. |
|
|
|
| ChicagoJohn |
Posted on 06/23/2015 2:26 PM
|
|
Pounder Posts: 513 Joined: June 15, 2015 |
Revised Instructions for using Passive Chaff Collector: I visited my friend at FreshGround Roasting in Geneva, IL today (Eric Anderson) to demo the modified popper and PCC. As a result (he had us use some high-chaff beans), I realized I did not get the use instructions for the PCC correct, so here they are: 1) Remove previous chaff accumulation from the disassembled PCC 2) Place the inner can into the base firmly 3) Place the copper mesh "donut" into the upper portion of the larger can, but not all the way to the top 4) Assemble the base and small can into the larger can and donut and attach the two spring clips holding the larger can onto the base. 5) Before inserting the 1/3 cup measuring cup in the top, use a finger to press the copper donut downward toward the glass window all the way around. 6) Insert the measuring cup so as to see through the window. The other change I think is necessary is to use a needle nose plier to bend back the downward corners of each of the slot openings in the inner can to curl them back and further increase the opening size. This is the corner formed by the two sides of each of the eight openings; that corner should be bent outwards and upwards. This will help to facilitate air flow and avoid trapping chaff in the openings. I am getting an anemometer Thursday and will conduct a series of experiments on various factors affecting airflow and I will publish all results in this thread. At that time I will include photos of the modified vent openings in the smaller can and of how to properly install the copper donut to make sure it is pressed downward toward the window in the smaller can. Eric, a professional roaster, was impressed by the uniformity of the product in both roasts we did, the degree of time-temperature control, and the elimination of chaff (though not quite 100% due to misplacement of the copper donut - (my bad!) Edited by ChicagoJohn on 06/23/2015 2:33 PM |
|
|
|
| ChicagoJohn |
Posted on 06/25/2015 3:39 PM
|
|
Pounder Posts: 513 Joined: June 15, 2015 |
Quote Lawnmowerman wrote: I like the chaff collector. I have also used the base portion from a poplite because it worked for what I needed it for. I see an area of possible concern. That is the outlet vents. They need to be not restrictive at all. Have you made sure if this? Pursuant to your question, I conducted a couple of studies. In the first, with no bean load, I evaluated exhaust air rates as a function of both motor input voltage (16, 20, and 24 VAC) and configuration of the passive chaff collector (empty, with internal slotted can, and fully assembled including copper mesh donut). I formed an exhaust port from a wide-mouth funnel with an opening of 5.5 cm diameter and used an anemometer to measure air velocity. I took 10 readings at each combination of levels for the two factors above. Spreadsheet results including raw data and statistical analysis are attached. In order for two means to be statistically significant at alpha 0.05, they would have to differ by more than 0.2 meters/second. On that basis, without a bean load, a statistically significant effect of chaff collector configuration was not detected, at least not a strong one, and certainly not a meaningful one. In the second study, at the 24 VAC voltage to the motor, I compared results for bean loads of 0, 30, 60. 90, and 120 gm for an empty chaff collector (no inner can and no copper mesh) versus a fully assembled chaff collector with inner can and copper mesh. While bean load reduced exhaust rate as expected, the effect appears to be flat from 30 - 90 gm loads with a further reduction at 120 gm. (I typically run 91 gm which is 1/5 of a pound). In comparing the four conditions in which bean loads were used, there appears to be a small but probably statistically significant effect with the fully assembled chaff collector being a little bit lower. However, I do not regard this difference as one of practical significance. These data are also attached. As a final study, I plan to compare flow rates for a 91 gm bean charge after 1, 2, and 3, roasts without emptying the chaff collector. This should indicate whether and to what extend chaff build up in the collector could affect air flow. However, based upon my results in trial roasts thus far, it seems to be performing well. Again, if you decide to try this, make sure to press the copper mesh donut downward to contact the top of the inner can to avoid any chaff escaping the top during roasting. That is the configuration I used in these two studies.
ChicagoJohn attached the following images:


|
|
|
|
| ChicagoJohn |
Posted on 06/28/2015 1:29 PM
|
|
Pounder Posts: 513 Joined: June 15, 2015 |
Continuing with the Passive Chaff Collector (PCC)... Today I did three consecutive roasts of 91 gm each, starting with a clean PCC, with exhaust velocity measured at 24.0VAC motor input, and then measuring it again after each of three roasts without disassembly or removal of built up chaff. This is roughly 0.6 lb of beans. Long and short: No effect of build up on the air flow. I will try this again after a full pound in the future. But I think it may well take even more than that because the chaff is so light that is won't be capable of impeding air flow until it builds up to levels beyond what I would ever experience in practical use. Also, time-temperature profiles were unaffected by replicate use of the PCC without cleaning, confirming the direct anemometer measurements of exhaust air flow. My next post will be a rebuild of the main unit using off-the-shelf parts and trying to achieve a lighter-weight design for the popper that is fully instrumented with digital inputs for motor speed and coil voltage as well as time and temperature; a fully portable system that will also be fool-proof in terms of how to plug everything in. As is, this will work OK indoors insofar as chaff and odor emissions are concerned for light to medium roasts that I like to do.
ChicagoJohn attached the following images:


|
|
|
|
| allenb |
Posted on 06/29/2015 6:24 PM
|
 Administrator Posts: 3869 Joined: February 23, 2010 |
I think you've got a winner of a chaff collector here! I really like the idea of the copper scourer for the filter media. As you had mentioned, it allows chaff to accumulate on its surface without stopping airflow. I once tried using a 1/16" opening perf metal screen with my Sirocco fluidbed roaster chaff collector and the chaff would hug the metal in a perfectly flat layer and it would only take a small amount of chaff to stop airflow. I had to switch to a screen material to keep that from happening but still is not optimum. I'll have to give that material a go. Allen 1/2 lb and 1 lb drum, Siemens Sirocco fluidbed, presspot, chemex, cajun biggin brewer from the backwoods of Louisiana
|
|
|
|
| ginny |
Posted on 06/29/2015 6:40 PM
|
|
Founder Posts: 3476 Joined: October 24, 2005 |
Quote I'll have to give that material a go. Allen, gotta agree with you on this, I like this chaff collector a lot. easy for anyone to make at home and really score. I will see if I can adapt it to on of my older Fresh Roasts, sure I can. John, thanks agin for the great work. ginny  |
|
|
|
| ChicagoJohn |
Posted on 06/29/2015 7:49 PM
|
|
Pounder Posts: 513 Joined: June 15, 2015 |
Thanks Allen and ginny, This does work great, you just have to remember to push the copper mesh donut down onto the smaller can below. Next build, I will not bother with the window. I never use it now; I just go by sight and temperature. The PCC really makes this something that one can use indoors. Next step I'm rebuilding the entire thing except for the chaff collector. Within a week or so, I'll post the much smaller, lighter footprint complete with a scale for weighing the green beans and an instrumented clipboard with time and temperature and forms to record all relevant data. I'm thinking a week or maybe two. The coffee I've obtained from this has been awesome, by the way. I find the best roast to my taste is along the lines of the last time-temperature curves I posted. I like lighter roasts; to each his/her own! Thanks again for the comments and encouragement. The next post will have details for a fully instrumented build. |
|
|
|
| ginny |
Posted on 06/29/2015 8:09 PM
|
|
Founder Posts: 3476 Joined: October 24, 2005 |
John: I cannot thank you enough for taking the time and energy to post all of this wonderful work... we all appreciate it very much. the nice thing is that your chaff collector can be modified for other units. your PCC rocks John. ginny |
|
|
|
| ChicagoJohn |
Posted on 06/30/2015 9:47 AM
|
|
Pounder Posts: 513 Joined: June 15, 2015 |
Quote Well, you just have to remember to press that ring of copper mesh down to contact both the side of the outer can and the lid of the inner can. Then there are virtually no chaff particles that escape; and, the good thing is that it appears to be capable of several batches without clogging. Also, my measurements show it doesn't even get close to the autoignition temperature of chaff. I think you'll like the new mod for the supporting stuff too as it's simple, compact, portable, light weight, ergonomic, and functional. And, most importantly for me, fool proof in operation (I had a few mishaps in the development process |
|
|
|
| ChicagoJohn |
Posted on 08/04/2015 5:16 PM
|
|
Pounder Posts: 513 Joined: June 15, 2015 |
I got interested in coffee from a local roaster "FreshGround Roasting" in Geneva, IL. And I took my original PopLite modification in to show him and he mad a video. So if you're interested it's at the following URL. I can highly recommend FreshGround Roasting and if you want to buy green beans just use the word "Green" as your discount word and you will get a 50% discount versus roasted beans. Anyway here it is: https://www.youtu...5BYqFgmraQ This is before any of the recent modifications, and they apparently hired a fat clown to do the video for humorous effect. |
|
|
|

| Jump to Forum: |
Powered by PHP-Fusion Copyright © 2024 PHP-Fusion Inc
Released as free software without warranties under GNU Affero GPL v3
Designed with ♥ by NetriXHosted by skpacman