
Login

Shoutbox
You must login to post a message.
renatoa
07/26/2024 3:49 PM
Bill grubbe and Jk, 
allenb
07/26/2024 5:15 AM
Spiderkw Welcome to HRO!

renatoa
07/24/2024 8:31 AM
ramiroflores and John123,

 ?
?
?renatoa
07/21/2024 1:18 AM
 , Luislobo
renatoa
07/19/2024 11:28 AM
Koepea,
Forum Threads
Newest Threads
Skywalker roaster modsBackground Roast Iss...
Hello from Arkansas
TC4ESP
Green coffee reviews
Hottest Threads
| Skywalker roaster... | [375] |
| TC4ESP | [115] |
| War on Farmers by... | [47] |
| Adventures in flu... | [26] |
| Hello! (soon) Roa... | [17] |
In Memory Of Ginny

Donations
Latest Donations
dmccallum - 10.00
JackH - 25.00
snwcmpr - 10.00
Anonymous - 2.00
Anonymous - 5.00
dmccallum - 10.00
JackH - 25.00
snwcmpr - 10.00
Anonymous - 2.00
Anonymous - 5.00
Users Online
Guests Online: 4
Members Online: 0
Total Members: 8,393
Newest Member: Bill grubbe
Members Online: 0
Total Members: 8,393
Newest Member: Bill grubbe
View Thread
Who is here? 1 guest(s)
 Low Cost Presto PopLite and Chaff Collector Mods
|
|
| ChicagoJohn |
Posted on 08/04/2015 10:31 AM
|
 Pounder  Posts: 513 Joined: June 15, 2015 |
So apart from any questions you might have, I will end the thread here with the parts list. Unless otherwise noted, parts obtained from Amason and prices include shipping (AmazonPrime) $17.52 Presto 04820 PopLite Hot Air Popper (optioinal) $8.75 American Weigh Scales Black Blade Digital Pocket Scale, BL-1KG-BLK 1000 by 0.1 G SELL $12.99 DROK? Digital Current Voltage Multimeter AC 100-300V 100A Voltage Amperage Meter, AC Volt Amp Testing Gauge Power Monitor LCD Dual Display Voltage $2.87 Interpower 8301213 IEC 60320 C14 Screw Mount Power Inlet with Quick Disconnects, IEC 60320 C14 Socket Type, Black, 10A/15A Rating, 250VAC Rating $7.45 Hammond 1591ESBK ABS Project Box Black $2.06 Black Brushless DC Cooling Blower Fan 2 Wires 5015S 12V 0.14A 50x15mm (optional) $3.90 Gardner Bender 73421 Spiral Wrap, 3/8-Inch in Diameter X 3 1/2-Feet Long, Black $6.25 AC 15A/250V 20A/125V ON-OFF 2 Position SPST Boat Rocker Switch 10pcs $4.63 PWM AC Motor Speed Control Controller 2000W Adjustable Voltage Regulator 50-220V $11.00 Packard 24VAC transformer ? Home Depot free shipping with pick up at store $4.50 Funnel Ace Hardware in Homeware section (optional) $5.00 SPST Dimmer for incandescent lighting ? Home Depot $5.90 5 pcs OF L7812CV LM7812 L7812 Voltage Regulator IC + 12V / Integrated Circuit ============= Other Optional and Spare Parts ============================================== $5.06 10Pcs 250V 10A 240C Celsius Circuit Cut Off Temperature Thermal Fuse $1.84 10 Pcs Molded Plastic Case 1000V 10A Rectifier Diodes 10A10 $2.29 2 Pcs K Type 800C Wire Lead Measuring Thermocouple Sensor 1M 3.3Ft $8.99 AODE? K-Type Digital Thermometer + TP-01 Thermocouple Probe Cable 110003 $9.97 Wrenwane Digital Kitchen Timer |
|
|
|
| ChicagoJohn |
Posted on 08/05/2015 1:30 PM
|
|
Pounder Posts: 513 Joined: June 15, 2015 |
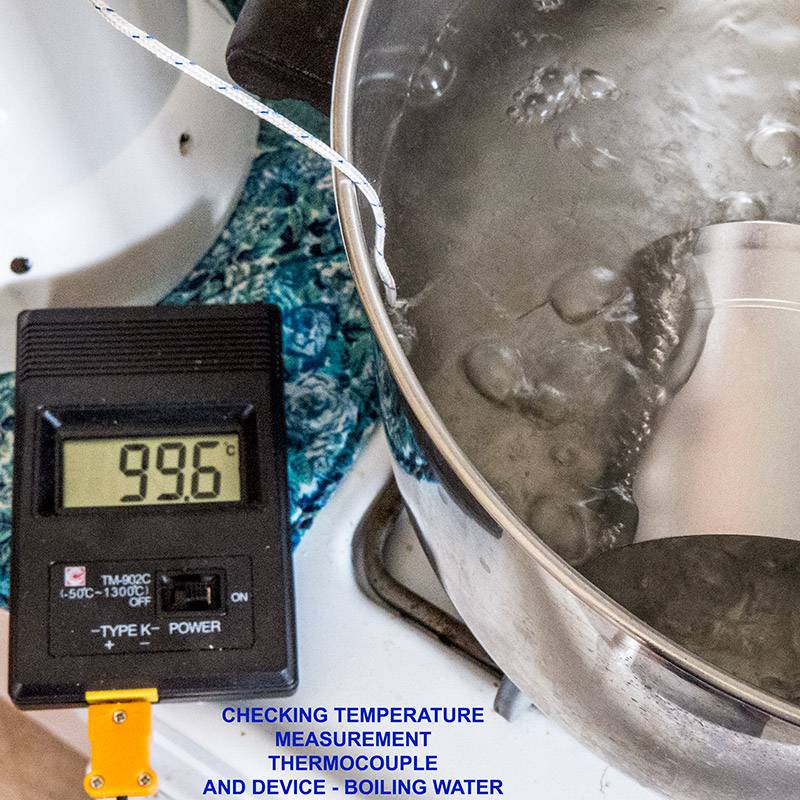
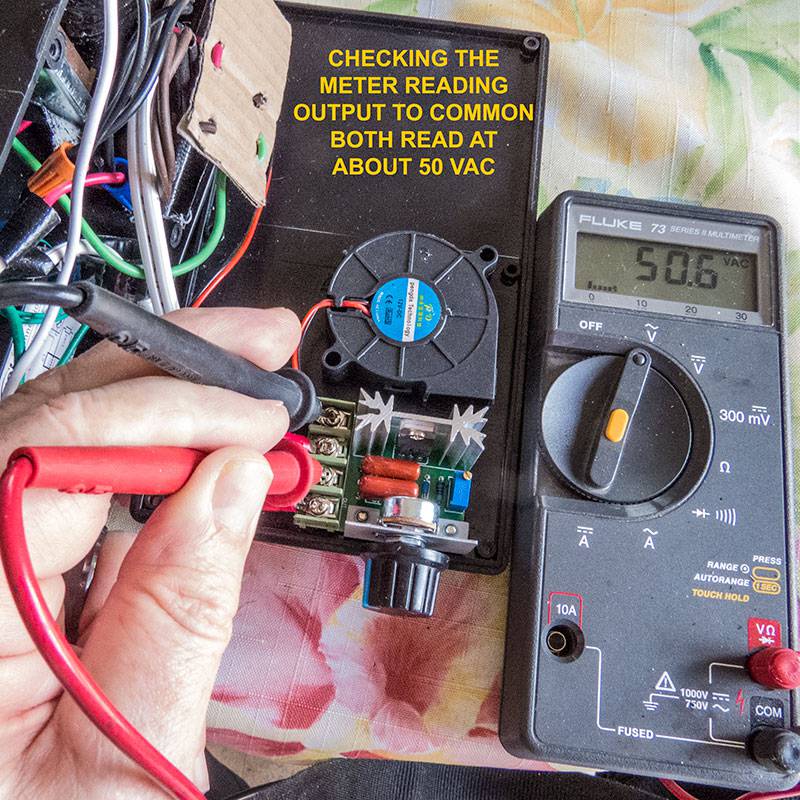
Well, to paraphrase Michael C. in Godfather Part III, Just when I thought I was out, circumstances pull me back in again... I was doing another roast today with the new unit and had a major problem in that there was a discrepancy between amperage and voltage and then the voltage and amperage locked to maximum and I had to turn the power to the coils on and off to reset it. This happened several times. I was hoping it would "go away" but it didn't. So I shut it down. This kind of thing happens sometimes, and when it happens, you just have to take a deep breath and figure out what is going on. In this case, the most likely differences between my previous build, which has been working flawlessly, are the following (a) thermocouple, (b) digital meter for voltage and amperage, and (c) PWM controller. These are all new elements. So first I decided to check out calibration of the thermocouple in-situ in ice water and boiling water, which should produce centigrade values of 0 and 100, respectively. As the images show, the readings are well within acceptable limits. This, of course, does not necessarily extrapolate to higher temperatures since the conversion of thermocouple emf to temperature takes a six or seven degree polynomial curve fit. But it is at least a basic check. Next I decided to check the meter versus my trusty Fluke VOM. This involved opening things up and checking it "live". Here is were it is very, very, very advisable to use a ground fault circuit interrupter, and I did. I learned that indeed the digital meter display I installed was reading quite close to my Fluke meter. Bad news was that the PWM was doing the same thing -- locking onto maximum power and refusing to respond to the potentiometer. And the maximum voltage reading was verified by my Fluke meter. So the digital meter was not the problem. Conclusion: Bad PWM for $4.65. Corrective Action: Order a new PWM for $17 from Amazon.com with free Prime shipping. I will have to see how I can fit it into the current build design when it arrives Friday or Saturday. With no small degree of chagrin, I then recalled the words of the famous John Arbuckle from a coffee commercial on TV when I was growing up who reportedly said, "You get what you pay for." This, ironically, was associate with a coffee commercial of a brand I've forgotten. Here's the scary part.... ================================ United States Patent Office John Arbuckle, JR., Allegheny City, Pennsylvania. Letters Patent No. 73,486, dated January 21, 1868 Improvement in Roasted Coffee. To all whom it may concern: Be it known that I, John Arbuckle, Jr., of the city and county of Allegheny, in the State of Pennsylvania, have invented a new and useful Improvement in "Roasted Coffee;" and I do hereby declare that the following is a full and exact description thereof. The nature of my invention consists in roasting coffee and then coating it with a glutinous or gelatinous matter, for the purpose of retaining the aroma of the coffee, and also act as a clarifying-agent when the ground coffee has been boiled in water. To enable others skilled in the art of "roasting coffee" to use my invention, I will proceed to describe its operation or preparation. ======================================
ChicagoJohn attached the following images:

|
|
|
|
| ChicagoJohn |
Posted on 08/06/2015 7:39 AM
|
|
Pounder Posts: 513 Joined: June 15, 2015 |
I worked with this PWM issue further today and the problem appears to be simply that it is undersized and overheats. It is rated at 2000 Watts, but it overheats at around 500-600 watts. When that happens, it begins acting erratically and then locks into maximum power and will not respond to the potentiometer. The PWM I used on my previous build, which has been working flawlessly from day 1, is the one shown below. It is rated at 4000 Watts, so if we apply the same factor, it is probably good to around 1000W where I'm using it. It is entirely possible that if the 2000W unit were operated under optimum cooling conditions for the heat sink, it would do better. I don't think it is defective, just rated too highly in wattage capability. But in this application, that would not be realistic, and I therefore think the unit below is preferable. I will be able to verify this tomorrow. Amazon Prime, free 2 day shipping. $16.66 SMAKN? AC 0-220V 20A Pulse Width Modulator PWM Electric Motor Speed Controller Max 4000W |
|
|
|
| JackH |
Posted on 08/06/2015 8:20 AM
|
 Administrator Posts: 1809 Joined: May 10, 2011 |
That SMAKN looks like a much better unit. Heavier heat sink and possibly thermally attached to the case as well. I hope it works for your roaster. ---Jack
KKTO Roaster. |
|
|
|
| ChicagoJohn |
Posted on 08/06/2015 8:48 AM
|
|
Pounder Posts: 513 Joined: June 15, 2015 |
Quote JackH wrote: That SMAKN looks like a much better unit. Heavier heat sink and possibly thermally attached to the case as well. I hope it works for your roaster. Well, I posted a "Gen 2" mod in another thread, and that uses the SMAKN PWM, and I've done probably 25 roasts with absolutely no problems whatsoever. So I'm pretty sure it will work, and you are right on regarding the build quality. I guess I was hoping the 2000W rating for the much cheaper unit would be accurate, but I'm afraid it isn't. It would probably work for under 500W though. Thanks for your comment, and we'll know more tomorrow, I guess  You can check out the Gen 2 thread on the Popcorn Popper Roasting forum if you want to and see what I've actually been using. In this thread I was trying to keep the cost as low as possible You can check out the Gen 2 thread on the Popcorn Popper Roasting forum if you want to and see what I've actually been using. In this thread I was trying to keep the cost as low as possible |
|
|
|
| ChicagoJohn |
Posted on 08/07/2015 2:30 PM
|
|
Pounder Posts: 513 Joined: June 15, 2015 |
GOOD NEWS & BAD NEWS Good News: The new PWM works fine, just like the one I used in the Gen 2 project. Bad News: There is no way I can fit it into the existing project box Good News: I can still use all the other parts, except that... Bad News: I need to buy a bigger plastic case. Good News: The new case should arrive within 1 to 2 weeks Bad News: It costs $12 which along with the $17 cost of the new PWM and the cost of the current case and PWM which I won't be able to use means that I no longer have a "low-cost" project and would have been better off sticking with the Gen 2 version. Good News: I can just put all this stuff in a big box in the garage and not think about it for a couple of weeks. Also, I can concentrate on roasting coffee for a change with the Gen 2 unit, brewing and drinking it, which is what this is supposed to be all about, after all. Bad News: When the new project box comes, I'll have to start over with the cutting, drilling, wiring, and making another big mess. Good News: I'll be able to do a much better job next time with what I learned in fabricating the current plastic box. Be back in a couple weeks to finish this thread once and for all, hopefully.... Edited by ginny on 08/07/2015 3:47 PM |
|
|
|
| ginny |
Posted on 08/07/2015 3:47 PM
|
 Founder Posts: 3476 Joined: October 24, 2005 |
Quote Be back in a couple weeks to finish this thread once and for all, hopefully.... jeez, hope you don't wait a full two weeks to come back. I will miss your almost daily posts...  |
|
|
|
| ChicagoJohn |
Posted on 08/07/2015 5:39 PM
|
|
Pounder Posts: 513 Joined: June 15, 2015 |
Quote ginny wrote: Quote Be back in a couple weeks to finish this thread once and for all, hopefully.... jeez, hope you don't wait a full two weeks to come back. I will miss your almost daily posts... I hope you're not being facetious But, as my wife will tell you, it's hard to make me shut up... I'll be roasting coffee and reporting my experience, realizing that it is not well informed. But in forums like this, I'm sure there are other newbies like me and the more conversation the more we can all benefit from each others' experiences. I just hope to get input from folks like you and many others here who have been doing this for a long time and have advice to offer But my main point is that I think dialogue is generally helpful. |
|
|
|
| allenb |
Posted on 08/08/2015 8:46 AM
|
 Administrator Posts: 3869 Joined: February 23, 2010 |
Quote ChicagoJohn wrote: I worked with this PWM issue further today and the problem appears to be simply that it is undersized and overheats. It is rated at 2000 Watts, but it overheats at around 500-600 watts. When that happens, it begins acting erratically and then locks into maximum power and will not respond to the potentiometer. The PWM I used on my previous build, which has been working flawlessly from day 1, is the one shown below. It is rated at 4000 Watts, so if we apply the same factor, it is probably good to around 1000W where I'm using it. It is entirely possible that if the 2000W unit were operated under optimum cooling conditions for the heat sink, it would do better. I don't think it is defective, just rated too highly in wattage capability. But in this application, that would not be realistic, and I therefore think the unit below is preferable. I will be able to verify this tomorrow. Amazon Prime, free 2 day shipping. $16.66 SMAKN? AC 0-220V 20A Pulse Width Modulator PWM Electric Motor Speed Controller Max 4000W I'm not sure where I read about this issue in the past but I remember it being reported that it's ratings were quite a bit exaggerated in the maximum power capabilities. It's possible, as you stated that it could be improved by increasing its ability to shed heat which could be accomplished by a large increase in heat sink surface area or forced air over the existing sink. If you get a chance, pull the units cover and see if you can read the model identification data on the face of the triac that's bolted to the sink. We could look up its data sheet and find max power ratings. If its undersized, it would be easy and very inexpensive to swap it out for a more capable triac. Of course, I'm assuming they're using a triac and not another type of semiconductor . Allen 1/2 lb and 1 lb drum, Siemens Sirocco fluidbed, presspot, chemex, cajun biggin brewer from the backwoods of Louisiana
|
|
|
|
| ChicagoJohn |
Posted on 08/08/2015 9:54 AM
|
|
Pounder Posts: 513 Joined: June 15, 2015 |
Quote allenb wrote: Quote ChicagoJohn wrote: I worked with this PWM issue further today and the problem appears to be simply that it is undersized and overheats. It is rated at 2000 Watts, but it overheats at around 500-600 watts. When that happens, it begins acting erratically and then locks into maximum power and will not respond to the potentiometer. The PWM I used on my previous build, which has been working flawlessly from day 1, is the one shown below. It is rated at 4000 Watts, so if we apply the same factor, it is probably good to around 1000W where I'm using it. It is entirely possible that if the 2000W unit were operated under optimum cooling conditions for the heat sink, it would do better. I don't think it is defective, just rated too highly in wattage capability. But in this application, that would not be realistic, and I therefore think the unit below is preferable. I will be able to verify this tomorrow. Amazon Prime, free 2 day shipping. $16.66 SMAKN? AC 0-220V 20A Pulse Width Modulator PWM Electric Motor Speed Controller Max 4000W If you get a chance, pull the units cover and see if you can read the model identification data on the face of the triac that's bolted to the sink. We could look up its data sheet and find max power ratings. If its undersized, it would be easy and very inexpensive to swap it out for a more capable triac. Of course, I'm assuming they're using a triac and not another type of semiconductor . Allen I appreciate the help, Allen. There ain't no cover on it so that part is easy. The designation is as follows: ST 63 VU BTA 16 600B MAR 1419 Purely from a pragmatic viewpoint, I have a good track record with the other unit that costs $17, and I have received that unit, and I have only $4.50 invested in this one (not counting all the labor invested), and the larger box is already on its way. However, from the perspective of learning more, if the problem should turn out to be the triac (I wonder if the 600 may be 600 watts, which is where it goes haywire , I'd be willing to look into another triac just as a learning experience. I might even slip in the new triac and complete the current build, reserving the new box sand PWM for something down the road.Anyway, that's is what is written on the surface of this TO-220. Any assistance would be appreciated. This deal gets to an estimated 160F by the time the VA is at around 500-600. |
|
|
|
| JackH |
Posted on 08/08/2015 10:21 AM
|
|
Administrator Posts: 1809 Joined: May 10, 2011 |
BTA 16 seems to be the number to use. Triac 16A 600 - 800V http://www.onsemi...0CW3-D.PDF ---Jack
KKTO Roaster. |
|
|
|
| ChicagoJohn |
Posted on 08/08/2015 10:34 AM
|
|
Pounder Posts: 513 Joined: June 15, 2015 |
Quote JackH wrote: BTA 16 seems to be the number to use. Triac 16A 600 - 800V http://www.onsemi...0CW3-D.PDF Thank you. That would be in line with their 2000W rating. Mine started failing around 7A / 70VAC RMS (based upon my Fluke and the digital meter / toroid. The heat sink appears to be a possible issue as it was too hot to touch at even lower power levels. The alternate unit (which has been working very well for me in the Gen 2 mod through many, many roasts) does have a larger heat sink, and I got it because I'd seen reports that it barely got warm at 1000 watts load. So rather than play around with it further, I'm just going to do a re-start with the new case. I may repurpose the problematic PWM for some lower wattage application in the future. Thanks so much for checking this for me! I really appreciate it. |
|
|
|
| JackH |
Posted on 08/08/2015 12:06 PM
|
|
Administrator Posts: 1809 Joined: May 10, 2011 |
I think a lot of these specifications are maximum ratings and not meant to be sustained for long.
---Jack
KKTO Roaster. |
|
|
|
| ChicagoJohn |
Posted on 08/17/2015 2:52 PM
|
|
Pounder Posts: 513 Joined: June 15, 2015 |
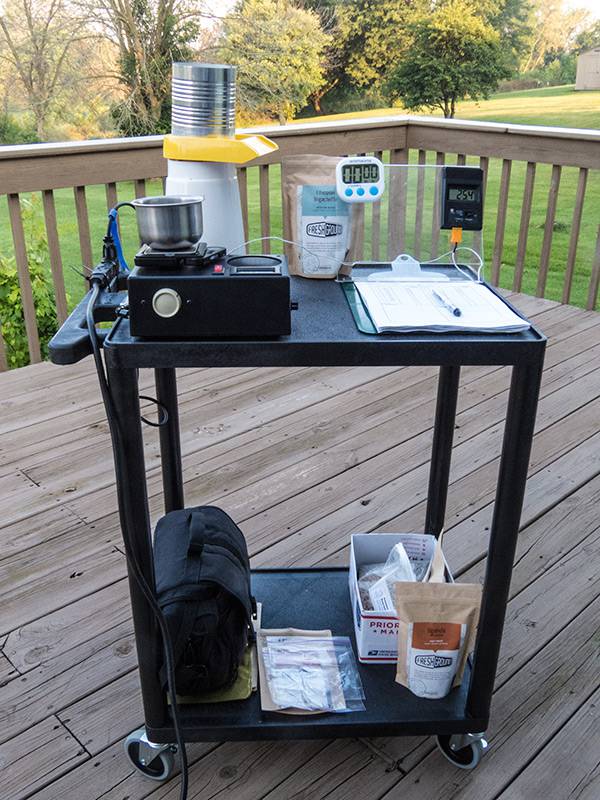
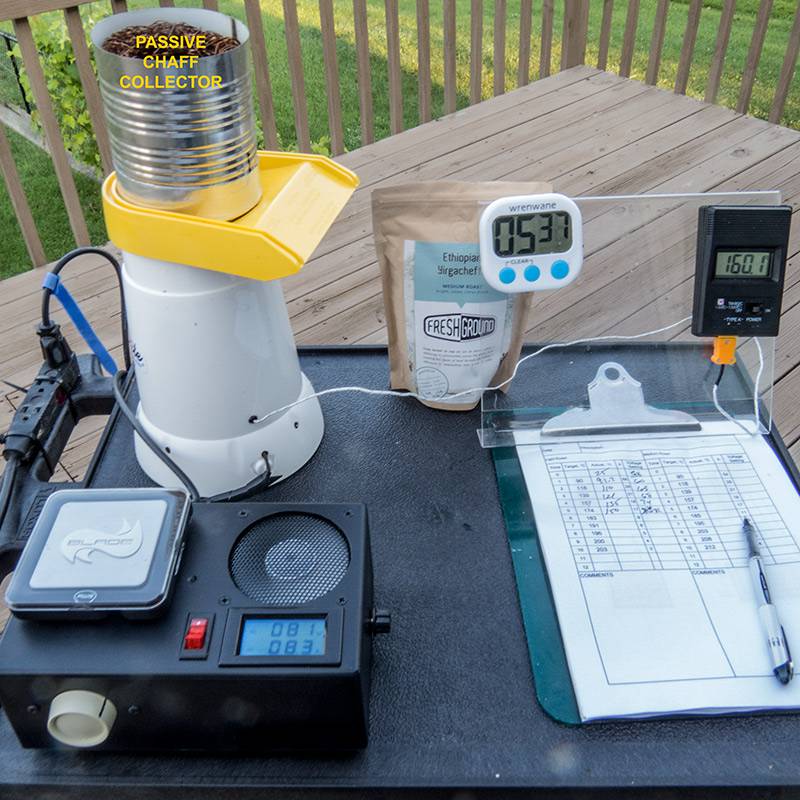
After I found that the cheaper PWM was going into thermal shut down at around 600 watts (supposedly rated for 2000), rather than play around with more efficient cooling, I just decided to go with what has been working well in the previous "Gen 2" build. The following parts replaced their counterparts listed previously: $16.66 SMAKN? AC 0-220V 20A Pulse Width Modulator PWM Electric Motor Speed Controller Max 4000W $8.95 CES PLASTIC ENCLOSURE BOX : 3.23" x 8.54" x 5.43" $5.99 ARCTIC F8 TC - 80 mm Standard Low Noise Temperature Controlled Case Fan $4.49 80mm Black Steel Mesh Filter Grill, 2.2mm Hole Diameter Optional: $66.99 Luxor/H.Wilson 2-3/4-Inch Deep Tub Shelf Utility Cart, Black (STC21-B) Note that in the new PWM, the position of Common and VACin and VACout have changed versus the previous block wiring diagram. The Common positions are now the two in the center, not the two on the ends. In the last build, I used a larger cooling fan so I decided to use the same one this time since I have had no problems with performance of the Gen2. I did find in an initial run that the 7812 regulator for the 12DC fan power got too hot glued to the piece of cardboard, so I added a heat sink for this and located it close to the cooling fan as shown in the photos. The larger box size made it easy to fit all the components in. Other than these changes, the rest of the construction is as previously shown in this thread. If I encounter any other problems with this construction, I will report them along with corrective measures in this thread. In the three roasts I?ve done so far with this new box, I observed 1C temperatures within 1?C of trials of the same beans with the previous build so I?m hopeful that the two units will produce similar profile results.
ChicagoJohn attached the following images:


So many beans; so little time.... |
|
|
|
| ChicagoJohn |
Posted on 08/18/2015 11:10 AM
|
|
Pounder Posts: 513 Joined: June 15, 2015 |
Three roasts this morning went like clockwork. One Ethiopian Yirga Cheffe, Med. and two Uganda Mt. Elgon, Lt. I think all the problems have been resolved. Now for the fun part. I'm reading Thurston's book and planning some roasting experiments ... 
So many beans; so little time.... |
|
|
|
| ChicagoJohn |
Posted on 08/20/2015 8:23 AM
|
|
Pounder Posts: 513 Joined: June 15, 2015 |
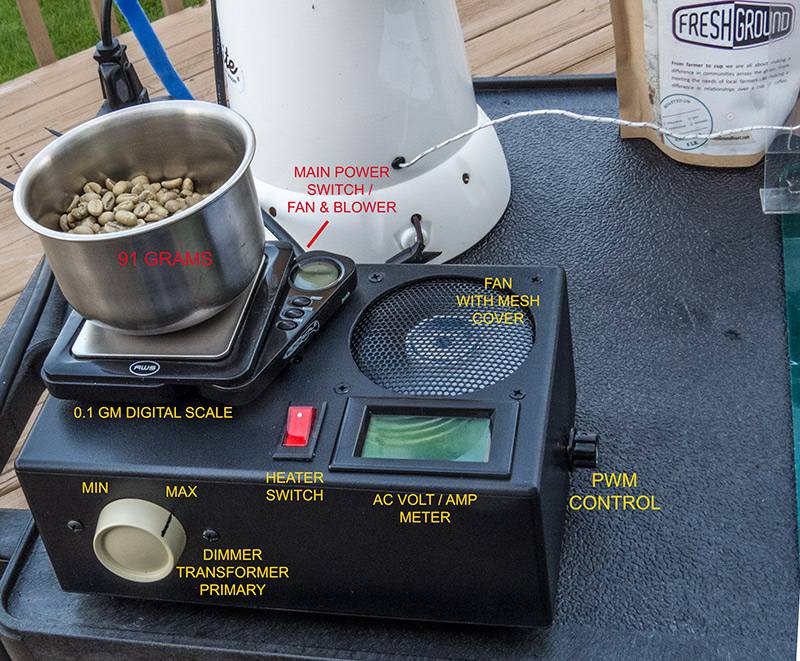
This is a cross-post (not that I'm angry; I'm actually quite happy, not only with the performance of the "low cost" mod, but also with this particular series of profile trials on a coffee from Happy Mug. The best single origin I've yet had (which isn't saying much), but I liked both of these. I thought it would be appropriate to post here as well as in the Profile forum since it illustrates the levels of control this approach allows one to attain on small batches of only 91 gm and with uniformity among those beans. Based upon some ideas I've taken from homeroasters.org forums, I've begun using the heating input initially and then the blower motor input approaching 1C and thereafter. That combination seems to work best for me.
ChicagoJohn attached the following image:

So many beans; so little time.... |
|
|
|
| ChicagoJohn |
Posted on 09/13/2015 9:57 AM
|
|
Pounder Posts: 513 Joined: June 15, 2015 |
I've been using the latest build regularly without problems. However I moved it to a different receptacle on our deck and thought I noticed a decrease in blower performance when I had lots of current flowing in the heating coil. I have a power strip mounted on my cart, so I plugged in a device that shows VAC I picked up on amazon for $7.24 incl shipping: DROK? Flat Plug AC 80-300V Voltage Panel Power Line Volt Test Monitor Gauge Meter AC 110V 220V Digital LCD Voltmeter for RV Boat Camper Household I found that at this receptacle, I was reading 122 VAC before cranking up the heater, but only 111 VAC when sending 8.5 amps to the heating coils (80 VAC which for this coil at 9.4 ohms, is 680 watts). When I did the same test using the receptacle I'd been using before, there was almost no change in voltage when I cranked up the heat to "80 VAC" (it dropped from 122 to 119 VAC line voltage). What is going to the heating coil is what is shown on the meter, but what is going to the blower fan (this newer build omits the DC voltage meter) at any given dimmer switch setting is determined by the primary voltage on the transformer. So if the voltage would have been 20 VDC after rectification, then it would have dropped to 18 VDC when powering the heating coils, and I can hear a decrease in motor rpm. So when using this receptacle, I have elected to reduce my batch size from 91 grams to 80 grams, and that seems to work well in terms of insuring good mixing throughout the roast without the need for stirring etc.
ChicagoJohn attached the following image:

So many beans; so little time.... |
|
|
|
| ChicagoJohn |
Posted on 09/19/2015 1:22 PM
|
|
Pounder Posts: 513 Joined: June 15, 2015 |
I resolved the problem with the blower. After further noting less bean action with the 2nd build even tough the motor sounded the same as the first, I decided to dig into it. I again measured the air flow at the outlet of the original PCC using my anemometer for both units with the same power receptacle. For the initial build, I got around 3.4 m/s like in my previous multiple-batch experiments. However, with the new build, I only was getting 2.4 m/s. Note that the PCC does offer some resistance versus a fully open throat. So I then decided to check the DC voltage to the motor. I removed the bottom plate and tested it with my VOM at 20.5VDC, exactly what it should be. But when re-assembling, I noticed that the yellow top of the unit wiggled, and then found I had not tightened the screws down all the way. After replacing the bottom and tightening the screws down fully on the top, the airflow measured 3.4 m/s just like on the original unit. Air had been leaking out whenever there was a little back pressure, such as beans in the hopper. So I thought I'd mention this as it is important to make sure the bottom cone of the funnel tightly contacts the base so that all of the air must go up through the funnel and cannot pass out of it below the beans. Now I can do 91 gm charges again in both units. So many beans; so little time.... |
|
|
|
| ChicagoJohn |
Posted on 09/27/2015 7:21 AM
|
|
Pounder Posts: 513 Joined: June 15, 2015 |
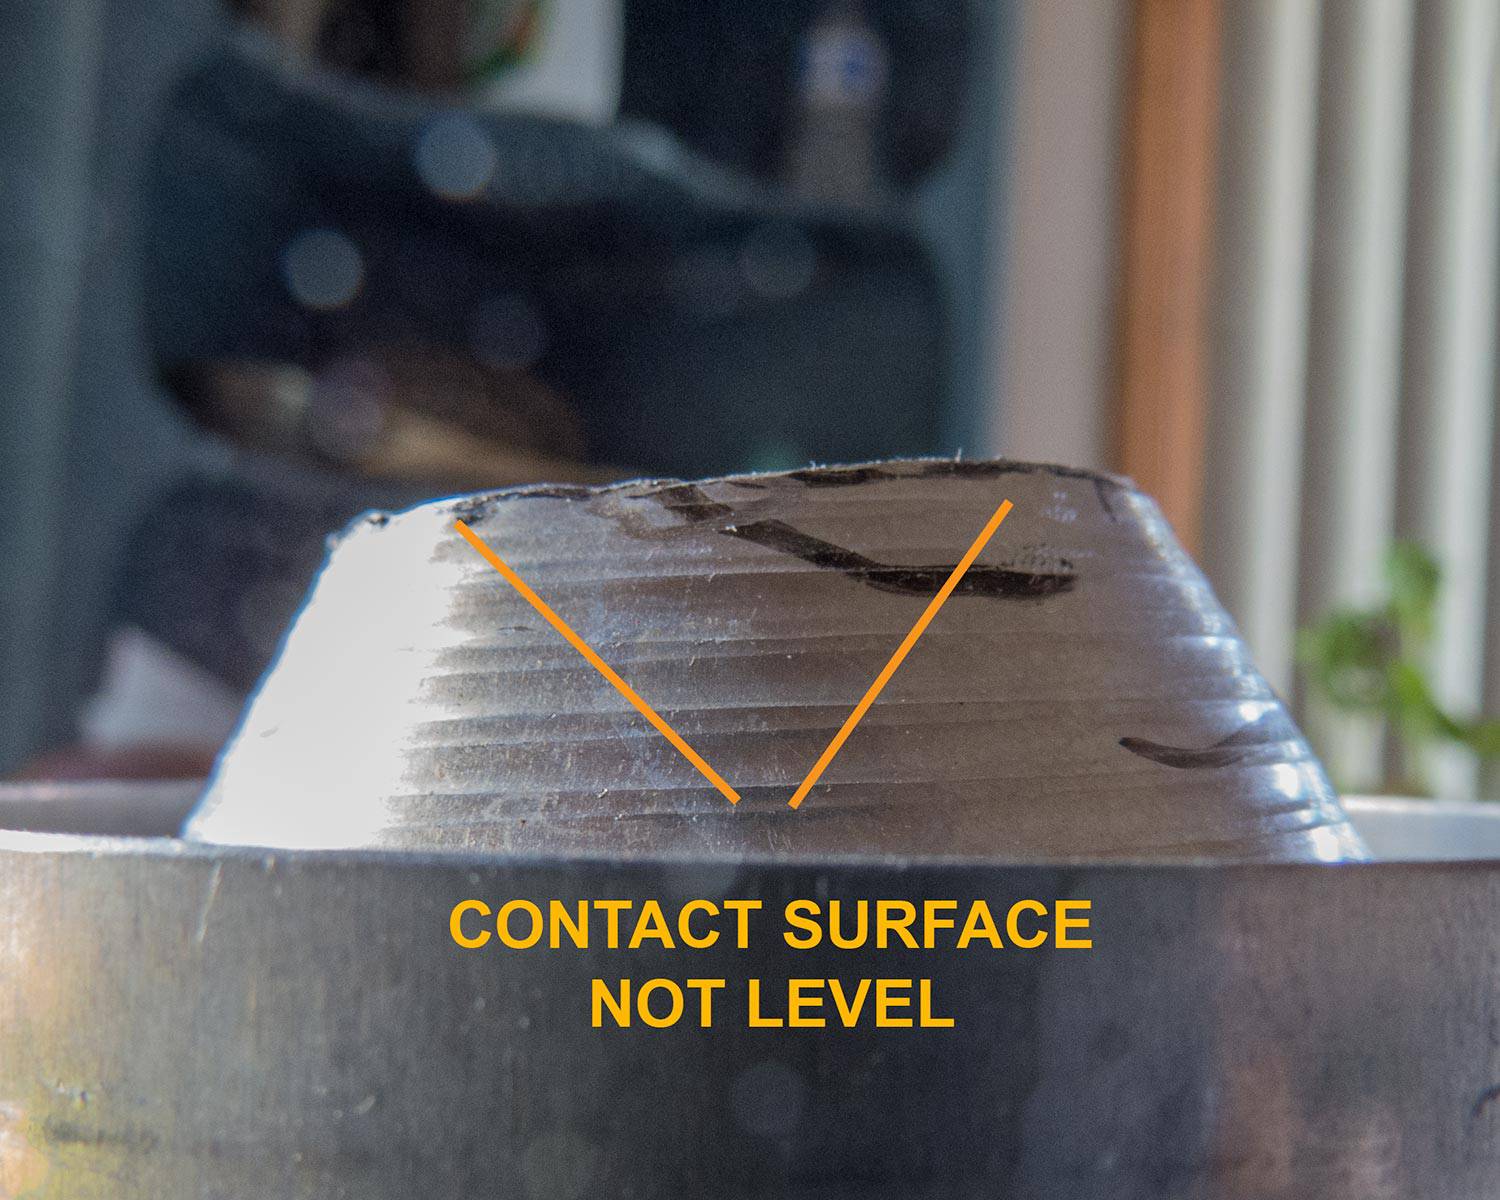
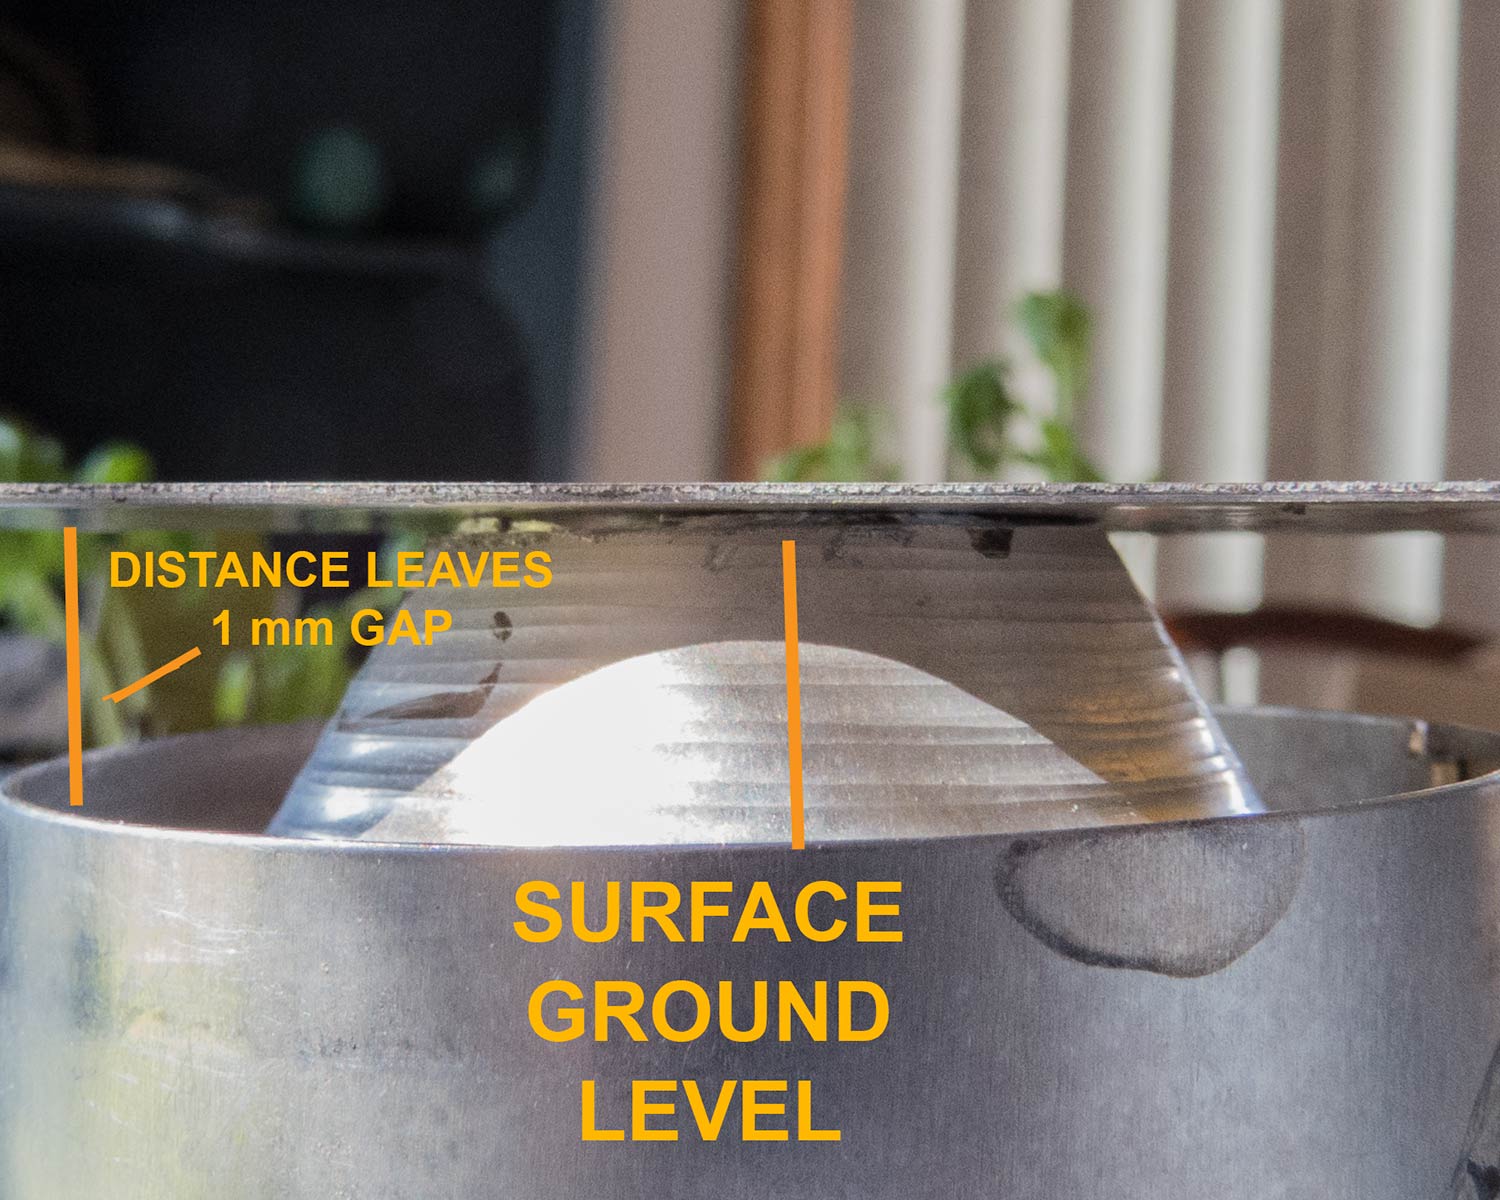
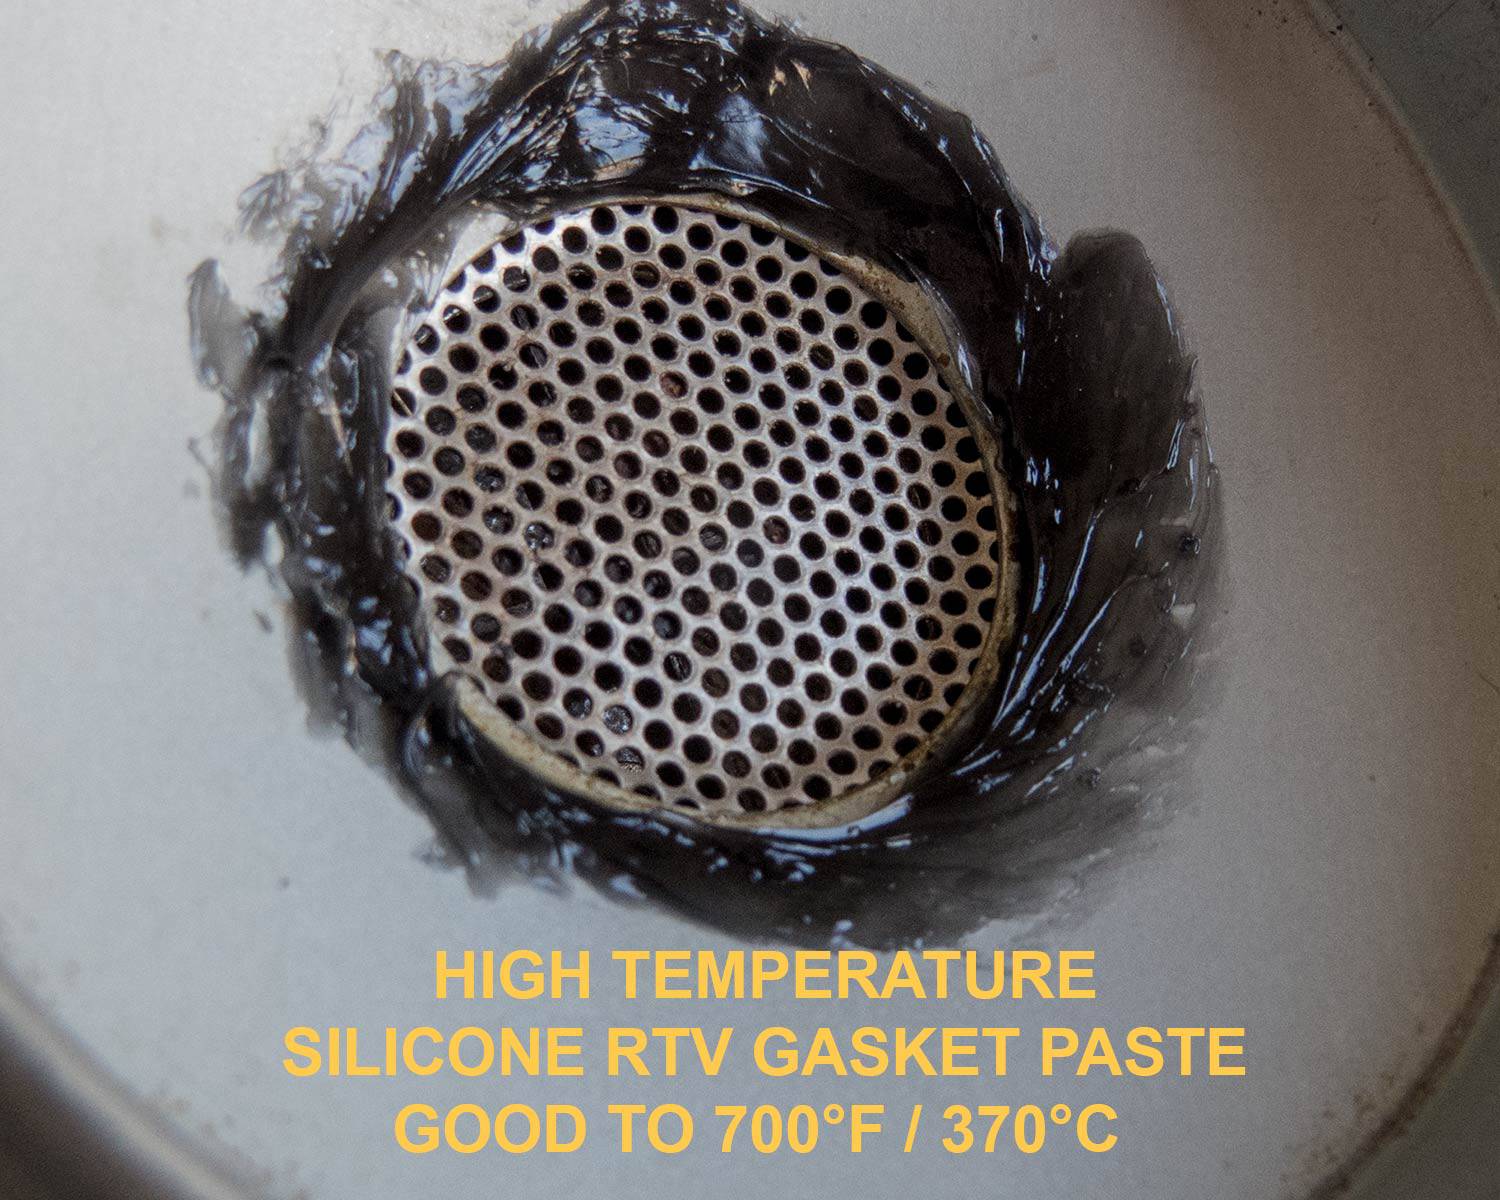
Update on blower performance: After continuing to see suboptimal movement of the beans in the most recent build, I did a side-by-side comparison and observed that my first unit was tossing beans in the air, throwing some out of the chamber while the second unit had greatly reduced movement. After further experiments and disassembly, I discovered the root cause - uneven contact surface in the newer unit due to lack of care in mounting the funnel. After correcting this, I still had some gap at the contact point surrounding the air inlet grate because the distance was now not sufficient. When there is back pressure on the airflow, such as a load of beans in the chamber, any gap will allow air to escape without going through the beans. To seal this surface, I applied a layer of high temperature silicone gasket material (non-toxic and inert when cured) and allowed it to cure overnight before reassembly. Problem solved; now both units have sufficient blower power to throw green beans out of the chamber at full blower voltage - (~20.5 VDC). See photos attached.
ChicagoJohn attached the following images:
So many beans; so little time.... |
|
|
|
| turtle |
Posted on 09/27/2015 9:34 AM
|
 1 1/2 Pounder  Posts: 652 Joined: November 06, 2013 |
Looks like your persistence and attention to detail as won out. Been following your trials and tribulations on this build and look forward to hearing that all is as you expect it to be for your next roast! Mick - "Drinking in life one cup at a time"
"I'd rather be roasting coffee" Roaster 1: San Franciscan SF-1 Roaster 2: Hottop B-2K+ Roaster 3: 2 kilo Chinese drum Grinders: Mazzer Major - Forte BG (x3) Pour over: Hario - Bee House - Chemex - Kalita - Bodum Drip: Bunn CWTF15-1 & CW15-TC (commercials) Espresso: Pasquini Livia 90 auto Vacuum: Cona - Bodum Press: Frieling - Bodum Colombia |
|
|
|
| ChicagoJohn |
Posted on 09/27/2015 10:39 AM
|
|
Pounder Posts: 513 Joined: June 15, 2015 |
Quote turtle wrote: Looks like your persistence and attention to detail as won out. Been following your trials and tribulations on this build and look forward to hearing that all is as you expect it to be for your next roast! I did two this morning and tried them without the resting period. Both were great -- a Kenya AA and a Guatamala. What I find interesting is that I've been struggling with trying to get decent roasts from a Colombian and a Brazilian and so I switched to the Kenya and Guatamala to see if that would solve the problem. The problem in all these was a burnt bitter undertone making them barely drinkable. Well, it turns out, I now believe, this was coming from uneven over-roasting at the bottom of the roasting chamber due to ineffective circulation and mixing of the beans. Today's roasts were great! Back to normal !! None of that burnt flavor. Roasted to 1C and 20% after without exceeding 203C. Now I'll go back to the Columbia and Brazil and see what happens with them. I'm anticipating a substantial improvement. It all comes down to the visual inspection of the beans' motion to make sure they are literally being thrown up into the air at a 91 gm charge, not just moving around a little. I was missing this visual in using the PCC chaff collector. The funnel not only serves to increase the angle of repose to 60 degrees, it also greatly increases the effective air pressure at the base of the roasting chamber due to the reduction in area of air entry. Now that I have the root cause identified and corrected, I'll know what to check for in the initial air flow with the green beans before installing the PCC and applying heat. I'll follow this up tomorrow with my results with the Columbia and Brazil samples. So many beans; so little time.... |
|
|
|
| ChicagoJohn |
Posted on 09/28/2015 6:06 AM
|
|
Pounder Posts: 513 Joined: June 15, 2015 |
Quote I'll follow this up tomorrow with my results with the Columbia and Brazil samples. Yesterday I roasted the Columbian and Brazilian dry process, both from Sweet Maria's, using my standard profile - about 7 minutes to 1C with 2 minutes for development at under 5C/min rate of rise after 1C. Interestingly 1C was the same for both as before the air flow fix (195C and 202C, respectively). I believe this is due to the placement of my thermocouples which is in the bottom third of the been charge where movement was occurring even though it was greatly reduced on the top layer prior to identification and remediation of the leakage at the contact surface between the funnel and the blower base. The blower was now capable of creating a "geyser" at highest speed (20.5VDC), occasionally tossing beans out the top of the popper chamber. By the end of each roast, it was capable of a few beans out the top of a 4.5 inch can acting as a chimney. Now the newer unit performs just like the first one I built using a 91 gm charge quantity. While the strong "cocoa" undertone was now absent in the Brazilian and it was noticeably sweeter and less bitter, same for the Columbian, and in general, to my personal, novice taste there was less objectionable taste and aroma, I much prefer the Kenya AA and Ethiopian Yirga Cheffe samples I've tried because, to me, they seem to have a "fruitier" component I like -- a broader range. Anyway, the main point is the blower issue is fixed for the 2nd build. I will continue to roast with this unit and will report any additional issues I discover and resolutions. In any development project that deviates from well-established technology unexpected problems are to be expected. Sometimes problem solving can be inefficient and circuitous, and for me that's part of the fun, especially when things finally work in terms of the intended objectives. So many beans; so little time.... |
|
|
|
| ChicagoJohn |
Posted on 10/17/2015 7:55 AM
|
|
Pounder Posts: 513 Joined: June 15, 2015 |
Continuing to experiment, I decided to use some heftier rectifier diodes I picked up for $0.18 each to replace the puny ones that came with the popper. The reference on Amazon was from Amico 10 Pcs Molded Plastic Case 1000V 10A Rectifier Diodes 10A10 Price: 1.83 & FREE Shipping for 10. I put the new bridge on a phenolic project board along with the heat-sinked 12VDC regulator, and while I was at it I decide to attach a 4700 uF 35V electrolytic capacitor I happened to have, about the calculated size needed for a 2 amp current at this voltage to significantly reduce pulse magnitude, noting polarity of course with respect to the DC +/- out from the bridge. This brought the operating voltage at the blower up from 20.5 to 22.5 VDC on my Fluke meter, about a 20% increase in power (V^2/R), and there was a distinct change in pitch (rpm) and a significant improvement in bean action at all dimmer settings during roasting. I plan to run it this way, alternating back and forth with my first unit which has no capacitor but does have a beefed up 10A bridge, and see if I discover any issues with motor life etc as a result of the power increase using the capacitor. So many beans; so little time.... |
|
|
|
| allenb |
Posted on 10/17/2015 9:36 AM
|
|
Administrator Posts: 3869 Joined: February 23, 2010 |
Quote The funnel not only serves to increase the angle of repose to 60 degrees, it also greatly increases the effective air pressure at the base of the roasting chamber due to the reduction in area of air entry. Are you still seeing the improved results with bean circulation? I remember many a complaint from others about this issue and I think your remedy will be of interest to other popper users. Quote This brought the operating voltage at the blower up from 20.5 to 22.5 VDC on my Fluke meter, about a 20% increase in power (V^2/R), and there was a distinct change in pitch (rpm) and a significant improvement in bean action at all dimmer settings during roasting. Great way to get all the potential out of the rectified source. Many have been puzzled when they see a higher DC voltage compared to the AC source. Allen 1/2 lb and 1 lb drum, Siemens Sirocco fluidbed, presspot, chemex, cajun biggin brewer from the backwoods of Louisiana
|
|
|
|
| ChicagoJohn |
Posted on 10/18/2015 6:39 AM
|
|
Pounder Posts: 513 Joined: June 15, 2015 |
Quote allenb wrote: Are you still seeing the improved results with bean circulation? I remember many a complaint from others about this issue and I think your remedy will be of interest to other popper users. As you know, I built two units. There was never an issue with bean movement in the first one. I made some changes in the second build, and I have seen variable performance in terms of bean movement in it and have been testing various hypotheses to see if I can produce more consistent and robust results in that unit. Quote This brought the operating voltage at the blower up from 20.5 to 22.5 VDC on my Fluke meter, about a 20% increase in power (V^2/R), and there was a distinct change in pitch (rpm) and a significant improvement in bean action at all dimmer settings during roasting. Quote Great way to get all the potential out of the rectified source. Many have been puzzled when they see a higher DC voltage compared to the AC source. Allen I did a roast yesterday of some yirga cheffe that went flawlessly. We will see if this continues. I may still decide to install another funnel to get a better fit with the chamber base without gasketing, and another concern is the 24VAC transformer I selected for the 2nd build for cost reduction purposes. My concern is that it may over heat and lose efficiency as this circuit is pushing the 40VA capacity. The first build used a Honeywell 40VA transformer which was definitely better quality and 80% higher cost. I am going to measure case temperature increase on both during a similar roast. Maybe I just got lucky in building the first one because there has never been any issues with it. I'm sure that eventually I'll be able to report similar consistency in performance in the second unit. Then we'll see how long each one lasts. In the mean time, I'm drinking some of the best coffee every morning I've ever had.
So many beans; so little time.... |
|
|
|

| Jump to Forum: |
Powered by PHP-Fusion Copyright © 2024 PHP-Fusion Inc
Released as free software without warranties under GNU Affero GPL v3
Designed with ♥ by NetriXHosted by skpacman