
Login

Shoutbox
You must login to post a message.
renatoa
07/26/2024 3:49 PM
Bill grubbe and Jk, 
allenb
07/26/2024 5:15 AM
Spiderkw Welcome to HRO!

renatoa
07/24/2024 8:31 AM
ramiroflores and John123,

 ?
?
?renatoa
07/21/2024 1:18 AM
 , Luislobo
renatoa
07/19/2024 11:28 AM
Koepea,
Forum Threads
Newest Threads
Background Roast Iss...Skywalker roaster mods
Hello from Arkansas
TC4ESP
Green coffee reviews
Hottest Threads
| Skywalker roaster... | [374] |
| TC4ESP | [115] |
| War on Farmers by... | [47] |
| Adventures in flu... | [26] |
| Hello! (soon) Roa... | [17] |
In Memory Of Ginny

Donations
Latest Donations
dmccallum - 10.00
JackH - 25.00
snwcmpr - 10.00
Anonymous - 2.00
Anonymous - 5.00
dmccallum - 10.00
JackH - 25.00
snwcmpr - 10.00
Anonymous - 2.00
Anonymous - 5.00
Users Online
Guests Online: 3
Members Online: 0
Total Members: 8,393
Newest Member: Bill grubbe
Members Online: 0
Total Members: 8,393
Newest Member: Bill grubbe
View Thread
Who is here? 1 guest(s)
 Presto Poplite Ratrod
|
|
| kaffeine |
Posted on 08/08/2015 7:35 PM
|
|
Newbie  Posts: 17 Joined: August 02, 2015 |
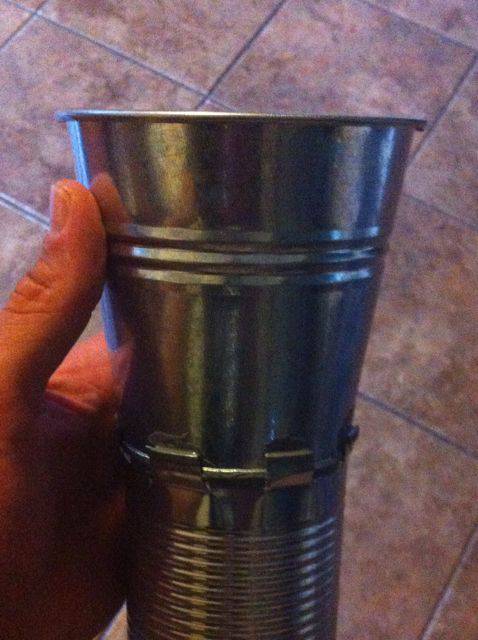
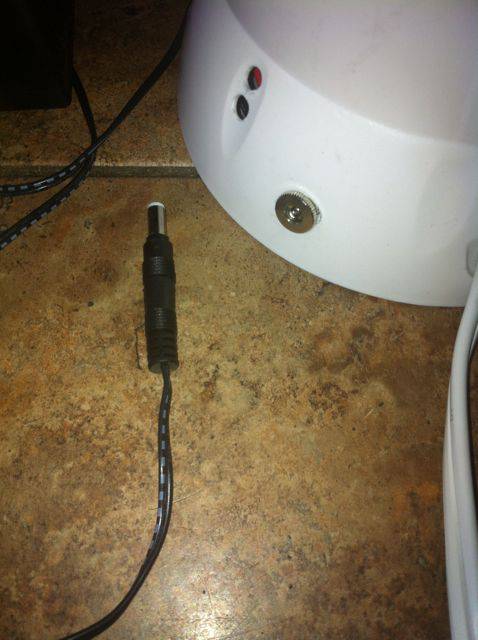
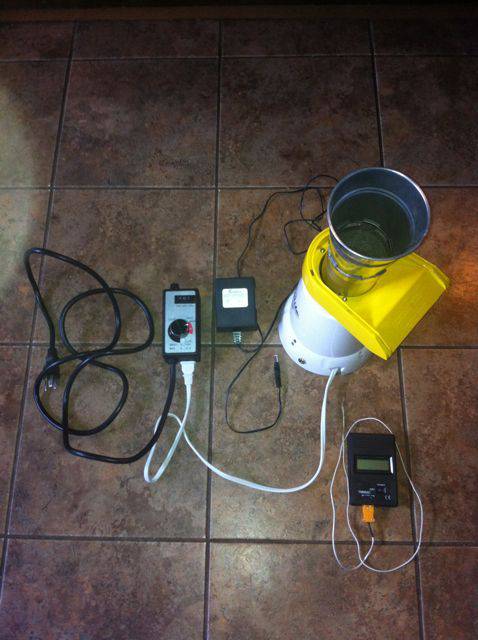
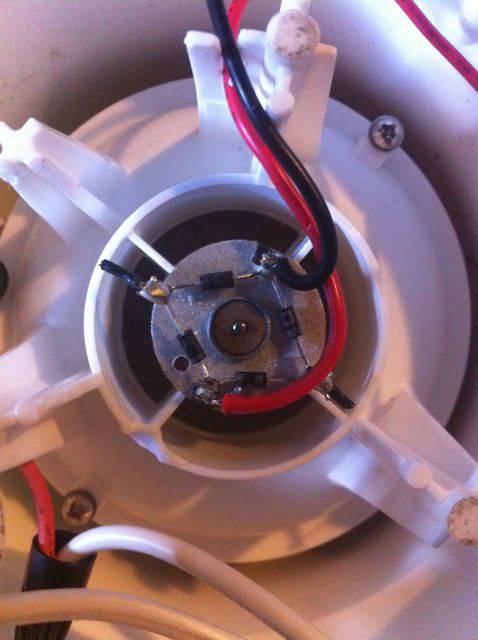
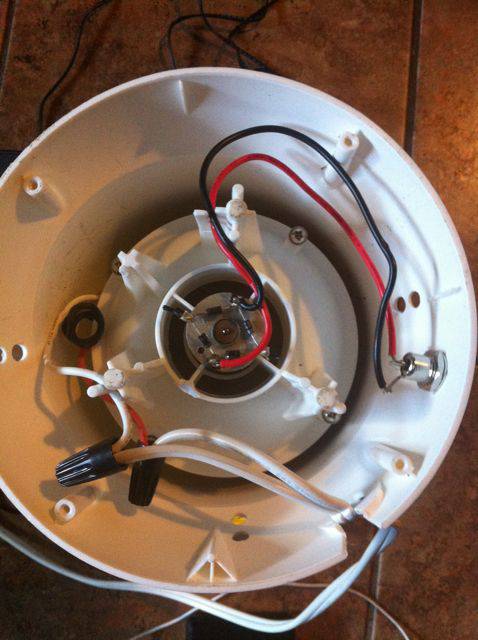
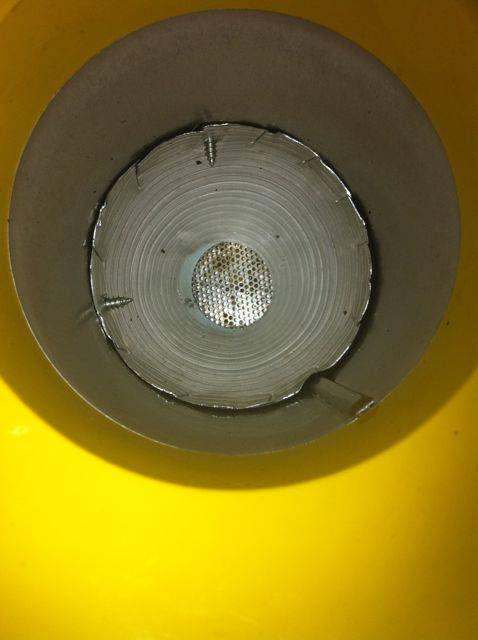
ChicagoJohn's modding posts helped me a great deal, so I thought I would post my mods to maybe help others who might be interested. And with that said, I highly recommend those who are reading this to check out ChicagoJohn's modding posts as well. He has laid his project(s) out really well, and his posts are very easy to follow. First and foremost, safety. Due keep it in mind! I did multiple empty test runs on my popper with fire extinguisher near by. I also keep said fire extinguisher near by when I roast. I suggest everyone else to do the same. Never leave your roaster roasting unattended! And lastly, take your time with modding, and roasting as well. Think out your workspace, and have it cleaned and squared away when you roast. It might be redundant mentioning all that, but personally I don't think it can be mentioned enough. Proceed at your own risk ;) ... Note: there is soldering involved in this project. >Presto Poplite Popper - $5, thrift store >Router Speed Controller - $17.17 w/%20 off coupon, Harbor Freight... Also included in the coupon was a free multimeter with any purchase. Bonus! >24 Volt Direct Current (VDC) power source - $19.99, local electronics store >24 VDC power source receptacle - $2.99, local electronics store >Small galvanized bucket/pale - $1.99, Hobby Lobby >Tomato can - $0.99, supermarket >Small tin kitchen funnel - $3.99, ACE Hardware >Thermocouple and LCD readout - ~$20, Amazon or eBay, but mine was given to me by a friend >Window screen (to put over a box fan for further bean cooling) - $2, thrift store >Donor wire and a few screws from an old broken fan Total ~ $72 But I will say about that total, one can find VDC's at thrift type stores. A friend of mine found the one he is using at our school's office surplus store for $5. Also, there are other options for temperature monitoring, up to and including no monitoring at all. But I recommend using something, and there are cheaper options used in other build posts. Stating the obvious, make sure the popper is unplugged. I would also recommend labeling wires when you get the bottom off your popper. There aren't too many, but just to be sure they all find their proper homes I'd do it... Flip it over and remove the metal bottom, which is held on by 4 screws. Clip the small gauge black wires connected to the motor. Remove the other end of the small gauge wire from where ever else it is connected to. Basically, there should not be any of the original small gauge black wire remaining (See pics) . If your model is the same as mine you will find that the + motor pole is marked by a red dot. This can be seen in one of the pics, the mark is near the pole that has a red wire connected to it. Drill a hole in the side of the popper near the bottom for the 24VDC receptacle, and fasten it in. Solder wire onto the motor poles, and onto the 24VDC receptacle. Pay attention to which pole is which and attach accordingly. The connector my VDC came with allowed me to change whether the tip was + or -, but if you get a VDC from a thrift store I don't think it will be that easy so pay attention and solder accordingly. I do not utilize the small heat element that acts as a resistor to step down the voltage to the motor. So as you will see in the pics the black wire is sniped, coiled, and tucked out of the way. Connect the heat element to the plug wires. I would recommend matching the original + and - as I am not sure if it will work switched. Again, good idea to label wires before starting this project. That concludes the electrical work in the bottom end. If you are not adding the funnel section to the roasting chamber the bottom cover can be reattached. To add the funnel into the chamber pull the motor/heat element assembly out. The chamber might or might not come with it, as it is just sandwiched between the popper top and assembly. ChicagoJohn has a great photo on how to clip the funnel so it fits nicely into the chamber, so please refer to his modding post for that. I did a willy nilly job on mine and it can be seen in the pics, but it works just fine. Also, as seen in the pic I fastened mine in with small screws as this was all I had available. I recommend rivets as ChicagoJohn uses, it looks a lot cleaner/professional. Plus, if you've got to get your hand down in there for any reason the rivets won't scrape you up like screws will. Anyhow, follow ChicagoJohn's post on funnel work and slap the popper back together. For the chimney/chamber extension I took both ends off a tomato can and the bottom off a small galvanized pale. The bottom of the pale came off easy with a can opener. I sniped the top of the can with side cutters and arranged the tangs so that the pale slipped down into them. I J.B. Welded around the tangs to keep this assembly together, but rivets would work great here as well. Walla! Plug the 24VDC into the wall, plug the connector into the popper. The motor will be going full tilt boogie, and it is now safe to plug the original/heat coil plug into the router speed controller (RSC). Make sure the RSC switch is in the off position and the dial is all the way low (just as a precaution). Plug the RSC into the wall, switch it on and you should be able to feel some heat in the air coming out of the top of the popper. !!!! Note: DO NOT EVER RUN THE HEATER WITHOUT THE MOTOR/BLOWER RUNNING!! I also recommend letting the motor/blower run for a bit after the heater is turned off. More than likely you will do this to stop a roast/cool your beans, but as a good practice I'd let it run for a few minutes before putting it away. -- I have not decided where and how I'd like to "permanently" install my temp probe. Maybe more on that later. As of now I simply lay it the chamber amongst the beans and it works fine that way -- I am still tossing ideas around in my head about chaff collection. Again, maybe more on that later as well. But more than likely it will resemble ChicagoJohn's setup Any questions or comments, post'm up! Pics to follow... |
|
|
|
| kaffeine |
Posted on 08/08/2015 7:42 PM
|
|
Newbie Posts: 17 Joined: August 02, 2015 |
Setup... Okay, pics don't want to upload. I think I will have to resize them. ... To be continued. |
|
|
|
| kaffeine |
Posted on 08/08/2015 8:03 PM
|
|
Newbie Posts: 17 Joined: August 02, 2015 |
Lets try medium size...
kaffeine attached the following images:
|
|
|
|
| ginny |
Posted on 08/08/2015 8:06 PM
|
 Founder Posts: 3476 Joined: October 24, 2005 |
this is posted all around or just ask an admin... ginny >>>PHOTO'S to a new post or reply: You cannot use the 'quick reply' feature at the bottom of every thread. Instead, click on 'New Topic' or 'Post Reply' buttons. At the bottom you will see the attachment field. Browse to your image, select it, and then hit 'Post Thread.' Hint: If you 'Preview Thread' you will not see your image, and you will have to reselect it before you 'Post Thread.' Images MUST NOT be larger than 800 x 800 pixels. System admins will adjust to size or delete post if photo is larger then 800x800 pixels. Also, please note: Save your file on your hard drive with no spaces in the name: thisisthenameofmyfile.jpg MORE INFORMATION ABOUT IMAGES Before attaching a picture or file to a post, there are two key rules: 1) The picture must be less than 800 x800 pixels. 2) The file must be less than 268Kb So, all of us with 7+ megapixel cameras have to do some editing otherwise the picture won't attach. How do you know if your picture is too big? Hover your mouse over the thumbnail or icon of the picture on your computer. The little popup box will say "Dimensions: 1600x1200" or larger or smaller (or right click and go to "Properties"). 1600 pixels is too large. Homeroasters wants 800 pixels as the largest dimension. So... some math: 800 / Largest Dimension = % reduction required In our case that's: 800 / 1600 = .5 or 50% (always round DOWN) Now, open your picture in MS Paint (right click, select "Open With" then "Paint"). Go to "Image" then "Stretch/skew" ("Re size and Skew" for Windows 7 paint). In the Horizontal AND Vertical windows type in the % reduction, 50 in our case. Click OK. Save the file, and use this as the attachment! Viola! How to attach it? When you go to make a new post, or to add a reply to an existing post, you'll see the "Attachment" section right above the "Preview Thread" and "Post Thread" buttons. Click "Browse" then find your re-sized image and attach it. If you click "Preview Thread" you won't see your picture AND you will have to RE-ATTACH it before clicking "Post Thread". You must have typed something in the window in order to attach a picture. Any trouble, just contact an Admin or Moderator by clicking on a name, then send a "PM" (Personal Message) and we'll help you pretty quick. HRO Adminstation <<< |
|
|
|
| kaffeine |
Posted on 08/08/2015 8:07 PM
|
|
Newbie Posts: 17 Joined: August 02, 2015 |
Some more pics...
kaffeine attached the following images:

|
|
|
|
| kaffeine |
Posted on 08/08/2015 8:16 PM
|
|
Newbie Posts: 17 Joined: August 02, 2015 |
Gotcha ginny, I figured it out, and it is indeed posted all around. Thanks |
|
|
|
| ginny |
Posted on 08/08/2015 8:26 PM
|
|
Founder Posts: 3476 Joined: October 24, 2005 |
kaffeine, glad you got it; we do want to help you in any way we can to post those great pics. thanks for your post and your photos are great. thanks for your membership here on HRO. all forum master software is quirky with photo's at times so if you have trouble juat ask Jack,(JackH) he is the photo wizard - I just work here... ginny  |
|
|
|
| kaffeine |
Posted on 08/08/2015 9:00 PM
|
|
Newbie Posts: 17 Joined: August 02, 2015 |
Haha, again, thanks ginny  . I just assumed they were small enough, I didn't even check their size. A simple resize was all that they needed. . I just assumed they were small enough, I didn't even check their size. A simple resize was all that they needed.**Something I noticed and failed to mention in my first post: Upon taking off the bottom there was a fair amount of foreign particles inside. This thing creates a good bit of vacuum at the bottom, so it is a good idea to operate it on a clean surface. Happy Roasting! |
|
|
|
| ChicagoJohn |
Posted on 08/09/2015 6:43 AM
|
 Pounder  Posts: 513 Joined: June 15, 2015 |
Quote Great, detailed description, Kaffeine!! Well done!! I especially like your use of dedicated plugs to allow for disconnection of the popper. I'm going to implement this on the mods I have. Great pics also -- these really help to convey the necessary information. I'm looking forward to accounts of your experience and anything you include in your mod. Great stuff!! So many beans; so little time.... |
|
|
|
| kaffeine |
Posted on 08/09/2015 9:07 PM
|
|
Newbie Posts: 17 Joined: August 02, 2015 |
Update: I just finished my 3rd and 4th batches in the Ratrod. I roasted 91g (each) of a Costa Rica Dota Estate variety to the beginning of 2C. Attempts were made to gather roast data, but I failed. I really need to mount my temp probe, as laying it in the bed is making for wild, and to my guess false, fluctuations in temperature. I don't even recall when 1C happened, perhaps 8-9 minute mark on first and 6-7 for the second. I preheated the chamber on the second batch, as I found upping the temp from 30*C was very tedious on my system which still needs some sorting. What I was attempting to do on the first batch was the Rao roasting curve, but as I just mentioned, it was a tedious process. The second batch got preheated and I upped the temp shooting for a 5-6 minute 1C. Both batches were brought to the first few audible 2C's and then the heat was killed. I can say that the first batch roasted longer between 1C and 2C, something on the order of 1-2 minutes... I mixed the batches as I am out of containers, so I won't be able to taste the differences between them. But I will say they smell absolutely intoxicating in the jar, and both batches came out very uniform in color. Concern: I've read that high altitude beans, which these are (6,000ft), tend to be dense. I am not sure if this was the culprit, but I noticed that the beans were not agitating as well as the first two batches did. The very first batch I did was 100g of Ethiopia Kochere Dry Wash, and if I recall correctly it agitated better than these batches did. I am concerned my blower motor is already pooping out on me. I removed the bottom to see if the intake got clogged, but all appeared well. So, are all 91g loads equal? This might be a silly question, but I just want to see what others think. My engineering senses tell me that big heavy beans that lay "loosely" around each other will simply let air flow around them and not really move. Conversely, small light beans that lay close together will move more with the air flow around them. The difference was between a constant eruption and a bubbling up like that of a tar pit. Other concern(s): I am beginning to wonder if this is a criminal act, this home roasting. The cups of coffee that these home roasted beans are making in my Aeropress are absolutely mind blowing. And holy moly, beware of light roasting! If I needed a jolt in the past I'd opt for a light roast at a coffee shop, and it'd do the trick nicely. But a fresh 1C light roast, this is a whole new level. 17g of coffee to (a final) 354ml of water gave me the shakes and some light nausea! Bing, right to the head! I thought, "man, what a bummer that this is so potent, I'd really like another tasty cup". Haha. ... Carry on... |
|
|
|
| kaffeine |
Posted on 08/15/2015 12:56 PM
|
|
Newbie Posts: 17 Joined: August 02, 2015 |
Answering my own question, now that I have roasted two more batches for this weeks coffee: It must have been bean size and density. The beans I roasted this time agitated really, really well. High altitude beans will just need a bit of help moving around, and this is perfectly acceptable with me. I cannot say it enough, this setup is truly ideal for a small batch DIY-er. It just keeps pumping out incredible batches with minimal fuss. From breakout to all clean I can roast two 91g batches in less than 30min. Stellar. ... Roast on... |
|
|
|
| ChicagoJohn |
Posted on 08/16/2015 2:26 PM
|
|
Pounder Posts: 513 Joined: June 15, 2015 |
Quote kaffeine wrote: Answering my own question, now that I have roasted two more batches for this weeks coffee: It must have been bean size and density. The beans I roasted this time agitated really, really well. High altitude beans will just need a bit of help moving around, and this is perfectly acceptable with me. I cannot say it enough, this setup is truly ideal for a small batch DIY-er. It just keeps pumping out incredible batches with minimal fuss. From breakout to all clean I can roast two 91g batches in less than 30min. Stellar. ... Roast on... Dude, I am totally with you!!! I share your joy, brother!! For one or two people, this set up (and an Aeropress, in my opinioin) is the key to efficient and effective exploration of the coffee journey. So many beans; so little time.... |
|
|
|
| kaffeine |
Posted on 08/27/2015 2:37 PM
|
|
Newbie Posts: 17 Joined: August 02, 2015 |
Dude, I am totally with you!!! I share your joy, brother!! For one or two people, this set up (and an Aeropress, in my opinioin) is the key to efficient and effective exploration of the coffee journey.[/quote] And I absolutely agree with the Aeropress as a means to great coffee from these beans... Every morning I have the best coffee I've ever had. The beans are roasted to my liking, and never more than a week old. I just got some Java beans in my queue, I can't wait for this weekend to come around! Nothing much more to report on the Ratrod roaster. I still need to get chaff collection sorted, perhaps this weekend I'll do that. |
|
|
|
| kaffeine |
Posted on 10/30/2015 7:08 PM
|
|
Newbie Posts: 17 Joined: August 02, 2015 |
School has kept me from posting, but I have an update worth sharing: Due to winter coming around here in Colorado the ambient air is getting fairly cold. My roasts were darn near stalling in 2C territory even with the majority of the vents covered after 1C. After working with this for two weekends I remembered I still had the little coil unconnected. Well, I opened the Ratrod up and connected the small coil. Connecting the small coil made a HUGE difference! I didn't think that 288W would do much, but it did. Then again, it makes since that it would. This is what, roughly 25% more power? I feel silly because while I connected it I was doubting the little guy could make any difference. This setup continues to blow me away every week. Happy roasting I wake, therefore I coffee
|
|
|
|
| JackH |
Posted on 10/31/2015 3:54 AM
|
 Administrator Posts: 1809 Joined: May 10, 2011 |
Very nice work on the roaster. I am impressed with the highly detailed documentation both you and ChicagoJohn did on your projects. These poppers are a lot of fun to use. ---Jack
KKTO Roaster. |
|
|
|
| ChicagoJohn |
Posted on 10/31/2015 11:46 AM
|
|
Pounder Posts: 513 Joined: June 15, 2015 |
Quote JackH wrote: Very nice work on the roaster. I am impressed with the highly detailed documentation both you and ChicagoJohn did on your projects. These poppers are a lot of fun to use. As you say, they are a lot of fun to use, but I would doubly underscore kaffeine's emphasis upon SAFETY. Not only safety in operation, but safety in construction and testing. Whenever we take an appliance that has been UL tested and for sale to consumers and radically modify it, we assume all responsibility for what happens, and when dealing with 120VAC and heating coils that can go from ambient to above the auto-ignition temperature of organic materials in a matter of seconds, this is something to take very seriously. I particularly applaud kaffeine for emphasizing the safety aspect, and would say again that anyone deciding to try this, as much fun as it can be, must also evaluate their own level of knowledge and skill and proceed accordingly within conservative, safe limits. So many beans; so little time.... |
|
|
|

| Jump to Forum: |
Powered by PHP-Fusion Copyright © 2024 PHP-Fusion Inc
Released as free software without warranties under GNU Affero GPL v3
Designed with ♥ by NetriXHosted by skpacman