
Login

Shoutbox
You must login to post a message.
renatoa
07/26/2024 3:49 PM
Bill grubbe and Jk, 
allenb
07/26/2024 5:15 AM
Spiderkw Welcome to HRO!

renatoa
07/24/2024 8:31 AM
ramiroflores and John123,

 ?
?
?renatoa
07/21/2024 1:18 AM
 , Luislobo
renatoa
07/19/2024 11:28 AM
Koepea,
Forum Threads
Newest Threads
Skywalker roaster modsBackground Roast Iss...
Hello from Arkansas
TC4ESP
Green coffee reviews
Hottest Threads
| Skywalker roaster... | [376] |
| TC4ESP | [115] |
| War on Farmers by... | [47] |
| Adventures in flu... | [26] |
| Hello! (soon) Roa... | [17] |
In Memory Of Ginny

Donations
Latest Donations
dmccallum - 10.00
JackH - 25.00
snwcmpr - 10.00
Anonymous - 2.00
Anonymous - 5.00
dmccallum - 10.00
JackH - 25.00
snwcmpr - 10.00
Anonymous - 2.00
Anonymous - 5.00
Users Online
Guests Online: 3
Members Online: 0
Total Members: 8,394
Newest Member: Bill grubbe
Members Online: 0
Total Members: 8,394
Newest Member: Bill grubbe
View Thread
Who is here? 1 guest(s)
 Dereks 1-2Kg drum roaster build
|
|
| dmccallum |
Posted on 12/04/2015 6:26 AM
|
|
1/4 Pounder  Posts: 93 Joined: November 24, 2015 |
Hello I?m a recent joiner and starting to flesh out a design for a new 1-2Kg drum roaster. I?ve been impressed with a number of designs here and the level of innovation, particularly with the Arduino/Pi and gas control mechanisms. The potential to create a roaster comparable to commercial machines is interesting. I?ve spent the last 10 years restoring lever espresso machines (thread of my current project here - http://www.home-b...rnazionale), I guess my attention was going to turn to building a roaster at some point. I?ve gleaned as much as possible from this site, pinched a few ideas and attached some shots of my initial design. I liked the thread with the Probatino style design so I?ve borrowed that, and there?s a useful photo floating around of the drum internals from a San Franciscan SF-1 which I?ve also referenced. I?m looking now for some steer as to whether the direction I?m going is correct. Drum Size & Capacity 250mm x 250mm x 2.5mm mild steel with a volume of 0.0122m3 or 12.2L. Shaft will probably be 12mm. I intend to be able to roast between 1-2Kg of green beans on basis that RoastableBeanMass = drum volume/10, so 1kg green bean = 5.8L give or take Drum Design I?ve noted comments to the effect that the likes of Probat prefer an equal diameter/length, so going with this. I've seen a range of opinion about drum thickness. I'm after something that will support roast-profiling so hence tending towards a thinner 2.5mm, but welcome comments. The outer drum skin will be 1mm mild steel and will put ceramic-fiber blanket over this. The rear of the inner drum will be a 1-2mm perforated mild steel with 3mm holes and a clearance of 30mm between it and the cabinet rear plate. About 28mm between the inner-drum and outer drum skin. Cabinet Will use 4mm mild steel for front and rear plates. The six stays will be 11mm steel hex section that I?ll tap at each end to take 8mm bolts. Cheers Derek
dmccallum attached the following images:


Edited by dmccallum on 12/04/2015 6:32 AM |
|
|
|
| Ringo |
Posted on 12/04/2015 4:57 PM
|
 Pounder  Posts: 474 Joined: January 14, 2010 |
That looks good to me. It should work great. You will be roasting in no time.
All you need in life is ignorance and confidence, and then success is sure. Mark Twain
|
|
|
|
| Tony_C |
Posted on 12/04/2015 7:41 PM
|
 1/4 Pounder Posts: 168 Joined: September 24, 2015 |
I can't wait to see it in action. Nice build! |
|
|
|
| allenb |
Posted on 12/05/2015 9:46 AM
|
 Administrator Posts: 3869 Joined: February 23, 2010 |
Totally agree with the previous comments! Looks like you've put a lot of work into this design and everything I'm seeing looks like all systems go. On drum wall thickness, if you haven't already purchased the tube or sheet metal stock, my preference for that size drum would be closer to 1/8" but I'm sure the 2.5 mm will perform fine. Regardless of what size you go with I would include a baffle above the burner and prefer locating the burner off to one side instead of centering it which eats up less height to fit everything in. I'm sure you're already savvy to this but be sure and chuck the drum/shaft works into a lathe and true up the front face to allow keeping the drum face gap to a minimum. BTW, I envy your ability to produce excellent graphics! Allen 1/2 lb and 1 lb drum, Siemens Sirocco fluidbed, presspot, chemex, cajun biggin brewer from the backwoods of Louisiana
|
|
|
|
| dmccallum |
Posted on 12/05/2015 1:10 PM
|
|
1/4 Pounder Posts: 93 Joined: November 24, 2015 |
Thanks for that feedback. I'll get on with some of the finer design detail before getting materials cut. |
|
|
|
| hbboyd |
Posted on 12/07/2015 7:47 PM
|
|
Newbie  Posts: 30 Joined: May 26, 2015 |
Mine is just in the finishing stages and I went with very similar dimensions and design to yours. So far working great at your intended load sizes so I wouldn't have any hesitations! |
|
|
|
| dmccallum |
Posted on 12/10/2015 11:05 AM
|
|
1/4 Pounder Posts: 93 Joined: November 24, 2015 |
I am investigating motors and think I have a solution for the drum, but thought to confirm what features in motor control I should be considering. The drum motor has been spec'd to my drum dimensions and weight fully loaded at 7kg - an AC 15W std induction with a 1:20 ratio gearbox giving approx 70rpm with 1.7nm torque (http://www.ggm.co...on_15W.asp). It has occurred to me though that I have seen people using various variac arrangements to control motor speeds (or was that for something else perhaps). I'd have thought you would want the drum speed kept constant at about 70rpm? Is there any desire/purpose to control drum or blower fan speeds? Edited by dmccallum on 12/10/2015 11:18 AM |
|
|
|
| hbboyd |
Posted on 12/10/2015 9:12 PM
|
|
Newbie Posts: 30 Joined: May 26, 2015 |
Here http://www.ebay.c...0373333454 is the motor I used. It seems to deal with the load ok. It gets really warm but from everything I've read, you cant use motor surface temp to gauge if a motor is overheating. It doesn't seem to struggle though. As for speed control, you'll see it on some roasters, I was always under the impression it is mostly just something you would adjust depending on load sizes. The goal being moving the coffee not so slow it sits and has tipping or goes too fast and gets pinned agains the drum (like that weird amusement park ride)...and has tipping. That being said, I do not have a variable, and I think I read somewhere the 50-60ish range works best. Now for the fan, I used http://www.ebay.c...0573233180 with a Variac. Controlling fan speed I would say is super important, but that also has to do with the way I learned to roast (learned on a indirect fire roaster). Pretty much everyone I've seen does use it, but some use it more than others. For subject of speed controlling fans, the best way to do it (with an AC fan) I know is a VFD, and I've seen those used on commercial roasters many times before. Many people don't want to spend that money, so do your research of what type you use and make sure your motor can take it, there are lots of cheap ways that will break it. ADMIN: edited to make links live and easier to use. Edited by JackH on 12/11/2015 5:51 AM |
|
|
|
| Ringo |
Posted on 12/11/2015 6:10 AM
|
|
Pounder Posts: 474 Joined: January 14, 2010 |
On controlling air through a fan the cheapest way is to put in a gate that restricts the air before it goes through the fan. Just like the choke on a carburetor. If you restrict the air before the fan the load on the motor will drop. You can not restrict the air after the fan because that will burn out the fan. On my drum roaster I have steel circle cut the size of the pipe coming out of the drum thats attached to a shaft. I can turn the shaft to restrict the air flow. I run boilers are work with 50 Hp motors running the draft fans and this is how they work. A pid controller opens and closes a big baffle to control how much air goes through. Now the fuel is controlled by a VFD because just like on a roaster you need fine control. On my drum I overestimated how much air I need to roast so I normally run with my baffle only open maybe 10 percent. But nice to have the extra capacity because when i need to cool off the roaster I can run draft at 100 percent. I have marks on the side for air flow during drying, development and 1st crack. But for normal roasting I have my hand full adjusting the propane, still doing that by hand. Edited by Ringo on 12/11/2015 6:16 AM All you need in life is ignorance and confidence, and then success is sure. Mark Twain
|
|
|
|
| Ringo |
Posted on 12/11/2015 6:43 AM
|
|
Pounder Posts: 474 Joined: January 14, 2010 |
This is not a roaster piece but this how it looks.
Ringo attached the following image:
All you need in life is ignorance and confidence, and then success is sure. Mark Twain
|
|
|
|
| dmccallum |
Posted on 12/11/2015 9:36 AM
|
|
1/4 Pounder Posts: 93 Joined: November 24, 2015 |
Thanks for that Ringo, I imagine I'll go with this. I'm up-specing plenty aside and can always revisit at a later stage. hbboyd, your motor looks much the same spec. I note you've gone with the 1:25 ratio gearbox. I may get the 1:20 & 1:25 when I order. How'd you mount yours? Inline direct onto the shaft or ? I'm looking at a 90deg mitre gear arrangement. |
|
|
|
| hbboyd |
Posted on 12/11/2015 4:27 PM
|
|
Newbie Posts: 30 Joined: May 26, 2015 |
Mine is mounted inline direct on the shaft, if I redo it, I would probably go chain drive. But for no reason other than i like it and it'll pull it away from an heat. |
|
|
|
| dmccallum |
Posted on 12/22/2015 5:34 AM
|
|
1/4 Pounder Posts: 93 Joined: November 24, 2015 |
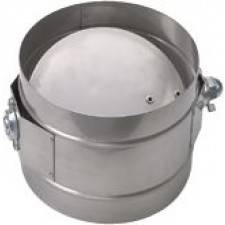
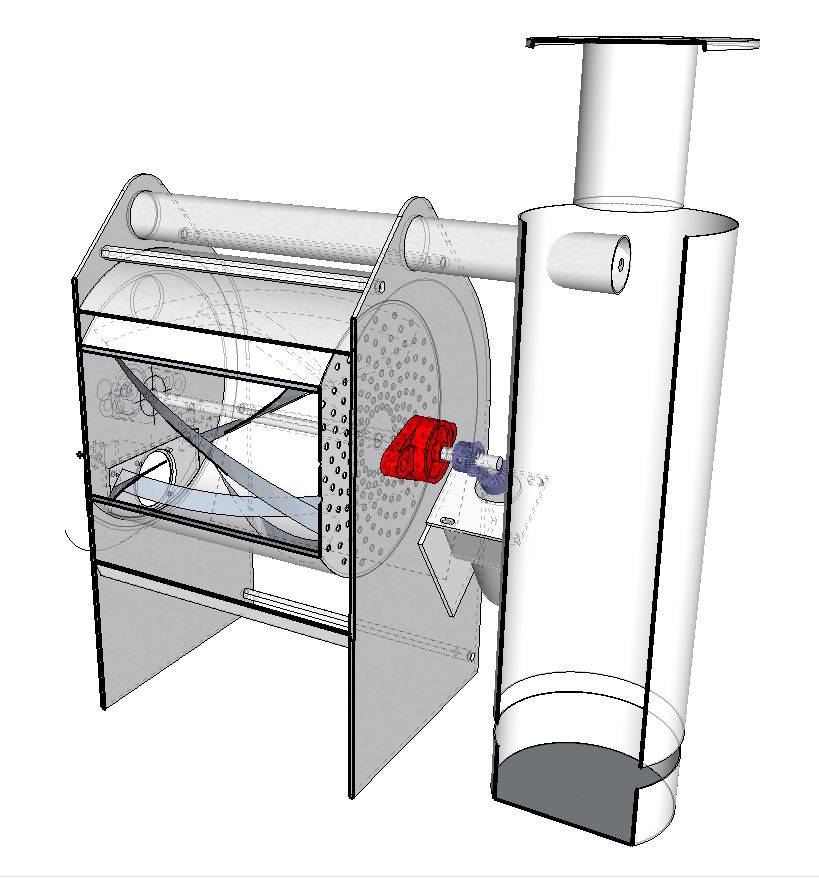
I'm starting to think about the cyclone and cooling tray arrangements. Want to keep things simple and ideally use only one blower for both air flows. I've looked around and seen some machines with both drum and cooling tray draw pipes that appear to connect to the cyclone assembly. The attached pic of a SF-1 pipe arrangement is a good example. Trouble is these are typically housed in enclosures and I've not seen a picture of one disassembled. I've an idea of what might be inside one but not sure as to what venting ideally should be going on (seen suggestions that drum venting should be continued after roast-end) Can anyone advise?
dmccallum attached the following image:

|
|
|
|
| Ringo |
Posted on 12/22/2015 6:00 AM
|
|
Pounder Posts: 474 Joined: January 14, 2010 |
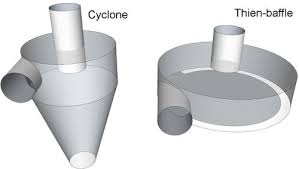
With chaff you are filtering out a big flake so you can keep you cyclone simple. You just need the inlet to come in at a tanget so the chaff spins this will make the it drop out. For home roasting you can just put a door in the bottom to open and clean out at the end of the roast. Put the suction fan on the top. If you fan is big you can put a T in before the cyclone to use it for bean cooling and roasting. If money is no problem I like to have a separate fan for the bean cooler. Look at the cyclone on the left for how they work. But you do not need the tapers at the bottom when you are removing chaff. Most coffee roasters I have seen use a straight tube with storage at the bottom. I would try to find a pipe that is not galvanized because of the fumes.
Ringo attached the following image:
All you need in life is ignorance and confidence, and then success is sure. Mark Twain
|
|
|
|
| dmccallum |
Posted on 12/22/2015 8:22 AM
|
|
1/4 Pounder Posts: 93 Joined: November 24, 2015 |
Ahhh, well that's very useful! No need to get carried away with a complete Bill Pentze design then. Will simplify matters. Thx v much. |
|
|
|
| allenb |
Posted on 12/22/2015 9:36 AM
|
|
Administrator Posts: 3869 Joined: February 23, 2010 |
Another additional reduction in unnecessary complexity is to enter the cyclone cylinder straight-on instead of a tangent (as in the SF-1). Attach a 90 degree angled sheet metal baffle just inside the entry hole to direct the flow into a cyclone vortex. As Ringo mentioned, for separating light chaff flakes and other small particles from a coffee roaster, one doesn't need high efficiency. Plus, fabricating the parts for a tangent entry is a real pain. Ringo, you mentioned using non-galvanized parts. All of the commercial cyclone systems and ducting I've worked on or came across in coffee roasting systems use galvanized and/or stainless. Most of them were passing straight roaster exhaust and not a mix which would have cooled down the air. I haven't seen any articles in the industry that suggest against using galvanized parts in this application. What I have seen is if one will be exposing galvanized parts to air/flue higher than 500 F and a food product is coming in contact with the air then there may be the possibility of contamination due to outgassing but I've never seen anything definitive written discussing those conditions. Allen 1/2 lb and 1 lb drum, Siemens Sirocco fluidbed, presspot, chemex, cajun biggin brewer from the backwoods of Louisiana
|
|
|
|
| Ringo |
Posted on 12/22/2015 2:01 PM
|
|
Pounder Posts: 474 Joined: January 14, 2010 |
I never knew how hot was dangerous with galvanized, so i played it safe. Thanks for the info.
All you need in life is ignorance and confidence, and then success is sure. Mark Twain
|
|
|
|
| dmccallum |
Posted on 12/23/2015 10:06 AM
|
|
1/4 Pounder Posts: 93 Joined: November 24, 2015 |
Quote I've found the equivalent 230V version for this fan but have noted that both the 115/230 models are not recommended for speed control. Can you expand a bit on how the motor performs and the variac mechanism you're using? Do you feel in hindsight it was the right one or could do with something more/less powerful? Also, does anyone have any idea as what is the optimal spec of blower for a machine of this size (250x250 drum drawing through a 1 3/4" pipe) expressed in CFM? In otherwords what's the actual required max airflow? |
|
|
|
| MikeW |
Posted on 12/23/2015 5:37 PM
|
|
1/4 Pounder Posts: 50 Joined: April 14, 2012 |
Hi Derek, maybe consider a permanent magnet DC motor. There are $11 PWM speed controllers that work really well. I noticed there are AC gear motors available that are really inexpensive, but DC motors that do not have gearboxes are also very cheap (like $3 for than Johnson motor on surpluscenter). I believe the important difference between AC induction, and DC permanent magnet, is that an AC motor will hold its speed under load but burn up if overloaded. A DC motor will slow down under load**, increasing its torque at the lower speed. I prefer the latter behavior but it is not always best for e.g. a drum motor. **Unless you use an expensive constant speed controller. For my drum I plan to use the $3 motor plus MXL pulley and PWM speed control. I don't think it will hold constant speed for all loads, b/c the motor is not that strong, but we'll see. If you're wondering about different means to control air, talk to BoldJava (Dave Borton) who has tried both on several roasters. I've heard one person comment that having direct fan speed control is desirable, but it would be worth settling that question. Drum speed can sometimes interact with coffee mixing, because beans may stay with the same vane each rev, depending on drum diameter and speed, and number of vanes. If your vanes perform different functions around the circle, that can be a problem. My drum is 6" and this may not be an issue for you. |
|
|
|
| BobbyM15 |
Posted on 12/24/2015 3:07 AM
|
 1/4 Pounder Posts: 64 Joined: January 23, 2015 |
I have a geared DC motor that I am going to use but I am going to put an $11.00 PWM speed controller on it. If I load it with 3 lbs of beans I will just adjust the speed for that load. In testing I have loaded the drum and ran that motor and speed controller for an hour at a time with no change in anything, so, I am happy. Coffee is a language in itself.
Jackie Chan |
|
|
|
| dmccallum |
Posted on 01/06/2016 7:52 AM
|
|
1/4 Pounder Posts: 93 Joined: November 24, 2015 |
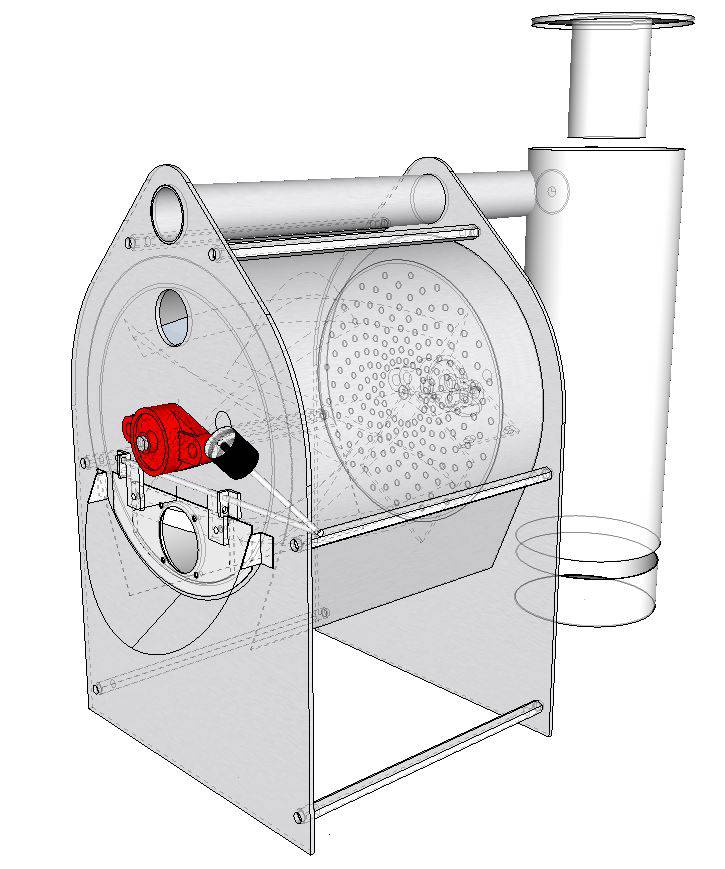
Can I have some advise please on my vane config. I've trimmed the drum just a little to 240mm dia x 250mm long, and have drafted 8 vanes (4 screw one way, 4 the other). Each set of 4 are 20mm high. I can see that each vane end will have to be trimmed back by 5mm from each end of the drum to prevent beans getting caught in crevices. One gap for me is the mention of a 25deg angle. Can someone elaborate on this - Is it the angle of the screw from the drum ends, or the angle between the vane surface and the drum wall? Oooh and also, what direction do drum roasters typically rotate - anti-clockwise when viewing from front? Outer set of vanes in that case would then be oriented to drive the beans towards the front I imagine (reverse of how I have shown)? Cheers
dmccallum attached the following images:


Edited by dmccallum on 01/06/2016 7:59 AM |
|
|
|
| dmccallum |
Posted on 01/06/2016 10:08 AM
|
|
1/4 Pounder Posts: 93 Joined: November 24, 2015 |
Where I've got to for the moment. Please do chip in with any feedback or advice.
dmccallum attached the following images:
Edited by dmccallum on 01/06/2016 10:16 AM |
|
|
|
| allenb |
Posted on 01/06/2016 6:55 PM
|
|
Administrator Posts: 3869 Joined: February 23, 2010 |
Quote dmccallum wrote: Can I have some advise please on my vane config. I've trimmed the drum just a little to 240mm dia x 250mm long, and have drafted 8 vanes (4 screw one way, 4 the other). Each set of 4 are 20mm high. I can see that each vane end will have to be trimmed back by 5mm from each end of the drum to prevent beans getting caught in crevices. One gap for me is the mention of a 25deg angle. Can someone elaborate on this - Is it the angle of the screw from the drum ends, or the angle between the vane surface and the drum wall? Oooh and also, what direction do drum roasters typically rotate - anti-clockwise when viewing from front? Outer set of vanes in that case would then be oriented to drive the beans towards the front I imagine (reverse of how I have shown)? Cheers I've found that going any less than 16 mm between front of roaster and front end of vanes will cause beans to cause a fairly severe thump when they line up and jam between metal parts. This can be more severe when opening the dump door and beans are jamming between vane front and edge of dump opening. No gap is necessary between vanes and rear of drum. Clockwise/counter clockwise doesn't matter and I've seen commercial roasters use either one. Obviously, where you locate the trier and thermometer will be determined by which one you choose. The outer vanes are always used for pulling the beans out during dumping. For vane angle calculation, drawing a straight line from front to rear on the drum wall would be the base of the angle. For some recent discussion on this topic read a ways into this thread and you'll see some useful information. http://homeroaste...post_56317 Allen 1/2 lb and 1 lb drum, Siemens Sirocco fluidbed, presspot, chemex, cajun biggin brewer from the backwoods of Louisiana
|
|
|
|
| dmccallum |
Posted on 01/07/2016 11:12 AM
|
|
1/4 Pounder Posts: 93 Joined: November 24, 2015 |
Thanks for that Allen. Another query around cooling tray and its size. If my drum size and volumes for intended 2Kg loads are, Radius 120mm, Length 250mm and volume = 0.0113m3 or 11.3L Then I've approximated the cooling tray at, Radius 165mm, Height 100mm giving a volume of 0.00855m3 or 8.5L I can't imagine this would be too far off the mark. Is there a general rule of thumb for sizing cooling tray relative to drum size and load? Appreciate the wider the tray the more the rate of cooling, I'm just trying to keep dimensions under control. I intend to have a dedicated blower on the tray. Thanks for everyones input. I am leaping into this having only ever viewed an old Vittoria roaster some time ago. Apart from that I'm relying on google search and your input. Cheers!
dmccallum attached the following image:

|
|
|
|
| allenb |
Posted on 01/07/2016 8:07 PM
|
|
Administrator Posts: 3869 Joined: February 23, 2010 |
I don't know of a general rule of thumb but in most of my experience, I've never seen a commercial roaster cooling tray that a roasters full capacity produced a bean depth that came much over 1/2 the cooling tray's height. The swell of beans just in front of the sweep arm can be much higher than the non-moving beans. You'll have to convert to metric units but 1 lb of roasted is around 70 cubic inches x 4.5 (2 kg) = 311 cu. in. A 2" bed depth in a 13" diameter cooling tray (330 mm) is around 265 cu. in. so you may run into trouble if your sweep arm is tall enough to cause a big swell. As far as rate of cooling? I can't see a tray of this size having any problem cooling 2 kg of beans in a pretty short time frame with even moderate air flow. Allen 1/2 lb and 1 lb drum, Siemens Sirocco fluidbed, presspot, chemex, cajun biggin brewer from the backwoods of Louisiana
|
|
|
|

| Jump to Forum: |
Powered by PHP-Fusion Copyright © 2024 PHP-Fusion Inc
Released as free software without warranties under GNU Affero GPL v3
Designed with ♥ by NetriXHosted by skpacman