
Login

Shoutbox
You must login to post a message.
renatoa
07/26/2024 3:49 PM
Bill grubbe and Jk, 
allenb
07/26/2024 5:15 AM
Spiderkw Welcome to HRO!

renatoa
07/24/2024 8:31 AM
ramiroflores and John123,

 ?
?
?renatoa
07/21/2024 1:18 AM
 , Luislobo
renatoa
07/19/2024 11:28 AM
Koepea,
Forum Threads
Newest Threads
Background Roast Iss...Skywalker roaster mods
Hello from Arkansas
TC4ESP
Green coffee reviews
Hottest Threads
| Skywalker roaster... | [374] |
| TC4ESP | [115] |
| War on Farmers by... | [47] |
| Adventures in flu... | [26] |
| Hello! (soon) Roa... | [17] |
In Memory Of Ginny

Donations
Latest Donations
dmccallum - 10.00
JackH - 25.00
snwcmpr - 10.00
Anonymous - 2.00
Anonymous - 5.00
dmccallum - 10.00
JackH - 25.00
snwcmpr - 10.00
Anonymous - 2.00
Anonymous - 5.00
Users Online
Guests Online: 4
Members Online: 0
Total Members: 8,393
Newest Member: Bill grubbe
Members Online: 0
Total Members: 8,393
Newest Member: Bill grubbe
View Thread
Who is here? 1 guest(s)
 Simple, bigger, better, faster, SC/TO high torque motor replacement for ~$35
|
|
| bobbooks |
Posted on 05/03/2016 4:38 PM
|
 Newbie  Posts: 22 Joined: August 03, 2015 |
Motor from EBay $23 Search ebay: ?110vac 30rpm reversible motor strong magnetic torque D-shape shaft? 7mm to 8mm shaft coupler 22mm length from ebay $5 Search ebay: ?5/6/7/8/10/12mm Shaft Coupling Rigid Coupling Coupler Motor? ? inch socket extender. $4 Local hardware store. Check extender rod diameter for 8mm. Most are that size in the 2-3 inch length. Cut off female end leaving 1.05 inches. Figure out the center the motor with modification to the plate. Punch a 1 inch hole in the bottom plate. The motor tabs are taped for 10/32 bolts. I used a SPDT center off toggle switch in series with motor. That way I can select the direction and also stop the rotation. Radio shack ~ $4 Not necessary! SC standoffs: ? inch schedule 40 PVC pipe with caps. Drilled hole in cap and connected to SC with ? X 20 4inch bolts. No problem doing 1+ pounds of beans. Very powerful torque motor that will not stop. 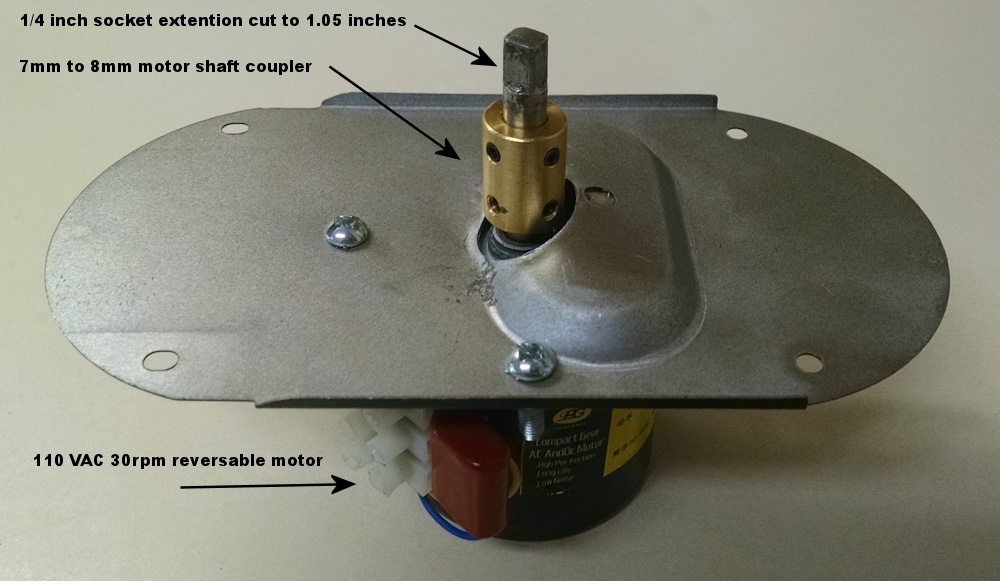 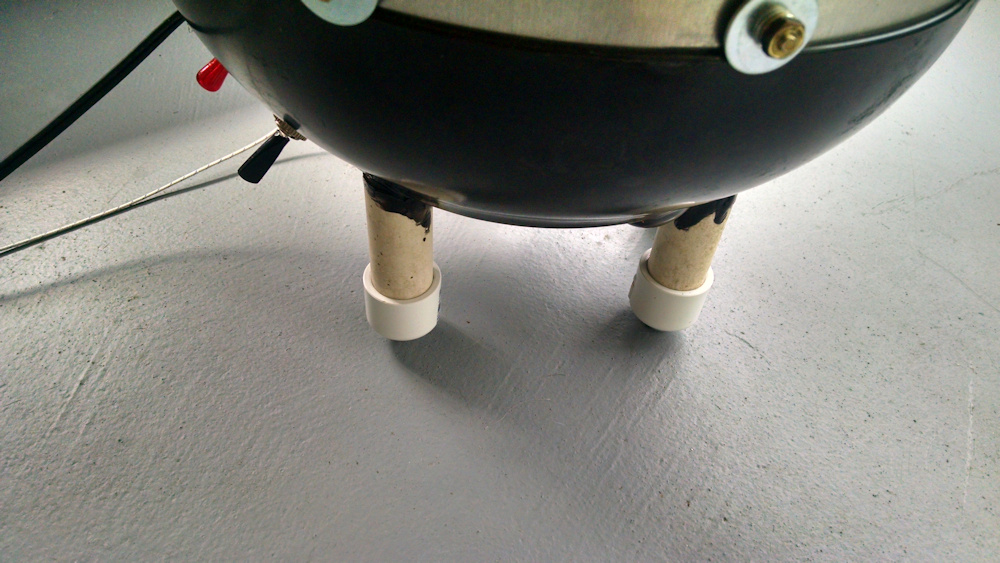 |
|
|
|
| Koffee Kosmo |
Posted on 05/05/2016 1:39 AM
|
 Administrator Posts: 1621 Joined: December 31, 2008 |
That's the beauty of the design It can be modified to work in many ways - as long as the volume to heat ratio is right and good mixing agitation is applied then you will have a roaster that will serve you for many years Your interpretation of the drive section is similar to the first roaster that was made in 2008 But neater  KK I home roast and I like it. Designer of the KKTO
Roaster Build information https://homeroast...ad_id=1142 https://docs.goog...lide=id.i0 Blog - http://koffeekosm...gspot.com/ Bezzera Strega, Mazzer Robur Grinder, Pullman Tamper Convex, (KKTO) Turbo Oven Home Roaster. |
|
|
|
| ginny |
Posted on 05/05/2016 8:50 AM
|
 Founder Posts: 3476 Joined: October 24, 2005 |
Very nice work, thanks for sharing this project... ginny  |
|
|
|
| bobbooks |
Posted on 05/08/2016 8:37 PM
|
|
Newbie Posts: 22 Joined: August 03, 2015 |
See 1lb2oz of beans tumble on the SC/TO roaster with the new motor on youtube. See youtube: https://www.youtu...1EgAlr3ipc 
Edited by bobbooks on 05/08/2016 8:48 PM |
|
|
|
| philB |
Posted on 03/13/2018 5:40 PM
|
 Newbie Posts: 7 Joined: March 13, 2018 |
Hey Bob! I found your mod on home roasters forum. I'm going to be using your design. I have always gotten unevenly roasted batches from my SC/TO and suspect this will fix that issue and give me the roaster ive always dreamed of. Few questions can I ask you to please post a short explanation/ diagram of how you wired the switch on the HR forum. I have a toggle and would like to do the same, but am not sure how. Also, what chamber temp do you aim for when you roast?? |
|
|
|
| renatoa |
Posted on 03/14/2018 1:56 AM
|
|
Administrator Posts: 3104 Joined: September 30, 2016 |
This video should tell you everything: |
|
|
|
| bobbooks |
Posted on 03/23/2018 8:40 PM
|
|
Newbie Posts: 22 Joined: August 03, 2015 |
Phil: Check out my mods at www.bobbooks.net |
|
|
|
| philB |
Posted on 03/05/2019 6:34 PM
|
|
Newbie Posts: 7 Joined: March 13, 2018 |
Finally got around to doing the mod!!! all based on your concept Bob, so thank you for that. Mine is based on a westbound kettle crazy, which is great, except it didn't have a nice mounting plate for the motor (which could be easily adapted fo the new motor) and some oddly placed mounting points for the original motor required my fabricating a custom mounting plate, which was a real pain! Other than that I got everything wired up and working relatively well. Just need to get some legs on her, as the motor a protrudes here as well. But first the inaugural roast! |
|
|
|
| JitterzZ |
Posted on 03/05/2019 7:29 PM
|
 1/4 Pounder  Posts: 151 Joined: October 08, 2018 |
Quote http://www.bobboo...urbo-build |
|
|
|
| philB |
Posted on 03/07/2019 1:27 AM
|
|
Newbie Posts: 7 Joined: March 13, 2018 |
Bob, Just curious what temp you are measuring here? Is this chamber temperature? http://www.bobbooks.net/ROR.htm PS, new motor working like a dream! whole new game here. |
|
|
|
| renatoa |
Posted on 03/07/2019 3:02 AM
|
|
Administrator Posts: 3104 Joined: September 30, 2016 |
His table refers probably so the called BeanTemp, but you are right, is rather chamber temperature. Indeed 300F/150C for dry end (yellowing), and 400F/200C for first crack (browning), are the most quoted and typical temperatures for BT, when we talk about profiles, on almost all machines. Actually is not a pure bean surface temperature, because the hot air between beans and probe, but so is the general consensus. On a particular machine, where the airflow in the probe area is minimal to null, I recorded significantly lower temperatures of beans, by about 8-10C degrees as average, as 138-144C for dry end, and 188-194C for FC. PS: new motor is 60KTYZ from the video ? |
|
|
|
| bobbooks |
Posted on 03/07/2019 1:48 PM
|
|
Newbie Posts: 22 Joined: August 03, 2015 |
The thermocouple probe tip is in the bean mass sticking up 1/4 inch from a small hole in the bottom of the SC pan. No doubt all probes have an ambient air influence within the chamber as witnessed from the initial charge and bean probe indication. That being said, the differential and influence are less at the end of the roast. I have several hundred roasts and no complaints yet! I'm happy to answer any questions: coffee@millview.net |
|
|
|
| philB |
Posted on 03/07/2019 6:20 PM
|
|
Newbie Posts: 7 Joined: March 13, 2018 |
Quote bobbooks wrote: The thermocouple probe tip is in the bean mass sticking up 1/4 inch from a small hole in the bottom of the SC pan. No doubt all probes have an ambient air influence within the chamber as witnessed from the initial charge and bean probe indication. That being said, the differential and influence are less at the end of the roast. I have several hundred roasts and no complaints yet! I'm happy to answer any questions: coffee@millview.net If you have an extra thermocouple id be curious to know roughly what the chamber temps are. I'll have a digital thermometer in the chamber halfway between the plate and the turbo top, and a IR thermo-gun as well. Just not sure if it will get past the glass to measure the beans. |
|
|
|
| philB |
Posted on 03/07/2019 7:59 PM
|
|
Newbie Posts: 7 Joined: March 13, 2018 |
Some initial throughts and interesting observations from the IR-thermo-gun. 1) The heat on the westbend kettle crazy plate oscillates quite a bit. Between 380-480f ... though this seems to stabilize around 400f when the lid is on and heating. Interesting, and unexpected. This will be a confounding issue in so far as getting a stable (or stably increasing/predictable) chamber temperature. 2) I have two turbo ovens (# blessed #livng my best life). I think the best option will be the halogen rather than the heating coil model. However, both have the same issue. The element is either on or off. This is how temperature is regulated, not with variable heat to the coil. This is a confounding issue in terms of getting a stable/predictable chamber temperature. When the element cycles it is not nearly fast enough to maintain a stable temperature. The chamber can fluctuate some 60f during one of these heat regulation cycles and it can take near a minute for it to a) overshoot the temp - turn off, b) undershoot the temp - turn on, c) hit the target temp on the way back to step a. 3) Just wondering if this fluctuation really matters in terms of bean temperature. perhaps the thermal mass/momentum in the beans acts as a sufficient averaging mechanism while the chamber air temp oscillates. 4) Only now that I have switched the motor (thanks Bob) am I taking the roasting profile more seriously, measuring temps, thinking about this stuff. Before the new motor, I knew insufficient agitation was the first and most serious issue. ................................................. Man, I used to let the whole setup preheat for 10 min (way to much/ hot a charge) then blast it with max power on the turbo until I pulled the coffee out. I even covered the regulating-thermometer in the Turbo with tin foil so it would never shut off at all. This was of course nearly to hot at every level/time. The coffee that came out was often decent, sometimes great, but I had no control at all. There was almost no separation between first and second crack, and the difference between good (in the city range) and to dark/ scorched was a matter of moments. To think of how many batches I ruined through this bad process. But no longer!!! Bob, what do you think about these things? Have you observed the same challenges? Do the beans fluctuate as they are on the rise? I see you left your email but thought it would be good to keep this conversation public in the forum where others can see it and might potentially chime in or pick up a tip. Edited by philB on 03/08/2019 12:41 PM |
|
|
|
| renatoa |
Posted on 03/08/2019 1:51 AM
|
|
Administrator Posts: 3104 Joined: September 30, 2016 |
The diode trick solve all the on-off issues. More exactly you place a diode parallel on thermostat. and that's all... no more PID, no more fancy automatization needs. All you need is to start at 200C and slowly increase temperature up to 250 C in about 5 minutes. Some 10C per minute. Then keep at 250 up to the end. 250 C is the maximum for most TO lids I know, anyway... When thermostat opens the circuit, the diode will maintain 50% power, enough to eliminate the drop. Actually, depending on your machine build, volume/insulation and power needs, you can have even a slight rise, as on mine ! So, to be more clear, when I am turning thermostat from 200 to 210 C level, for example, the machine start full power until 210 C is reached, then thermostat opens, and temperature slowly raise for about 20 seconds up to 215 C, then stay there or maybe drop 2-3 degrees until the next minute mark, when I turn thermostat to 220 C, and so on. Though, at 250 C maximum the 50% power brought by diode is no more enough to maintain this regime ... the temperature fluctuates, but a lot less than without diode, perhaps in a 5 degrees band. Another benefit, you can use the diode alone for preheating without worry about timers or timeouts, on my 9 liters machine 50% of power brought by diode keep the temperature to stable state around 200 C, which is a good for charge. Did I mention that the diode maintain also a permanent light on the beans ?  darker and more orange, but still you have a light to see beans turning... darker and more orange, but still you have a light to see beans turning...
Edited by renatoa on 03/08/2019 2:01 AM |
|
|
|
| philB |
Posted on 03/08/2019 12:05 PM
|
|
Newbie Posts: 7 Joined: March 13, 2018 |
Quote renatoa wrote: The diode trick solve all the on-off issues. More exactly you place a diode parallel on thermostat. and that's all... no more PID, no more fancy automatization needs. All you need is to start at 200C and slowly increase temperature up to 250 C in about 5 minutes. Some 10C per minute. Then keep at 250 up to the end. 250 C is the maximum for most TO lids I know, anyway... When thermostat opens the circuit, the diode will maintain 50% power, enough to eliminate the drop. Actually, depending on your machine build, volume/insulation and power needs, you can have even a slight rise, as on mine ! So, to be more clear, when I am turning thermostat from 200 to 210 C level, for example, the machine start full power until 210 C is reached, then thermostat opens, and temperature slowly raise for about 20 seconds up to 215 C, then stay there or maybe drop 2-3 degrees until the next minute mark, when I turn thermostat to 220 C, and so on. Though, at 250 C maximum the 50% power brought by diode is no more enough to maintain this regime ... the temperature fluctuates, but a lot less than without diode, perhaps in a 5 degrees band. Another benefit, you can use the diode alone for preheating without worry about timers or timeouts, on my 9 liters machine 50% of power brought by diode keep the temperature to stable state around 200 C, which is a good for charge. Did I mention that the diode maintain also a permanent light on the beans ? darker and more orange, but still you have a light to see beans turning...Can you point me to more info about this Didoe mod? I'm not sure I understand completely. But sounds like potentially a good solution. So the Diode means that instead of turning off, the coil goes to half power??? And then you need a switch to activate/deactivate the diode??? or you can let the thermostat do that?? Sorry, I'm just not electrically inclined so really have no idea what the diode is doing. Not sure i understand this part? So this is like a ramping up phase, instead of going to full power? Quote renatoa wrote: So, to be more clear, when I am turning thermostat from 200 to 210 C level, for example, the machine start full power until 210 C is reached, then thermostat opens, and temperature slowly raise for about 20 seconds up to 215 C, then stay there or maybe drop 2-3 degrees until the next minute mark, when I turn thermostat to 220 C, and so on. Though, at 250 C maximum the 50% power brought by diode is no more enough to maintain this regime ... the temperature fluctuates, but a lot less than without diode, perhaps in a 5 degrees band. If you have a link to a post about how to accomplish this I would appreciate it. Sounds like this might be the answer to my issues! Thanks! Edited by philB on 03/08/2019 12:50 PM |
|
|
|
| renatoa |
Posted on 03/08/2019 1:35 PM
|
|
Administrator Posts: 3104 Joined: September 30, 2016 |
Yes, placing a diode parallel to thermostat will keep permanently half power on the heater. Sure you need a switch to cut the diode path, else the machine will never cool, unless you raise the lid handle, which is connected to a machine master switch. I am not aware about posts with pictures about this mod, but it implies opening the lid, are you ready for this surgery ? Without knowing the exact layout inside your lid is hard to show a mod. Even for popcorn machines, where almost all models were modes, and Internet is full with detailed pictures, there is still people asking what is that wire or that part. In the TO lid case, the location is simple and clear: parallel on the thermostat contacts. Show me your thermostat Regarding the ramping part, when you turn up the thermostat to raise the temperature, the power will be instantly full until reaching the desired level. Where the diode helps is it smoothen the regulation cycles, the temperature drop when thermostat cut the power is a lot less brutal and abrupt than before. so the 60F fluctuations are now maybe even less than 10 F amplitude. |
|
|
|
| bobbooks |
Posted on 03/08/2019 1:38 PM
|
|
Newbie Posts: 22 Joined: August 03, 2015 |
All good information from renatoa! I took out the thermostat on both the Turbo and SC. Some of the Turbos (I have three) lack sufficient power at the end of the roast because the thermostat keeps cutting off. I put a switch in series with the diode and heater in the SC. This limits the SC to half power. I put a diode in series with the heater in the Turbo and a switch across the diode. This allows me to keep an accurate profile using the Turbo. in rare occasions or cold days I might supplement extra heat with by turning on the SC with the diode. The purpose of the diode is to cut the power in half going to the heaters. |
|
|
|
| philB |
Posted on 03/09/2019 1:10 PM
|
|
Newbie Posts: 7 Joined: March 13, 2018 |
Okay guys, thanks for the great info.... I did some testing and realized that the Turbo with the coil is much more stable than the halogen. That makes sense, since the coil retains heat, but also lucky since it means the thermostat is better tuned than the halogen. Its called an Inifinty, been using it for years and its great. Just missing the halogen light is a bummer. So.... I think I'll mod the halogen. I'll rip it open and post some pictures. maybe you guys can help me out with some pointers. I've got the heat resistant wire on order. Sorry, I still have questions to clarify exactly how this works. *Renatoa's method essentially works so that, when the thermostat is open the halogen gives 100% power, and when the thermostat is closed it gives 50% power. Is that the idea? This prevents the temp from dropping so far during the thermostat regulation cycle. Then Renatoa uses the temp dial bumping it up a bit to keep the heat on the increase, adding more control to the process. *Bob, it sounds like you manage the temperature manually with a switch, going between 100% power and 50% power to balance the temp and get the profile you are shooting for? Is that right? Is there a lot of flipping or does the 50% power kind of hold the temp steady? Funny the westbend base seems to hold a steady temperature once the turbo heat is applied also. I think it might keep it just hot enough to keep the thermostat closed. Damn, wish i just had 2 Variacs. Too bad they are so expensive. |
|
|
|
| renatoa |
Posted on 03/09/2019 1:22 PM
|
|
Administrator Posts: 3104 Joined: September 30, 2016 |
You nailed right both "methods", actually variations of same control method that we could name ... dr.Evil quotes... "manual PWM" For my machine, up to 230C the 50% keep steady enough, then start the cycles, but less severe than pure on-off. All depends how well is insulated and beans mass. i.e. reasons of power losses. If this is Infinity machine... https://yaoota.co...umia-kenya ...then it resembles a lot with one of my past lids, then will be very simple to find the hook points... the thermostat is right under the temperature knob, on same shaft. |
|
|
|
| bobbooks |
Posted on 03/09/2019 1:45 PM
|
|
Newbie Posts: 22 Joined: August 03, 2015 |
I use two switches to control the heat. On/Off on the SC and full or half heat on the turbo. I normally have to do very little switching. Seems that my 3 cups of beans, TO, SC, stirring all keep my profile on target. More often I have to slow down the development time with turbo going half heat beginning at first crack for about a minute. Different beans, ambient, wind have slightly different results. The profile I have online is the one I use with ONE EXCEPTION: I start my timing when the roast hits 200F. ROR is the same after that. The reason is that nothing is happening to the roast before that and the charge temp or time to 200F is less of a concern. You just have to adjust the time scale on the left of the profile chart. My research with other roasters that have used halogen turbos actually prefer the heating coil. I have no experience myself with halogen. |
|
|
|
| renatoa |
Posted on 03/10/2019 4:04 AM
|
|
Administrator Posts: 3104 Joined: September 30, 2016 |
Conversely, no experience with heating coil, no such models here. A peculiarity of my setups is the complete removal of halogen cover, this way the IR heating becomes majoritar versus convection, which is good, for my taste... maybe because I prefer meat cooked using a radiant (shawarma) versus convection (oven) Also tried cheap chinese carbon fiber tubes from Aliex, but abandoned, low reliability in this environment with vibrations, the fiber breaks quickly, after some roasts. Edited by renatoa on 03/10/2019 4:19 AM |
|
|
|
| Koffee Kosmo |
Posted on 10/09/2019 9:50 PM
|
|
Administrator Posts: 1621 Joined: December 31, 2008 |
I have used both element and halogen Both work great and I like both equally The halogen has one small advantage, that it lights up the roast chamber to view what?s going on inside KK I home roast and I like it. Designer of the KKTO
Roaster Build information https://homeroast...ad_id=1142 https://docs.goog...lide=id.i0 Blog - http://koffeekosm...gspot.com/ Bezzera Strega, Mazzer Robur Grinder, Pullman Tamper Convex, (KKTO) Turbo Oven Home Roaster. |
|
|
|

| Jump to Forum: |
Powered by PHP-Fusion Copyright © 2024 PHP-Fusion Inc
Released as free software without warranties under GNU Affero GPL v3
Designed with ♥ by NetriXHosted by skpacman