
Login

Shoutbox
You must login to post a message.
renatoa
07/26/2024 3:49 PM
Bill grubbe and Jk, 
allenb
07/26/2024 5:15 AM
Spiderkw Welcome to HRO!

renatoa
07/24/2024 8:31 AM
ramiroflores and John123,

 ?
?
?renatoa
07/21/2024 1:18 AM
 , Luislobo
renatoa
07/19/2024 11:28 AM
Koepea,
Forum Threads
Newest Threads
Skywalker roaster modsBackground Roast Iss...
Hello from Arkansas
TC4ESP
Green coffee reviews
Hottest Threads
| Skywalker roaster... | [375] |
| TC4ESP | [115] |
| War on Farmers by... | [47] |
| Adventures in flu... | [26] |
| Hello! (soon) Roa... | [17] |
In Memory Of Ginny

Donations
Latest Donations
dmccallum - 10.00
JackH - 25.00
snwcmpr - 10.00
Anonymous - 2.00
Anonymous - 5.00
dmccallum - 10.00
JackH - 25.00
snwcmpr - 10.00
Anonymous - 2.00
Anonymous - 5.00
Users Online
Guests Online: 9
Members Online: 0
Total Members: 8,393
Newest Member: Bill grubbe
Members Online: 0
Total Members: 8,393
Newest Member: Bill grubbe
View Thread
Who is here? 1 guest(s)
 1 KG Roaster
|
|
| eschlukebir |
Posted on 10/08/2016 8:48 AM
|
|
Newbie  Posts: 22 Joined: October 06, 2016 |
Hi everyone, I've been roasting for a couple years on a behmor, but I'm getting bored and have been considering upgrading. After looking pretty hard at the quest. The batch size makes me think I won't be happy there for real long either. I think my best bet is probably going to be to build one myself. I think I have access to people and resources to make it happen. Of course pretty much everything I know about roasters I have learned on this board. So I'm looking for a little help/confirmation and advice. I'm still in the concept/research phase but I want to make sure I am on the right track and start gathering components Here is what I am hoping to build up to 1KG.- more interested in being able to do batches smaller than 1k. Propane pipe burner- more interested in simple and functional than fully automated. First question is about the drum. Mill City's 1kg roaster drum dimensions are 8.5x9. Is this a good place to start or would something a little smaller be better given i'll more often be doing 1lb batches than 1kg. |
|
|
|
| allenb |
Posted on 10/08/2016 9:21 AM
|
 Administrator Posts: 3869 Joined: February 23, 2010 |
Welcome to HRO! I'm using a 7" x 7" in my gas fired drum roaster and I've roasted up to 1 1/4 lb batches with no crowding issues but if you're wanting to occasionally roast up to 1kg, I would go with Mill City's size to be safe. A little extra capacity won't cause any issues with your ability to maintain a nice profile. Allen 1/2 lb and 1 lb drum, Siemens Sirocco fluidbed, presspot, chemex, cajun biggin brewer from the backwoods of Louisiana
|
|
|
|
| eschlukebir |
Posted on 10/08/2016 11:23 AM
|
|
Newbie Posts: 22 Joined: October 06, 2016 |
Thanks. that is helpful. a couple questions on the burner. Looking at something like Russ' setup here http://forum.homeroasters.org/forum/viewthread.php?thread_id=4189&pid=52175#post_52175 I am not really interested in automating the gas at this point. But I am intrigued about the high flame/low flame idea on the switch. How advantageous is that, or is that just making things unnecesarily more complicated? would just a single needle valve with a gauge be sufficient? also with a single pipe burner like this, does it go directly under the drum, or off to one side? |
|
|
|
| allenb |
Posted on 10/08/2016 1:47 PM
|
|
Administrator Posts: 3869 Joined: February 23, 2010 |
My advice to everyone I speak to about drum roasters is to keep it simple and yes, the needle valve is by far the way to go for controlling it. Include a nice pressure gauge and mount them both in an up front, convenient location and I highly suggest incorporating a gas safety valve/pilot combo in your design. If you ever end up building a roaster for production runs in a shop with others running it, this is when you'll want to add automation to maintain consistency. To me, once we automate a drum roaster, we lose the art and the enjoyment of roasting. My preference on burner location is off to one side to give a little more space above the flames. Allen 1/2 lb and 1 lb drum, Siemens Sirocco fluidbed, presspot, chemex, cajun biggin brewer from the backwoods of Louisiana
|
|
|
|
| eschlukebir |
Posted on 10/08/2016 5:11 PM
|
|
Newbie Posts: 22 Joined: October 06, 2016 |
I'm looking at this venturi, needle combo. customgasburners....enturis/79 The part about BTU's and opening sizes, etc is where I really feel like I can't get my head around. I see some of these custom pipe burners are drilled, and some cut slots with a hacksaw. Is either method preferred? How critical are these calculations on a manually controlled burner? Edited by allenb on 10/08/2016 10:19 PM |
|
|
|
| allenb |
Posted on 10/08/2016 10:06 PM
|
|
Administrator Posts: 3869 Joined: February 23, 2010 |
One of the most important parts of roaster burner design is to size the burner and accompanying jet/orifice so that at maximum expected coffee charge weight, with properly sized needle valve open to full output, you've got enough fire power to get the job done plus "some headroom" which could be around 10-20 % additional. In looking over a chart I put together a while back, I would size the burner somewhere between 12,000 and 15,000 btus. http://forum.home...post_41645 If you size it way over your needs, you'll have a very difficult time achieving a low enough output when needed and still maintain a stable flame. On holes versus slots? I like slots as I've been able to bring the burner down to an extreme low output while maintaining a very stable flame. But, you may find pipe burners with holes equally effective and many here are using them with holes and seem to have plenty of control. The jet orifice on the venturi/needle valve assembly you linked to is drilled to a #61 orifice (.039") which when fed by an 11" H2O (.4 psi) low pressure propane regulator (standard BBQ pit regulator) you'll get between 10,000 and 11,000 btu's/hr which would be a little low for your roaster. They said they will custom drill it for you on request so I would ask for a #57 orifice. If you make the 3/4" pipe the same length as the drum (8-9") and saw the slots with 1/2 spacing from each other and use a slot depth of 1/3rd the pipes outside diameter, you should be good. If, after testing with a full batch, you find it needing more umph, just go one larger drill size on the orifice diameter. For ease of use, buy a quality needle valve with appropriate CV value for your flow rate at a couple of turns open (I came up with a CV of .095), mount it near the front of your roaster with a good pressure gauge just downstream then use a hose to go from there to the inlet of the supplied valve on the venturi. This will allow precise control and convenient access from the front of your roaster. Allen Edited by allenb on 10/08/2016 10:13 PM 1/2 lb and 1 lb drum, Siemens Sirocco fluidbed, presspot, chemex, cajun biggin brewer from the backwoods of Louisiana
|
|
|
|
| eschlukebir |
Posted on 10/09/2016 2:25 PM
|
|
Newbie Posts: 22 Joined: October 06, 2016 |
amazing! seriously. This is why I love places like this. Thanks for the help. Time to get some parts do some designing. I can't wait to get this going. |
|
|
|
| allenb |
Posted on 10/10/2016 8:29 AM
|
|
Administrator Posts: 3869 Joined: February 23, 2010 |
You're welcome, glad to help. To make sure we've got enough internal pipe volume for your BTU requirements, let's up the pipe diameter to 1" (use a coupling adapter) and have the slots cover at least 9 1/2" of pipe length (flame may extend a little beyond drum length). Happy building! Allen 1/2 lb and 1 lb drum, Siemens Sirocco fluidbed, presspot, chemex, cajun biggin brewer from the backwoods of Louisiana
|
|
|
|
| allenb |
Posted on 10/10/2016 6:19 PM
|
|
Administrator Posts: 3869 Joined: February 23, 2010 |
There is one thing that I forgot to mention and highly suggest you include with your roaster that I cannot/will not do without and that is the ability to view bean temperature Rate of rise. You can get this with the TC4 setup and I think is available with Artisan but make sure you include the ability to view this extremely important value. Allen 1/2 lb and 1 lb drum, Siemens Sirocco fluidbed, presspot, chemex, cajun biggin brewer from the backwoods of Louisiana
|
|
|
|
| eschlukebir |
Posted on 10/11/2016 11:42 AM
|
|
Newbie Posts: 22 Joined: October 06, 2016 |
Thanks Allen, thats definitely in the plans. Its a big part of why I am ready to move on from the Behmor (mine is still the older control board). There isn't enough ability to track and manipulate roasts. It's been more of a push a button and wait sort of deal. It's been a good intro into roasting, but I think I can do better. |
|
|
|
| eschlukebir |
Posted on 10/12/2016 7:12 PM
|
|
Newbie Posts: 22 Joined: October 06, 2016 |
trying to get the vanes worked out. I like this design, as it seems pretty simple http://forum.home...cd_m_1.jpg it looks like the reverse vanes are quite a bit smaller and set back quite a bit further than the forward vanes. Is that an issue at all? I guess the nice thing is it leaves more room for the trier. |
|
|
|
| allenb |
Posted on 10/13/2016 11:05 AM
|
|
Administrator Posts: 3869 Joined: February 23, 2010 |
For reverse vanes to be effective, they must be located close enough to the front plate to allow thinning out the stacked mass of beans caused by the forward vanes but back far enough to clear the bean probe. I wouldn't mount them more than 1.5" back from the front plate. Finding a location for a trier with a drum diameter less than 12" is not easy since the only logical location is between the shaft and reverse vane set. Allen 1/2 lb and 1 lb drum, Siemens Sirocco fluidbed, presspot, chemex, cajun biggin brewer from the backwoods of Louisiana
|
|
|
|
| eschlukebir |
Posted on 02/01/2017 6:14 PM
|
|
Newbie Posts: 22 Joined: October 06, 2016 |
I'm back. I haven't abandoned this, but as most of these seem to go. I haven't had much time to get things going. I have been keeping my eye out for parts though, and I came across this motor on craigslist. It's clearly overkill for what I need, but is it something I can use pulleys to get it down to a proper rpm? I can't quite see the tag, but it kind of looks like it might be 1725. And it's only $20 http://rockford.c...45311.html Edited by JackH on 02/02/2017 2:49 AM |
|
|
|
| allenb |
Posted on 02/02/2017 5:47 PM
|
|
Administrator Posts: 3869 Joined: February 23, 2010 |
That motor could be anything from a 1050 to somewhere around 1500 rpm. Although, some with that frame style can hit the 3000 + range but most are the lower rpm range. In either case, pulleys to get those down to our rpm needs with a drum roaster are pretty cumbersome and require at least 2 stages of reduction (4 pulleys). When you add in the cost of bearings, pulleys, belts, any savings gained will be quickly spent. I'd use a gearmotor instead. Allen 1/2 lb and 1 lb drum, Siemens Sirocco fluidbed, presspot, chemex, cajun biggin brewer from the backwoods of Louisiana
|
|
|
|
| allenb |
Posted on 02/02/2017 7:19 PM
|
|
Administrator Posts: 3869 Joined: February 23, 2010 |
One option farmroast suggested a while back is this brand and you could go direct drive and be pretty safe with the rpm of the one linked to below. I've used this rpm before and the beans trajectory was very nice. Not too much of an arc as they traveled to the bottom of the drum. https://www.amazo...ullets-btf Allen 1/2 lb and 1 lb drum, Siemens Sirocco fluidbed, presspot, chemex, cajun biggin brewer from the backwoods of Louisiana
|
|
|
|
| eschlukebir |
Posted on 02/02/2017 8:27 PM
|
|
Newbie Posts: 22 Joined: October 06, 2016 |
nice. thanks |
|
|
|
| eschlukebir |
Posted on 03/15/2017 9:58 PM
|
|
Newbie Posts: 22 Joined: October 06, 2016 |
Progress!!! Aside from finishing the pipe burner, and the custom metal pieces which should be getting cut this week, I think I have all of the pieces together. https://goo.gl/ph...YMUb8sJqm7 Edited by JackH on 03/16/2017 1:54 AM |
|
|
|
| eschlukebir |
Posted on 07/31/2017 2:54 PM
|
|
Newbie Posts: 22 Joined: October 06, 2016 |
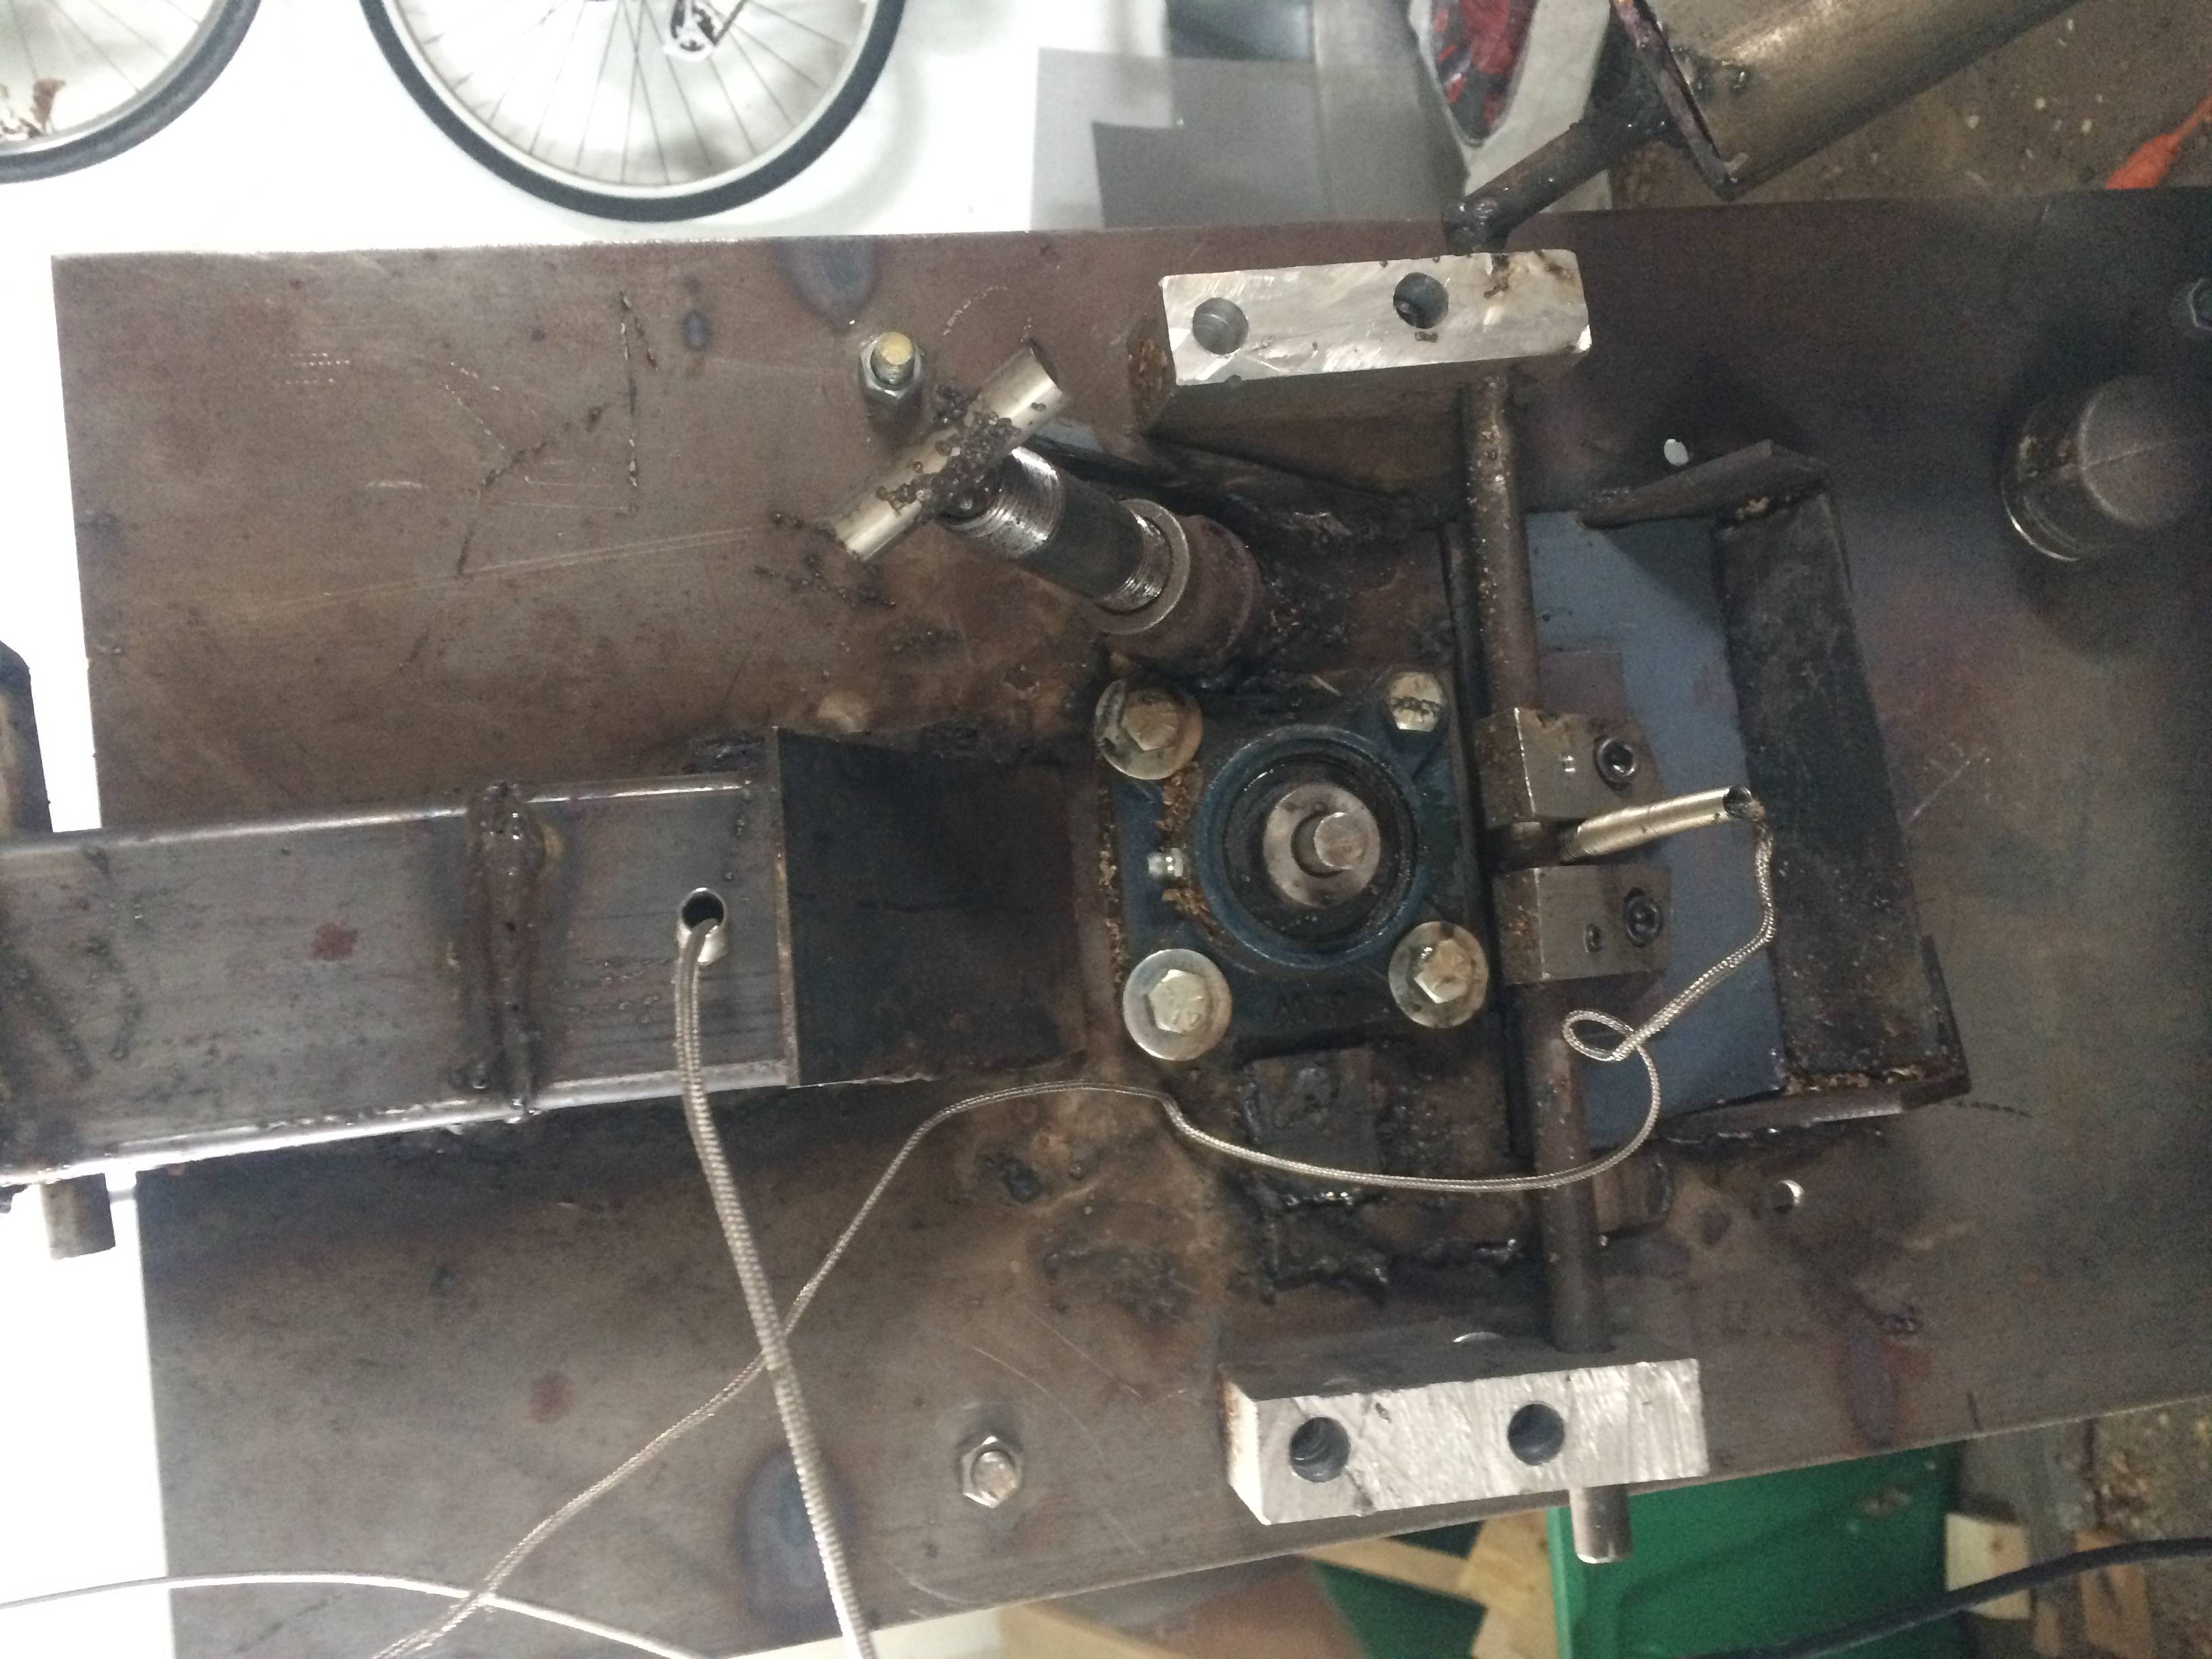
I have been making some slow and steady progress over the last few months. The overall structure is done. the drum is done. the motor is in place. Need to finish up the dump door, get the cooling tray put together and get some air flow through there, trier and sight glass assembled. and then I think I'll be ready to go. It won't win any coffee roaster beauty contests, and I wouldn't want to have to trust any of my welds to hold anything of value, but its coming along.
eschlukebir attached the following image:

|
|
|
|
| Ringo |
Posted on 08/01/2017 10:04 AM
|
 Pounder  Posts: 474 Joined: January 14, 2010 |
To me that is a beautiful machine. It will do a great job.
All you need in life is ignorance and confidence, and then success is sure. Mark Twain
|
|
|
|
| eschlukebir |
Posted on 12/02/2017 4:58 PM
|
|
Newbie Posts: 22 Joined: October 06, 2016 |
Update- Still have a little bit of work to do. Get the cover right, do some more work on the trier, etc, but it works. I seasoned the drum for a while, then even did a couple batches today. Some of these projects on here are beautiful, and the workmanship rivals the commercial machines. This one is a study of "what can I guy with no metal working experience, a craigslist box welder and a 4in angle grinder build?"
eschlukebir attached the following images:


|
|
|
|
| Ringo |
Posted on 12/04/2017 6:52 AM
|
|
Pounder Posts: 474 Joined: January 14, 2010 |
Like I said that is a beautiful machine, you have done all the hard we you should be very happy. I really like how you have your burners way away from the drum, I think this will roast better. The flameon your burner looks perfect.
All you need in life is ignorance and confidence, and then success is sure. Mark Twain
|
|
|
|
| dmccallum |
Posted on 12/05/2017 10:31 AM
|
|
1/4 Pounder  Posts: 93 Joined: November 24, 2015 |
Quote eschlukebir wrote: This one is a study of "what can I guy with no metal working experience, a craigslist box welder and a 4in angle grinder build?" This really does show what can be done with just the basics. Those beans you're roasting are looking good! |
|
|
|
| eschlukebir |
Posted on 12/05/2017 12:49 PM
|
|
Newbie Posts: 22 Joined: October 06, 2016 |
I really am quite happy with it. It took way longer than I thought. And way more patience to get everything to line up right. There is a Metal Supermarket nearby so I spent a lot of time there in their junk pile, so all of the pieces were cheap. I still have to play with the air flow/ chaff collector a little. I'm losing quite a bit of chaff through the gap by the drum, and more than I expected out the exhaust of the fan too. But other than that for a first time it went well. |
|
|
|
| eschlukebir |
Posted on 04/09/2018 9:37 AM
|
|
Newbie Posts: 22 Joined: October 06, 2016 |
I've done maybe 40 roasts overall now, and I'm pretty happy. Of course, now I'm also ready to start modifying it. I've been redoing the whole cooling tray, because the first one didn't work very good. The bigger question I have right now is about the BT TC My ET probe seems to be working about as expected, but the BT one is showing almost 470 before FC. I'm guessing its reading the front plate. I have been using these TC's are there better ones, or is there a way to insulate it better? https://www.amazo...&psc=1
eschlukebir attached the following images:

|
|
|
|

| Jump to Forum: |
Powered by PHP-Fusion Copyright © 2024 PHP-Fusion Inc
Released as free software without warranties under GNU Affero GPL v3
Designed with ♥ by NetriXHosted by skpacman