
Login

Shoutbox
You must login to post a message.
renatoa
07/26/2024 3:49 PM
Bill grubbe and Jk, 
allenb
07/26/2024 5:15 AM
Spiderkw Welcome to HRO!

renatoa
07/24/2024 8:31 AM
ramiroflores and John123,

 ?
?
?renatoa
07/21/2024 1:18 AM
 , Luislobo
renatoa
07/19/2024 11:28 AM
Koepea,
Forum Threads
Newest Threads
Skywalker roaster modsBackground Roast Iss...
Hello from Arkansas
TC4ESP
Green coffee reviews
Hottest Threads
| Skywalker roaster... | [375] |
| TC4ESP | [115] |
| War on Farmers by... | [47] |
| Adventures in flu... | [26] |
| Hello! (soon) Roa... | [17] |
In Memory Of Ginny

Donations
Latest Donations
dmccallum - 10.00
JackH - 25.00
snwcmpr - 10.00
Anonymous - 2.00
Anonymous - 5.00
dmccallum - 10.00
JackH - 25.00
snwcmpr - 10.00
Anonymous - 2.00
Anonymous - 5.00
Users Online
Guests Online: 7
Members Online: 0
Total Members: 8,393
Newest Member: Bill grubbe
Members Online: 0
Total Members: 8,393
Newest Member: Bill grubbe
View Thread
Who is here? 1 guest(s)
 Baby George Foreman Roaster
|
|
| Kinder |
Posted on 09/18/2017 11:32 AM
|
|
Newbie  Posts: 21 Joined: March 07, 2017 |
One other thing to note that added to my decision for redoing the door. Due to expansion of the metal housing when temperature increases the door would be hard to slide some times (even got stuck to where I had to really force it open). Since making the door hinged, it works like a champ. Good Luck! |
|
|
|
| coffeeismagick |
Posted on 09/18/2017 4:02 PM
|
|
Newbie Posts: 34 Joined: September 14, 2017 |
Quote Kinder wrote: One other thing to note that added to my decision for redoing the door. Due to expansion of the metal housing when temperature increases the door would be hard to slide some times (even got stuck to where I had to really force it open). Since making the door hinged, it works like a champ. Good Luck! I am actually having the same exact issue, would you mind sharing a picture and describe how you add the hinge? THANKS! |
|
|
|
| Kinder |
Posted on 09/19/2017 8:19 AM
|
|
Newbie Posts: 21 Joined: March 07, 2017 |
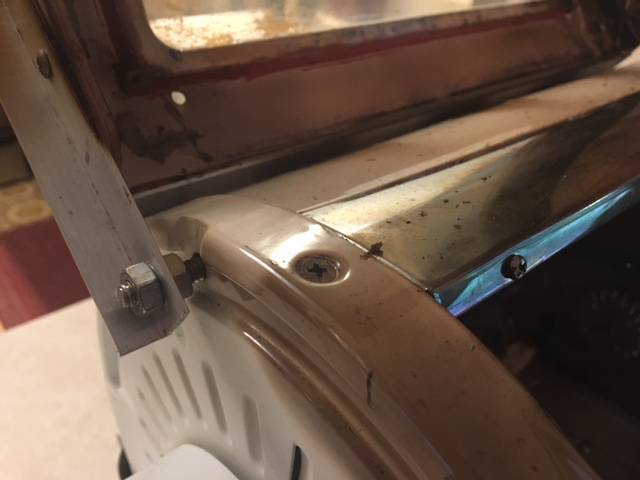
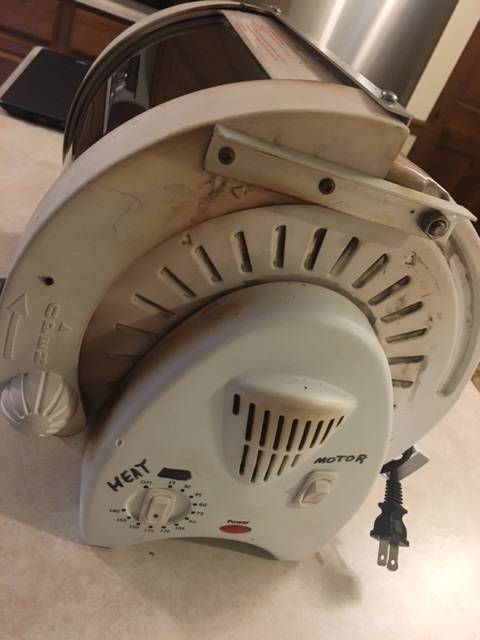
Ok, here are a few photos of the door. I basically used some aluminum angle and attached it to the door with some short screws. Then drilled holes for the bolts that the door hinges on. I ran it from the inside out so I could use two nuts to lock it to the angle. Also added some aluminum angle to the top of the door just to help close up some gaps. You will also have to cut the knobs (knobs that slide in the track) on the inside of the door flush.
Kinder attached the following images:


|
|
|
|
| coffeeismagick |
Posted on 09/19/2017 8:50 AM
|
|
Newbie Posts: 34 Joined: September 14, 2017 |
Quote Kinder wrote: Ok, here are a few photos of the door. I basically used some aluminum angle and attached it to the door with some short screws. Then drilled holes for the bolts that the door hinges on. I ran it from the inside out so I could use two nuts to lock it to the angle. Also added some aluminum angle to the top of the door just to help close up some gaps. You will also have to cut the knobs (knobs that slide in the track) on the inside of the door flush. Thanks a lot! Did you use 1" angle? can you measure the length of the angle? and how long (and diameter) are the two bolts that hold the angles? I am going out to buy the materials for adding the hinge, it would be great that if I can have these dimensions so that I can get the right materials and sizes. |
|
|
|
| Kinder |
Posted on 09/19/2017 9:13 AM
|
|
Newbie Posts: 21 Joined: March 07, 2017 |
Yeah, I believe the angle is 1", and I think the bolts are 1/4-20 x 1.5". I can get you some more info but it would have to be later today because i'm at work. |
|
|
|
| coffeeismagick |
Posted on 09/19/2017 9:36 AM
|
|
Newbie Posts: 34 Joined: September 14, 2017 |
Quote Kinder wrote: Yeah, I believe the angle is 1", and I think the bolts are 1/4-20 x 1.5". I can get you some more info but it would have to be later today because i'm at work. Thanks a lot! I can wait, no hurry. |
|
|
|
| coffeeismagick |
Posted on 09/19/2017 2:00 PM
|
|
Newbie Posts: 34 Joined: September 14, 2017 |
Just did my 2nd 250g batch test roast, the result 100% met my expectation! As planned, I wanted to test the roasting before the heating element mod, if the result meet my expectation, then there is no need to proceed with the heating element mod. Exactly what I had done differently roasting the 2nd batch than the 1st batch: 1. I added the aluminum foil to the glass door, cover top 2/3 of the glass area 2. I change the drum rotation from the default (away from heating element) to the opposite direction (towards the heating element) 3. I added 3M thermal insulation putty tape to seal the gaps at both ends of the oven door 4. I preheated the oven until the env. temperature stopped going higher, at 360F+/- (at 355F, temperature started to jump up and down rapidly and randomly between 325F and 379F), before inserting the drum The beans turned to yellow and light brown and then brown very evenly, and at desired the time steps, at exactly 11 minutes I heard the first crack, and it developed slowly, at exactly 15 minutes I turned off the power and took out the drum, dump the beans to the cooler. The roast was stopped right before the very end of the 2nd crack, before the beans become coated with oils. I judged the timing by the cracking sound and the amount of smokes coming out of the roaster, since I don't have means to read bean temperature. The roaster interior env. temperature after the drum was inserted, stayed under 300F throughout the roasting process. Very even roast! I am very pleased with the performance of this roaster. No heating element mod, no need to add halogen lamp, no need to add heat gun, perfect as is for roasting 250g batch. Since I really would love to use this roaster to roast 500g to 1,000g batches, my next step is to move the heating element closer to the drum, from 1.5" to 0.25", this should allow me to roast a 500g batch in less than 15 minutes time. I had ordered a 2nd heating element, that may be needed for roasting the 1000g batch, but I don't know if I really need to roast 1000g batch since I don't really drink that much coffee a day (I drink 3 cups of coffee daily, about the size of the Starbuck medium size cup). There are fire risks for roasting 1000g beans in GF roaster, as had been reported in the past, one accident involved with beans caught fire and burnt down the aluminum drum, another involved with a fire that burnt down a house because the jerk wasn't attending to the roaster while coffee was roasting in a GF modified roaster. My biggest complaint about this roaster: it took over 20 minutes to preheat the roaster. I roasted outdoors at temperature 78F. I might want to add the 2nd heating element to shorten the preheating time, then turn the 2nd heating element off after the roster is preheated. Edited by coffeeismagick on 09/19/2017 2:13 PM |
|
|
|
| Kinder |
Posted on 09/19/2017 2:35 PM
|
|
Newbie Posts: 21 Joined: March 07, 2017 |
Sounds like its coming together. Upon some of my first mods to the GF I caught a batch on fire because I moved the heating element under the drum and the RPM of the motor just isn't fast enough. Luckily had a fire extinguisher handy.  Lol Lol
Edited by Kinder on 09/19/2017 2:41 PM |
|
|
|
| coffeeismagick |
Posted on 09/19/2017 2:42 PM
|
|
Newbie Posts: 34 Joined: September 14, 2017 |
I was considering either moving or adding the heating element under the drum, because someone somewhere had posted that it would allow GF to roast the beans much faster, but after reading about the fires accidents, there is no way in hell that I would want to put the heating element under the drum. |
|
|
|
| renatoa |
Posted on 09/19/2017 2:59 PM
|
|
Administrator Posts: 3104 Joined: September 30, 2016 |
If the drum dimensions are close to 14cm D x 23 cm L, then this 3.5 l volume is recommended for up to 600 grams, and not much more, according to some formulas from the word of mouth. Compute your actual volume and adjust accordingly, but I don't think you can do 1 kg, a 6 l drum is required for this job. Regarding temperature monitoring, you can do it using just air temperature, no need for BT to have a good roast, will detail more if you want to add a temperature control. |
|
|
|
| coffeeismagick |
Posted on 09/19/2017 3:13 PM
|
|
Newbie Posts: 34 Joined: September 14, 2017 |
The size of the drum is 7 inch diameter by 8.5 inch long, or 17.78 CM (Dia) x 21.59 CM (Long). the volume will be 4.71 imperial gallon, or 21431 cubic centimeter. I will be roasting 500g batches mostly, up to 750g batch, won't risk catching fire by pushing it to 1000g. Edited by coffeeismagick on 09/19/2017 3:20 PM |
|
|
|
| renatoa |
Posted on 09/19/2017 3:29 PM
|
|
Administrator Posts: 3104 Joined: September 30, 2016 |
My volume computation give 5.375 l, so good for 900 grams. Fire hazard could occur especially when beans occupy more than half volume (touch the shaft), the agitation almost cease in the inner layers if no vanes on the drum wall. |
|
|
|
| coffeeismagick |
Posted on 09/19/2017 3:40 PM
|
|
Newbie Posts: 34 Joined: September 14, 2017 |
This factory GF drum has excellent vanes which enabled the beans to be roasted very uniformly even at such low RPM |
|
|
|
| coffeeismagick |
Posted on 09/19/2017 11:07 PM
|
|
Newbie Posts: 34 Joined: September 14, 2017 |
Quote renatoa wrote: Regarding temperature monitoring, you can do it using just air temperature, no need for BT to have a good roast, will detail more if you want to add a temperature control. the air temperature inside GF never get hard enough for beans to reach 1C, only the beans closest to the heating element received enough radiant heat to cause them to reach 1C temperature, therefore, it is very tricky to monitor air temperature for this oven for the purpose of controlling the coffee roasting process. the reason for the low air temperature inside GF is because it not only has zero insulation, but also has way too many hole, gaps, openings that it is impossible for the hot air to stay inside long enough to be heated sufficiently (meaning the air temp should be greater than 2C temp). thus, in order to raise the air temp sufficiently, I need to seal most hole s, gaps and openings, except for exhaust outlet, then I need to insulate the entire metal body to prevent rapid heat losses. Can that be done without extensive labors and expenses? I believe so, I am working on design plans. |
|
|
|
| stuie25 |
Posted on 10/27/2017 6:33 AM
|
|
Newbie Posts: 2 Joined: February 27, 2016 |
I have the same oven, i added a second set of heating elements out of a toaster oven, i can hit 500 in a short time on pre heat, im running a watlow compact pid with the temp sensor drilled in just above the drum. My biggest issue is the thing catching fire from the chaff, i have started cracking the door about two inches now and i have a bathroom fan ducted outside that i place infront of the door with a bit of tinfoil over the rest f the open door that sucks out a bit of chaff and most of the smoke. I also went nuts with the tinfoil to help keep the heat in but with 4 elements im not as worried about lag time on my heating curve. I can post some pics if anyone is interested, my system is down right now as i have to get a biger ssr heatsink i keep melting them down. |
|
|
|
| coffeeismagick |
Posted on 11/02/2017 9:20 PM
|
|
Newbie Posts: 34 Joined: September 14, 2017 |
Quote stuie25 wrote: I have the same oven, i added a second set of heating elements out of a toaster oven, i can hit 500 in a short time on pre heat, im running a watlow compact pid with the temp sensor drilled in just above the drum. My biggest issue is the thing catching fire from the chaff, i have started cracking the door about two inches now and i have a bathroom fan ducted outside that i place infront of the door with a bit of tinfoil over the rest f the open door that sucks out a bit of chaff and most of the smoke. I also went nuts with the tinfoil to help keep the heat in but with 4 elements im not as worried about lag time on my heating curve. I can post some pics if anyone is interested, my system is down right now as i have to get a biger ssr heatsink i keep melting them down. Thanks so much for sharing! Yes, I am definitely interested in seeing your MOD pics, especially how you added the 2nd heating element. I have purchased an original heating element for this oven from eBay, but had not put it in yet, partly because after some simple mods/tweaks I have been getting very consistent roasting time for 250g batches, at 14-15 minutes (not counting pre-heating the oven for 10-15 minutes before I start roasting), so it is no longer necessary for me to add that 2nd heating element, and partly because I had not been able to get any response from the guy on this forum who is supposed to sell a TC4 kit, he doesn't respond to emails and not posting any updates on the forum either, I had all the parts for the temperature controller MOD ready but no TC4, sad! BTW, your measuring temperature at a location above the drum may be a little off from the temperature inside the drum, at least that had been my own experience and I had given up using any temperature probes/gauges for that reason. I am replacing the center rod for the drum (left side only) with a 6mm OD stainless steel tube with a 4mm diameter hole, and will then use a rigid 2mm diameter K-type probe through the center hole of the tube to measure the temperature inside the drum with beans constantly hitting the probe, this temperature data will then be fed to the TC4+UNO unit for controlling the roasting profiles using Artisan program, but unfortunately, TC4 is not available for purchasing any more, at least for the time being. I am also working on replacing the motor with one that would rotate at 8 RPM to 16 RPM, with a separate power supply and voltage control for speed (possibly be integrated into the Artisan software for voltage control for both heat and motor speed). |
|
|
|
| renatoa |
Posted on 11/03/2017 2:14 AM
|
|
Administrator Posts: 3104 Joined: September 30, 2016 |
I did this trick, I mean empty shaft for drum, for other oven than GF, and indeed, inside drum temperature is significantly different than hot air outside, even 30C lower in some places near the lateral drum walls. Adding some vanes also change temperature distribution inside a lot. You can go even further and add a single big vane, middle drum, as in Gene roaster. The difference will be that the drum will be horizontal and paddle oblique, but the mixing will have same dynamics as in Gene. Instead all this unobtainum TC4 quest, preferred to go simpler, cheaper and more efficient, imo, using a Mastech dual thermometer, that connects to Artisan instantly via USB, and perform manual heat adjustments until I found the machine best natural curve. |
|
|
|
| coffeeismagick |
Posted on 11/03/2017 2:02 PM
|
|
Newbie Posts: 34 Joined: September 14, 2017 |
Quote renatoa wrote: I did this trick, I mean empty shaft for drum, for other oven than GF, and indeed, inside drum temperature is significantly different than hot air outside, even 30C lower in some places near the lateral drum walls. Adding some vanes also change temperature distribution inside a lot. You can go even further and add a single big vane, middle drum, as in Gene roaster. The difference will be that the drum will be horizontal and paddle oblique, but the mixing will have same dynamics as in Gene. Instead all this unobtainum TC4 quest, preferred to go simpler, cheaper and more efficient, imo, using a Mastech dual thermometer, that connects to Artisan instantly via USB, and perform manual heat adjustments until I found the machine best natural curve. Right now my highest priority is to replace the motor/gearbox that turns the drum at only 2.5 RPM speed. The motor itself does not contain any reduction gear, it runs at synchronous motor speed, likely 60Hz (60 RPM?), but I don't know how to determine that motor speed precisely. I was thinking to get a replacement synchronous motor that runs at higher than 200 RPM speed, but they are not easy to find, or are outrageously expensive, so I am still working on finding one on ebay that is reasonably priced. Another thought is to modify the gearbox, this would require some detail knowledge on how to calculate gear reduction ratios, design the new gear set layout within the existing gearbox with existing holes to insert the new gears, and to source the exact diameter and teeth-number plastic gears from ebay or from an online hobby supply web store, I am sure it is DOABLE, but I just have not have the required knowledge for that yet, am working on it loosely now, not a priority for now, since the motor replacement method is a much simpler solution for this problem. |
|
|
|
| renatoa |
Posted on 11/04/2017 2:15 AM
|
|
Administrator Posts: 3104 Joined: September 30, 2016 |
For the other readers here, this is the assembly we are debating: Running faster means replacing that gearwheel we see with one proportionally bigger, same tooth profile/pitch. Double diameter = double teeth = double RPM And alternative would be to direct drive the drum shaft with a 30-60 RPM $15 motor how I am using for my roasters, I can post link if interested. Roasters: DIY: TO based IR 200-640g
Commercial, moded: Skywalker, Dieckmann RoestMeister, Nesco, popper(s). Electronics: TC4ESP (author), MS6514, USB/Artisan/Apps (contributor), PID controllers Grinders: Potu ghost burrs, Arco, Xeoleo ghost burrs, Krinder, vintage PeDe Dienes, MBK Feldgrind, Kinu M38 Brew/presso: ALM pour over, Arin lever, Staresso Mirage, Hario Cafeor dripper, Flair Signature, Kompresso, Aeropress, Gaggia Mini |
|
|
|
| coffeeismagick |
Posted on 11/04/2017 4:06 PM
|
|
Newbie Posts: 34 Joined: September 14, 2017 |
Quote Running faster means replacing that gearwheel we see with one proportionally bigger, same tooth profile/pitch. Double diameter = double teeth = double RPM If I were to double the diameter of driver gear, I also must half the driven gear, in order to keep the existing gearbox structure. This will result in 2x2=4 time higher speed. Unfortunately, these gears are not standard, and the driver gear is part of the motor shaft, so that option is now dead. I can still replace the motor with one that has higher speed (300 RPM is what I am looking for), and in fact I have been able to locate them on ebay (same size motor body), but the problem is: I don't know how to attach the driver gear to the new motor, the driver gear is plastic with a 2mm hole in the center, none of the motor of this size has a 2mm diameter shaft. Another option is to remove the existing gearbox and motor, then add a new gear motor (6Watt minimum) with 16 RPM speed to drive the drum shaft directly by coupling the drum shaft to the motor shaft, I will need to do some substantial mod to the roaster housing to attach the new motor to the exact location to drive the drum shaft. Why 16 RPM? because the medium drum speed is 8 to 12 RPM, or 10 RPM, I want to use a motor speed controller to control the motor/drum speed (both manually and automatically via Artizian). |
|
|
|
| renatoa |
Posted on 11/05/2017 3:18 AM
|
|
Administrator Posts: 3104 Joined: September 30, 2016 |
In this video I see the drum speed is close to the motor speed, one rotation is about 20 seconds, from 1:30 to 1:50 https://www.youtu...P0tHdsYd00 This means the gear ratio is 1:1 or very close. If the gear is plastic, should be easy to enlarge the hole to 3-4 mm as you can find other motors on eBay. Much easier than mod direct drive the drum shaft. About speed rotation, from my experience 10 RPM is the minimum acceptable, IF adding a lot of vanes inside drum, like Behmor. Else, without additional agitators 30 RPM is a minimum, 60 RPM is desirable. Gene roaster turns also by 10 RPM, but it has inside a big paddle ! You can also have a look at a Dieckmann Roestmesister drum, to have an idea about the movement of 300 grams at 20 RPM in a drum without any vanes. Speed control for this design is a gimmick, not waste your time and resources, this is not a real drum roaster, to worry about drum speed, or hope you see any effect from only 20% change. Roasters: DIY: TO based IR 200-640g
Commercial, moded: Skywalker, Dieckmann RoestMeister, Nesco, popper(s). Electronics: TC4ESP (author), MS6514, USB/Artisan/Apps (contributor), PID controllers Grinders: Potu ghost burrs, Arco, Xeoleo ghost burrs, Krinder, vintage PeDe Dienes, MBK Feldgrind, Kinu M38 Brew/presso: ALM pour over, Arin lever, Staresso Mirage, Hario Cafeor dripper, Flair Signature, Kompresso, Aeropress, Gaggia Mini |
|
|
|
| coffeeismagick |
Posted on 11/06/2017 11:17 AM
|
|
Newbie Posts: 34 Joined: September 14, 2017 |
Quote renatoa wrote: In this video I see the drum speed is close to the motor speed, one rotation is about 20 seconds, from 1:30 to 1:50 https://www.youtu...P0tHdsYd00 This means the gear ratio is 1:1 or very close. If the gear is plastic, should be easy to enlarge the hole to 3-4 mm as you can find other motors on eBay. Much easier than mod direct drive the drum shaft. About speed rotation, from my experience 10 RPM is the minimum acceptable, IF adding a lot of vanes inside drum, like Behmor. Else, without additional agitators 30 RPM is a minimum, 60 RPM is desirable. Gene roaster turns also by 10 RPM, but it has inside a big paddle ! You can also have a look at a Dieckmann Roestmesister drum, to have an idea about the movement of 300 grams at 20 RPM in a drum without any vanes. Speed control for this design is a gimmick, not waste your time and resources, this is not a real drum roaster, to worry about drum speed, or hope you see any effect from only 20% change. Thanks for the suggestions. I had completely dissembled the gearbox and took out the motor and the gears for examination. The motor shaft is driving a planetary gear that rotates at 11 RPM based on the gear ratio calculation. The driver gear has 12 teeth, the driven gear has 44 teeth, the ratio is 1:3.666, so with the drum speed at 3 RPM, the motor speed is exactly 11RPM, which is very common for this type of motor. If my above observation and calculation is correct, all that I need to do to increase the drum speed to 10-16 RPM is to replace the motor with one that runs at 35-60 RPM, this is better than what I originally thought that I would need a 300 RPM motor based on the assumption that that the existing motor speed is 60 RPM. I was not able to find a 300RPM motor at this size, but 60RPM motors at this size (5CM D x 2CM H) is much easier to get on ebay. |
|
|
|
| renatoa |
Posted on 11/06/2017 2:34 PM
|
|
Administrator Posts: 3104 Joined: September 30, 2016 |
A crazy idea... is there any chance to mechanically swap the wheels, turning the 1:3.67 reduction ratio into the same ratio but reversed=multiplication ! Will result 3*3.67*3.67 = 40 RPM, a nice speed, but beware, proportionally less torque... worth a try though 
Roasters: DIY: TO based IR 200-640g
Commercial, moded: Skywalker, Dieckmann RoestMeister, Nesco, popper(s). Electronics: TC4ESP (author), MS6514, USB/Artisan/Apps (contributor), PID controllers Grinders: Potu ghost burrs, Arco, Xeoleo ghost burrs, Krinder, vintage PeDe Dienes, MBK Feldgrind, Kinu M38 Brew/presso: ALM pour over, Arin lever, Staresso Mirage, Hario Cafeor dripper, Flair Signature, Kompresso, Aeropress, Gaggia Mini |
|
|
|
| coffeeismagick |
Posted on 11/06/2017 5:44 PM
|
|
Newbie Posts: 34 Joined: September 14, 2017 |
In theory I can replace gears and get whatever ratios I want; in practice, it is almost impossible to to find the gears that would fit the existing holes and the gearbox layout. Changing the motor appears to be the easiest option, but I was still unable to find a motor that is the same size as the existing one and with the centered shaft layout, most gear motors have the shaft off center. The hardest part is to find a 12 teeth pinion gear that would fit the motor shaft, I had not been able to find one. |
|
|
|
| coffeeismagick |
Posted on 12/12/2018 9:01 PM
|
|
Newbie Posts: 34 Joined: September 14, 2017 |
One year after my last post. I was not able to find a suitable motor to replace the original motor, nor was I able to figure out how to modify the gearbox, therefore I have been using this roaster at 3 RPM drum rotation speed, beans have been consistently evenly roasted, so 3 RPM drum rotation speed is actually perfectly acceptable for this type of steel mesh drum roaster. I have not performed any additional modification to this roaster since my last post, because it works exactly as it is expected to: I can roast 230g in under 11 minutes or 250g under 15 minutes, FC occurs at around 7 - 9 minutes depends on the load size (230g to 250g). I am using the roasting time as my main roasting control, while I also use cracking sounds and smoke as confirmation to terminate the roasting. Right before the 1st crack, I remove the vent cover, which immediately causes a slight environment temperature drop, to lengthen the development time, since I don't have means to control the temperature of the heating element. I could also open the glass door slightly to let some cool air in, but so far I have not had the need for doing so. All that has been accomplished with a $53 roaster without any major mod except for adding tin foil to cover the glass door and some insulation tape to cover up some holes and gaps. This has been a great learning experience, turning a cheap rotisserie oven into a perfectly functioning "drum" roaster with just two little tricks (that cost less than $5)! Would my coffee tastes better if I had spent thousands of dollars on a 500g or 1-kilo real drum roaster that I can run automated profiles using Artisan? Perhaps so, but I think I am perfectly happy with this cheap, simple but very capable "drum" roaster. If I ever need to roast a 500g or larger batch, I can always add that spare heating element that I purchased for $15 last year, it serves as a spare heating element for the peace of mind as well. Edited by coffeeismagick on 12/12/2018 10:58 PM |
|
|
|

| Jump to Forum: |
Powered by PHP-Fusion Copyright © 2024 PHP-Fusion Inc
Released as free software without warranties under GNU Affero GPL v3
Designed with ♥ by NetriXHosted by skpacman