
Login

Shoutbox
You must login to post a message.
renatoa
07/26/2024 3:49 PM
Bill grubbe and Jk, 
allenb
07/26/2024 5:15 AM
Spiderkw Welcome to HRO!

renatoa
07/24/2024 8:31 AM
ramiroflores and John123,

 ?
?
?renatoa
07/21/2024 1:18 AM
 , Luislobo
renatoa
07/19/2024 11:28 AM
Koepea,
Forum Threads
Newest Threads
Skywalker roaster modsBackground Roast Iss...
Hello from Arkansas
TC4ESP
Green coffee reviews
Hottest Threads
| Skywalker roaster... | [375] |
| TC4ESP | [115] |
| War on Farmers by... | [47] |
| Adventures in flu... | [26] |
| Hello! (soon) Roa... | [17] |
In Memory Of Ginny

Donations
Latest Donations
dmccallum - 10.00
JackH - 25.00
snwcmpr - 10.00
Anonymous - 2.00
Anonymous - 5.00
dmccallum - 10.00
JackH - 25.00
snwcmpr - 10.00
Anonymous - 2.00
Anonymous - 5.00
Users Online
Guests Online: 6
Members Online: 1
Bill grubbe
Total Members: 8,393
Newest Member: Bill grubbe
Members Online: 1
Bill grubbe
Total Members: 8,393
Newest Member: Bill grubbe
View Thread
Who is here? 1 guest(s)
Page 1 of 2: 12
|
 I think I found a great motor deal for my 1 kg Stainless Steel gas roaster build
|
|
| pixelsmithy |
Posted on 04/17/2018 2:33 PM
|
|
Newbie  Posts: 28 Joined: October 14, 2016 |
Greetings people. I'm doing a 1 kg Stainless Steel drum roaster build (Propane) based upon ChingThye Gan's IKEA roaster design. The goal is to do it with 99% off-the-shelf parts. Part 1 is here: https://imgur.com...lery/I267A Some discussion on Reddit/r/roasting. Part 2 is here: https://imgur.com...lery/KEY3e Some more discussion on Reddit/r/roasting So I screwed up with my motor/power supply selection. But I found this deal on eBay. The gear reducer alone is selling for $42-45 on ebay (from CHINA). This seller is in the U.S. and he had 5 of them. I bought one. The combo gives 51 RPM, which might be ideal AS IS without any belt/gearing. Thought I would pass that along. This solution is great for avoiding the need to buy a step-up transformer (needed if buying a 220v motor). All of this is based on ChingThye Gan's Instructable. More in coming weeks! Respectfully, Darren Addy Kearney, NE Edited by JackH on 04/24/2018 10:53 AM |
|
|
|
| renatoa |
Posted on 04/18/2018 12:12 AM
|
|
Administrator Posts: 3104 Joined: September 30, 2016 |
Large capacity... hmmm... the ikea colander is only 5 litres though... According to colective wisdom here and elsewhere, and matching also my experience, this should be good up to 800 grams... Wondering how this colander would behave used under an angle, as a concrete mixing machine ... loading and dropping beans same way, by tumbling 
renatoa attached the following image:
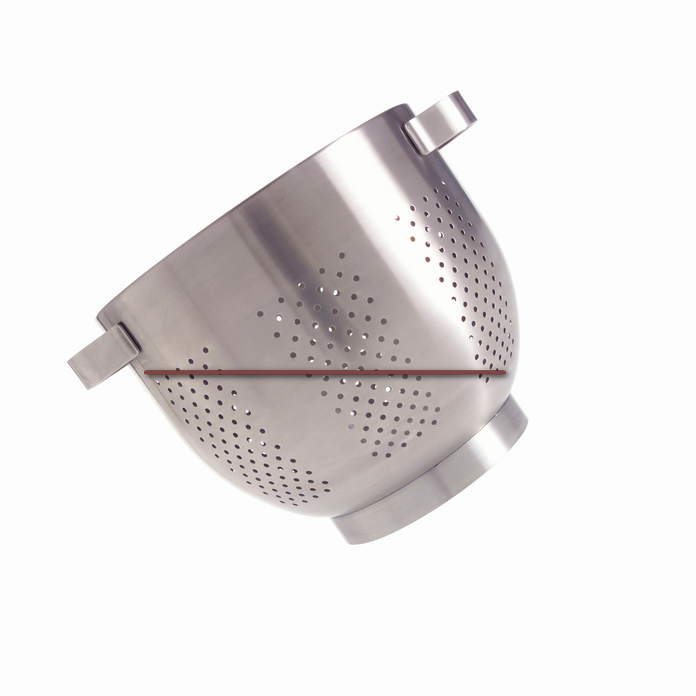
Edited by renatoa on 04/18/2018 12:26 AM |
|
|
|
| Josh025 |
Posted on 04/21/2018 10:04 PM
|
|
Newbie Posts: 29 Joined: October 23, 2017 |
So glad this got posted here! Much easier to follow. Can't wait to see how this progresses. |
|
|
|
| renatoa |
Posted on 04/22/2018 3:59 AM
|
|
Administrator Posts: 3104 Joined: September 30, 2016 |
What I don't completely understand, from the OP linked designs, is how the oven lid/cover ensure the drum closing, to not spill the beans... |
|
|
|
| pixelsmithy |
Posted on 04/23/2018 1:19 PM
|
|
Newbie Posts: 28 Joined: October 14, 2016 |
Thanks for the comments and encouragement! I only get bits of time to work on this on weekends, so it may go a little slower than I like. Regarding the colander capacity... Since my stock pot is significantly deeper than the colander, I don't see why I couldn't rivet on some perforated s/s/sheeting around the lip to make it a higher capacity. I would love to get it to 1 kg, just so one could compare it with the commercial 1 kg roasters out there. renatoa: The colander/roasting drum is positioned on the threaded rod/shaft so that it is VERY close to the underside of the lid. Closer than the smallest green bean diameter, so as not to lose any. The step I am working on now is to make the front shaft support for the colander/roasting drum. It will use three 8-32 brass threaded rods that will screw into every other face of a s/s threaded connector (that has been drilled and tapped 8-32 in every other face of the hex). That will give support to the open end of the colander every 120 degrees. Also, I got an 11x14" piece of plexiglass. This is going to serve as a transparent "lid" for me to see how the beans toss when I make & place my stir paddles, and also to hopefully fine tune the RPM needed for efficient agitation. Note: The 11x14" does not cover the whole stock pot, but it doesn't have to... it just needs to cover the colander/drum. The shaft and bearing will be temporarily affixed to the plexiglas during this part of the testing. Another design feature that I am considering (since I have the room around the drum/colander) is to incorporate another wrap of s/s/ mesh or perforated sheeting to make it a pseudo-double-wall drum. Besides moderating any hot spots, I'm hoping that it would serve as a sort of flame arrest feature also. More pics when I get to the point of assembly on this. Does anyone have any tips on constructing a trier port to bolt onto the lid? I'm also going to be curious about the hardware needed to hold my cheap thermocouples through the S/S, when I get to that point. |
|
|
|
| renatoa |
Posted on 04/23/2018 1:51 PM
|
|
Administrator Posts: 3104 Joined: September 30, 2016 |
I have recent building experience with 1 kg drum and that's why I asked about tightness... you could be surprised to find how much force has a broken/shell bean, with a sharp edge, that act as a splitter, forcing the two parts, i.e. drum/closing wall, separate more and more until beans start chute. The smallest bean distance is already too much, in my scenario above I used a drum rotating flush against a perfect flat wall, under 1mm distance, even touching here and there. And still needed additional hardware added, to secure them against the bean mass push force. Using this colander under an angle, as a concrete mixing machine eliminate this issue. |
|
|
|
| pixelsmithy |
Posted on 04/23/2018 4:05 PM
|
|
Newbie Posts: 28 Joined: October 14, 2016 |
Interesting idea, but I think it might introduce a few other problems (at least for my purposes). How does one get a TC into the beans for BT in that configuration? Also, my design will hopefully have a trier and an optical window (in the dump door). Don't see how you could do either with the tilted back configuration. I'm sure you have a valid point about the possiblity (eventuality?) of a bean or bean fragment acting as a wedge in that space. In any event, I'm committed on this one to a horizontal shaft arrangement. I'm not afraid to report my failures, though, so stay tuned! Edited by pixelsmithy on 04/24/2018 4:16 PM |
|
|
|
| pixelsmithy |
Posted on 04/23/2018 5:42 PM
|
|
Newbie Posts: 28 Joined: October 14, 2016 |
Quote JackH wrote: Isn't there a video of the guy roasting with it? Seems to be beyond the drawing board stage. Yes, ChingThye Gan made an excellent Instructable and the video is there. I have been communicating back & forth with him on Facebook. I believe this is his 3rd attempt and he is now in the process of doing a build No. 4. I'm following his basic plan, but using Stainless Steel (and a little brass) nearly everywhere - no zinc/galvanized. I'n also hoping to incorporate a small Fused Silica Quartz optical window in the drop door, a trier, and a Magnahelic to measure exhaust air flow. |
|
|
|
| pixelsmithy |
Posted on 04/23/2018 6:10 PM
|
|
Newbie Posts: 28 Joined: October 14, 2016 |
Quote renatoa wrote: Large capacity... hmmm... the ikea colander is only 5 litres though... According to colective wisdom here and elsewhere, and matching also my experience, this should be good up to 800 grams... I'm curious: What is the limiting factor? Uneven roast if you go over that? Far be it from me to question the collective wisdom (wait... my motto is "Question Reality"... so what am I saying?)  How much of heat source (BTUs)... what RPM... number of paddles and their design (etc) might be somewhat of a factor. Are those considered in the calculation that came up with 800 grams? To increase capacity, I think I can safely make the colander 2-1/2" taller by riveting on a band of stainless steel perforated screen, so if I'm not happy with the capacity of it (as is) all I have to do is screw the colander farther towards the back to accommodate the screen addition. |
|
|
|
| pixelsmithy |
Posted on 04/23/2018 6:24 PM
|
|
Newbie Posts: 28 Joined: October 14, 2016 |
Quote renatoa wrote: What I don't completely understand, from the OP linked designs, is how the oven lid/cover ensure the drum closing, to not spill the beans... In addition to the set screws on the shaft (on the outside of the lid and stock pot bottom), the lid will be held onto the pot with adustable toggle clamps, something like THESE. (The plastic will need to be cut off, because I'm sure that would melt). Holes will be cut in the lid for the bean inlet port/exhaust port and a trier. A section will need to be cut out for a hinged dump door to be bolted on. Thrift stores can be scavenged for donor stainless steel. Edited by pixelsmithy on 04/24/2018 8:43 AM |
|
|
|
| renatoa |
Posted on 04/24/2018 12:48 AM
|
|
Administrator Posts: 3104 Joined: September 30, 2016 |
The reason seems to be when greens are more than 1/6 ratio (kg per litre) the final volume will be more than half drum (the shaft level), and the agitation will become rather a layers sliding, like a volcano lava, with more difficult heat penetration into inner layers... with final result yes, lack of uniformity. I am not familiar with BTU for roasting, but 1 kg commercial drums are in the 3kW ballpark. RPM... 60 seems a standard today, but depends a lot of the vanes layout, some designs seems more happy between 40 and 48 RPM than at 60, where beans jump like popcorn. You should not worry about this if you get the variable speed motor used by ChingThye. |
|
|
|
| pixelsmithy |
Posted on 04/24/2018 7:10 AM
|
|
Newbie Posts: 28 Joined: October 14, 2016 |
Thanks for the reply & good explanation. Sounds like it would really make sense to extend the colander, since I have the room then. The motor I linked to above is not a variable speed motor like ChingThye?s design. His costs $113 from AliExpress with a long wait and requires 220v or a $60 Step Up Transformer to use on 110V. I believe that I can still slow mine down with a phase wave modulator, but to get MORE than 51 RPM, I will need gears/pulleys/chain/belt. I will need to look up your 1 kg build, renatoa. (Assuming you documented it here, or elsewhere.) |
|
|
|
| renatoa |
Posted on 04/24/2018 8:44 AM
|
|
Administrator Posts: 3104 Joined: September 30, 2016 |
Nope, mine still work in progress, sorry. I didn't noticed at first read that under "this deal on eBay" is hidden a link Great finding at this price ! Me too evaluated a similar model, that can be found somewhat "locally" in Germany for 82 Euro + shipping, including governor, i.e. RPM variator. But decided it is too massive (and expensive) for my needs. A more interesting model, close to what Bullet R1 is using, could be a 24V DC motor as you can see here: https://eckstein-shop.de/V-TEC-24V-7mm-Dual-Antriebwelle-DC-Motor-Gleichstrom-Turbine-Getriebe-Motor-80-RPM 24V DC make it more universal and easy to control RPM than an AC motor. Also more efficient, this motor delivers 1N.m torque at 10W power, compared with 15-25W required by an AC motor. |
|
|
|
| pixelsmithy |
Posted on 04/24/2018 8:53 AM
|
|
Newbie Posts: 28 Joined: October 14, 2016 |
It is not a "hidden link", it is just that this forum is not set up to show you a link by a different color, which is standard browser behavior. This means that there are probably about a million "hidden links" that you and I miss in people's post. (I'm sure that there is a setting for Active Links and Visited Links in the forum software settings, but they are currently all set to the SAME hex code **SILLY**). In the future, to make links more obvious, I will make the visible link the same as the URL to which the link goes. This should be unnecessary. Thanks for the link to the 24V DC motor. I'm sure that you are keeping in mind that the torque changes as you dial it down and often they don't give you those specs. (Maybe there is a way to calculate it? Don't know, I'm not an electrical engineer and I didn't stay at a Holiday Inn Express last night). EDIT: Just looked at your link and that is the motor that I started with (only mine was not a double drive shaft). It has plastic gear motor gears in the speed reducer and (if it drives it at all) will not last very long, I fear. I found mine on Amazon under the Uxcell brand name, available in various RPM configurations (gear reducers on the same motor). I found the maker's specs on that motor (after I decided to buy it) and was pretty sure it would not work (particular after Thye voiced the same opinion). When it arrived, I clamped a big VICE grip to it and plugged it in. It didn't want to start until I gave it a push (too much load). I did not even get to check it on my system because I dropped it about 29" to the floor (with the vice grip attached) and that was enough to break a plastic gear in the speed reducer, so it was toast. I looked for 24V motors that would be in a different class, but they were all pretty expensive. Then I looked at Thye's motor a little closer (which I should have done in the beginning) and was about to go the 220V motor plus Step-Up Transformer route. Then I discovered the spec sheets on http://www.zd-mot... where they sell 110V motors. Then I searched eBay for ZD Motors and found the one in my OP in this thread. The same seller has a higher RPM motor also, but it would have cost close to double (at least at the time of my shopping). Edited by pixelsmithy on 04/24/2018 9:03 AM |
|
|
|
| renatoa |
Posted on 04/24/2018 3:15 PM
|
|
Administrator Posts: 3104 Joined: September 30, 2016 |
You make me worry about the motor I am interested, so I searched and I found this model, very close to the German link, where they state clearly metal gearbox: https://www.amazo..._1_fkmr1_4 So will take the risk though... |
|
|
|
| Koffee Kosmo |
Posted on 04/24/2018 8:45 PM
|
 Administrator Posts: 1621 Joined: December 31, 2008 |
Nice project - I had contemplated making a drum roaster with twin Turbo Ovens as the heat source My personal preference is to go with a 12 or 24 Volt motor As for capacity Always remember that the weight amount in green beans transfers to 20% less in roasted beans KK I home roast and I like it. Designer of the KKTO
Roaster Build information https://homeroast...ad_id=1142 https://docs.goog...lide=id.i0 Blog - http://koffeekosm...gspot.com/ Bezzera Strega, Mazzer Robur Grinder, Pullman Tamper Convex, (KKTO) Turbo Oven Home Roaster. |
|
|
|
| renatoa |
Posted on 04/25/2018 2:12 AM
|
|
Administrator Posts: 3104 Joined: September 30, 2016 |
I think 1 kg of greens is possible with one lid only, with an added IR radiant. Managed to roast 800 grams with such setup, and the limitation was from the roast pot volume, and satisfactory agitation, not from the power. More exactly the roast pot height only 8 cm, was not enough to stop spill beans outside at 800 g. The setup consist of a standard oven lid, where I removed the central bulb protection perforated plate, and mounted just above the fan an 10 cm diameter IR lamp of 900 W. The IR lamp was been powered directly, and its radiation alone was been right enough for the development/finishing of 800 grams, while the original halogen of the lid was been modulated by the roast controller between 50% and 0%. So the maximum power used, in the drying phase, was been 900 + 1300/2 = 1550, then decreasing to 900 W. FC was in the 9-10 min ballpark, so enough margin for 1 kg, if a bigger roasting pot would be available. Roasters: DIY: TO based IR 200-640g
Commercial, moded: Skywalker, Dieckmann RoestMeister, Nesco, popper(s). Electronics: TC4ESP (author), MS6514, USB/Artisan/Apps (contributor), PID controllers Grinders: Potu ghost burrs, Arco, Xeoleo ghost burrs, Krinder, vintage PeDe Dienes, MBK Feldgrind, Kinu M38 Brew/presso: ALM pour over, Arin lever, Staresso Mirage, Hario Cafeor dripper, Flair Signature, Kompresso, Aeropress, Gaggia Mini |
|
|
|
| pixelsmithy |
Posted on 04/25/2018 4:12 PM
|
|
Newbie Posts: 28 Joined: October 14, 2016 |
So I'm learning a LOT as I go through this little project. Motor arrived. Seller sent me the wrong one, but I think the error is in my favor. The one that arrived has a 1:10 gear reducer on it (for 155 rpm) but I can bring it down with sprockets and chain (I think). It is a powerful motor. Come to find out that making a single phase induction motor variable speed is expensive. It requires a VFD and most of those are for three-phase motors. I originally ordered the 1:30 gear reduction that would have given me 51 RPM, but I found a good formula for "bean exposure to flowing hot gas is maximized at an optimal RPM 10% to 25% less than the formula calculation. RPM based upon my drum radius would make that 79 - 66 RPM. This page (under Drumspeed) has the info. http://coffeenavi...ng-coffee/ The writer is particularly interested in the Bullet R1 (coincidentally a 1 kg roaster with a 5.9L drum that has a 8.5 cm radius). My colander has a 11 cm radius and a 5 liter capacity. If I can make a comparison calculation, my drum would come in at a top end of 850 grams. I'm fine with that (even a little less) for my first iteration. Here is an article on roaster vessel calculations that may be of interest: http://www.roaste...imensions/ I'm working on the threaded coupler that I'm using for the front vane support. And trying to figure out the 10mm bore sprocket, pulley, or timing belt pulley that I will use to gear down my RPM. Finally, I'm going to make up a wooden frame that I can mount my plexiglas, bearings, shaft & colander on for testing weight capacity and bean tossing as I experiment with the size and placement of the drum flights. More to come! EDIT: A few more photos and a captioned illustration here: https://imgur.com...ry/AqMherK Edited by pixelsmithy on 04/25/2018 7:45 PM |
|
|
|
| renatoa |
Posted on 04/26/2018 2:22 AM
|
|
Administrator Posts: 3104 Joined: September 30, 2016 |
For such purposes I used this site for transmission calculation: https://www.bbman...alculator/ To bring down actual 110 RPM of my motor to 44 RPM, ended with 48/19 teeth pulleys and 160 belt, XL037 system. Btw, 18 is the smallest pulley that you can mount on a 10 mm shaft, and still have a teeth in mesh value bigger than the minimum allowed 6. Bullet has a similar pulley system, probably already seen pictures in the manual. Looking at your picture, I found another reason for the non-horizontal concrete mixing machine approach... just look how uneven is distributed the heat... ;) I would give it a slight front up tilt, to bring the heat heart in the holes area, and let the upper part, not perforated, as a space for the beans expansion in the development phase. Edited by renatoa on 04/26/2018 2:30 AM Roasters: DIY: TO based IR 200-640g
Commercial, moded: Skywalker, Dieckmann RoestMeister, Nesco, popper(s). Electronics: TC4ESP (author), MS6514, USB/Artisan/Apps (contributor), PID controllers Grinders: Potu ghost burrs, Arco, Xeoleo ghost burrs, Krinder, vintage PeDe Dienes, MBK Feldgrind, Kinu M38 Brew/presso: ALM pour over, Arin lever, Staresso Mirage, Hario Cafeor dripper, Flair Signature, Kompresso, Aeropress, Gaggia Mini |
|
|
|
| pixelsmithy |
Posted on 04/26/2018 10:50 AM
|
|
Newbie Posts: 28 Joined: October 14, 2016 |
Thank you for the link and information. I really appreciate your input and experience. I believe that I'm more comfortable with the flexibility and robustness (is that a word?) of a chain drive system. Thinking outside the box, I was looking at how one might adapt a 10-speed bicycle rear gear cluster (apparently called a "cassette" or flywheel in AliExpress land) to provide a selection of drum RPMs. So, exercising my Google-Fu, I found an example cassette that has sprockets ranging from 11-42T (teeth). With a 10 tooth drive spocket on my motor, the 4 gears I would be most interested in have 32T (48.43 RPM with my motor/gear reducer), 28T (55.35 RPM), 24T (64.58 RPM) and 21T (73.81 RPM). Bike chain is commonly called #40. The metric standard calls it #8 or "08B" (12.7mm pitch). So far I have been unable to locate a 10mm bore sprocket with 10 teeth at that pitch (in the U.S.), but I have found them at bigger bores... so making or finding a 10mm bore bushing would be an option (if I go this route). Otherwise, they ARE available from China but MAN I hate the wait for that slow boat. This seller has them in a variety of teeth from 9-15: http://vi.raptor....2474698328 I might go your toothed belt route, just to help nail down the RPM that will be appropriate for my drum diameter, load, and drum paddle configuration. Once I know the RPM I could choose my chain sprockets based on that figure (and give up the bicycle gear idea, which obviously requires some modification to get jambed on the 10mm threaded drive rod in my design. In any event, I'm probably going to mount my motor on a hinge and let the motor "flop" to take up any slack in the belt or chain. Then I don't have to worry about EXACT chain sizing... just find (or in the case of chain MAKE) a length that works within a range. Edited by pixelsmithy on 04/26/2018 10:56 AM |
|
|
|
| pixelsmithy |
Posted on 05/01/2018 9:01 AM
|
|
Newbie Posts: 28 Joined: October 14, 2016 |
Got my cyclone motor (a 50 cfm Dayton 1/125 hp) hooked up to an AC speed control and that works well. Now need to put together the traffic cone, 5 gal bucket, and plumbing to handle the chaff removal/airflow duties. Also made the front drum support spider. Detailed here: https://imgur.com... I will probably be making a video of how the front support is installed and the drum spaced correctly from the front lid. |
|
|
|
| JackH |
Posted on 05/03/2018 7:23 AM
|
 Administrator Posts: 1809 Joined: May 10, 2011 |
The site default theme is now fixed so no more "hidden" links.
---Jack
KKTO Roaster. |
|
|
|
| pixelsmithy |
Posted on 05/03/2018 9:50 AM
|
|
Newbie Posts: 28 Joined: October 14, 2016 |
Quote Thanks JackH - that is great news! While I wait for my motor chain and gears, I've turned my attention to the chaff collector (which will also control roaster airflow and direct the roaster exhaust up a chimney). Photos and captions are here: https://imgur.com...ry/ITz9Toe (which also serves to test the link color. Still looks the same color to me.) |
|
|
|
| renatoa |
Posted on 05/03/2018 10:31 AM
|
|
Administrator Posts: 3104 Joined: September 30, 2016 |
Is blue for me, but not underlined. Perform a full page refresh (CTRL+F5) to force css reload. |
|
|
|
| pixelsmithy |
Posted on 05/03/2018 11:19 AM
|
|
Newbie Posts: 28 Joined: October 14, 2016 |
Quote renatoa wrote: Is blue for me, but not underlined. Perform a full page refresh (CTRL+F5) to force css reload. Thanks, that worked!  So my original post (about the "great motor" deal) turned out to be a bit of a wash since the single phase induction motor can't be speed controlled. So after thrashing about for a while, I decided to purchase three gears from China that will give me two choices of RPM speed, using an 04C chain. Photo of my eBay order below. This seller will combine shipping, so I went with the $20 expedited on one item in order to get it in a week or less.  The 50T sprocket will go on the drum shaft and if I put the 18T sprocket on the motor shaft, then my 155 rpm becomes 55.76 rpm. If I put the 20T sprocket on the motor shaft, I would get 66.6 rpm (which is very close to the 68 rpm which represents 25% less than the calculated formula found for my drum diameter: http://coffeenavi...ng-coffee/ (1/2 way down the page) |
|
|
|

Page 1 of 2: 12
| Jump to Forum: |
Powered by PHP-Fusion Copyright © 2024 PHP-Fusion Inc
Released as free software without warranties under GNU Affero GPL v3
Designed with ♥ by NetriXHosted by skpacman