
Login

Shoutbox
You must login to post a message.
renatoa
07/26/2024 3:49 PM
Bill grubbe and Jk, 
allenb
07/26/2024 5:15 AM
Spiderkw Welcome to HRO!

renatoa
07/24/2024 8:31 AM
ramiroflores and John123,

 ?
?
?renatoa
07/21/2024 1:18 AM
 , Luislobo
renatoa
07/19/2024 11:28 AM
Koepea,
Forum Threads
Newest Threads
Skywalker roaster modsBackground Roast Iss...
Hello from Arkansas
TC4ESP
Green coffee reviews
Hottest Threads
| Skywalker roaster... | [375] |
| TC4ESP | [115] |
| War on Farmers by... | [47] |
| Adventures in flu... | [26] |
| Hello! (soon) Roa... | [17] |
In Memory Of Ginny

Donations
Latest Donations
dmccallum - 10.00
JackH - 25.00
snwcmpr - 10.00
Anonymous - 2.00
Anonymous - 5.00
dmccallum - 10.00
JackH - 25.00
snwcmpr - 10.00
Anonymous - 2.00
Anonymous - 5.00
Users Online
Guests Online: 5
Members Online: 0
Total Members: 8,393
Newest Member: Bill grubbe
Members Online: 0
Total Members: 8,393
Newest Member: Bill grubbe
View Thread
Who is here? 1 guest(s)
 Simple Arduino-based datalogger
|
|
| Brewin_Bruin |
Posted on 05/29/2018 6:11 PM
|
 Newbie  Posts: 23 Joined: March 05, 2018 |
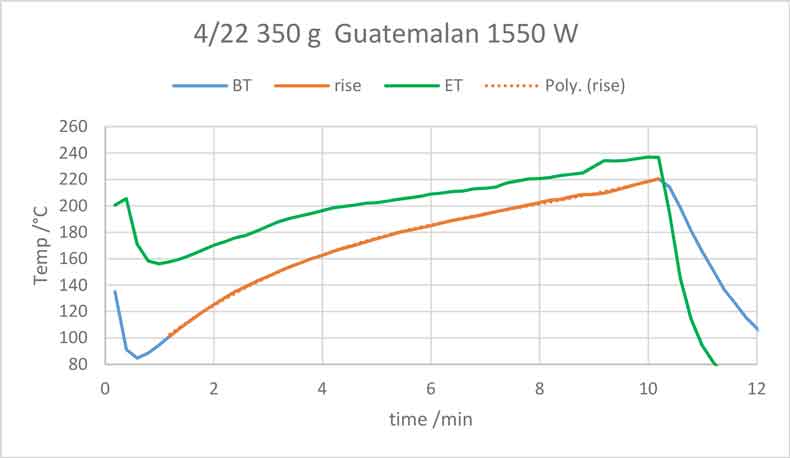
Design criteria: Given that the availability of TC4 boards was a murky issue when I started building my roaster, I decided to design and build a bare-bones datalogger and time/temperature display unit based on Arduino, capable of standalone operation. I wanted to be able to roast without hauling a computer to the roasting station, and I roast totally under manual control. Fluidized bed roasters with heat recirculation perform a lot of what people are looking for a PID to do simply via the thermal characteristics of the system. If you get the heater power in the right vicinity for the bean load, it takes only tiny tweaks of the airflow, or maybe none, to get the desired profile. The datalogging allows one to collect roast profile data on and SD card and upload and display it, e.g., in Excel. The Arduino code could be easily modified to allow serial reads to a computer during the roast if desired, the greater part of the work is incorporating the serial data into a graphing interface, which Artisan of course already does. The LCD shows a continuously updated display of time, bean temperature (BT), and rate of rise (RoR). I also included the external temp (ET: in fluidized bed roaster, this parameter doesn?t appear to be very critical) and the ET ? BT difference. Components: All were sourced from Adafruit except the thermocouples: ? Arduino Uno board ? Adafruit Assembled Data Logging shield for Arduino ? Thermocouple amplifier MAX31855 breakout board (one per thermocouple, you can use the MAX 31856 if you want to use something other than type K thermocouples, but in this application given the ready availability of type K and the operating requirements of a coffee roaster, it seemed a good choice to stick with that). Also used Adafruit Perma-Proto Half-sized Breadboard PCB to mount the thermocouple amplifiers. ? Adafruit LCD display (16 x 2 characters) Shield kit (Item #722) Assembly: the Adafruit website nicely details how to wire and connect these items. Coding: The biggest challenge to coding with the Uno was that most of the available memory was used. The large number of header files included for the display, thermocouple amplifiers and the datalogger take up a lot of memory. The concept of reading time and the temperature values periodically (in practice, as fast as can be managed) is simple. To calculate RoR, the time and temperature data are pushed into a data buffer, 10 ? 20 readings are quite adequate, and a slope is calculated using ordinary linear least squares equations. The RoR is updated with every reading, meaning that this buffer has changed by only one pair of time, temp points, showing how signal averaging plays into this process (doing slope from a pair of points gets very noisy with only ? degree resolution on temperature). The most current temperature reading is displayed; a somewhat less noisy value can be calculated using current time, slope and intercept, but isn?t really necessary in this context. The time, BT, ET and RoR values are written to the SD card once every ten readings (about every 12 seconds) to keep the data logs small and minimize the time spent writing to the card. The rate of rise value was cross checked in the roast profile by fitting the rising portion of the BT curve to a polynomial of order three or four; the first derivative of the polynomial gives an independent means of estimating the rate of rise at each point. These values agree reasonably well with the logged values (the latter will inherently have more variation in it) proving that the code was operating properly. An example plot from the datalogger is shown. If there's interest, when I get the time, I'll upload the code to the Arduino playground.
Brewin_Bruin attached the following image:
|
|
|
|
| renatoa |
Posted on 05/30/2018 12:46 AM
|
|
Administrator Posts: 3104 Joined: September 30, 2016 |
Welcome and congrats ! No ideea why people still stick with the antique Arduino boards, with their historic limitations, when we have today ESS based boards offering 10x processing power and memory, plus wifi, for a price in the same ballpark... Just judge for yourself: - 80MHz vs 8/16 MHz clock - 100-250k vs 2k RAM These boards are fully programmable in Arduino environment, possible to run even TC4 firmware, but a lot more available room for extending it with anything you can imagine, like graphic libraries, to create an embedded Artisan. |
|
|
|
| Brewin_Bruin |
Posted on 05/30/2018 1:05 PM
|
|
Newbie Posts: 23 Joined: March 05, 2018 |
Thanks for the input. Fundamentally, my scarcest commodity is time, I program because I need to in various contexts, it's not my core work. I use Arduino because of experience with them in various environments, lots of shields are available, the learning curve is easy. There's always a time investment in shifting platforms. However, I clearly ran up against the limits of tiny memory space in this application. Looking into the ESS boards, a quick search turned up nothing much, so can you be a bit more specific? The Raspberry Pi or Beagle boards offer even higher performance for only a modest price bump, but a significant change to a LINUX environment with the above learning curve issues; I haven't used LINUX for hardware interface. Edited by Brewin_Bruin on 05/30/2018 1:42 PM |
|
|
|
| renatoa |
Posted on 05/30/2018 1:25 PM
|
|
Administrator Posts: 3104 Joined: September 30, 2016 |
All your time invested in programming is preserved, Arduino source has a great degree of portability. I never been used Arduino shields, the form factor didn't suited my needs, so built mine. A good start would be to have a look of popc roasting software, that is still maintained alive as a dual system Uno-ESP, but reaching its limits on Uno, while on ESP is at 40% of board capabilities. Using all specific libraries in our field, as MAX TC, and 1602 LCD, and featuring a significantly advanced PID controller than TC4/Arduino, allows you to discover very quickly the two systems peculiarities, just by browsing the #IF ESP/UNO statements. Roasters: DIY: TO based IR 200-640g
Commercial, moded: Skywalker, Dieckmann RoestMeister, Nesco, popper(s). Electronics: TC4ESP (author), MS6514, USB/Artisan/Apps (contributor), PID controllers Grinders: Potu ghost burrs, Arco, Xeoleo ghost burrs, Krinder, vintage PeDe Dienes, MBK Feldgrind, Kinu M38 Brew/presso: ALM pour over, Arin lever, Staresso Mirage, Hario Cafeor dripper, Flair Signature, Kompresso, Aeropress, Gaggia Mini |
|
|
|
| Brewin_Bruin |
Posted on 05/30/2018 3:04 PM
|
|
Newbie Posts: 23 Joined: March 05, 2018 |
Sorry, I'm not finding much on Arduino-ESP, except the esp8266 WiFi board. I still don't have enough info here to find out more about this controller setup. |
|
|
|

| Jump to Forum: |
Powered by PHP-Fusion Copyright © 2024 PHP-Fusion Inc
Released as free software without warranties under GNU Affero GPL v3
Designed with ♥ by NetriXHosted by skpacman