
Login

Shoutbox
You must login to post a message.
renatoa
07/26/2024 3:49 PM
Bill grubbe and Jk, 
allenb
07/26/2024 5:15 AM
Spiderkw Welcome to HRO!

renatoa
07/24/2024 8:31 AM
ramiroflores and John123,

 ?
?
?renatoa
07/21/2024 1:18 AM
 , Luislobo
renatoa
07/19/2024 11:28 AM
Koepea,
Forum Threads
Newest Threads
Skywalker roaster modsBackground Roast Iss...
Hello from Arkansas
TC4ESP
Green coffee reviews
Hottest Threads
| Skywalker roaster... | [375] |
| TC4ESP | [115] |
| War on Farmers by... | [47] |
| Adventures in flu... | [26] |
| Hello! (soon) Roa... | [17] |
In Memory Of Ginny

Donations
Latest Donations
dmccallum - 10.00
JackH - 25.00
snwcmpr - 10.00
Anonymous - 2.00
Anonymous - 5.00
dmccallum - 10.00
JackH - 25.00
snwcmpr - 10.00
Anonymous - 2.00
Anonymous - 5.00
Users Online
Guests Online: 2
Members Online: 0
Total Members: 8,394
Newest Member: Bill grubbe
Members Online: 0
Total Members: 8,394
Newest Member: Bill grubbe
View Thread
Who is here? 1 guest(s)
 Fluid Bed Roaster Build - bye bye Heat Gun and Flour Sifter
|
|
| jbrux4 |
Posted on 01/22/2020 12:42 AM
|
|
1/4 Pounder  Posts: 139 Joined: October 26, 2019 |
I spent the evening doing some electrical.         Anybody have an alternative to bullet connectors. Something a bit easier to handle/connect/disconnect? Also, anybody have a hood rod idea with pics or parts to keep the project enclosure lid open?
jbrux4 attached the following images:


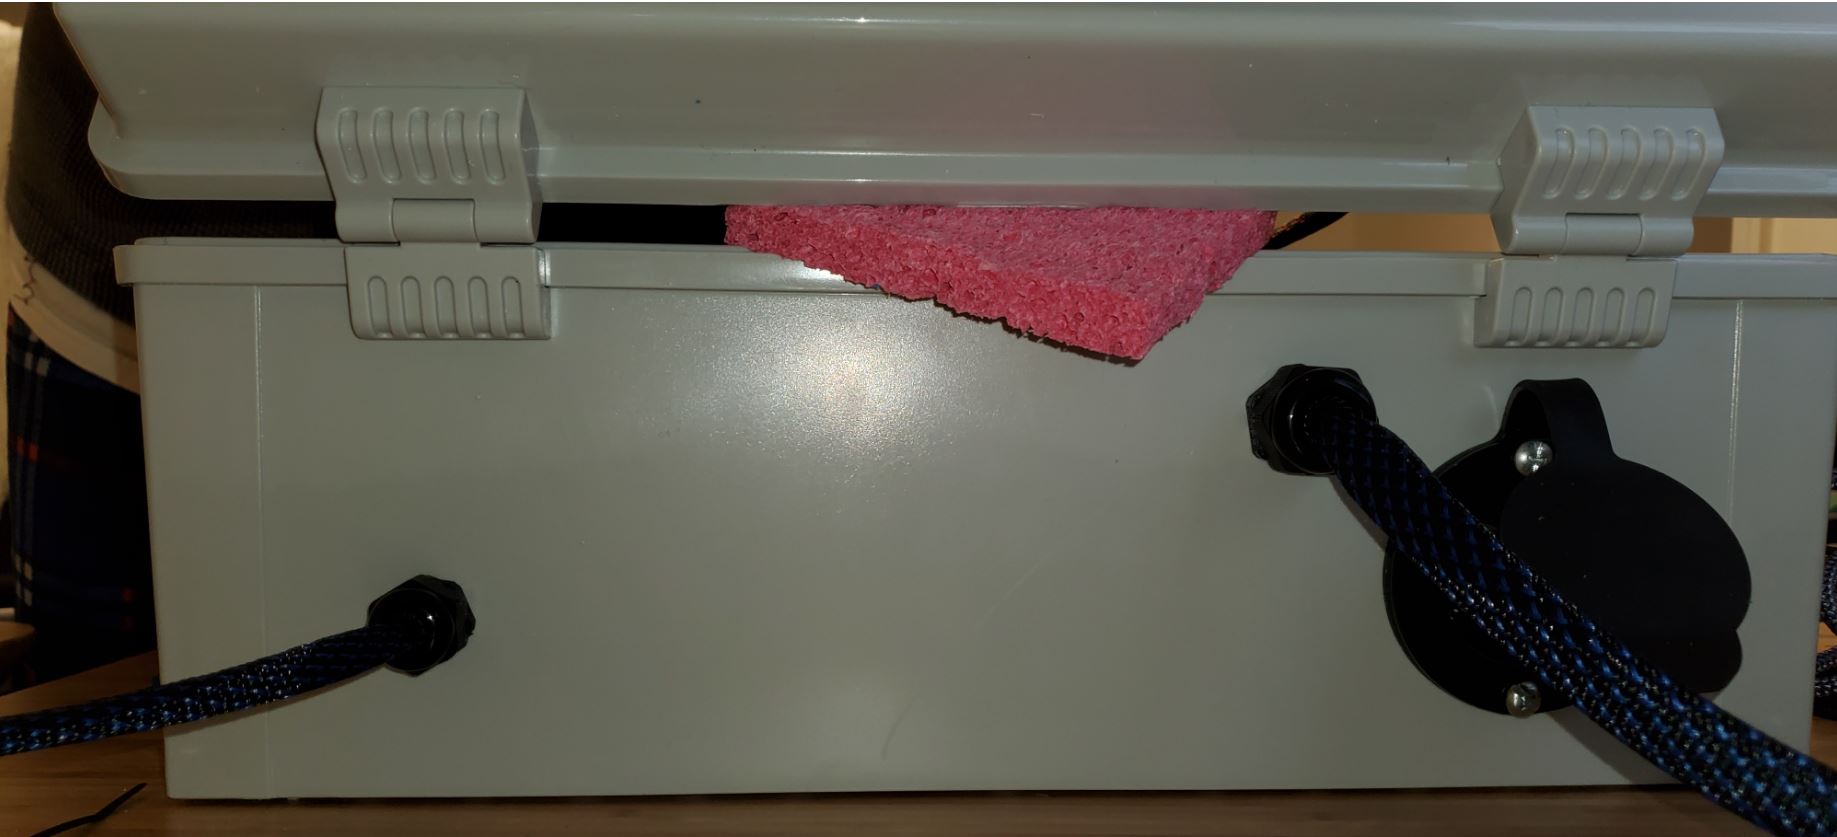

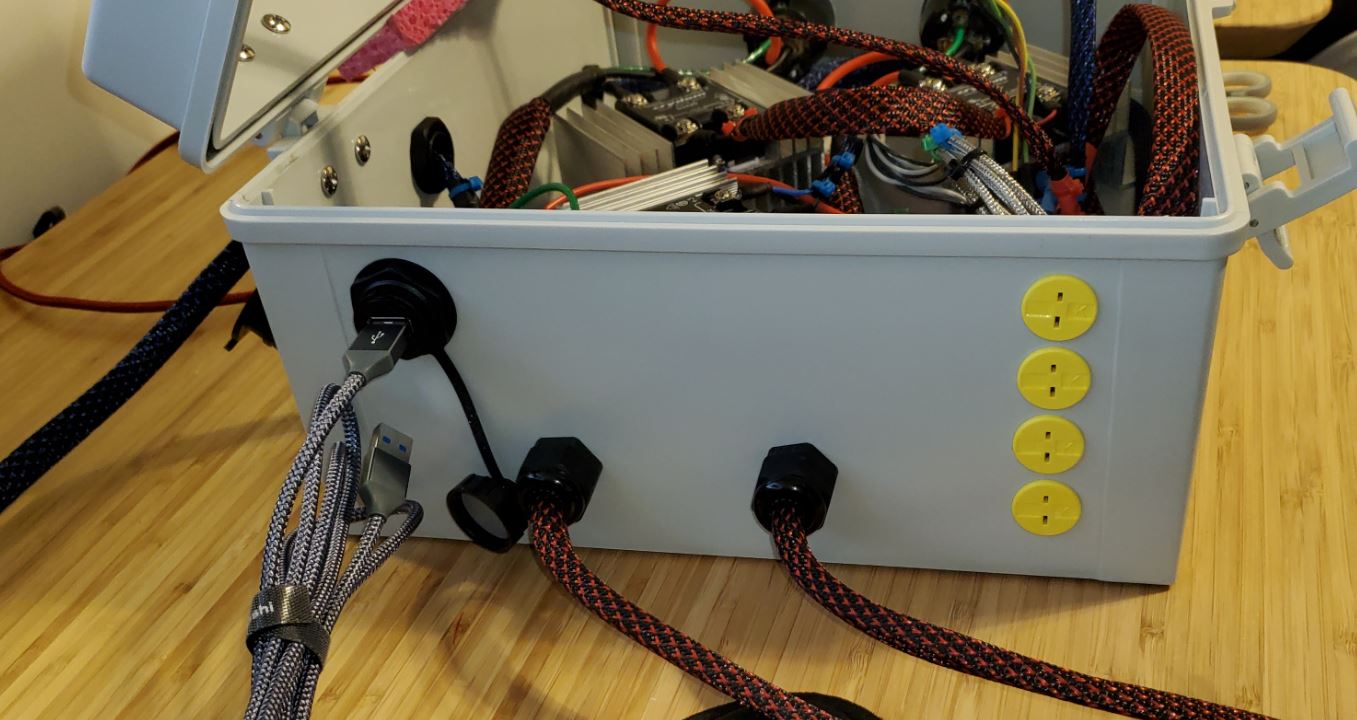

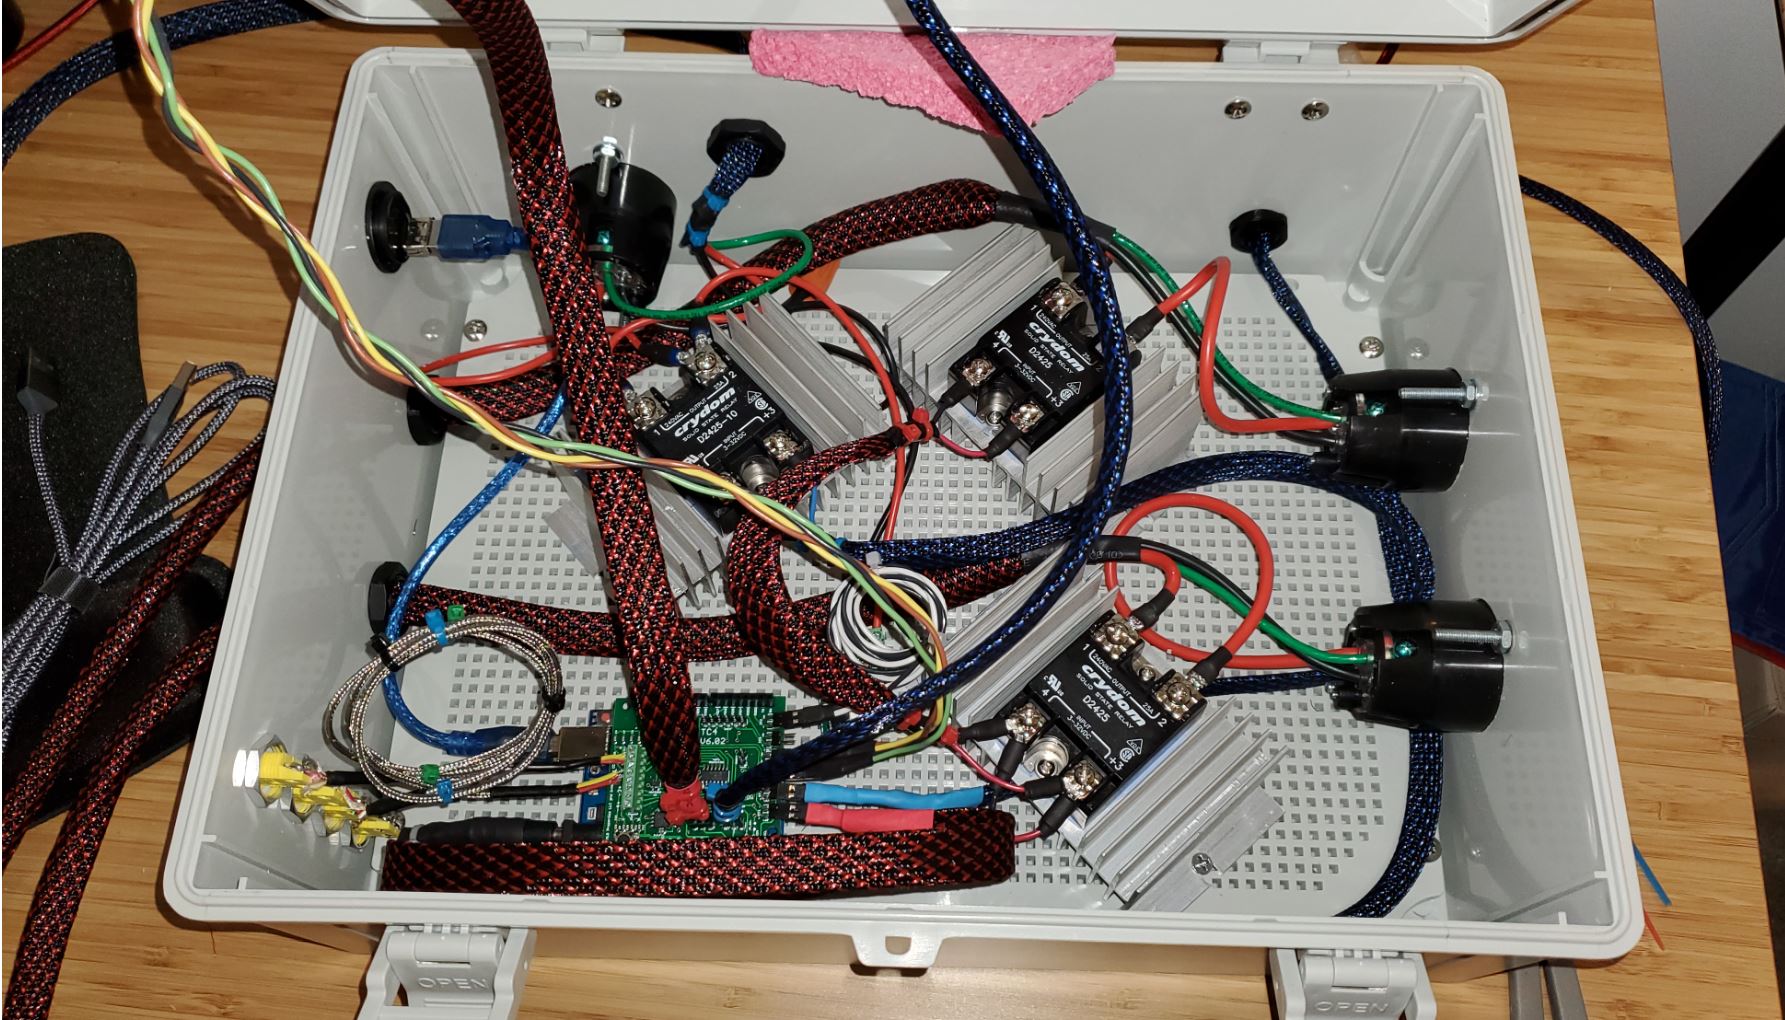
R/
Jared |
|
|
|
| JackH |
Posted on 01/22/2020 7:32 AM
|
 Administrator Posts: 1809 Joined: May 10, 2011 |
Nice progress Jared!
---Jack
KKTO Roaster. |
|
|
|
| CK |
Posted on 01/22/2020 5:57 PM
|
|
1/2 Pounder  Posts: 252 Joined: December 07, 2018 |
Quote jbrux4 wrote: Anybody have an alternative to bullet connectors. Something a bit easier to handle/connect/disconnect? These are the type that I used. https://www.amazo...arkle_slot They are a little tricky to solder but are much easier than the bullets for connecting and disconnecting. Like you, I started with bullet type connectors and changed to these because the bullets were difficult to unhook. Also, the bullet type didn't like/perform well with high amperage for some reason... |
|
|
|
| jbrux4 |
Posted on 01/22/2020 10:19 PM
|
|
1/4 Pounder Posts: 139 Joined: October 26, 2019 |
Quote Thanks Jack! Still a ways to go with a proper stand for it, more testing with bean charges, chaff collection, handle for the roast chamber, figure out how to use a screen mesh instead of a perf plate, trying the automation and artisan, getting the bluetooth module installed and in use with RoastLogger, putting ground on the front of roaster instead of back, upgrading the bullet connectors, training my wife on how to use it once I learn how to use it, and more I am sure. And this I consider as the home stretch? I must be kidding myself. What is it - the first 80% of the build takes 20% of the time and the last 20% takes 80% of the time. R/
Jared |
|
|
|
| jbrux4 |
Posted on 01/22/2020 10:24 PM
|
|
1/4 Pounder Posts: 139 Joined: October 26, 2019 |
Quote CK wrote: Quote jbrux4 wrote: Anybody have an alternative to bullet connectors. Something a bit easier to handle/connect/disconnect? These are the type that I used. https://www.amazo...arkle_slot They are a little tricky to solder but are much easier than the bullets for connecting and disconnecting. Like you, I started with bullet type connectors and changed to these because the bullets were difficult to unhook. Also, the bullet type didn't like/perform well with high amperage for some reason... Thanks for the item link. You said it was tricky to solder. I have a soldering iron, and I am a novice at best, but I have been successful at soldering some of my current bullet connectors. I would be glad to get some pointers or pics because I am going to get these. R/
Jared |
|
|
|
| jbrux4 |
Posted on 01/22/2020 11:04 PM
|
|
1/4 Pounder Posts: 139 Joined: October 26, 2019 |
These are the type that I used. https://www.amazo...arkle_slot They are a little tricky to solder but are much easier than the bullets for connecting and disconnecting. Like you, I started with bullet type connectors and changed to these because the bullets were difficult to unhook. Also, the bullet type didn't like/perform well with high amperage for some reason...[/quote] Thanks for the item link. You said it was tricky to solder. I have a soldering iron, and I am a novice at best, but I have been successful at soldering some of my current bullet connectors. I would be glad to get some pointers or pics because I am going to get these.[/quote] So, I found an Amazon link with an almost same connector with the soldering process as a video: https://www.amazo...amp;sr=8-1. I could do that with a little trial and error. Edited by JackH on 01/25/2020 2:46 PM R/
Jared |
|
|
|
| CK |
Posted on 01/23/2020 9:17 AM
|
|
1/2 Pounder Posts: 252 Joined: December 07, 2018 |
Those connectors look great, and the video is better than the one I found last year on how to solder them. Very easy to do. Tip; Don't fill the connector socket with too much solder. If you do, it will overflow when you stick the pre-tinned wire in the socket. That it makes it almost impossible to put the caps on from excess material in the way. |
|
|
|
| CK |
Posted on 01/23/2020 9:36 AM
|
|
1/2 Pounder Posts: 252 Joined: December 07, 2018 |
A video for wire tinning. |
|
|
|
| jbrux4 |
Posted on 01/23/2020 7:52 PM
|
|
1/4 Pounder Posts: 139 Joined: October 26, 2019 |
Quote CK wrote: Those connectors look great, and the video is better than the one I found last year on how to solder them. Very easy to do. Tip; Don't fill the connector socket with too much solder. If you do, it will overflow when you stick the pre-tinned wire in the socket. That it makes it almost impossible to put the caps on from excess material in the way. Thanks for the tip and the vid. I get the connectors tomorrow and will be putting them on. R/
Jared |
|
|
|
| jbrux4 |
Posted on 01/23/2020 8:11 PM
|
|
1/4 Pounder Posts: 139 Joined: October 26, 2019 |
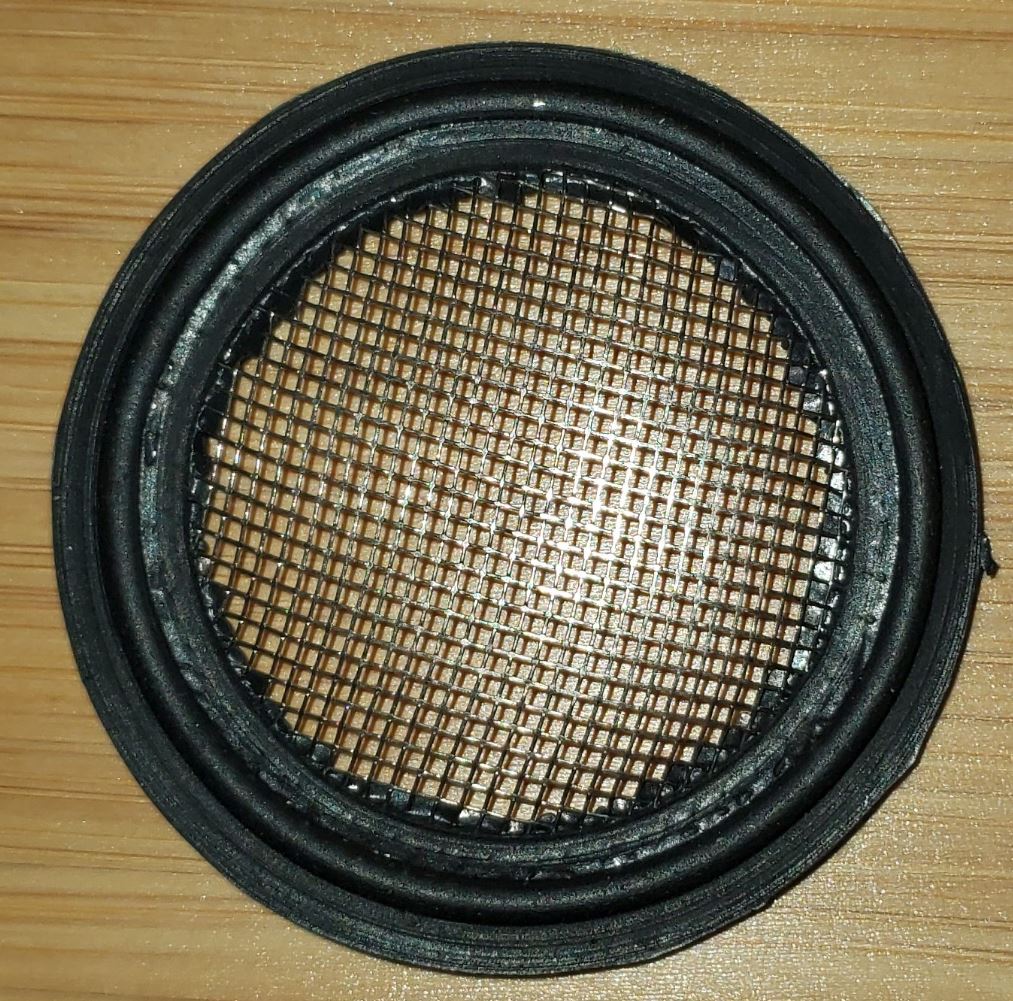
So, I need to turn my perforated plate section into a section. I have a PTFE 20 Mesh Gasket getting here tomorrow. I banged out the perf plate being held on by 4 tack welds. The perf plate is a Dernord 1.5" Tri-Clamp kind. The thing has 6mm holes which can allow smaller beans to fall right through, and this scared me into having a mesh screen underneath the perf plate. What's the point, right? Since I have another 1.5" perforated plate piece, I will be able to test various bean charges at various blower % to see if there is a noticeable difference - just as CK did in the following post: https://forum.hom...post_69968. This matches my original intent of having a mesh gasket. Since I haven't seen any noticeable degradation to any of the silicone or PTFE gaskets in the set-up so far, I am much more confident that the gasket will hold up to temps and last long enough to be worth it. In addition, I will have to do another round of testing to verify the temps that I can get at various blower % as well. This is a whole new dynamic, and the system should produce new results. Maybe it will be nominal - but I will know. R/
Jared |
|
|
|
| jbrux4 |
Posted on 01/25/2020 11:06 AM
|
|
1/4 Pounder Posts: 139 Joined: October 26, 2019 |
Crisis Averted! I replaced the bullet connectors with the other connections and when I went to test the blower, it did not work. It was such a struggle to get the other connections on that I simply equated the issue to not making a successful soldered connection. I abandoned the new connectors, cut them all off and put back on bullet connectors. I then go to test the blower again, and it still isn't working. The TC4's OT2 light is not flashing when I turn up the blower %, and I thought it normally did. The blower % changes on the display, but nothing is happening. I reseated all connections with the TC4 and reloaded the sketch as well. Also, I don't have the heating elements plugged into the wall outlet, but I can still turn up the % on those, and the OT1 light is not flashing either. Any thoughts on the issue? Is it the TC4 or something else? The only change I did was those connectors. UPDATE: I tested the blower directly to a plug bypassing TC4, ZCD, and SSR, and it works directly from the plug. Now I am thinking that the other connectors may have been connected just fine and the issue lies elsewhere. Puzzzling seeing that the enclosure is very secure and nothing got jostled or disconnected. UPDATE: I am a dummy. I had the ZCD wire that connects to the ZCD flipped. I now recall that when I put the ZCD on risers, the orientation of the ZCD changed and I didn't properly attach the connection. I hate that I probably could have used the other connectors - they were really smooth to hook and unhook. Edited by jbrux4 on 01/25/2020 1:30 PM R/
Jared |
|
|
|
| jbrux4 |
Posted on 01/25/2020 4:51 PM
|
|
1/4 Pounder Posts: 139 Joined: October 26, 2019 |
TESTING RESULTS: [size=8]These results surprised me[/size] Discussion: Testing Perf Plate, Mesh Screen, and combination thereof. You can see the results of Test 1 here: https://forum.hom...post_70401. Test 1 Setup: 1.5" Perf Plate with x7 6mm holes and a fine mesh screen underneath.  Test 2 Setup: 1.5" 20 Mesh Gasket  Test 3 Setup: 1.5" 20 Mesh Gasket (Intention was to achieve the same temp as test 1 to determine the element % increase needed to achieve the same temp)  Test 4: 1.5" Perf Plate with x7 6mm holes and a fine mesh screen underneath.  Test 5: 1.5" Perf Plate with x7 6mm holes and the 20 Mesh Gasket underneath  The difference in Ambient Temp: Test 1 @ 30F; Tests 2 thru 5 @ 49F When I performed Test 2, the temps were so low that I thought there was an issue with the thermocouple. There wasn't. I tested with a calibrated external reader to compare temps. When I performed Test 3, I was simply trying to achieve Test 1 temps at the given blower %. I ended up only reaching 425F @ 30% Blower with 100% element. I was in dismay. Test 4 proves that the fine mesh filter and the perf plate create a back pressure that allows the air to heat up longer. This also shows that a 19 degree increase in ambient allowed 49F increase in ET. Test 5 proves that the fine mesh allows for increased temperatures albeit less airflow. I will test more settings with this set-up to see if I can reach roasting temps at blower settings required to roast at max capacity. Since I am still waiting on my beans to get here, I can't test capacity yet. I need to abandon the 20 Mesh Gasket Only setup. I know that the Perf Plate w/ the Fine Mesh gets me to roasting temps at all blower % in 30F ambient. I just need to see if the Perf Plate w/20 Mesh Gasket can perform to roasting temps at the capcity needed. Snippet results here:  Full test results attached.
jbrux4 attached the following file:
jbrux4 attached the following images:


Edited by jbrux4 on 01/25/2020 4:59 PM R/
Jared |
|
|
|
| jbrux4 |
Posted on 01/25/2020 6:17 PM
|
|
1/4 Pounder Posts: 139 Joined: October 26, 2019 |
I just roasted 318.5g of Organic Bali Blue Moon with the following setup: Heat Pipe to Mass Airflow Straightener to Perf Plate to 20 Mesh Gasket. I started the blower at 20% and reduced to 15% by the end of FC and then 30% for cool down phase. The roast resulted with 271.4g of roasted beans. I am currently having issues with the BT thermocouple and can't get a reading except for ambient - which is prob just the TC4 reading ambient. Those cables are so tiny and I will have to try and get them situated appropriately. My roast ended at ET reading ~495F. The roast ran long because I didn't achieve FC at Approx 9 minutes. I would let my ET get to a milestone before I would expect the beans to reach that temp, ~20 seconds or so. I just gradually increased element percentage or reduced blower % to increase temp. There is heat loss from ET to roast chamber, but the difference in ET to what I expected BT to be is what it is. In the end, I was at too low a bean temp for a given milestone. How much - not sure. I'll just have to get my BT working appropriately. Dialing this thing in is going to be an arduous process. But hey, I can roast. And, I attached pics to show that 318.5 grams does not even fill up the reducer - close though. Sorry for staying full manual with the setup. Remember, I just came from a heat gun and flour sifter. I'll get to logging roasts soon.
jbrux4 attached the following images:


Edited by jbrux4 on 01/25/2020 6:24 PM R/
Jared |
|
|
|
| jbrux4 |
Posted on 01/27/2020 5:42 PM
|
|
1/4 Pounder Posts: 139 Joined: October 26, 2019 |
TESTING RESULTS for BLOWER CAPACITY I did a couple if vids: 1 lb @27% Blower 2 lb. @ 40% Blower I am pleased with the results. R/
Jared |
|
|
|
| CharcoalRoaster |
Posted on 01/28/2020 7:34 AM
|
 1 1/2 Pounder  Posts: 640 Joined: April 13, 2012 |
Nice work! I think you'll find a more uniform roast with the 2lb load as the circulation includes a lot of contact between beans in the bean mass. It'll help even out heat distribution early in the roast without resulting in some beans cracking while others are yellowing. |
|
|
|
| jbrux4 |
Posted on 01/28/2020 8:23 AM
|
|
1/4 Pounder Posts: 139 Joined: October 26, 2019 |
Quote CharcoalRoaster wrote: Nice work! I think you'll find a more uniform roast with the 2lb load as the circulation includes a lot of contact between beans in the bean mass. It'll help even out heat distribution early in the roast without resulting in some beans cracking while others are yellowing. Thanks for that info. When I get to that size roast, I should see that difference. Also, what helps out with the heat distribution in this setup, even with smaller loads, is the reducer. This thing captures and retains heat. It doesn't solve the problem completely, but it does mitigate it. Also, the more beans, the more back pressure I noticed. In my set-up, the more back pressure, the more heat that gets developed. With my recent tests of mesh gasket, perf plate, etc, I can see a balancing act I could perform with the set-up to keep the back pressure at a certain range for some consistency. For instance, I am curious to see if a 2 lb. roast would only need the 20 mesh gasket instead of the perf plate and mesh gasket combo. Doing so would allow lower blower % to be utilized for the given roast. I will still conduct further testing with the mesh gasket only to see if the beans get to moving with less blower % as I suggest. As a note, the heat pipe doesn't get that hot and I can touch it throughout the entire roast. The internal sleeve of mica through the entire length of the pipe makes sure the heat gets up and out. R/
Jared |
|
|
|
| CharcoalRoaster |
Posted on 01/28/2020 2:44 PM
|
|
1 1/2 Pounder Posts: 640 Joined: April 13, 2012 |
Jared -- where did you purchase the sight glass from? What's the max capacity it can hold? -Josh |
|
|
|
| renatoa |
Posted on 01/28/2020 3:02 PM
|
|
Administrator Posts: 3104 Joined: September 30, 2016 |
I found a lot of such glasses with clamps on Aliexpress, check here some I am interested: https://www.aliex...40299.html https://www.aliex...01944.html Clamps, glasses, gaskets, lots of parts alone. |
|
|
|
| jbrux4 |
Posted on 01/28/2020 9:47 PM
|
|
1/4 Pounder Posts: 139 Joined: October 26, 2019 |
Quote CharcoalRoaster wrote: Jared -- where did you purchase the sight glass from? What's the max capacity it can hold? -Josh I got from: https://shop.dist...&_ss=r I just roasted two 1 lb. batches. I started at 29% blower and reduced to 19% by the end of the roast. The first batch was a Colombian Supremo taken towards the end of 2nd crack. Don't ask me the temps - these thermocouples are useless. Grounding loop this. Noise that. Who knows at this point. Anyways, I had to watch the beans because of their expansion. I could have blown lots out if I didn't pay attention. I was being cautious and put a splatter screen above the chamber, and when I lifted an end to let some chaff go, I lost about 30g of beans - pressure change. Anyways, I didn't need the splatter screen - just needed to be attentive. The 2nd batch of Honduras Santa Rosa I took to end of FC - smelled like peanut butter. No issues with losing beans. Just watched the blower % that time. Take into account whether or not you have a reducer. Mine holds over 300g and still wasn't at the sight glass section yet. Also, the glass is 9mm thick. There is no clanking of beans on the glass. It needs to be wiped down after each roast to maintain clarity for the next roast. Also, it is heavy. The PTFE gaskets show no sign of melting or burn off as of now. R/
Jared |
|
|
|
| Husamka |
Posted on 02/06/2020 11:54 AM
|
|
1/4 Pounder Posts: 56 Joined: September 16, 2016 |
I am thinking to buy ( 4" BOROSILICATE TRI CLAMP SIGHT GLASS WITH GASKETS AND TRI CLAMPS) its same like yours plus (two Hinge Tri Clamps and two Silicone Gaskets). do you recommend that or there is a reason that you ordered only the Tri Clamp sight glass without the clamps ? https://shop.distillery-equipment.com/products/3-protected-borosilicate-tri-clamp-sight-glass-with-gaskets-and-tri-clamps-1?_pos=1&_sid=e3bad1f67&_ss=r |
|
|
|
| jbrux4 |
Posted on 02/06/2020 7:57 PM
|
|
1/4 Pounder Posts: 139 Joined: October 26, 2019 |
Quote Husamka wrote: I am thinking to buy ( 4" BOROSILICATE TRI CLAMP SIGHT GLASS WITH GASKETS AND TRI CLAMPS) its same like yours plus (two Hinge Tri Clamps and two Silicone Gaskets). do you recommend that or there is a reason that you ordered only the Tri Clamp sight glass without the clamps ? https://shop.distillery-equipment.com/products/3-protected-borosilicate-tri-clamp-sight-glass-with-gaskets-and-tri-clamps-1?_pos=1&_sid=e3bad1f67&_ss=r No particular reason. You should be just fine. R/
Jared |
|
|
|
| jbrux4 |
Posted on 02/06/2020 8:02 PM
|
|
1/4 Pounder Posts: 139 Joined: October 26, 2019 |
I've roasted 6 pounds so far, and I think I have my thermocouples figured out. They are off. Yep, that's it. They are off. How much you say? Enough to know that they are off. But, at least they are consistently off. I think my ET is to high while my BT is too low. But, at least I have BT sending a signal. After a few more roasts I may commit to an offset to put me more in the ball park I guess. Then I can actually attempt some automation - perhaps, at some point... However, sight, sound, and smell work great - almost every time. I love this thing. It is awesome. So glad I fell down the rabbit hole AND drank the potion. R/
Jared |
|
|
|
| jbrux4 |
Posted on 02/08/2020 5:37 PM
|
|
1/4 Pounder Posts: 139 Joined: October 26, 2019 |
I have been coming up with a way to track what I have purchased, roasted, and sold. Yep, already selling!! The roasting data will get better when utilizing Artisan and/or Roastlogger - I'm just not there yet, so I built this out of necessity. I will continue to modify into the future, but it has helped me corral all that I have going on. My goal is to expand it to include a break even point which includes the cost of the roaster. Maybe it could be of some use to others. It is attached.
jbrux4 attached the following file:
R/
Jared |
|
|
|
| jbrux4 |
Posted on 02/27/2020 9:32 PM
|
|
1/4 Pounder Posts: 139 Joined: October 26, 2019 |
The roaster build is taking a break. I am picking up and moving 1800 miles to work a diff job - same company though. I recently got through an element and SSR issue: https://forum.hom...post_70905 I spent a bit of time on a Break Even Analysis that turned into more of an accounting spreadsheet - it is still evolving. If you want to do a break even analysis, it is spot on - I think. So, if you are interested in seeing how long it would take to turn a profit, take a look. It does more, and I am not done with dynamic links either. I'll work on it more while I am not roasting. None of the data in there is legit. It should be considered "dummy data" to show proof of concept.
jbrux4 attached the following file:
Edited by jbrux4 on 02/27/2020 9:41 PM R/
Jared |
|
|
|
| jbrux4 |
Posted on 03/27/2020 11:37 PM
|
|
1/4 Pounder Posts: 139 Joined: October 26, 2019 |
In a new location and in a new house. Luckily, there are 20A breakers and separate GFCI circuits near each other in the garage. There is a third circuit, non-gfci for the blower and electronics. I added a roast chamber extension and a curved exhaust at the top. The exhaust is undone obviously, but I do want it to get vented to outside. Since I am renting, I don't want to install a port hole outlet through the wall. Hopefully I buy in a year and make something more permanent. In the meantime, I may just wrap a mesh over it to catch the chaff. I roasted two batches: (1) Yirgacheffe and an Organic Papua New Guinea A/X. I said what the heck and bought 50lb of the Yirg and 25lb. of the PNG. I love the cost per lb and no shortages at my house for the foreseeable future. Now, if I could only meet the neighbors....guess i'll have to wait a little bit before that. Fluid Bed Roasting-Papua New Guinea 1lb at FC: Fluid Bed Roaster Walk Around: R/
Jared |
|
|
|

| Jump to Forum: |
Powered by PHP-Fusion Copyright © 2024 PHP-Fusion Inc
Released as free software without warranties under GNU Affero GPL v3
Designed with ♥ by NetriXHosted by skpacman