
Login

Shoutbox
You must login to post a message.
renatoa
07/26/2024 3:49 PM
Bill grubbe and Jk, 
allenb
07/26/2024 5:15 AM
Spiderkw Welcome to HRO!

renatoa
07/24/2024 8:31 AM
ramiroflores and John123,

 ?
?
?renatoa
07/21/2024 1:18 AM
 , Luislobo
renatoa
07/19/2024 11:28 AM
Koepea,
Forum Threads
Newest Threads
Skywalker roaster modsBackground Roast Iss...
Hello from Arkansas
TC4ESP
Green coffee reviews
Hottest Threads
| Skywalker roaster... | [376] |
| TC4ESP | [115] |
| War on Farmers by... | [47] |
| Adventures in flu... | [26] |
| Hello! (soon) Roa... | [17] |
In Memory Of Ginny

Donations
Latest Donations
dmccallum - 10.00
JackH - 25.00
snwcmpr - 10.00
Anonymous - 2.00
Anonymous - 5.00
dmccallum - 10.00
JackH - 25.00
snwcmpr - 10.00
Anonymous - 2.00
Anonymous - 5.00
Users Online
Guests Online: 3
Members Online: 0
Total Members: 8,394
Newest Member: Bill grubbe
Members Online: 0
Total Members: 8,394
Newest Member: Bill grubbe
View Thread
Who is here? 1 guest(s)
 Fluid Bed Roaster Build - bye bye Heat Gun and Flour Sifter
|
|
| CharcoalRoaster |
Posted on 03/28/2020 7:25 AM
|
 1 1/2 Pounder  Posts: 640 Joined: April 13, 2012 |
Nice roast  How do you dump beans? Do you have to completely disassemble? Edited by JackH on 03/28/2020 2:56 PM |
|
|
|
| jbrux4 |
Posted on 03/28/2020 6:01 PM
|
|
1/4 Pounder  Posts: 139 Joined: October 26, 2019 |
Quote Let me answer the charge and discharge question. To charge with the roast chamber extension & exhaust port attached: I use the scoop to dump in the beans through the open ended handle into the exhaust port. By the way, the scoop is pretty cool because of the open handle, but also because it has a flattened bottom so prevent any type of roll. Its flat bottom let's me use it on the scale.  To discharge the beans: Loosen the tri-clamp that is below the screen (see pic below). Use silicon gloves to handle the hot roast chamber metal and roast chamber extension/exhaust port. If I want, I can take off the roast chamber extension with the exhaust port by removing one tri-clamp. I then tilt the chamber to release the beans. I am plenty capable, so there is no issue. If I start roasting 10 hours straight, I would come up with another more streamlined solution. Besides, this is Mark I. Mark II will have improvements. Still learning.... I've been watching this thread for dumping inspiration:https://forum.hom...post_70758 
jbrux4 attached the following images:


Edited by jbrux4 on 03/28/2020 6:06 PM R/
Jared |
|
|
|
| jbrux4 |
Posted on 04/10/2020 6:34 PM
|
|
1/4 Pounder Posts: 139 Joined: October 26, 2019 |
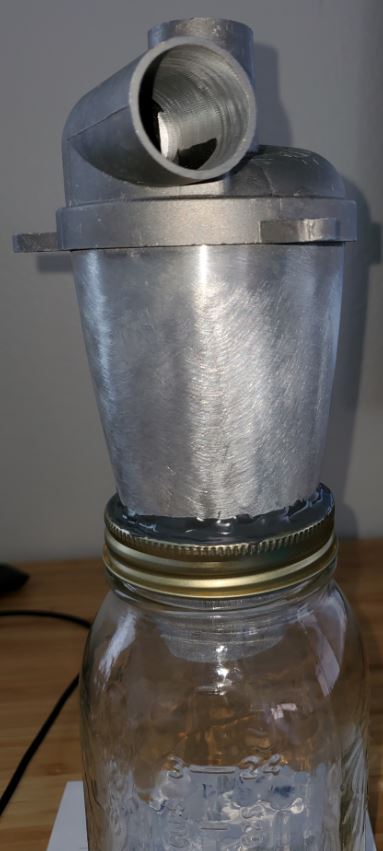
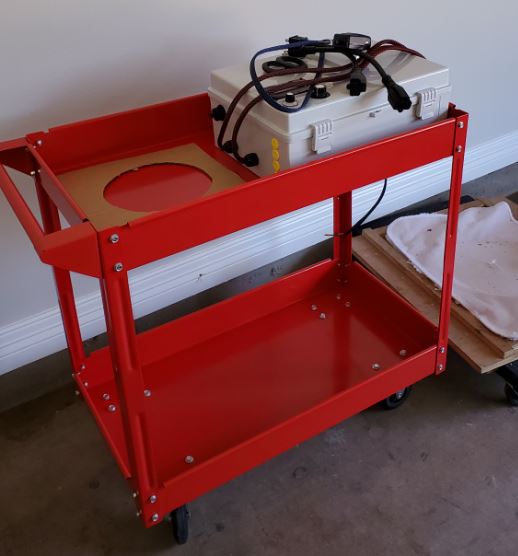
The trek towards a cyclone chaff collector has begun. I am waiting on pieces and parts to connect it all together. I decided on a mason jar lid to attach directly to the cyclone with J-B Weld so that I can screw a jar on and off. All I was thinking when trying to come up with a method to attach the lid was surface area. Maximize the surface area for the lid to grab on to the epoxy and cyclone with. So, I snipped along the inner circumference of the lid and alternated the bending of the tabs - up then down. I applied the epoxy to the tabs and along the mating line on the cyclone. I then pressed the lid into place. It holds extremely well. I have no fears of the lid losing anchor. In addition, I got a little cheap cart that will fit the electronics enclosure and the roaster. It is coming along. I kind of got forced into figuring out the chaff collection because my extension cords aren't long enough to get the roaster to the outside of the garage. I was lucky enough to get two GFCI outlets on separate 20A circuits in the garage. Since it is the safest approach, I don't want to try my luck anywhere else. Temperature readings are a nightmare. No point in charting inaccuracies. However, I know that the full capabilities of the TC4 and Artisan won't get realized until I do start charting with accurate readings. I do have a really good feel for the roaster and the stages that beans take through the course of roasting. I am to the point where I can play with the roast. I have plenty of beans on hand, so I am trying different things. I did my largest roast of 19 oz (539g). which netted a little over 16 oz. (453g). I will keep pushing it and playing around.
jbrux4 attached the following images:


R/
Jared |
|
|
|
| renatoa |
Posted on 04/11/2020 4:44 AM
|
|
Administrator Posts: 3104 Joined: September 30, 2016 |
My quick (and dirty  ) solution was to use a hot cup silicone sleeve, as a seal fitting directly into the jar mouth. ) solution was to use a hot cup silicone sleeve, as a seal fitting directly into the jar mouth.
renatoa attached the following image:

|
|
|
|
| jbrux4 |
Posted on 04/11/2020 12:24 PM
|
|
1/4 Pounder Posts: 139 Joined: October 26, 2019 |
Quote renatoa wrote: My quick (and dirty ) solution was to use a hot cup silicone sleeve, as a seal fitting directly into the jar mouth.It is quick and dirty, but seems like you have it resting on a table as well. Mine will be suspended in air, so I needed to have a more secure solution. I do like your method though. R/
Jared |
|
|
|
| CK |
Posted on 04/11/2020 10:02 PM
|
|
1/2 Pounder  Posts: 252 Joined: December 07, 2018 |
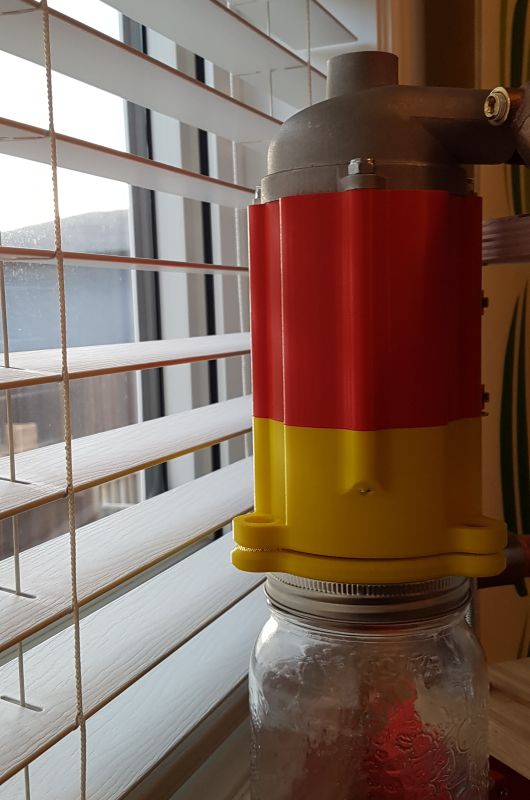
Here's a new one I've designed that is similar to Jared's. This is not high temp PLA yet, but rather a proof of concept that works well. It has a custom high temp gasket that makes the system airtight.
CK attached the following image:
|
|
|
|
| jbrux4 |
Posted on 04/14/2020 7:55 PM
|
|
1/4 Pounder Posts: 139 Joined: October 26, 2019 |
Quote CK wrote: Here's a new one I've designed that is similar to Jared's. This is not high temp PLA yet, but rather a proof of concept that works well. It has a custom high temp gasket that makes the system airtight. CK, Ohhhh man that is nice. That 3D printing not only solves functional issues, it solves them in form as well. R/
Jared |
|
|
|
| CK |
Posted on 04/15/2020 12:49 PM
|
|
1/2 Pounder Posts: 252 Joined: December 07, 2018 |
Quote That 3D printing not only solves functional issues, it solves them in form as well. Tip: I added the red extension piece (a performance improvement) because I?ve found if the bottom of the chaff container is too close to the bottom of the metal cyclone, too many chaff fragments escape the exhaust. |
|
|
|
| jbrux4 |
Posted on 04/16/2020 2:34 PM
|
|
1/4 Pounder Posts: 139 Joined: October 26, 2019 |
Quote CK wrote: Quote That 3D printing not only solves functional issues, it solves them in form as well. Tip: I added the red extension piece (a performance improvement) because I?ve found if the bottom of the chaff container is too close to the bottom of the metal cyclone, too many chaff fragments escape the exhaust. I'll see how mine goes. I do have the option of using a wide mouth jar to move farther up the cyclone. The epoxy is easy to remove - just use a heat gun to heat it up - I set mine at 800 - and it flakes off. I'll cross that bridge later if needed. Thanks for the tip!! R/
Jared |
|
|
|
| jbrux4 |
Posted on 04/16/2020 9:51 PM
|
|
1/4 Pounder Posts: 139 Joined: October 26, 2019 |
Cyclone chaff collector test is a success from the perspective of collecting chaff. I didn't notice anything escaping. I roasted 16 oz. of Yirgacheffe for this. However, from the perspective of roasting by sight, smell, and sound - the sound factor has been diminished greatly. Overall, the roast was extremely muffled. This means I can't hear cracks unless I focus and really try to listen for them. Before, when there was an "open end" to the system, the cracks were prominent. If I don't pay attention, I will miss it. One might say it is easy to just focus and listen, but focusing on temp or airflow can easily take me away from listening for just a bit, and that bit just may be 2nd crack getting underway or rapidly progressing without my awareness. This makes the need for accurate temps more of a necessity. However, the cost and work in trying to do so just isn't in my cards right now. My next action will be to split the heat pipe into two separate pieces with each piece having its own element. I will also think about a bean dump or charge of some sort. Here's a couple vids of the chaff collector in action. Early in the roast: Late in the roast: R/
Jared |
|
|
|
| renatoa |
Posted on 04/17/2020 3:54 AM
|
|
Administrator Posts: 3104 Joined: September 30, 2016 |
More than accurate temp, rather focus on differentials / jumps, they tell you FC start better than sound. Check attached pic, in this roast, because I am partially hearing-impaired, my ears hear the first sounds at 204 C, but that jump at 200 tell me a lot better that endothermic reaction started. i.e. first crack
renatoa attached the following image:

Edited by renatoa on 04/17/2020 4:00 AM |
|
|
|
| pisanoal |
Posted on 04/17/2020 8:09 AM
|
|
1/4 Pounder Posts: 97 Joined: October 11, 2019 |
Quote renatoa wrote: More than accurate temp, rather focus on differentials / jumps, they tell you FC start better than sound. Check attached pic, in this roast, because I am partially hearing-impaired, my ears hear the first sounds at 204 C, but that jump at 200 tell me a lot better that endothermic reaction started. i.e. first crack Good advice. One possible drawback to this is not all roasters/beans have a distinct "flick" at the start of FC. There also isn't a distinct change at 2C that i am aware of? Generally speaking, i get a slight leveling off and sometimes an actual flick right before FC, then towards the end, my ROR will start to try to go back up. I'm not as familiar with start of 2C as i don't roast that far generally. Another possibility that i had to do with a sealed roaster i built was open the top up for the first roast of a new type of bean (or after making changes that affect your BT reading) so i could hear the cracks better and log where FC and 2C happens for that bean. Just let the chaff blow everywhere for that roast. It should be within a couple degrees each time. Then as you approach those temps on later roasts with that bean, you can listen more intently for the cracks, and look for the clues renatoa was speaking of. |
|
|
|
| jbrux4 |
Posted on 04/17/2020 11:00 AM
|
|
1/4 Pounder Posts: 139 Joined: October 26, 2019 |
Quote renatoa wrote: More than accurate temp, rather focus on differentials / jumps, they tell you FC start better than sound. Check attached pic, in this roast, because I am partially hearing-impaired, my ears hear the first sounds at 204 C, but that jump at 200 tell me a lot better that endothermic reaction started. i.e. first crack I am trying to see the jump, but all I see is a gradual increase. I do not understand how you are seeing FC with that gradual of an increase. I do understand the point you are making though. I need to understand this, so perhaps provide additional points to consider with your example... R/
Jared |
|
|
|
| jbrux4 |
Posted on 04/17/2020 11:15 AM
|
|
1/4 Pounder Posts: 139 Joined: October 26, 2019 |
Quote pisanoal wrote: Good advice. One possible drawback to this is not all roasters/beans have a distinct "flick" at the start of FC. There also isn't a distinct change at 2C that i am aware of? Generally speaking, i get a slight leveling off and sometimes an actual flick right before FC, then towards the end, my ROR will start to try to go back up. I'm not as familiar with start of 2C as i don't roast that far generally. Another possibility that i had to do with a sealed roaster i built was open the top up for the first roast of a new type of bean (or after making changes that affect your BT reading) so i could hear the cracks better and log where FC and 2C happens for that bean. Just let the chaff blow everywhere for that roast. It should be within a couple degrees each time. Then as you approach those temps on later roasts with that bean, you can listen more intently for the cracks, and look for the clues renatoa was speaking of. I used 2C as an example because it isn't as loud and it can come on quickly with rapid progression depending on the bean - the Indonesian Sumatra comes to mind with a quick onset and rapid progression of 2C. I do like to develop some roasts to the verge of 2C and then perform a rapid cooling. That is neither here nor there - the point is that any crack is muffled. I became so tuned into the cracks and their start and stop to determine roast progression, my roasting prowess has diminished along with the sound. I have to relearn the system. The dynamic of the roaster has changed with the addition of the chaff collector because it creates more back pressure. Back pressure, in my system, means better heat development from the elements and a "hotter" roast chamber. I need to find the balance again. The Yirg roasted quicker with the chaff collector in my test. Your example of opening the system to hear cracks and focusing on the "registered" BT at cracks is independent of back pressure - so this is a good recommendation that I will follow through with. Independent because the additional back pressure deals with element heat output and the hotter roast chamber affects the time for bean development through stages. I need to focus on the registered temp and then try to get to those temps according to a profile with the chaff collector then attached. Temperature is temperature - how quick you get there is determined by the roaster - whether that is Artisan/TC4 or me. R/
Jared |
|
|
|
| renatoa |
Posted on 04/17/2020 11:43 AM
|
|
Administrator Posts: 3104 Joined: September 30, 2016 |
Quote jbrux4 wrote: I am trying to see the jump, but all I see is a gradual increase. I do not understand how you are seeing FC with that gradual of an increase. I do understand the point you are making though. I need to understand this, so perhaps provide additional points to consider with your example... In real ... er, roast, is not that gradual, it happens quick, and is really easy to detect that bump.To be more clear, I am not roasting with tethered Artisan, but TC4 only, and my eyes are on TC4 screen. I don't watch the bump to happen on the graph, but in values evolution. In those moments all you want to see is a continuous declining RoR, having as goal the value 6-7 C degrees when entering FC. It's very easy to notice a change in trend, for example when I am at RoR 7 waiting to see the change down to 6, an opposite direction change, to value 8, is an instant bell ring. It's quick, not lasting more than 10 seconds, and you see the RoR fall to the expected 6 value, and continue to decrease. THAT is crack, the exhaust of vapors from the first beans. ! Unfortunately, this not work for 2nd crack, and I can't give you any advice, I am a light roasting man, not even finishing FC. |
|
|
|
| CK |
Posted on 04/17/2020 6:07 PM
|
|
1/2 Pounder Posts: 252 Joined: December 07, 2018 |
Quote jbrux4 wrote: I am trying to see the jump, but all I see is a gradual increase. I do not understand how you are seeing FC with that gradual of an increase. I do understand the point you are making though. I need to understand this, so perhaps provide additional points to consider with your example... I don't see any jump/flick on my roasts either. I believe it's is because of the roaster type we use... spouting fluid bed... there is too much airflow exiting the roaster, combined with a relatively small batch size (275g). It seems to me the temperature can't rise drastically because it is always being exchanged with new ET controlled air. Perhaps this jump is only a phenomenon of different types of roasters?
CK attached the following image:

|
|
|
|
| renatoa |
Posted on 04/18/2020 1:58 AM
|
|
Administrator Posts: 3104 Joined: September 30, 2016 |
Quote CK wrote: I don't see any jump/flick on my roasts either. I believe it's is because of the roaster type we use... spouting fluid bed... there is too much airflow exiting the roaster, combined with a relatively small batch size (275g). It seems to me the temperature can't rise drastically because it is always being exchanged with new ET controlled air. Perhaps this jump is only a phenomenon of different types of roasters? It is there, maybe flattened by your smoothing, possible more aggressive than mine. Check attached, where I highlighted the small hump. Mine could be more proeminent perhaps due to the fact I am using other RoR computation method than original TC4 code, a Savitzky?Golay derivative, whose main advantage is that it tends to preserve features of the distribution such as relative maxima, minima and width, which are usually 'flattened' by other averaging techniques (like a moving average filter, in original TC4) To be more clear, below you have the sequence of RoR values I am watching on the TC4 display, that signals me the start of FC. 9:36 - a normal declining RoR 8 8 8 8 8 8 7 7 7 7 7 7 9:48 - declining stop 8 8 8 8 8 8 8 8 9:56 - bump 9 9 9 9 9 9 9 9 9 10:05 - declining resume, back to normal trend 8 8 8 8 8 8 8 8 8 8 8 7 7 7 7 7 7 7 7 7 6 6 10:26 ... Without those RoR 9 values would be harder to detect the real start, indeed, because instead a bump would be a long, 27 seconds, plateau of value 8, but the first 9 is what I am hunting, to trigger FC button press.
renatoa attached the following image:

Edited by renatoa on 04/18/2020 2:10 AM |
|
|
|
| Ooij01 |
Posted on 04/18/2020 10:19 AM
|
|
Newbie  Posts: 21 Joined: June 25, 2018 |
Quote jbrux4 wrote: This makes the need for accurate temps more of a necessity. However, the cost and work in trying to do so just isn't in my cards right now. My next action will be to split the heat pipe into two separate pieces with each piece having its own element. I will also think about a bean dump or charge of some sort. I've currently got a setup using two separate elements as well and was wondering how you were planning on connecting the two elements together using triclamp pipes. Had a look at this and thought it might work out well. https://www.aliex...web201603_ Edited by JackH on 04/18/2020 1:00 PM |
|
|
|
| jbrux4 |
Posted on 04/19/2020 6:54 PM
|
|
1/4 Pounder Posts: 139 Joined: October 26, 2019 |
Quote jooi123 wrote: Quote jbrux4 wrote: This makes the need for accurate temps more of a necessity. However, the cost and work in trying to do so just isn't in my cards right now. My next action will be to split the heat pipe into two separate pieces with each piece having its own element. I will also think about a bean dump or charge of some sort. I've currently got a setup using two separate elements as well and was wondering how you were planning on connecting the two elements together using triclamp pipes. Had a look at this and thought it might work out well. https://www.aliex...web201603_ Mine will be in line. 1.5" diameter pipe at 6" long, silicone gasket, 1.5" diameter pipe at 6" long, silicone gasket then roast chamber. Each 6" pipe will have an element. Each 6" pipe will have egress for the power cables. Each pipe will have a hanger to suspend the elemetns in the pipe. Each pipe will have a full sleeve of mica. R/
Jared |
|
|
|
| jbrux4 |
Posted on 04/19/2020 7:05 PM
|
|
1/4 Pounder Posts: 139 Joined: October 26, 2019 |
I pushed my roaster to a limit today. Because I did a multiple roast session, I started at 19oz (538g, my previous high) and stepped up 2oz each roast. I skipped 27 (765g) and went straight from 25 (709g) to 29 (822g) because I was feeling frisky. The 29oz roast was inconsistent, so I stepped it back down to 25oz to maintain an even roast profile. I would start at around 45% blower and step down to around 25% at the end of roast. I never exceeded 92% element. Times and steps were consistent with each roast as well. As CK mentioned, I had some chaff escape because of how my jar is situated on my cyclone. Some being acceptable considering A 7.5 lb. yield roast session. I will try a larger jar first to create more distance between the bottom of the cyclone and the bottom of the jar. If that doesn't work, I will figure out a way to lower the lid further down the cyclone wall. IF you are taking orders on your design CK, I'll gladly buy one! Edited by jbrux4 on 04/19/2020 7:52 PM R/
Jared |
|
|
|
| jbrux4 |
Posted on 04/27/2020 7:01 PM
|
|
1/4 Pounder Posts: 139 Joined: October 26, 2019 |
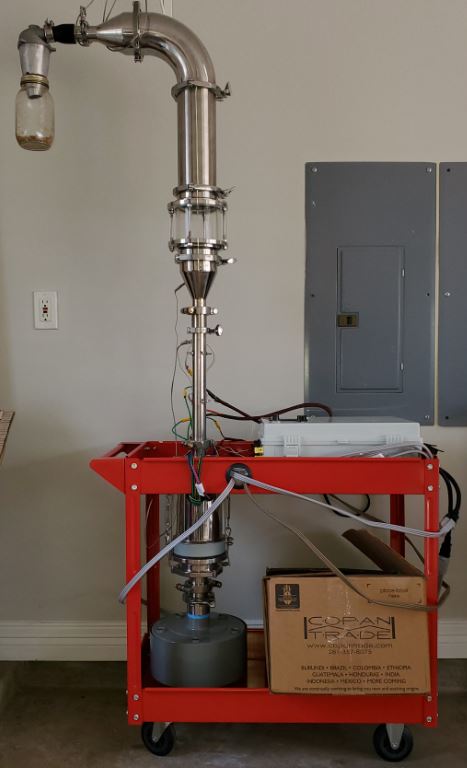
I have the roaster at a somewhat presentable state now. It is on it's cart, and I have the top section hanging via balustrade cable so I can detach and reattach the top portion by myself with little hassle. My goal with the top is to have it vent directly outside via an exit port/vent through the garage - but, I need to buy a house before I start doing crazy stuff like that. I have ideas for charge and dump that I can't execute because I don't have the tools or the know-how. I will be able to network and meet people in this new area once the social distancing thing relaxes. Anyways - I am really going to roll with this set-up until I can get to something major for the charge/dump. Things to do still: - Separate heat pipe into two lengths, one length for each element - Switch out the glass mason jar for a SS jar (I fear the glass bottle getting shot down and exploding - I am bare foot a lot and don't want shards of glass in my legs and feet - besides, I know the thing works and don't necessarily need to see the chaff cycloning). - Charge port - Dump port - Building exhaust port - Accurate temps to then use TC4/Artisan to full extent - Accurate temps to Bluetooth module with Roastlogger With Ethiopian Yirgacheffe, Panama Boquete, East Timor - Organic, African Burundi - Washed, and Papua New Guinea - Organic in inventory, I have no shortage any time soon to prevent me from roasting. I am completely happy with what I have built, and even if I don't do any of the other things I mentioned above, I still have one heck of a roaster. Much thanks to all people who inspired, helped, or just had a tidbit of knowledge buried in a post - this could not have been done without Homeroasters.org.
jbrux4 attached the following image:
R/
Jared |
|
|
|
| mtbizzle |
Posted on 04/27/2020 7:07 PM
|
|
1/4 Pounder Posts: 101 Joined: April 22, 2020 |
What a machine. I'm always so impressed to see true DIY roasters on here. I bet it is a neat feeling to tune in roasts with your own roaster! |
|
|
|
| JackH |
Posted on 04/27/2020 7:13 PM
|
 Administrator Posts: 1809 Joined: May 10, 2011 |
Nice job building that roaster!
---Jack
KKTO Roaster. |
|
|
|
| renatoa |
Posted on 04/28/2020 1:55 AM
|
|
Administrator Posts: 3104 Joined: September 30, 2016 |
Is there any technical reason to have all the piping sections so long, resulting so tall build? For instance why not having the chaff collecting jar at the level of the red cabinet? My FB dream machine would be something of the compactness of a filter coffee machine, something like a Nesco: pump in the filter machine water compartiment location, popper style heater in the base, beans in a glass carafe, chaff collecting in the coffee filter compartiment location, above carafe. 250-333 grams would be enough for a household appliance. Dreaming ? |
|
|
|
| CharcoalRoaster |
Posted on 04/28/2020 8:55 AM
|
|
1 1/2 Pounder Posts: 640 Joined: April 13, 2012 |
OGH actually built something of what you're describing Renatoa -- except in a commercial brewer instead of home counter top one. Too big for your dreams?  |
|
|
|

| Jump to Forum: |
Powered by PHP-Fusion Copyright © 2024 PHP-Fusion Inc
Released as free software without warranties under GNU Affero GPL v3
Designed with ♥ by NetriXHosted by skpacman