
Login

Shoutbox
You must login to post a message.
renatoa
07/26/2024 3:49 PM
Bill grubbe and Jk, 
allenb
07/26/2024 5:15 AM
Spiderkw Welcome to HRO!

renatoa
07/24/2024 8:31 AM
ramiroflores and John123,

 ?
?
?renatoa
07/21/2024 1:18 AM
 , Luislobo
renatoa
07/19/2024 11:28 AM
Koepea,
Forum Threads
Newest Threads
Skywalker roaster modsBackground Roast Iss...
Hello from Arkansas
TC4ESP
Green coffee reviews
Hottest Threads
| Skywalker roaster... | [375] |
| TC4ESP | [115] |
| War on Farmers by... | [47] |
| Adventures in flu... | [26] |
| Hello! (soon) Roa... | [17] |
In Memory Of Ginny

Donations
Latest Donations
dmccallum - 10.00
JackH - 25.00
snwcmpr - 10.00
Anonymous - 2.00
Anonymous - 5.00
dmccallum - 10.00
JackH - 25.00
snwcmpr - 10.00
Anonymous - 2.00
Anonymous - 5.00
Users Online
Guests Online: 11
Members Online: 0
Total Members: 8,393
Newest Member: Bill grubbe
Members Online: 0
Total Members: 8,393
Newest Member: Bill grubbe
View Thread
Who is here? 1 guest(s)
 KKTO build questions***FOR SALE***
|
|
| mkane |
Posted on 02/26/2020 7:53 PM
|
 1/4 Pounder  Posts: 151 Joined: October 23, 2017 |
Quote JackH wrote: Quote mkane wrote: I pondering over the idea of some kind of bearing for the shaft https://www.mcmas...-bearings/ to pass through on the outer pot. Thoughts? Those look good. I wish I did that for mine. What shaft diameter are you going with? 1/2" When I gather all my parts I'll start a build thread. Edited by mkane on 02/26/2020 8:14 PM Always learning
|
|
|
|
| mkane |
Posted on 02/26/2020 8:16 PM
|
|
1/4 Pounder Posts: 151 Joined: October 23, 2017 |
Quote Koffee Kosmo wrote: Quote mkane wrote: I pondering over the idea of some kind of bearing for the shaft https://www.mcmas...-bearings/ to pass through on the outer pot. Thoughts? Those look good. I wish I did that for mine. What shaft diameter are you going with? Yes that will work fine The most crucial area is the perforated plate - so I would put one there as well  KK Always learning
|
|
|
|
| Alaroast |
Posted on 02/27/2020 8:59 AM
|
 Newbie  Posts: 43 Joined: February 04, 2020 |
Installed false bottom with about 1.5" thickness of the ceramic insulation. I decided against using the full 2" thickness since this stuff is pretty dense and would have taken a lot of compression and pressure while sealant was curing. I used the copper silicone stuff since it had a little higher heat rating than the red. I found an old aluminum cake plate at the thrift store for $2 which was easy to cut to size with a jigsaw and file for the false bottom. I filed down edges to allow for about .040" clearance around all sides after cutting with saw. After setting bottom in place with sealant, I smoothed out the fillet with my finger and then placed a 1"2 roll of tape on bottom, inserted the inner pot and place a gallon jug of water in there to provide weight while curing. Make sure all holes through false bottom and pots are properly aligned before sealant starts to set up. Should be good to go in 24 hours where I'll do a lengthy heat burn in. Don't want silicone fumes in my coffee Thanks KK for the pictures of how you went about this; it helped out a lot as I did mine.
Alaroast attached the following images:

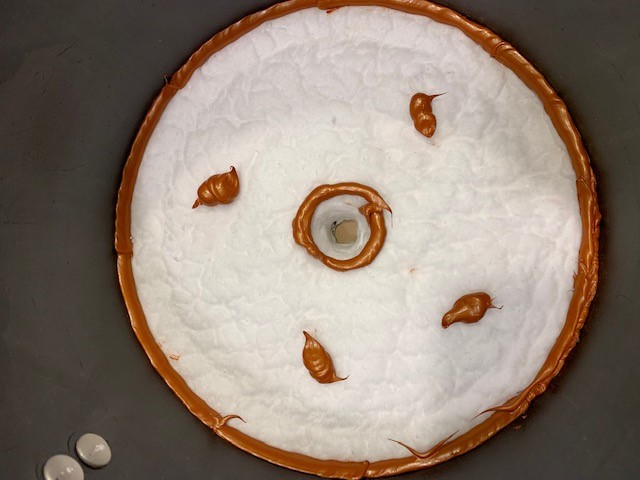


Edited by Alaroast on 02/27/2020 9:06 AM Fiorenzato Bricoletta Espresso Machine, Obel EB Grinder, USRC 3kg roaster
|
|
|
|
| Koffee Kosmo |
Posted on 03/03/2020 7:12 PM
|
 Administrator Posts: 1621 Joined: December 31, 2008 |
Well done Alaroast For ease of use and easy electrical connection to the drive motor it?s best to fit a female connector plug for the wall wart 12V power supply Something like this  KK I home roast and I like it. Designer of the KKTO
Roaster Build information https://homeroast...ad_id=1142 https://docs.goog...lide=id.i0 Blog - http://koffeekosm...gspot.com/ Bezzera Strega, Mazzer Robur Grinder, Pullman Tamper Convex, (KKTO) Turbo Oven Home Roaster. |
|
|
|
| Alaroast |
Posted on 03/04/2020 7:47 AM
|
|
Newbie Posts: 43 Joined: February 04, 2020 |
Thanks! About the drive motor connection; I'm using a 120V motor so I just have it wired in directly to a standard 2 prong plug for house power. I am still trying to figure out roast times and temps though. On my old SC/TO roaster, the roasting chamber space was much smaller and so heat was easier to manage and usually roasts were completed in 12-15 minutes to beginning of 2C. I'm finding that I need to preheat the KKTO at least 10 minutes until I get it up to about 480F. Once I drop in beans, it takes a while to recover in temperature and my last roast took nearly 25 minutes. I think with added insulation and correct preheat times, I'll be able to get that time down to about 15 minutes. My last roast was also 800 grams so I may need to back off to about 650 grams.
Fiorenzato Bricoletta Espresso Machine, Obel EB Grinder, USRC 3kg roaster
|
|
|
|
| renatoa |
Posted on 03/04/2020 8:29 AM
|
|
Administrator Posts: 3104 Joined: September 30, 2016 |
If possible, try to measure the real power of the bulb heater. There is a big spread in the supply sources the chinese are using to build these lids. Was surprised one day to have a lid that requires 80% level to bring 250 grams into FC in 10 minutes, while my regular workhorse needs only 64% for same task. Measured, and the new lid was been found having 900W !!! |
|
|
|
| Koffee Kosmo |
Posted on 03/04/2020 5:10 PM
|
|
Administrator Posts: 1621 Joined: December 31, 2008 |
Quote Alaroast wrote: Thanks! About the drive motor connection; I'm using a 120V motor so I just have it wired in directly to a standard 2 prong plug for house power. I am still trying to figure out roast times and temps though. On my old SC/TO roaster, the roasting chamber space was much smaller and so heat was easier to manage and usually roasts were completed in 12-15 minutes to beginning of 2C. I'm finding that I need to preheat the KKTO at least 10 minutes until I get it up to about 480F. Once I drop in beans, it takes a while to recover in temperature and my last roast took nearly 25 minutes. I think with added insulation and correct preheat times, I'll be able to get that time down to about 15 minutes. My last roast was also 800 grams so I may need to back off to about 650 grams. I use this method for blended beans to equalise the moisture content but will also work on any single origin Run the beans normally on the lowest temp setting for up to 10 minutes Then ramp up the heat to full and start time on the roast proper for the duration of the roast The sweet spot for the roaster is 600gr to 750gr But as ones roasting experience develops after several hundred roasts - and with some modifications to the TO like deflector mod and thermostat you can roast up to 1 kg The ideal TO is one that operates at 1400W as that is matched to the roaster volume If the TO is lower wattage then the volume needs to be reduced lower to compensate So take baby steps and learn the capabilities of the design Don?t follow any other roaster profile - make up your own to your personal taste in coffee I personally prefer the older roast methods to bring out the full flavour of coffee So experiment with roast times to FC and SC ( no right or wrong here ) and choose the ones that your tastebuds love KK I home roast and I like it. Designer of the KKTO
Roaster Build information https://homeroast...ad_id=1142 https://docs.goog...lide=id.i0 Blog - http://koffeekosm...gspot.com/ Bezzera Strega, Mazzer Robur Grinder, Pullman Tamper Convex, (KKTO) Turbo Oven Home Roaster. |
|
|
|
| mkane |
Posted on 03/04/2020 6:36 PM
|
|
1/4 Pounder Posts: 151 Joined: October 23, 2017 |
Does someone know what steps need to be taken to bypass the Supentown's thermostat. Is it a simple resistor change or is it more complicated?
Always learning
|
|
|
|
| renatoa |
Posted on 03/05/2020 1:43 AM
|
|
Administrator Posts: 3104 Joined: September 30, 2016 |
Check back in the thread, first page, the repair video link in post #5. When the guy detach the plate with bulb from the glass lid, you see the thermostat hanging in two wires. Unplug thermostat from those sockets and use the terminals to connect the SSR. Or short them if you want to connect SSR in other location. Tip: before going further with electronic control, you could try the diode trick, is much simpler and effective, but sure, not allowing Artisan connection and profiling. |
|
|
|
| Koffee Kosmo |
Posted on 03/05/2020 6:24 AM
|
|
Administrator Posts: 1621 Joined: December 31, 2008 |
Quote mkane wrote: Does someone know what steps need to be taken to bypass the Supentown's thermostat. Is it a simple resistor change or is it more complicated? Try this thread and see post 47 https://forum.hom...owstart=40 KK Edited by JackH on 03/05/2020 4:35 PM I home roast and I like it. Designer of the KKTO
Roaster Build information https://homeroast...ad_id=1142 https://docs.goog...lide=id.i0 Blog - http://koffeekosm...gspot.com/ Bezzera Strega, Mazzer Robur Grinder, Pullman Tamper Convex, (KKTO) Turbo Oven Home Roaster. |
|
|
|
| renatoa |
Posted on 03/05/2020 6:43 AM
|
|
Administrator Posts: 3104 Joined: September 30, 2016 |
i.e. this post: https://forum.hom...post_58787 |
|
|
|
| JackH |
Posted on 03/05/2020 4:45 PM
|
 Administrator Posts: 1809 Joined: May 10, 2011 |
My Turbo is an older model Sunpentown with the solid electric element like a stove. Most of the newer models are wired differently and some use Halogen bulbs as the heat source. It is hard to document this because of so many variations in wiring and wire colors. With the thermostat bypassed it will run "wide open" so it needs to be controlled and monitored so it doesn't burn your house down. It is probably a good idea to leave the built in fire safety fuse intact. ---Jack
KKTO Roaster. |
|
|
|
| mkane |
Posted on 03/05/2020 5:05 PM
|
|
1/4 Pounder Posts: 151 Joined: October 23, 2017 |
And the unit I bought is only 1200 w. Seems 1400w is hard to come by so vessel size is of utmost importance.
Always learning
|
|
|
|
| JackH |
Posted on 03/05/2020 6:09 PM
|
|
Administrator Posts: 1809 Joined: May 10, 2011 |
The Galloping Gourmet Perfection-Aire, Model# 707 was the Poppery I of turbo ovens. I believe it was 1400W. If you can find one.
JackH attached the following image:
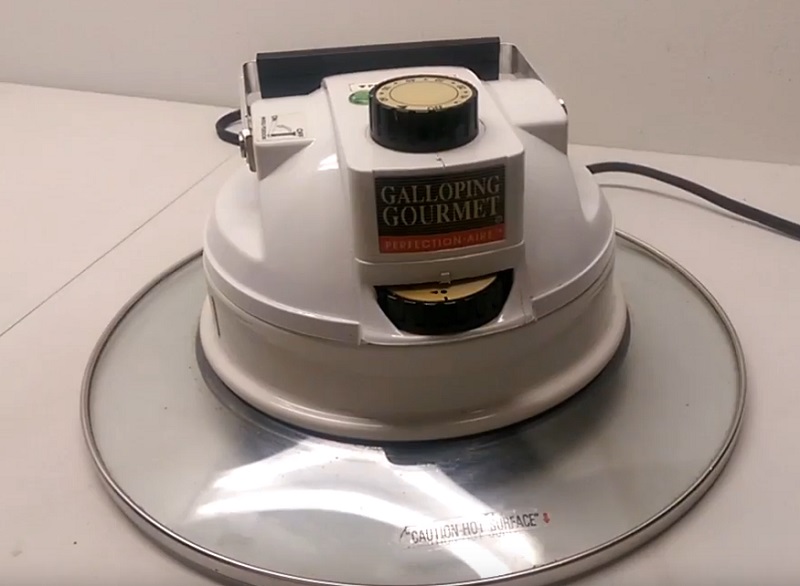
---Jack
KKTO Roaster. |
|
|
|
| mkane |
Posted on 03/05/2020 7:44 PM
|
|
1/4 Pounder Posts: 151 Joined: October 23, 2017 |
Thanks Jack. Found one in nice shape. 1470W. At this rate I'll have enough parts to build 2 units.
Always learning
|
|
|
|
| Alaroast |
Posted on 03/06/2020 11:45 AM
|
|
Newbie Posts: 43 Joined: February 04, 2020 |
I have 2 variations of Sunpentown's ; one is digital and one is regular dial for thermostat and timer. What I found with both of these ovens after using a thermocouple to check chamber temperature is that they will not get hot enough even turned up wide open. Once they get near temperature of 480F, they begin cycling on and off to maintain temp and don't quite get there for a KKTO setup. I'm using older 1200W Savoueux TO that has the solid heating element. It passes 520F if I'm not careful. The thermostat knob shaft broke off several years ago so I inserted a long screw through the broken knob to act as the shaft and it works great. Maybe this allowed knob to go past the recommended setting.
Fiorenzato Bricoletta Espresso Machine, Obel EB Grinder, USRC 3kg roaster
|
|
|
|
| mkane |
Posted on 03/06/2020 5:05 PM
|
|
1/4 Pounder Posts: 151 Joined: October 23, 2017 |
So If I'm going to use the Supentown the thermostat needs to be bypassed or I'll use it to cook something.
Always learning
|
|
|
|
| renatoa |
Posted on 03/07/2020 1:43 AM
|
|
Administrator Posts: 3104 Joined: September 30, 2016 |
I wouldn't say it needs to be bypassed, as mandatory... 480F = 248C, if true convective air temperature, in the center of the oven, is good to do a medium roast. I did light roasts even with 236 C. +400F are required for SC roasts, perhaps, but I am not that kind of coffee guy. Also. modding the thermostat, to translate scale by 10 or 20 degrees, is not a difficult job. Just a screw rotation. |
|
|
|
| mkane |
Posted on 03/07/2020 10:54 AM
|
|
1/4 Pounder Posts: 151 Joined: October 23, 2017 |
I'll take it apart and find that screw. I could also use a lower volume pot set and use less beans to get the inside temp up there? Problem doing this is pot diameter might not match up well. As it is 10" diameter is on the verge of too small.
Always learning
|
|
|
|
| renatoa |
Posted on 03/07/2020 11:28 AM
|
|
Administrator Posts: 3104 Joined: September 30, 2016 |
Ikea steamer insert is 23 cm - 9" Requires welded handles removal though. |
|
|
|
| mkane |
Posted on 03/07/2020 5:27 PM
|
|
1/4 Pounder Posts: 151 Joined: October 23, 2017 |
Of all the insert's I've tried the handles are in the way. I have another double boiler on the way and I'm sure the handles will be in the way also. I'll bend em' or break em'. TO has to fit one way or the other.
Always learning
|
|
|
|
| Koffee Kosmo |
Posted on 03/08/2020 3:16 AM
|
|
Administrator Posts: 1621 Joined: December 31, 2008 |
Quote mkane wrote: Of all the insert's I've tried the handles are in the way. I have another double boiler on the way and I'm sure the handles will be in the way also. I'll bend em' or break em'. TO has to fit one way or the other. I had earlier posted that the OP had the same issue My answer was - the steel handle will bend, just put it in a vice and push You can also put some heat to it to soften it up first KK I home roast and I like it. Designer of the KKTO
Roaster Build information https://homeroast...ad_id=1142 https://docs.goog...lide=id.i0 Blog - http://koffeekosm...gspot.com/ Bezzera Strega, Mazzer Robur Grinder, Pullman Tamper Convex, (KKTO) Turbo Oven Home Roaster. |
|
|
|
| Koffee Kosmo |
Posted on 03/08/2020 10:12 PM
|
|
Administrator Posts: 1621 Joined: December 31, 2008 |
OK after careful deliberation on the thermostat I have found an easy solution This applies to the halogen turbo ovens but any that have an exposed heat sensor No need to dismantle the TO On the photos below you will see a rectangular piece of metal that expands with heat When that heat is reached it trips the heat cycle Speaking manually - if you press it down it will switch off the heat So the easy fix to modify the thermostat is to use a fine screwdriver and lift the metal slightly over to the side so it rests or wedges on the side metal The heat won?t cycle any longer But it comes with a WARNING Don?t leave the roast alone as it will get away from you and may catch on fire So it may be best to leave it standard if you can?t devote your time on the roast 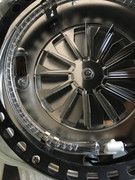 KK I home roast and I like it. Designer of the KKTO
Roaster Build information https://homeroast...ad_id=1142 https://docs.goog...lide=id.i0 Blog - http://koffeekosm...gspot.com/ Bezzera Strega, Mazzer Robur Grinder, Pullman Tamper Convex, (KKTO) Turbo Oven Home Roaster. |
|
|
|
| renatoa |
Posted on 03/09/2020 2:46 AM
|
|
Administrator Posts: 3104 Joined: September 30, 2016 |
Very strange piece of metal there... and big doubts I have it is the temperature regulating thermostat. Why I say this... because that piece is not in the right location to be actuated by temperature knob. All mechanical thermostat models I moded have the thermostat placed on same vertical as the temperature knob, because they are mechanically coupled. Also, the thermostat is placed in the second stage/compartiment, under the bulb plate, to protect it from oils that could cover the contacts and clog the thermostat. I seen stuff in that location only for electronically controlled lids, but they are thermocouple sensors, not thermostats. Not that kind of thing you can make not operational with a screwdriver only. That rectangular piece of metal could be a sensor cover, just a guess... Could be also a safety bimetal, the last chance against fire when everything else fails, which trips at +250C or other high temperature, out of normal oven cooking range. |
|
|
|
| Koffee Kosmo |
Posted on 03/09/2020 6:28 AM
|
|
Administrator Posts: 1621 Joined: December 31, 2008 |
It?s kinda springy When I press that metal IN while the oven element is ON - it clicks and switches off the element OFF So I thought it may be a heat sensitive metal thermostat KK I home roast and I like it. Designer of the KKTO
Roaster Build information https://homeroast...ad_id=1142 https://docs.goog...lide=id.i0 Blog - http://koffeekosm...gspot.com/ Bezzera Strega, Mazzer Robur Grinder, Pullman Tamper Convex, (KKTO) Turbo Oven Home Roaster. |
|
|
|

| Jump to Forum: |
Powered by PHP-Fusion Copyright © 2024 PHP-Fusion Inc
Released as free software without warranties under GNU Affero GPL v3
Designed with ♥ by NetriXHosted by skpacman