
Login

Shoutbox
You must login to post a message.
renatoa
07/26/2024 3:49 PM
Bill grubbe and Jk, 
allenb
07/26/2024 5:15 AM
Spiderkw Welcome to HRO!

renatoa
07/24/2024 8:31 AM
ramiroflores and John123,

 ?
?
?renatoa
07/21/2024 1:18 AM
 , Luislobo
renatoa
07/19/2024 11:28 AM
Koepea,
Forum Threads
Newest Threads
Background Roast Iss...Skywalker roaster mods
Hello from Arkansas
TC4ESP
Green coffee reviews
Hottest Threads
| Skywalker roaster... | [374] |
| TC4ESP | [115] |
| War on Farmers by... | [47] |
| Adventures in flu... | [26] |
| Hello! (soon) Roa... | [17] |
In Memory Of Ginny

Donations
Latest Donations
dmccallum - 10.00
JackH - 25.00
snwcmpr - 10.00
Anonymous - 2.00
Anonymous - 5.00
dmccallum - 10.00
JackH - 25.00
snwcmpr - 10.00
Anonymous - 2.00
Anonymous - 5.00
Users Online
Guests Online: 2
Members Online: 0
Total Members: 8,393
Newest Member: Bill grubbe
Members Online: 0
Total Members: 8,393
Newest Member: Bill grubbe
View Thread
Who is here? 1 guest(s)
Page 1 of 2: 12
|
 Mean Time To Failure for FB Elements
|
|
| jbrux4 |
Posted on 02/13/2020 8:23 AM
|
|
1/4 Pounder  Posts: 139 Joined: October 26, 2019 |
Hello, I just had an element die in my fluid-bed roaster. This is my first roaster, so I don't know how long the elements normally last. It is a Master Appliance HAS-043K - which I thought would be a good one for longevity. I've only got about 10 roasts on it plus testing time. Anybody else experience this? Was it the element or a build issue? Thanks. R/
Jared |
|
|
|
| renatoa |
Posted on 02/13/2020 10:29 AM
|
|
Administrator Posts: 3104 Joined: September 30, 2016 |
Do you have any overheat protection due to low airflow ? A bimetal on hot air exit should be enough to protect your element for overheating. |
|
|
|
| CharcoalRoaster |
Posted on 02/13/2020 10:48 AM
|
 1 1/2 Pounder  Posts: 640 Joined: April 13, 2012 |
Also check for an accidental short with contact of any kind to the element coil. I had a similar issue on my first element when a tiny piece of nichrome from my element build somehow fell into the chamber where the heating element was and shorted it out. |
|
|
|
| greencardigan |
Posted on 02/13/2020 4:58 PM
|
 1 1/2 Pounder Posts: 1185 Joined: November 21, 2010 |
I haven't replaced any heat gun elements. I'm not counting, but I've probably done well over 100 roasts on my small roaster. |
|
|
|
| jbrux4 |
Posted on 02/13/2020 6:52 PM
|
|
1/4 Pounder Posts: 139 Joined: October 26, 2019 |
Quote renatoa wrote: Do you have any overheat protection due to low airflow ? A bimetal on hot air exit should be enough to protect your element for overheating. I don't have protection except me knowing not to let the element run without adequate blower. In this case, I was in the middle of ramping from yellowing to FC, so airflow was much more than adequate. It literally just died in the middle of a roast. I lost 1lb of Ethiopian Harrar. I don't know what you mean regarding the bimetal on hot air exhaust... R/
Jared |
|
|
|
| jbrux4 |
Posted on 02/13/2020 7:41 PM
|
|
1/4 Pounder Posts: 139 Joined: October 26, 2019 |
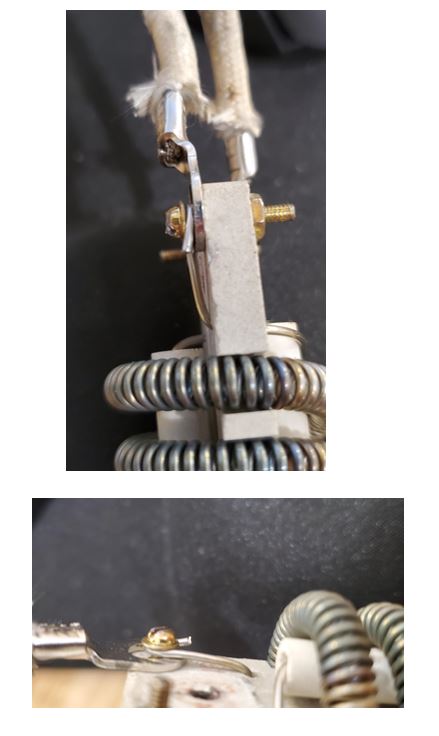
So, the top element in my inline heat pipe decided to melt. See the pic. Ummmm, no idea how this happened. The bottom element looks fine, and the other connection of this burn element is fine. Any ideas so I can avoid this in the future?
jbrux4 attached the following image:

R/
Jared |
|
|
|
| renatoa |
Posted on 02/14/2020 1:04 AM
|
|
Administrator Posts: 3104 Joined: September 30, 2016 |
Melting in the contact areas, and not the wire, is a different story... the culprit was the imperfect contact, an issue that develop in time. If the two contact surfaces aren't perfectly flat and tightened, you can see the contact area as hills and valleys, making contact only in some microscopic points. In these points you will have first a local temperature increase, that led to oxidation, that finally led to complete contact rust. The oxides having increased resistance, in the contact area you will have a significant power drop in a very small volume, that means heat (in excess) => finally melting. |
|
|
|
| jbrux4 |
Posted on 02/14/2020 9:17 AM
|
|
1/4 Pounder Posts: 139 Joined: October 26, 2019 |
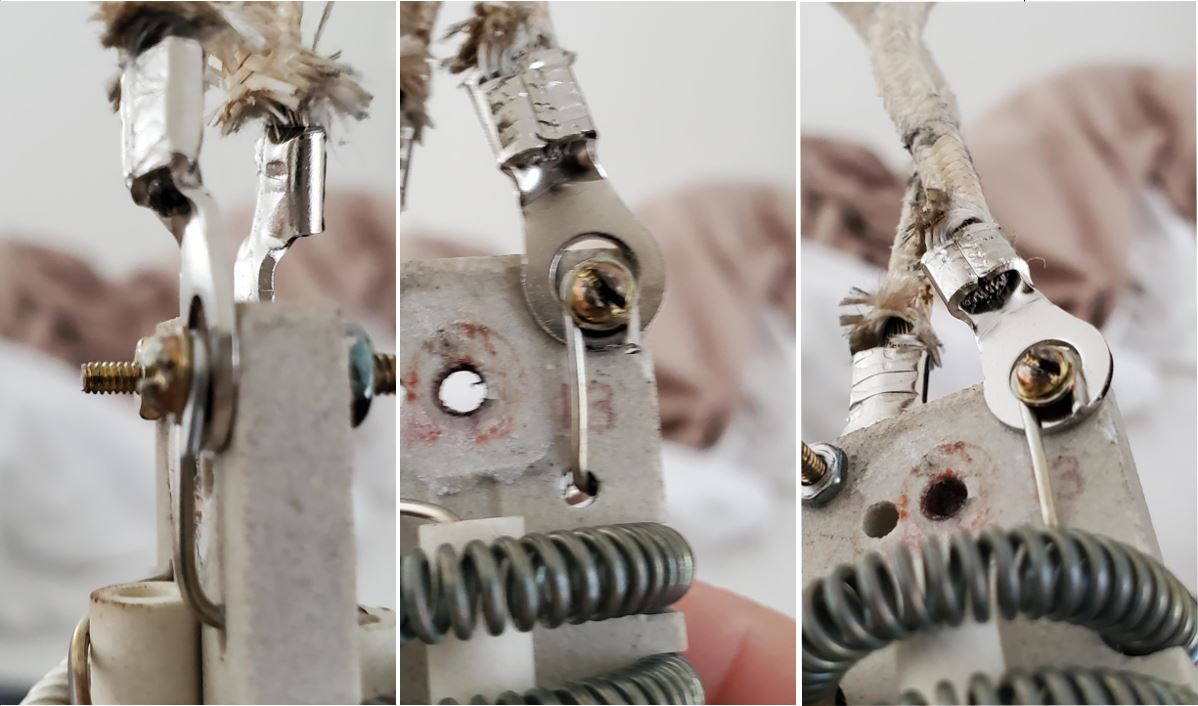
Quote renatoa wrote: Melting in the contact areas, and not the wire, is a different story... the culprit was the imperfect contact, an issue that develop in time. If the two contact surfaces aren't perfectly flat and tightened, you can see the contact area as hills and valleys, making contact only in some microscopic points. In these points you will have first a local temperature increase, that led to oxidation, that finally led to complete contact rust. The oxides having increased resistance, in the contact area you will have a significant power drop in a very small volume, that means heat (in excess) => finally melting. Thank you for the detailed explanation. So, the element that is still working, I've attached as good a picture as I could get to show the sandwich. Is there a different configuration that I could use to mitigate melting?  
jbrux4 attached the following images:
R/
Jared |
|
|
|
| renatoa |
Posted on 02/14/2020 9:42 AM
|
|
Administrator Posts: 3104 Joined: September 30, 2016 |
Sounds ok, the surfaces seems clean and good contact. almost forged  Turn it on again ! And check again after 10 roasts, for any oxide signs. |
|
|
|
| allenb |
Posted on 02/14/2020 11:13 AM
|
 Administrator Posts: 3869 Joined: February 23, 2010 |
Quote Thank you for the detailed explanation. So, the element that is still working, I've attached as good a picture as I could get to show the sandwich. Is there a different configuration that I could use to mitigate melting? One thing that can create issues with varying contact quality is using an incorrectly sized eyelet diameter. Using too large eyelet diameter will cause contact to occur only on one small area of the ring and depending on how things line up, it will sometimes appear to have a good solid contact but in reality does not and voltage drop/overheating can occur. 1/2 lb and 1 lb drum, Siemens Sirocco fluidbed, presspot, chemex, cajun biggin brewer from the backwoods of Louisiana
|
|
|
|
| jbrux4 |
Posted on 02/14/2020 12:02 PM
|
|
1/4 Pounder Posts: 139 Joined: October 26, 2019 |
Quote allenb wrote: Quote Thank you for the detailed explanation. So, the element that is still working, I've attached as good a picture as I could get to show the sandwich. Is there a different configuration that I could use to mitigate melting? One thing that can create issues with varying contact quality is using an incorrectly sized eyelet diameter. Using too large eyelet diameter will cause contact to occur only on one small area of the ring and depending on how things line up, it will sometimes appear to have a good solid contact but in reality does not and voltage drop/overheating can occur. I searched and searched for High Temp eye terminals that could fit 12AWG when I started the project. I suspected a possible issue from the beginning - I mean, I knew a better fitting eyelet would simply be better. I was unsuccessful in finding such a unique connector, obviously. Is there such a thing that accepts 12AWG for an M2/3 terminal? R/
Jared |
|
|
|
| allenb |
Posted on 02/14/2020 3:42 PM
|
|
Administrator Posts: 3869 Joined: February 23, 2010 |
I've found large wire gauge in small screw size (stainless steel or something high temp) in the past at one of the resistive wire heater suppliers but this was quite a while ago and can't remember who. I'll do some digging and let you know what I find. Hopefully someone else here with more current build can chime in as well (help 
1/2 lb and 1 lb drum, Siemens Sirocco fluidbed, presspot, chemex, cajun biggin brewer from the backwoods of Louisiana
|
|
|
|
| jbrux4 |
Posted on 02/14/2020 5:15 PM
|
|
1/4 Pounder Posts: 139 Joined: October 26, 2019 |
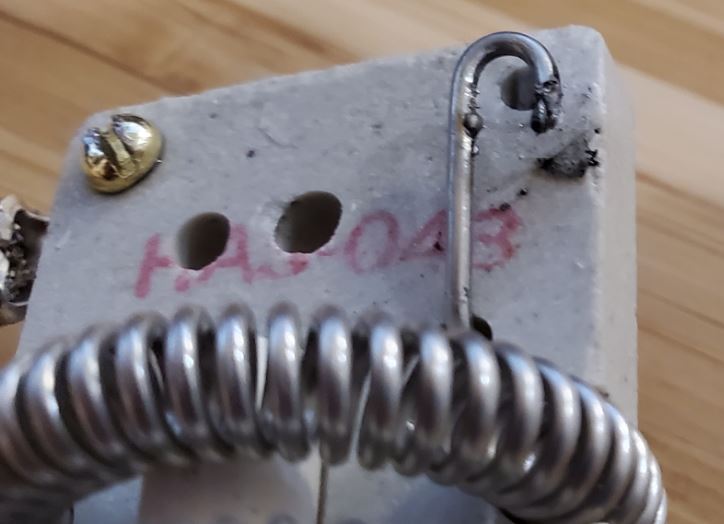
Quote allenb wrote: I've found large wire gauge in small screw size (stainless steel or something high temp) in the past at one of the resistive wire heater suppliers but this was quite a while ago and can't remember who. I'll do some digging and let you know what I find. Hopefully someone else here with more current build can chime in as well (help Yep. I really need this type of connector. I put on a brand new element and it fried upon ignition. See pic. 
jbrux4 attached the following image:

R/
Jared |
|
|
|
| allenb |
Posted on 02/14/2020 6:48 PM
|
|
Administrator Posts: 3869 Joined: February 23, 2010 |
Did the nichrome wire melt through or just arc across to the washer?
1/2 lb and 1 lb drum, Siemens Sirocco fluidbed, presspot, chemex, cajun biggin brewer from the backwoods of Louisiana
|
|
|
|
| jbrux4 |
Posted on 02/14/2020 7:53 PM
|
|
1/4 Pounder Posts: 139 Joined: October 26, 2019 |
Quote There is slight "melting" but the wire hook is in tact. See pic. 
jbrux4 attached the following image:
R/
Jared |
|
|
|
| jbrux4 |
Posted on 02/14/2020 8:06 PM
|
|
1/4 Pounder Posts: 139 Joined: October 26, 2019 |
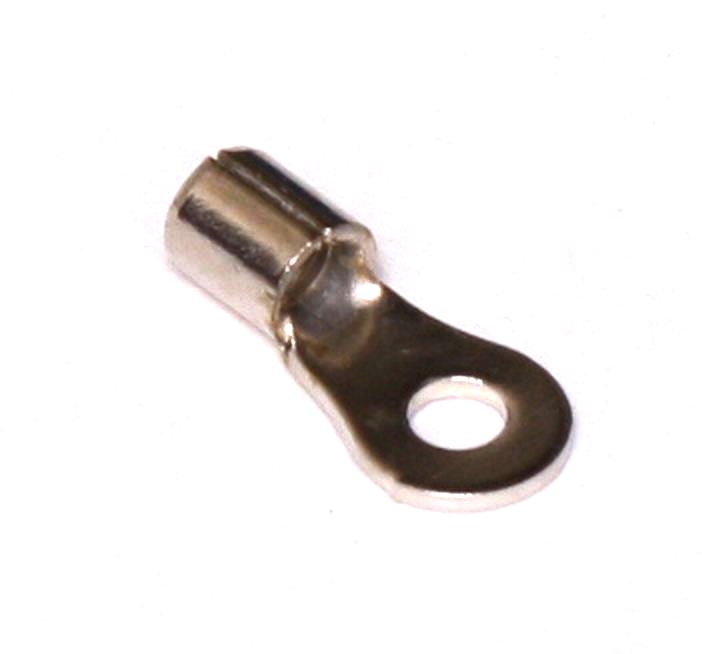
The smallest eyelet I have found so far (#6): https://www.wirin...ieces.html
jbrux4 attached the following image:
R/
Jared |
|
|
|
| allenb |
Posted on 02/14/2020 8:35 PM
|
|
Administrator Posts: 3869 Joined: February 23, 2010 |
I haven't found anything smaller than that. I would go for the #6 eyelet and step through a couple of washer sizes to get good full contact with that one.
1/2 lb and 1 lb drum, Siemens Sirocco fluidbed, presspot, chemex, cajun biggin brewer from the backwoods of Louisiana
|
|
|
|
| jbrux4 |
Posted on 02/14/2020 11:55 PM
|
|
1/4 Pounder Posts: 139 Joined: October 26, 2019 |
Quote allenb wrote: I haven't found anything smaller than that. I would go for the #6 eyelet and step through a couple of washer sizes to get good full contact with that one. Is there a preferred washer material (i.e. nickel plated, ss, etc.)? And, do you think the element is trash now? R/
Jared |
|
|
|
| renatoa |
Posted on 02/15/2020 2:56 AM
|
|
Administrator Posts: 3104 Joined: September 30, 2016 |
Never trash it, even melt in the middle. I have one with two wires of different diameters, just wrapped together and inserted inside of a brass tube, then the tube pinch each side with a wire clamp tool. Working ok for some years. |
|
|
|
| jbrux4 |
Posted on 02/15/2020 10:30 AM
|
|
1/4 Pounder Posts: 139 Joined: October 26, 2019 |
Quote renatoa wrote: Never trash it, even melt in the middle. I have one with two wires of different diameters, just wrapped together and inserted inside of a brass tube, then the tube pinch each side with a wire clamp tool. Working ok for some years. Given the location of the degradation, wouldn't the oxidation to rust to failure just happen again? R/
Jared |
|
|
|
| CK |
Posted on 02/15/2020 12:38 PM
|
|
1/2 Pounder  Posts: 252 Joined: December 07, 2018 |
R&D at its finest... sorry for your temporary set backs. Any idea of the amperage you're putting through that connection? I'm reading about dissimilar metal connections and negative effects of high current at the connection point. |
|
|
|
| jbrux4 |
Posted on 02/15/2020 6:25 PM
|
|
1/4 Pounder Posts: 139 Joined: October 26, 2019 |
In trying to find a good solution, I am thinking that the male part of a spade connector could work. It has a tiny hole and a large surface area. I could make the hole bigger if needed to fit on the tiny screw. I would have to find a high temp non-insulated connector. Anybody see any issues with this potential solution? 
jbrux4 attached the following image:

R/
Jared |
|
|
|
| allenb |
Posted on 02/15/2020 7:11 PM
|
|
Administrator Posts: 3869 Joined: February 23, 2010 |
Wow, you are very resourceful! That should work fine. I would cut the plastic insulator off before crimping and you should be good to go by drilling the proper hole diameter. Also, I would use a washer in between the machine screw head and spade terminal.
1/2 lb and 1 lb drum, Siemens Sirocco fluidbed, presspot, chemex, cajun biggin brewer from the backwoods of Louisiana
|
|
|
|
| jbrux4 |
Posted on 02/15/2020 8:56 PM
|
|
1/4 Pounder Posts: 139 Joined: October 26, 2019 |
Quote CK wrote: R&D at its finest... sorry for your temporary set backs. Any idea of the amperage you're putting through that connection? I'm reading about dissimilar metal connections and negative effects of high current at the connection point. MFR documentation puts it at 120V, 60Hz, 14.5A, 1740W. I don't run at 100% ever. I get into the 80s and 90s towards last quarter of the roast. The wire is high temp nickel coated copper wire. The terminal is nickel coated high temp. I think the screws, washers, and nuts that come with the element are brass - just from the color of the material. The element is nichrome. Here are more images of the burnt connections.  Side Note: Also, I attached a file with my energy use estimate/calculation. I am using it for my break-even analysis workbook, and I want to know it produces the correct output. Does it seem correct?
jbrux4 attached the following file:
jbrux4 attached the following image:
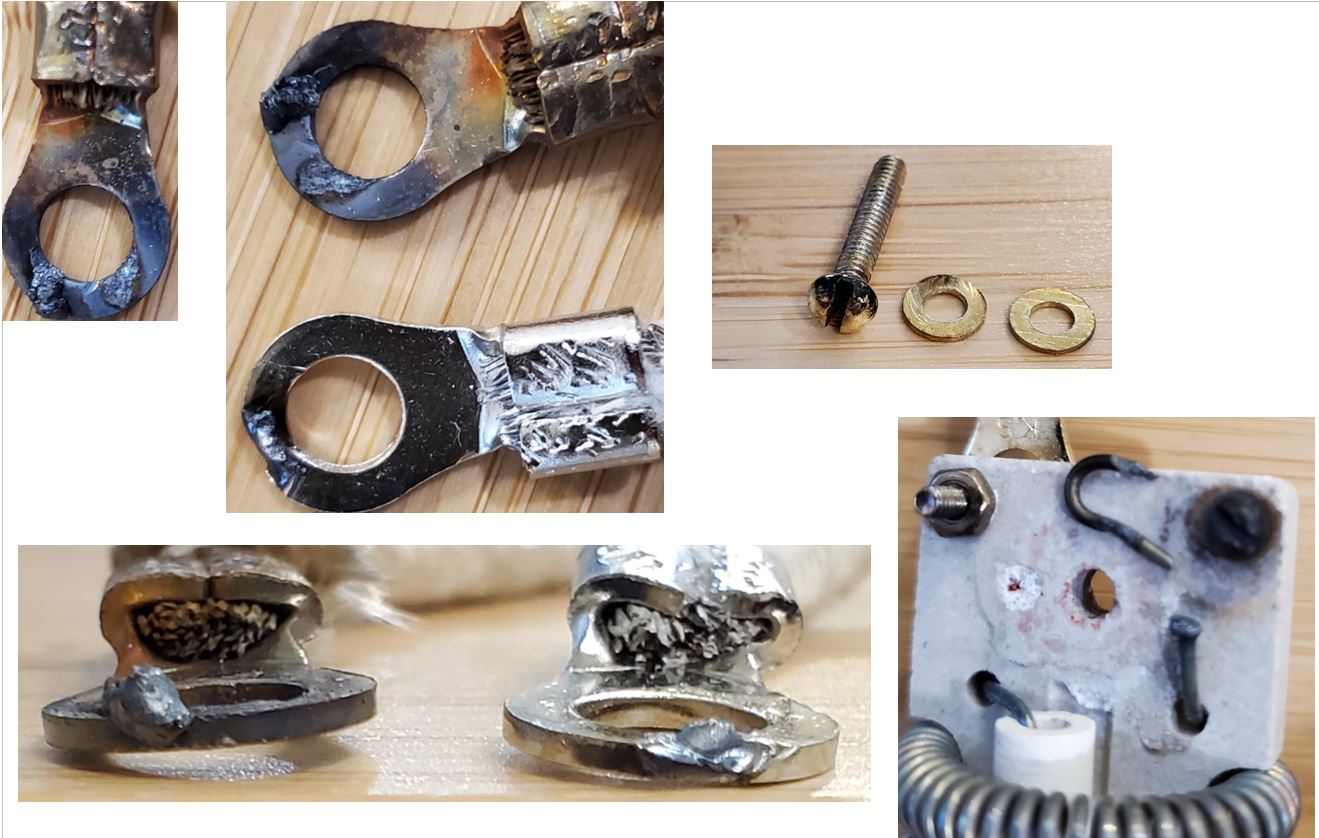
R/
Jared |
|
|
|
| renatoa |
Posted on 02/16/2020 4:07 AM
|
|
Administrator Posts: 3104 Joined: September 30, 2016 |
Intrigued that the other terminal connection looks fine... I would investigate how/what are they different... I would try the following sandwich: - washer - element wire, cut to remove any rust and melted drops, then coiled around the screw in a single loop - washer - eyelet with AWG12 wire Edited by renatoa on 02/16/2020 4:13 AM |
|
|
|

Page 1 of 2: 12
| Jump to Forum: |
Powered by PHP-Fusion Copyright © 2024 PHP-Fusion Inc
Released as free software without warranties under GNU Affero GPL v3
Designed with ♥ by NetriXHosted by skpacman