
Login

Shoutbox
You must login to post a message.
renatoa
07/26/2024 3:49 PM
Bill grubbe and Jk, 
allenb
07/26/2024 5:15 AM
Spiderkw Welcome to HRO!

renatoa
07/24/2024 8:31 AM
ramiroflores and John123,

 ?
?
?renatoa
07/21/2024 1:18 AM
 , Luislobo
renatoa
07/19/2024 11:28 AM
Koepea,
Forum Threads
Newest Threads
Skywalker roaster modsBackground Roast Iss...
Hello from Arkansas
TC4ESP
Green coffee reviews
Hottest Threads
| Skywalker roaster... | [375] |
| TC4ESP | [115] |
| War on Farmers by... | [47] |
| Adventures in flu... | [26] |
| Hello! (soon) Roa... | [17] |
In Memory Of Ginny

Donations
Latest Donations
dmccallum - 10.00
JackH - 25.00
snwcmpr - 10.00
Anonymous - 2.00
Anonymous - 5.00
dmccallum - 10.00
JackH - 25.00
snwcmpr - 10.00
Anonymous - 2.00
Anonymous - 5.00
Users Online
Guests Online: 5
Members Online: 0
Total Members: 8,393
Newest Member: Bill grubbe
Members Online: 0
Total Members: 8,393
Newest Member: Bill grubbe
View Thread
Who is here? 1 guest(s)
 KKTO Build
|
|
| mkane |
Posted on 03/21/2020 11:07 AM
|
 1/4 Pounder  Posts: 151 Joined: October 23, 2017 |
I may try that Paul. Slits with a dremel, then some other type of tool to raise an edge. Which direction should the raised edge face?
Always learning
|
|
|
|
| JackH |
Posted on 03/21/2020 11:50 AM
|
 Administrator Posts: 1809 Joined: May 10, 2011 |
A tip I found about the hard way: When you make cuts in the roasting chamber, be sure to smooth out the holes with sanding. I found that the drilled holes with sharp edges acted like a cheese grater, slicing/damaging the beans as they spin around. ---Jack
KKTO Roaster. |
|
|
|
| renatoa |
Posted on 03/21/2020 12:25 PM
|
|
Administrator Posts: 3104 Joined: September 30, 2016 |
Quote mkane wrote: I may try that Paul. Slits with a dremel, then some other type of tool to raise an edge. Which direction should the raised edge face? In the direction of the vortex spiral. If not ever done a roast, so rotation unknown, then drop some hay/dried grass inside the pot, and start the lid at lowest temperature. Will see the grass drying, then raised by the airflow, thrown outside the pot and spinning along the wall. For my lid the vortex spinning direction is CCW, so the opening for chaff collecting (cyclone exhaust) has the orientation according to this rotation direction. |
|
|
|
| mkane |
Posted on 03/21/2020 4:10 PM
|
|
1/4 Pounder Posts: 151 Joined: October 23, 2017 |
I need to work on the agitator as the roast isn't real even. I also wasn't prepared to get the beans cool fast enough. But, there's plenty of heat.
mkane attached the following images:


Always learning
|
|
|
|
| mkane |
Posted on 03/21/2020 4:14 PM
|
|
1/4 Pounder Posts: 151 Joined: October 23, 2017 |
1C was 9:15. 350g. I still need to source some silicone tubing.
Always learning
|
|
|
|
| Koffee Kosmo |
Posted on 03/21/2020 4:27 PM
|
 Administrator Posts: 1621 Joined: December 31, 2008 |
Quote mkane wrote: I may try that Paul. Slits with a dremel, then some other type of tool to raise an edge. Which direction should the raised edge face? Generally in a TO the chaff spins counter clockwise With the agitator Try to copy the shape of the original solid unit in the photo Notice the higher profile at the shaft and again at the side This shape mixes the beans in a figure 8 Silicone tubing should be high temp 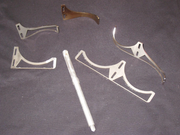 KK I home roast and I like it. Designer of the KKTO
Roaster Build information https://homeroast...ad_id=1142 https://docs.goog...lide=id.i0 Blog - http://koffeekosm...gspot.com/ Bezzera Strega, Mazzer Robur Grinder, Pullman Tamper Convex, (KKTO) Turbo Oven Home Roaster. |
|
|
|
| mkane |
Posted on 03/21/2020 6:02 PM
|
|
1/4 Pounder Posts: 151 Joined: October 23, 2017 |
Great pic's Paul, thanks. I'll get on this tomorrow.
Always learning
|
|
|
|
| mkane |
Posted on 03/22/2020 6:09 PM
|
|
1/4 Pounder Posts: 151 Joined: October 23, 2017 |
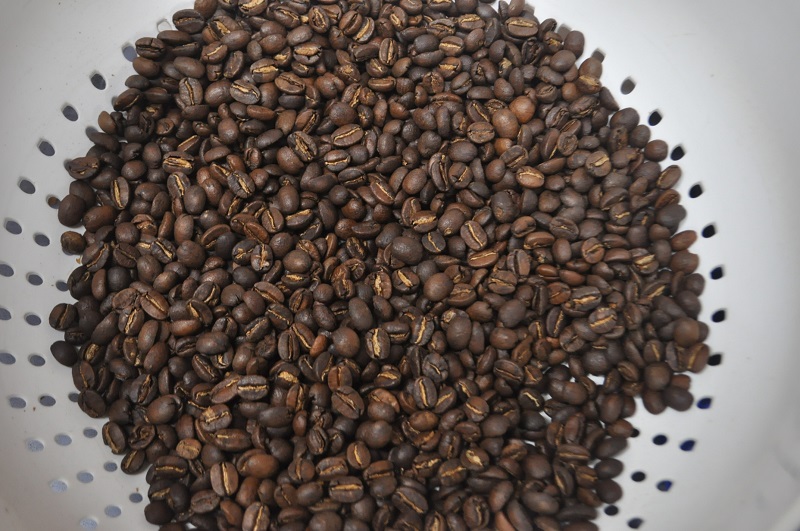
Spent the morning fabbing a new agitator, using a Dremel, files and a drill press. Down the road I may just have a CNC company spit a few of these out. Did 3 back to back roasts and just like our drum roaster it just gets better as the machine heat soaks. The 300 g batch in the pic reached DE @ 4:30, 1C @ 8:17. No more burnt beans. 
Always learning
|
|
|
|
| mkane |
Posted on 03/22/2020 6:13 PM
|
|
1/4 Pounder Posts: 151 Joined: October 23, 2017 |
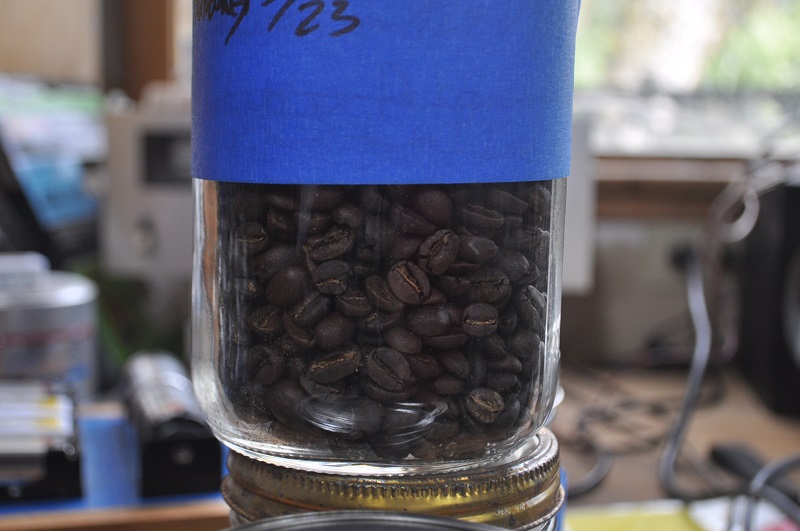
Missed something. Still have holes to plug where I removed the handles. I'm going to flip em' so there out of the way. And order silicone tube, heat resistant of course.
mkane attached the following images:


Always learning
|
|
|
|
| mkane |
Posted on 03/22/2020 6:32 PM
|
|
1/4 Pounder Posts: 151 Joined: October 23, 2017 |
One more thing, I need to wrap the outer drum. If nothing else to keep from getting burnt.
Always learning
|
|
|
|
| Gullygossner |
Posted on 03/22/2020 7:34 PM
|
|
1/4 Pounder Posts: 95 Joined: January 06, 2019 |
Quote mkane wrote: One more thing, I need to wrap the outer drum. If nothing else to keep from getting burnt. I've been using a cotton towel with no issues but others have used fibreglass fire blankets. I think my final insulation will end up being felt but the towel will do the trick until I source that. Creative agitator design! Much like the production units. |
|
|
|
| mkane |
Posted on 03/23/2020 5:30 PM
|
|
1/4 Pounder Posts: 151 Joined: October 23, 2017 |
That agitator seems to work very well. Did another roast today. Warmed the machine 10 minutes or so, ET 410? f . DE @ 4;05, 1C 7:45. Trying to roast darker for my wife. Campfire like. Beans look real evenly roasted.
Always learning
|
|
|
|
| mkane |
Posted on 03/23/2020 5:35 PM
|
|
1/4 Pounder Posts: 151 Joined: October 23, 2017 |
.
mkane attached the following image:
Always learning
|
|
|
|
| Koffee Kosmo |
Posted on 03/24/2020 1:07 AM
|
|
Administrator Posts: 1621 Joined: December 31, 2008 |
It will take some time and many roasts under your belt to gain experience with the roaster before you can call yourself a fully fledged home roaster Good work on the build so far now start roasting KK I home roast and I like it. Designer of the KKTO
Roaster Build information https://homeroast...ad_id=1142 https://docs.goog...lide=id.i0 Blog - http://koffeekosm...gspot.com/ Bezzera Strega, Mazzer Robur Grinder, Pullman Tamper Convex, (KKTO) Turbo Oven Home Roaster. |
|
|
|
| mkane |
Posted on 03/24/2020 6:44 AM
|
|
1/4 Pounder Posts: 151 Joined: October 23, 2017 |
Woke up thinking about a way to measure BT. I can't think of a way. Is there one? Although from my scouring topics on coffee roasting ET is just as important, no?
Always learning
|
|
|
|
| renatoa |
Posted on 03/24/2020 7:38 AM
|
|
Administrator Posts: 3104 Joined: September 30, 2016 |
Do you already measure BT ? How? I mean where is the sensor placed ... I seen the Fluke meter in pics, but not the probe location. ET is important, I mean VERY important, when you have a setup not allowing a precise BT measurement. Like Gene roaster for example. That's why I ask the above. Also, does your meter features any communication/connections, or internal temperature logging ? If not, and you plan reading visually, and write down by hand the time/temp, then there is no more precision requirements. Maybe you can improve this using the roastlogger OCR feature, i.e. aim meter display with a camera and record optical recognised values (page 11 of manual). In a TO the most accurate ET measurement is right in the center of the oven. How you place a probe there is one of the many ways to skin a cat. |
|
|
|
| Koffee Kosmo |
Posted on 03/24/2020 8:08 AM
|
|
Administrator Posts: 1621 Joined: December 31, 2008 |
The easiest of my designs to fit a probe into the bean mass of the KKTO roaster is - Over the perforated pots top lip and in between the join of the silicone tubing The reason it works is that it sits just inside the side wall and the agitator blade when properly bent is positioned 1/2 ? from the side wall So the probe sits in this void but inside the bean mass Similar to this 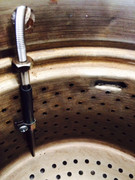 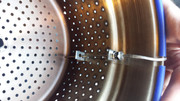 KK I home roast and I like it. Designer of the KKTO
Roaster Build information https://homeroast...ad_id=1142 https://docs.goog...lide=id.i0 Blog - http://koffeekosm...gspot.com/ Bezzera Strega, Mazzer Robur Grinder, Pullman Tamper Convex, (KKTO) Turbo Oven Home Roaster. |
|
|
|
| mkane |
Posted on 03/24/2020 8:22 AM
|
|
1/4 Pounder Posts: 151 Joined: October 23, 2017 |
Thanks for the pic's Paul. Guess I'l put some more bend in the agitator blade. renatoa, the TC's in use for the time being is just floating in mid air, measuring ET. No BT probe, yet. The plan is to use Artisan software to track profiles. Always learning
|
|
|
|
| renatoa |
Posted on 03/24/2020 10:00 AM
|
|
Administrator Posts: 3104 Joined: September 30, 2016 |
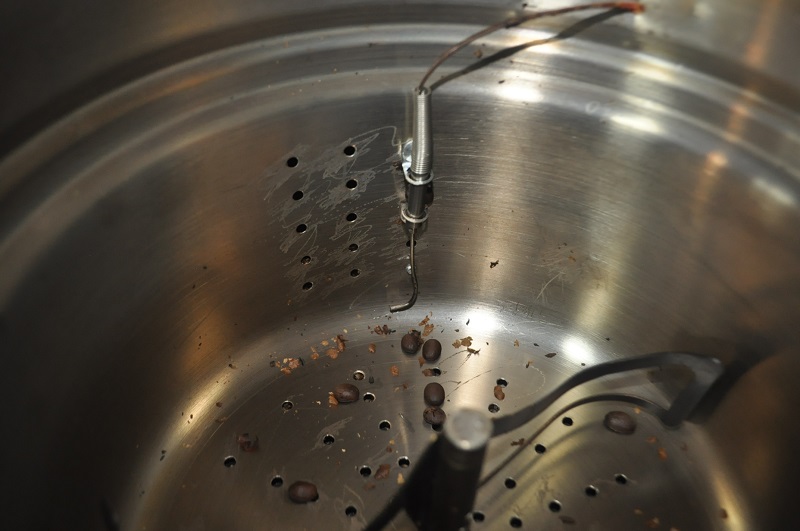
Tried the position above and get beans stuck between probe and the wall, that finally bent the probe. So mine is placed as in the picture attached. ...
renatoa attached the following image:

|
|
|
|
| renatoa |
Posted on 03/24/2020 10:06 AM
|
|
Administrator Posts: 3104 Joined: September 30, 2016 |
Back to your ET question. I would try first to see if I can get good BT readings, i.e. values smooth enough to not give headaches when looking at RoR curve... then think to ET as the next step. If having a good BT reading, then ET is just for safety, not mandatory to judge a good roast. |
|
|
|
| mkane |
Posted on 03/24/2020 12:43 PM
|
|
1/4 Pounder Posts: 151 Joined: October 23, 2017 |
Thanks. I might just try a bit fat probe and see if it stays straight.
Always learning
|
|
|
|
| mkane |
Posted on 03/24/2020 7:16 PM
|
|
1/4 Pounder Posts: 151 Joined: October 23, 2017 |
I have the TC wires shoved into a DMM. Don't know how accurate this could be. Charged @ 400? TP 45 sec 177? 3:50 300? 4:38 320? 5:12 350? 6:00 370? 1C 8min 395? I dropped roast @ 10:20-430?. My wife likes it dark. Always learning
|
|
|
|
| mkane |
Posted on 03/24/2020 7:17 PM
|
|
1/4 Pounder Posts: 151 Joined: October 23, 2017 |
Keep forgetting
mkane attached the following images:

Always learning
|
|
|
|
| mkane |
Posted on 03/31/2020 8:43 PM
|
|
1/4 Pounder Posts: 151 Joined: October 23, 2017 |
This arrived as did the tubing. https://www.ebay....2569538620 much for instructions , does this need 220v AC to operate? My silicone held up to the heat BTW. Happy camper.
Edited by JackH on 04/01/2020 7:06 AM Always learning
|
|
|
|
| Koffee Kosmo |
Posted on 03/31/2020 10:16 PM
|
|
Administrator Posts: 1621 Joined: December 31, 2008 |
Quote mkane wrote: This arrived as did the tubing. https://www.ebay.com/itm/4000W-AC-220V-SCR-Voltage-Regulator-Motor-Speed-Control-Semiconductor-Silic/202569538620No much for instructions , does this need 220v AC to operate? My silicone held up to the heat BTW. Happy camper. Good to see that you are enjoying coffee roasting This info from the specs How to Use: 1.The input is connected with the AC 220V. 2.Output wire is connected to the electric cooker or appliance motor. 3.Turn the knob for speed, voltage, temperature control. However it may work on 110V as the Voltage regulation range starts at 10V But someone with more electrical knowledge can answer that better than me KK I home roast and I like it. Designer of the KKTO
Roaster Build information https://homeroast...ad_id=1142 https://docs.goog...lide=id.i0 Blog - http://koffeekosm...gspot.com/ Bezzera Strega, Mazzer Robur Grinder, Pullman Tamper Convex, (KKTO) Turbo Oven Home Roaster. |
|
|
|

| Jump to Forum: |
Powered by PHP-Fusion Copyright © 2024 PHP-Fusion Inc
Released as free software without warranties under GNU Affero GPL v3
Designed with ♥ by NetriXHosted by skpacman