
Login

Shoutbox
You must login to post a message.
renatoa
07/26/2024 3:49 PM
Bill grubbe and Jk, 
allenb
07/26/2024 5:15 AM
Spiderkw Welcome to HRO!

renatoa
07/24/2024 8:31 AM
ramiroflores and John123,

 ?
?
?renatoa
07/21/2024 1:18 AM
 , Luislobo
renatoa
07/19/2024 11:28 AM
Koepea,
Forum Threads
Newest Threads
Background Roast Iss...Skywalker roaster mods
Hello from Arkansas
TC4ESP
Green coffee reviews
Hottest Threads
| Skywalker roaster... | [374] |
| TC4ESP | [115] |
| War on Farmers by... | [47] |
| Adventures in flu... | [26] |
| Hello! (soon) Roa... | [17] |
In Memory Of Ginny

Donations
Latest Donations
dmccallum - 10.00
JackH - 25.00
snwcmpr - 10.00
Anonymous - 2.00
Anonymous - 5.00
dmccallum - 10.00
JackH - 25.00
snwcmpr - 10.00
Anonymous - 2.00
Anonymous - 5.00
Users Online
Guests Online: 3
Members Online: 0
Total Members: 8,393
Newest Member: Bill grubbe
Members Online: 0
Total Members: 8,393
Newest Member: Bill grubbe
View Thread
Who is here? 1 guest(s)
 Cyclops - my 1kg drum build
|
|
| pjvdl |
Posted on 07/05/2020 9:34 PM
|
 Newbie  Posts: 38 Joined: April 05, 2020 |
As a bit of an isolation project, I decided to build a drum roaster earlier in the year to replace a BBQ roaster that I have been using for the last couple of years. I've named it cyclops for the one-eyed monster that it has become - you will see what I mean from the photos that I post in due course! I think my ambition exceeded my fabrication skills - but hey, they can only get better! This is my first post, so before I share my cyclops story though, I would like to say a HUGE thankyou to all of those who contribute to this forum! Without the invaluable information that I have gleened from this site, I doubt I could have ever got close to doing this. So, Cyclops is nearing completion, which is very exciting; both for myself and my wife who is looking forward to getting her husband back  But, I have hit a bit of a snag, which I would appreciate your collective wisdom on! But, I have hit a bit of a snag, which I would appreciate your collective wisdom on!Some background and context ... I began by setting myself some parameters:
With these parameters set, and based on a huge amount of reading of this site and other sources, I decided on the following details:
It is by no means finished yet, as you will see from the photos, but after endless hours of building, welding, experimenting, failing and trying again over the last 3 months, I tried my first test roast a few days ago. It was a bit of a flying blind process, as I have not yet finished control mechanisms for the heater or fan and I only have BT, but the attached photos show what I have so far ... The problem that I have come up against though, is that I have now blown 3 nichrome elements. You will just see in the 3rd photo the element sitting behind the fan enclosure. The heater is essentially an element designed for a hot air guy and is mounted in a 4 cm diamter tube designed to replicate the tube that these heaters are design for. It is insulated using mica sheets. I am aware that this setup is probably not providing as much radiant heat to the drum as I would like, but the heaters seem to need a reasonably high minimum airflow to avoid melting. Even with this airflow though, I am still melting them. I am aware of a few threads discussing this, but none seem to arrive at a perfect solution. So my question is, should I be mounting the heater this way, or is there a better way? Many thanks again to all on this site. Any feedback or suggestions would be very much appreciated! For those who are interested, I have captured the project in many photos that I have shared at https://photos.ap...11njNVVQF7 Paul.
pjvdl attached the following images:
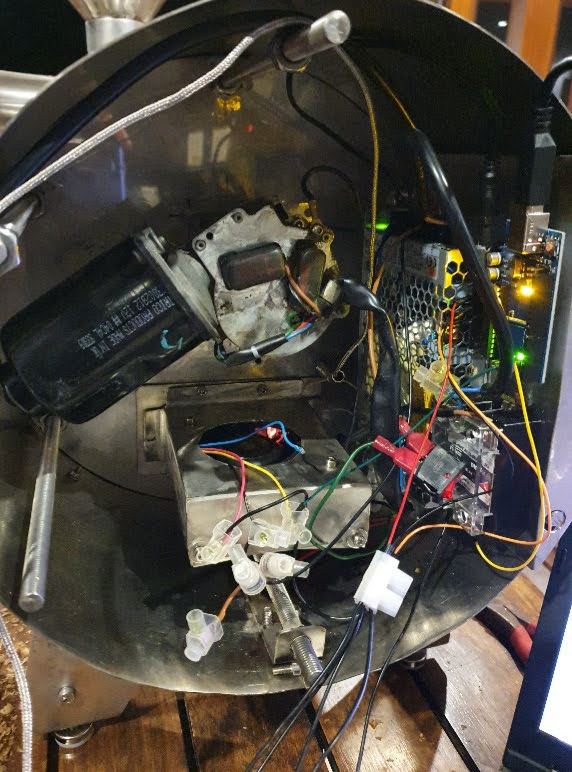

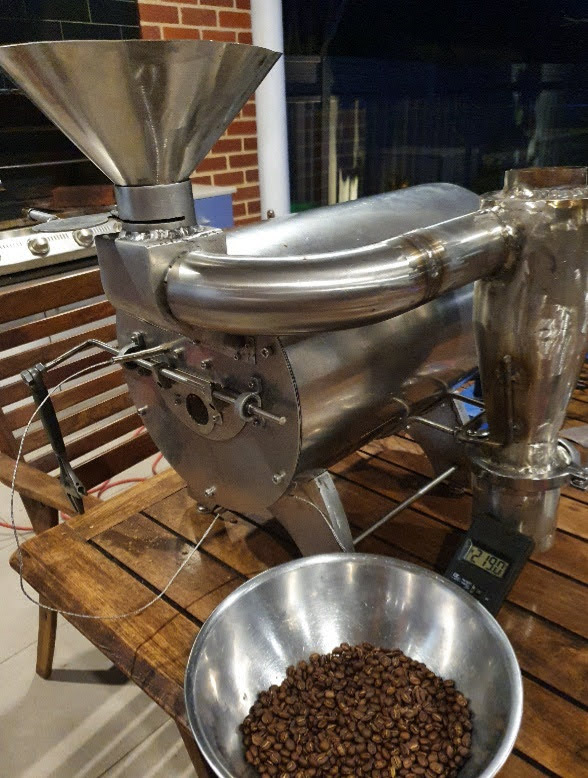
Edited by pjvdl on 07/06/2020 12:17 AM |
|
|
|
| directtraderoasting |
Posted on 07/06/2020 4:54 PM
|
|
Newbie Posts: 13 Joined: July 06, 2020 |
Maybe I missed it, but what is the drum thickness and what rpm? Nice build. I have a custom 2kg, but looking to make a smaller one in the future as well. |
|
|
|
| JackH |
Posted on 07/06/2020 9:36 PM
|
 Administrator Posts: 1809 Joined: May 10, 2011 |
Welcome to Homeroasters! Nice job on the roaster! Thanks for posting your build. Hang on a bit, someone here should be able to help you with the element problem. ---Jack
KKTO Roaster. |
|
|
|
| pjvdl |
Posted on 07/07/2020 1:05 AM
|
|
Newbie Posts: 38 Joined: April 05, 2020 |
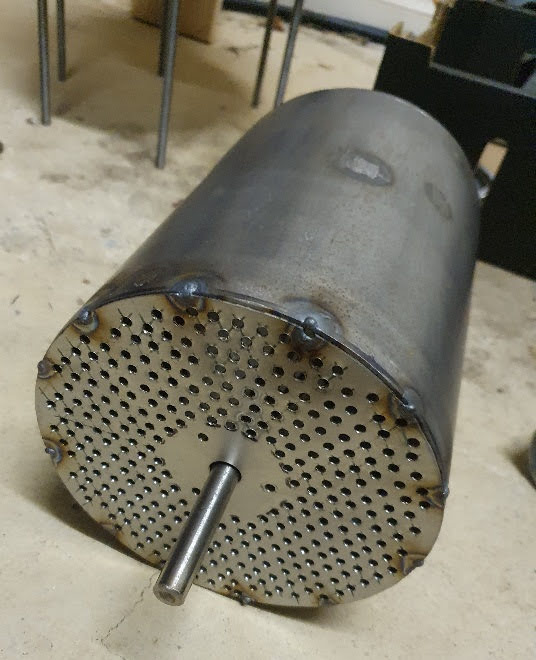
Quote directtraderoasting wrote: Maybe I missed it, but what is the drum thickness and what rpm? Nice build. I have a custom 2kg, but looking to make a smaller one in the future as well. Thanks. No you didn't miss it The fire extinguisher that I used has some type of carbon steel body. Wall thickness is approx 1.7mm thick, so hopefully about right. I have welded a perforated stainless backplate on (only because I had plenty of stainless left over from the build). I am using a re-puposed 12V DC, 2-speed windscreen wiper motor from and old Ford for the drum (picked up from a wreckers for $25). Published speeds for this are 65 rpm and 45 rpm, although by reconfiguring the wiring I can also get 130 rpm. I am currently using 65 rpm, which I have tested with 500g and 1kg bean loads and it seems to be giving the beans plenty of air, so hopefully should be about right. I also has plenty of torque, even when beans get a little caught up against the face of the roaster. If the speed isn't quite right, might I might need to take advantage of the Arduino TC4+'s phase angle control to tune the speed, but I am not going to go there unless I need to.
pjvdl attached the following images:


|
|
|
|
| pjvdl |
Posted on 07/07/2020 1:38 AM
|
|
Newbie Posts: 38 Joined: April 05, 2020 |
Quote JackH wrote: Welcome to Homeroasters! Nice job on the roaster! Thanks for posting your build. Hang on a bit, someone here should be able to help you with the element problem. Thanks Jack. Don't look at the fabrication too closely as it's a bit rough, but still perfectly servicable! I have done a bit more research and testing on my element problem (and blown another element in the process :( ). From my testing, the elements have the following properties:
I can calculate the wire length and temperature using https://jacobs-on...eCalc.html. I get the following:
Melting temperature of nichrome is around 1400 degrees C, so we should be well under this, but this temperature assumes a straight oxidised wire in stagnant air that is not in contact with anything.. So my current theory is that the temperature is getting much higher than this because I am using an open coil element mounted in a confined space (photo below of the blown element). On this basis, I think my options are: - use the arduino TC4 to restrict the maximum power to the element (eg 70% of max) - use a bigger fan to increase airflow (I am currently using a centrifugal fan with a published max of 42 CFM) - change the mounting of the element to give better airflow - combination of the above The downside of restricting the power is that I understand from my reading here that 1800W is already on the low side for a 1kg bean load. I have included provision in the roasting chamber for a 2nd element, so I could potentially run 2 x 1800W elements in parallel at a max of 70% power (3600W x 70% = 2520W), but I'm not really convinced yet that this is going to fix the problem. As I think I mentioned, I currently have the elements mounted in a 4cm diameter tube, through which the fan forces air. This has the advantage of ensuring good airflow, but I think the other adverse side effect of this arrangement is that a high airflow means that the far end of the element reaches melting point because the temperature breaker mounted at the near end of the element trips. So, the other option I am considering is to free mount the element(s) in the roasting chamber. I would then be relying more open free air flow around the elements, rather than the forced air through the pipe. The best option may be to configure the operation of the fan and heater to ensure that the fan is always operating at a minimum level for a given heat level, effectively linking the ramping of the fan to the ramping of the heater. I am a software engineer by trade and have already made a number of changes to the Arduino aArtisanQ_PID sketchbook to support some other changes I wanted, so this might be the easiest option for me. Unfortunately, the complexities of the heat dynamics involved are getting beyond me, so any help in this area would be very welcome!
pjvdl attached the following image:
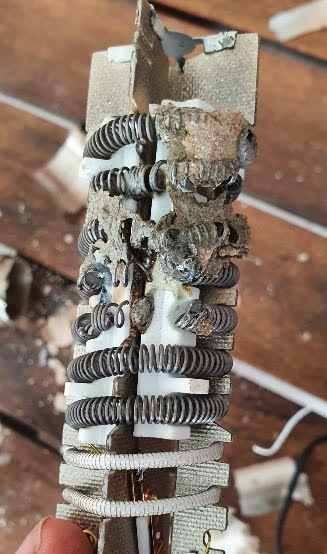
Edited by pjvdl on 07/07/2020 1:52 AM -- Paul
ECM Rocket espresso Eureka Mignon grinder 500g BBQ rotisserie roaster 1kg drum roaster |
|
|
|
| directtraderoasting |
Posted on 07/07/2020 8:31 AM
|
|
Newbie Posts: 13 Joined: July 06, 2020 |
Quote pjvdl wrote: Quote directtraderoasting wrote: Maybe I missed it, but what is the drum thickness and what rpm? Nice build. I have a custom 2kg, but looking to make a smaller one in the future as well. Thanks. No you didn't miss it The fire extinguisher that I used has some type of carbon steel body. Wall thickness is approx 1.7mm thick, so hopefully about right. I have welded a perforated stainless backplate on (only because I had plenty of stainless left over from the build). I am using a re-puposed 12V DC, 2-speed windscreen wiper motor from and old Ford for the drum (picked up from a wreckers for $25). Published speeds for this are 65 rpm and 45 rpm, although by reconfiguring the wiring I can also get 130 rpm. I am currently using 65 rpm, which I have tested with 500g and 1kg bean loads and it seems to be giving the beans plenty of air, so hopefully should be about right. I also has plenty of torque, even when beans get a little caught up against the face of the roaster. If the speed isn't quite right, might I might need to take advantage of the Arduino TC4+'s phase angle control to tune the speed, but I am not going to go there unless I need to. I like the repurposing a lot. The 1.7mm sounds pretty good. The 3mm on my 2kg works pretty well. If I ever build another 2kg size, I may go to a thicker drum, though. The speed sounds like it should work pretty well. |
|
|
|
| allenb |
Posted on 07/08/2020 7:55 PM
|
 Administrator Posts: 3869 Joined: February 23, 2010 |
It appears from what you stated that you are not using the same blower that was originally attached to the element within the heatgun? Shoot us some photos showing the arrangement of the current blower and how it connects to the element tube. This will typically only happen when there is insufficient air flow. You mentioned possibly mounting the element in free air (not within a tube). This will not provide the needed amount of heat transfer from element to air unfortunately and will cause the nichrome to exceed the maximum rated wire temp. 1/2 lb and 1 lb drum, Siemens Sirocco fluidbed, presspot, chemex, cajun biggin brewer from the backwoods of Louisiana
|
|
|
|
| pjvdl |
Posted on 07/08/2020 10:56 PM
|
|
Newbie Posts: 38 Joined: April 05, 2020 |
Quote allenb wrote: You mentioned possibly mounting the element in free air (not within a tube). This will not provide the needed amount of heat transfer from element to air unfortunately and will cause the nichrome to exceed the maximum rated wire temp. Thanks for your suggestions. I tend to agree that mounting in free air will not provide that amount of heat transfer needed, but I am at a bit of a loss, so am exploring a few ideas. Quote allenb wrote: It appears from what you stated that you are not using the same blower that was originally attached to the element within the heatgun? Shoot us some photos showing the arrangement of the current blower and how it connects to the element tube. This will typically only happen when there is insufficient air flow. I don't have any way of measuring airflow, but the blower I am using instead of the one that comes with the heater is a high static pressure centrifugal fan that is rated to 42 CFM at 100%. Anicdotally, it seems to push far more air through the roasting chamber than the fan that came with the heat gun when run at 100%. The fan is a 4 wire 12V fan that is PWM controllable, and I think I had it running at around 60% when the element blew, which may be the problem. It is connected directly to the heater tube. I have attached a couple of photos that show the tube assembly without the fan attached and with the fan and heater in operation (you can just see the glow of the heater through the fan assembly). The concern I have is that when I run it at 100% the airflow through the drum will be too high except for chaff removal. Do you think I need to be worrying about too much air? I think the option I am tending towards is keep the heater in a tube, directly connected to the fan enclosure, but to improve the control interlink between the fan and heater. ie: fan % >= heater %, or something similar. This way, during pre-heat I can run both at 100% to get to charge temp rapidly, then wind back the heat and fan as needed.
pjvdl attached the following images:


-- Paul
ECM Rocket espresso Eureka Mignon grinder 500g BBQ rotisserie roaster 1kg drum roaster |
|
|
|
| allenb |
Posted on 07/09/2020 7:43 AM
|
|
Administrator Posts: 3869 Joined: February 23, 2010 |
One way to provide you with needed feedback from the heater is to monitor the air temp leaving the end of the tube. As long as the voltage feeding the element is no higher than what it received on highest setting of the heatgun and you never exceed the highest discharge temperature claimed by the heatgun manufacturer then all should be good. Typical causes for element meltdown are insufficient airflow uneven flow lack of sufficient and uniform gap between element coils and tube (or mica insulator material). If an element is not centered within the tube, it can reduce the gap to where very little air is passing across a portion of the element and while most of the element is ok, part of it is going beyond the maximum rated temperature. Exceeding watt density by using higher than design voltage Short to ground 1/2 lb and 1 lb drum, Siemens Sirocco fluidbed, presspot, chemex, cajun biggin brewer from the backwoods of Louisiana
|
|
|
|
| danst |
Posted on 07/10/2020 2:38 AM
|
 1/4 Pounder  Posts: 65 Joined: April 18, 2013 |
Hi, I believe open nichrome elements are cheap, but more problematic then heating rods. These are safe. The needed air flow for wires can be too high for a drum roaster. I can say, 2x 1800W for 70% can be too low power for 1 kg roaster. Better 4 x 1800W at max 50-60% or 3x for 70% . I am very curious if this thing goes good and for longer working time. Good luck with it, I hope I am wrong with my conclusions. 1000g Ugly roaster, QM Alexia EVO, Bezzera BZ09, Niche Zero, Fiorenzato Doge 63, Mazzer Jolly(Mestre), Handground, T. Moccamaster, Aeropress.
|
|
|
|
| renatoa |
Posted on 07/10/2020 4:21 AM
|
|
Administrator Posts: 3104 Joined: September 30, 2016 |
Not sure how you evaluate this power needs, but surely 2x1800W are enough for 1 kg, if the heat is well routed and not wasted. Surely some airflow would help a lot. The TO designs are roasting up to 750 grams using a single 1400W bulb. There are several drum 1 kg commercial roasters using less than 3 kW to do their jobs. |
|
|
|
| danst |
Posted on 07/11/2020 2:41 AM
|
|
1/4 Pounder Posts: 65 Joined: April 18, 2013 |
Yes, some chinese roasters have 2.5 kW for 1 kg coffee. I say no profiling roasters. I mean, with so low power it is difficult to really "manage" the roast and to keep profile what you want. The more powered gas roasters are more flexible. In this type of home made roaster, with a lot of metal, it is a problem not to waste the heat. All the body take it. And the ambient too. And it has a huge influence on the roast. Probably the solution is less body mass, more insulation, good hot air distribution - and this is not a classic roaster. I think this goes towards the fluid bed concept, like Gene Cafe and others with more convective heating. With less mass is more power needed - it looses the accumulation of the heat for first stages of the roast. And so we have the problem again. Less power - longer roasts, significantly lower chance on controling RoR. I like it classic and there is a need of roughly 4-5 kW / 1kg greens for a good responsive roaster. No matter gas or electric. And this has nothing to do with quality of the result. A roast from underpowered roaster can be very good. The operator must to fit the roaster properties, however. On the other hand, It can be a Rolls-Royce or Mustang. (DIY) Edited by danst on 07/11/2020 2:54 AM 1000g Ugly roaster, QM Alexia EVO, Bezzera BZ09, Niche Zero, Fiorenzato Doge 63, Mazzer Jolly(Mestre), Handground, T. Moccamaster, Aeropress.
|
|
|
|
| renatoa |
Posted on 07/11/2020 4:50 AM
|
|
Administrator Posts: 3104 Joined: September 30, 2016 |
For the drum approach I would not rely on responsiveness to control something related to profile... I mean based on real time feedback from machine temperatures. All the pros I know roasting on drum machines are using recipes based massively on machine natural curve and their high inertia, with only 3-4 power change points and nothing else. Something like: preheat, charge keeping the same power level as in preheat, at TP add 20%, one minute after add another 20%, keep that level until DE and 2 minutes after, lower 10%, then another 10% after one more minute, and that's all. Just an example What we call profiling is to find the exact moments when to apply these power changes, and how much. Not a computer controlled power change based on BT evolution feedback, because the machine inertia simply don't allow this. Think to at least 30 seconds lag time for a step response, and you will have a better reason why. Overpowering will not change this behaviour. You don't have have tyres and brakes enough to stop an overshot of an overheated machine  Related to cheap machines, here, at the gates of the Orient, predominant are the Turkish brands. same price range as Chinese and several centuries more advanced in coffee roasting experience make their choice obvious. |
|
|
|
| pjvdl |
Posted on 07/11/2020 8:02 PM
|
|
Newbie Posts: 38 Joined: April 05, 2020 |
Quote allenb wrote: One way to provide you with needed feedback from the heater is to monitor the air temp leaving the end of the tube. As long as the voltage feeding the element is no higher than what it received on highest setting of the heatgun and you never exceed the highest discharge temperature claimed by the heatgun manufacturer then all should be good. Typical causes for element meltdown are insufficient airflow uneven flow lack of sufficient and uniform gap between element coils and tube (or mica insulator material). If an element is not centered within the tube, it can reduce the gap to where very little air is passing across a portion of the element and while most of the element is ok, part of it is going beyond the maximum rated temperature. Exceeding watt density by using higher than design voltage Short to ground Thanks Allen, I am reasonably confident that I have enough airflow. One of the reasons I am not using the fan that came with the heat gun is that it did not move enough air to remove chaff, where the fan that I using now does with ease. I think you are on to something with the uneven airflow though. Your comments have also got me thinking about the voltage. These elements are designed for use in 240V AC heat guns and I am using 240V. However looking more closely at the circuit design of the heat gun, approx. 18 - 24V is used for the fan. So only around 220V across the heating element, which I am exceeding the voltage slightly. I have run another test with the maximum heat tied to the fan duty (ie. max heat <= max fan). It performed well while I ran it outside of the roasting chamber, but blew when running insitu once the roaster chamber temperature rose above around 130C. Looking at that element and the others that blew, I can see they are all blowing on the same side, so I suspect there is an issue with the air flow. Anyway, I've blown all of my elements and an waiting on some more from China - could be a while! It is also possible that the heat gun controller does not run the element at 100% either, so once I have the new elements I plan to install one in the heat gun and measure the current draw. My investigations continue ... -- Paul
ECM Rocket espresso Eureka Mignon grinder 500g BBQ rotisserie roaster 1kg drum roaster |
|
|
|
| pjvdl |
Posted on 07/11/2020 8:10 PM
|
|
Newbie Posts: 38 Joined: April 05, 2020 |
Quote danst wrote: Hi, I believe open nichrome elements are cheap, but more problematic then heating rods. I am interested in your suggestion of heating rods. What do you mean by these? Quote danst wrote: The needed air flow for wires can be too high for a drum roaster. I can say, 2x 1800W for 70% can be too low power for 1 kg roaster. Better 4 x 1800W at max 50-60% or 3x for 70% . I am very curious if this thing goes good and for longer working time. Good luck with it, I hope I am wrong with my conclusions. You could well be right about the airflow. As a last test, I am planning 2 x 1800W at a max 70%. I can't really go more than 2 elements because the slow PWM control used by the TC4+ effectively turns that elements on and off to achieve the desired percentage. This means that when on, the elements are drawing 100% current. 2 x 1800W @ 240V => 15 Amps. 3 x 1800W @ 240V => 22.5 Amps. The most I can draw on a domestic circuit in Australia is 15 Amps. If this doesn't work, I am going to have to investigate other heating options. Either electric or gas. -- Paul
ECM Rocket espresso Eureka Mignon grinder 500g BBQ rotisserie roaster 1kg drum roaster |
|
|
|
| pjvdl |
Posted on 07/11/2020 8:21 PM
|
|
Newbie Posts: 38 Joined: April 05, 2020 |
Quote danst wrote: Yes, some chinese roasters have 2.5 kW for 1 kg coffee. I say no profiling roasters. I mean, with so low power it is difficult to really "manage" the roast and to keep profile what you want. The more powered gas roasters are more flexible. In this type of home made roaster, with a lot of metal, it is a problem not to waste the heat. All the body take it. And the ambient too. And it has a huge influence on the roast. Probably the solution is less body mass, more insulation, good hot air distribution - and this is not a classic roaster. I think this goes towards the fluid bed concept, like Gene Cafe and others with more convective heating. With less mass is more power needed - it looses the accumulation of the heat for first stages of the roast. And so we have the problem again. Less power - longer roasts, significantly lower chance on controling RoR. I like it classic and there is a need of roughly 4-5 kW / 1kg greens for a good responsive roaster. No matter gas or electric. And this has nothing to do with quality of the result. A roast from underpowered roaster can be very good. The operator must to fit the roaster properties, however. On the other hand, It can be a Rolls-Royce or Mustang. (DIY) Thanks for your observations on this. I agree that I am pushing the limit attempting to profile with only 2 - 3kw for 1kg. My exiting BBQ rotisserie roaster already provides a more convective result, which I still like, but I would like to give "classic" profiling a go. I have planned to give this a go with electric, but I have designed the roasting chamber so that I can install a gas burner as plan B if this isn't enough. Time will tell. -- Paul
ECM Rocket espresso Eureka Mignon grinder 500g BBQ rotisserie roaster 1kg drum roaster |
|
|
|
| pjvdl |
Posted on 07/11/2020 8:37 PM
|
|
Newbie Posts: 38 Joined: April 05, 2020 |
Quote renatoa wrote: For the drum approach I would not rely on responsiveness to control something related to profile... I mean based on real time feedback from machine temperatures. All the pros I know roasting on drum machines are using recipes based massively on machine natural curve and their high inertia, with only 3-4 power change points and nothing else. Something like: preheat, charge keeping the same power level as in preheat, at TP add 20%, one minute after add another 20%, keep that level until DE and 2 minutes after, lower 10%, then another 10% after one more minute, and that's all. Just an example What we call profiling is to find the exact moments when to apply these power changes, and how much. Not a computer controlled power change based on BT evolution feedback, because the machine inertia simply don't allow this. Think to at least 30 seconds lag time for a step response, and you will have a better reason why. Overpowering will not change this behaviour. You don't have have tyres and brakes enough to stop an overshot of an overheated machine Related to cheap machines, here, at the gates of the Orient, predominant are the Turkish brands. same price range as Chinese and several centuries more advanced in coffee roasting experience make their choice obvious. So what you are saying is that increasing heat power isn't the answer? I am new to profiling, but I am hoping the machine that I have built is going to be "somewhat" responsive, although not in the same way as a fluid bed. I suspect your estimate of around 30 seconds isn't far off the mark. Again, time will tell, but I have selected a solid drum with a wall thickness of only about 1.6mm. Assuming there is a fair amount of convective roasting, I am hoping I can slow the roast by increasing airflow. My tests so far in an empty chamber show that I can drop the chamber temperature quite quickly using this method. In other words, I am using variations in airflow to provide responsiveness as much as variations in the heating power. Thanks again for your comments. This is all a bit of an experiment for me, but the collective wisdom of this group is giving me a lot more information on what I should be thinking about and what could potentially work or not
-- Paul
ECM Rocket espresso Eureka Mignon grinder 500g BBQ rotisserie roaster 1kg drum roaster |
|
|
|
| renatoa |
Posted on 07/12/2020 1:22 AM
|
|
Administrator Posts: 3104 Joined: September 30, 2016 |
Beware how to evaluate inertia, the empty machine could make you believe it's enough responsive, but the beans mass adds a lot to heat inertia. In my TO machine - 6 seconds lag time - after an empty preheat, the (air) temperature drop is 120 C per minute, from 185 C to about 60 C (skin test) Loaded with beans it's a different story, needs 5 minutes cooling down to same level. After the first minute the temperature is still in the 180-190 C range. This was just a test I did in the beginnings, to find if cooling inside the roast chamber, as for FB, is an option. |
|
|
|
| pjvdl |
Posted on 07/12/2020 2:35 AM
|
|
Newbie Posts: 38 Joined: April 05, 2020 |
Quote renatoa wrote: Beware how to evaluate inertia, the empty machine could make you believe it's enough responsive, but the beans mass adds a lot to heat inertia. In my TO machine - 6 seconds lag time - after an empty preheat, the (air) temperature drop is 120 C per minute, from 185 C to about 60 C (skin test) Loaded with beans it's a different story, needs 5 minutes cooling down to same level. After the first minute the temperature is still in the 180-190 C range. This was just a test I did in the beginnings, to find if cooling inside the roast chamber, as for FB, is an option. Wow. That's quite a difference. Are you referring to been temp or environmental temp? -- Paul
ECM Rocket espresso Eureka Mignon grinder 500g BBQ rotisserie roaster 1kg drum roaster |
|
|
|
| renatoa |
Posted on 07/12/2020 8:42 AM
|
|
Administrator Posts: 3104 Joined: September 30, 2016 |
I have a single sensor, when empty is about air temp, when loaded bean temp. |
|
|
|
| directtraderoasting |
Posted on 07/13/2020 8:14 PM
|
|
Newbie Posts: 13 Joined: July 06, 2020 |
My 10" diameter x 12" drum is around 3mm thick (a little over) and it's pretty responsive, but you still have to be ahead of what the bean is going to do when profiling. You have to do a few roasts to know how the bean responds then tweak your adjustments based on that bean and how is going to act in certain stages of the roast. I run 2 temp probes. One in the bean mass and one near the opposite side up by the bean loading chute (hot air in the drum). I also have an analog thermometer in my bean loading chute and chaff collector (mainly to keep an eye on things/backup). Edit: if I ever build another 2kg/2.5kg, I may go a little thicker on the drum wall. The next standard option I can easily order is a .250" wall pipe, which is 6mm. I think that may be better overall. I do like that the 3mm drum is quick to heat up and cool down though and it's responsive. I think the slightly thicker wall might be easier though, just make the adjustments earlier Edited by directtraderoasting on 07/13/2020 8:24 PM |
|
|
|
| pjvdl |
Posted on 07/14/2020 12:54 AM
|
|
Newbie Posts: 38 Joined: April 05, 2020 |
Quote directtraderoasting wrote: My 10" diameter x 12" drum is around 3mm thick (a little over) and it's pretty responsive, but you still have to be ahead of what the bean is going to do when profiling. You have to do a few roasts to know how the bean responds then tweak your adjustments based on that bean and how is going to act in certain stages of the roast. I run 2 temp probes. One in the bean mass and one near the opposite side up by the bean loading chute (hot air in the drum). I also have an analog thermometer in my bean loading chute and chaff collector (mainly to keep an eye on things/backup). Edit: if I ever build another 2kg/2.5kg, I may go a little thicker on the drum wall. The next standard option I can easily order is a .250" wall pipe, which is 6mm. I think that may be better overall. I do like that the 3mm drum is quick to heat up and cool down though and it's responsive. I think the slightly thicker wall might be easier though, just make the adjustments earlier Interesting figures. I am a little concerned that a 1.6mm drum will not have enough heat inertia. When I get my new elements, I'm keen to test the responsiveness of mine. -- Paul
ECM Rocket espresso Eureka Mignon grinder 500g BBQ rotisserie roaster 1kg drum roaster |
|
|
|
| danst |
Posted on 07/14/2020 12:55 PM
|
|
1/4 Pounder Posts: 65 Joined: April 18, 2013 |
Quote renatoa wrote: For the drum approach I would not rely on responsiveness to control something related to profile... I mean based on real time feedback from machine temperatures. All the pros I know roasting on drum machines are using recipes based massively on machine natural curve and their high inertia, with only 3-4 power change points and nothing else.... Yes, but If I keep preheating reasonably low, say 200-210 C, then I can be in FC in 8 or 13 minutes, it depends also on ambient temperature and power of the roaster. This is profiling too, how quickly to go to FC. With more power I have more choices. And a chance of correction of false preheating. 2.5 kW for 1 kg is rather low. Apart of SSFF or FSSF profiles for the same machine. 1000g Ugly roaster, QM Alexia EVO, Bezzera BZ09, Niche Zero, Fiorenzato Doge 63, Mazzer Jolly(Mestre), Handground, T. Moccamaster, Aeropress.
|
|
|
|
| danst |
Posted on 07/14/2020 1:07 PM
|
|
1/4 Pounder Posts: 65 Joined: April 18, 2013 |
Quote I forgot supply problems. We have 3 phases 3x25A, 230V . Plenty of power . The heating rods is standard safe heating in roasters. Like in North 1kg electric, Hottop, Quest M3... North: https://northroas...67e_15.png I have custom made heating. 1000g Ugly roaster, QM Alexia EVO, Bezzera BZ09, Niche Zero, Fiorenzato Doge 63, Mazzer Jolly(Mestre), Handground, T. Moccamaster, Aeropress.
|
|
|
|
| allenb |
Posted on 07/14/2020 3:06 PM
|
|
Administrator Posts: 3869 Joined: February 23, 2010 |
pjvdl posted in another thread: Quote Thanks for the clarification. Yes, I understand. I don't want to hijack Cyrus's thread, so might be better to respond in the other thread I started, but I had hoped to use nichrome to provide a blend of convective and radiant on the drum. Unfortunately my testing with nichrome is showing this is probably not practical with the forced air requirements of the nichrome. Might need to look at tubular elements or gas heating if I wnat more radiant on the drum. I am also considering infrared halogen elements to heat the drum (not directly on the beans). Do you have a tubular element that you would recommend? I am also wondering how best to control a tubular element using a TC4/Adruino combination. . Do you know if slow PWM still works, or do I need to look at ICC or phase angle control? Nichrome can be used but if one wants to use nichrome resistive wire and to have it provide radiant and convection, you'll need to wind your own element using a much larger gauge that can handle operating in free air or with very limited air movement without exceeding the watt density for free air. Probat did this with their electric heated sample roaster quite a few years ago and worked well. Glass sheathed infrared halogen has it's own peculiar challenges in that they can be difficult to mount under the drum although it's possible. Controlling a tubular element with their high thermal inertia is fortunately easy to control and only needs simple on-off duty cycling by your controller of choice and yes, slow pwm is fine. I'll look up the company that made me a few sets of tubulars and post the contact info. 1/2 lb and 1 lb drum, Siemens Sirocco fluidbed, presspot, chemex, cajun biggin brewer from the backwoods of Louisiana
|
|
|
|

| Jump to Forum: |
Powered by PHP-Fusion Copyright © 2024 PHP-Fusion Inc
Released as free software without warranties under GNU Affero GPL v3
Designed with ♥ by NetriXHosted by skpacman