
Login

Shoutbox
You must login to post a message.
renatoa
07/26/2024 3:49 PM
Bill grubbe and Jk, 
allenb
07/26/2024 5:15 AM
Spiderkw Welcome to HRO!

renatoa
07/24/2024 8:31 AM
ramiroflores and John123,

 ?
?
?renatoa
07/21/2024 1:18 AM
 , Luislobo
renatoa
07/19/2024 11:28 AM
Koepea,
Forum Threads
Newest Threads
Skywalker roaster modsBackground Roast Iss...
Hello from Arkansas
TC4ESP
Green coffee reviews
Hottest Threads
| Skywalker roaster... | [375] |
| TC4ESP | [115] |
| War on Farmers by... | [47] |
| Adventures in flu... | [26] |
| Hello! (soon) Roa... | [17] |
In Memory Of Ginny

Donations
Latest Donations
dmccallum - 10.00
JackH - 25.00
snwcmpr - 10.00
Anonymous - 2.00
Anonymous - 5.00
dmccallum - 10.00
JackH - 25.00
snwcmpr - 10.00
Anonymous - 2.00
Anonymous - 5.00
Users Online
Guests Online: 7
Members Online: 0
Total Members: 8,393
Newest Member: Bill grubbe
Members Online: 0
Total Members: 8,393
Newest Member: Bill grubbe
View Thread
Who is here? 1 guest(s)
 Cyclops - my 1kg drum build
|
|
| allenb |
Posted on 07/29/2020 4:08 PM
|
 Administrator Posts: 3869 Joined: February 23, 2010 |
The chart doesn't convey what I'm looking for. What is the temperature leaving the elements at a fan power level you expect to use to allow removal of chaff and smoke and at 90% or somewhere around there power level to the element. The chart is showing a maximum of 161C (321F) discharge temperature which will not get you where you want to go. Or, am I missing something?
1/2 lb and 1 lb drum, Siemens Sirocco fluidbed, presspot, chemex, cajun biggin brewer from the backwoods of Louisiana
|
|
|
|
| pjvdl |
Posted on 07/29/2020 6:45 PM
|
 Newbie  Posts: 38 Joined: April 05, 2020 |
Quote allenb wrote: The chart doesn't convey what I'm looking for. What is the temperature leaving the elements at a fan power level you expect to use to allow removal of chaff and smoke and at 90% or somewhere around there power level to the element. The chart is showing a maximum of 161C (321F) discharge temperature which will not get you where you want to go. Or, am I missing something? No. You are not missing anything. I agree that it doesn't show what I would expect either. The temperatures at the exit are definitely lower than what I would expect. It is unclear why this is the case. As an aside, this is why the table is incomplete, as I realised that I was not getting the results that I would expect (and I blew an element at 100%/100%). I have a couple of theories as to why this may be. Either there is an issue with the responsiveness of the K-type thermocouple that I am using to take the measurements. Or, the airflow is too high at high fan %, causing significant variations in the temperature. I did notice if II moved location of the probe, the temerature reading did vary significantly, supporting this theory. I am not an expert in fluid dynamics, but I think the data also supports this, as you will notice the measured temperature at 80%/80% and 90%/90% is lower than 60%/60%, even though the colour indicates it should be hotter. I would be interested in other's thoughts on this. Because I didn't trust the absolute temperature readings, I was guided more by the temperatures relative to each other, building up a picture of how the temperature curves develop as a factor of heat and fan. I was also guided by the colour of the elements at their hottest point, which I did also record, although I neglected to include these in the table that I attached. I have now updated the table with the colour, so this might give a better indication (attached below). You will see that the colour at 100% fan / 100% heat is yellow. This is when I blew an element, ending my test :( On this basis, I am assuming that my "Orange/Yellow" is as high as I can go. I did also run a couple of tests the next day with the tip of the thermocouple inserted into the end of the pipe as close as I could get to the live element without actually touching it - probably 5mm from the end of the live element coil. At this point I was measuring around 540C at 90% when the element was orange/yellow, which is more in line with what I would expect. Chaff and smoke are removed when the fan is at least 50%, so I have some room to move in this regard. As I mentioned, this settup is heating my roasting chamber to 250C in around 6 minutes, so clearly the temperature readings that I have recorded are incorrect for some reason.
pjvdl attached the following image:

Edited by pjvdl on 07/29/2020 6:58 PM -- Paul
ECM Rocket espresso Eureka Mignon grinder 500g BBQ rotisserie roaster 1kg drum roaster |
|
|
|
| pjvdl |
Posted on 07/29/2020 7:05 PM
|
|
Newbie Posts: 38 Joined: April 05, 2020 |
Quote renatoa wrote: You should use 1 Hz PWM for at least 2% (1.67% on 60Hz) control resolution... 8Hz will degrade significantly your control precision. I think I understand why you would get a 1.67% control resolution at 60Hz, but are you sure you would get a 2% resolution at 1Hz? To be fair, I struggle to get my head around the ATMega bit control theory of PWM, but from my testing, 1Hz PWM on a Arduino/TC4 setup switches the power on/off at a maximum frequency of 1Hz. To achieve a 2% control resolution you would need to include 50 cycles in your control cycle, which at 1Hz is 50 seconds for one cycle through. Or am I missing something here? From user.h file in the aArtisanQ_PID arduino shield (you will see that I have 8Hz uncommented): //////////////////// // Time Base for slow PWM on OT1, OT2 // When NOT using PHASE_ANGLE_CONTROL option // choose one of the following for the PWM time base for heater output on OT1 or OT2 //#define TIME_BASE pwmN4sec // recommended for Hottop D which has mechanical relay //#define TIME_BASE pwmN2sec //#define TIME_BASE pwmN1Hz // recommended for most electric heaters controlled by standard SSR //#define TIME_BASE pwmN2Hz // #define TIME_BASE pwmN4Hz #define TIME_BASE pwmN8Hz // The faster frequencies below are for advanced users only, and will require changes to the PWM16 Library //#define TIME_BASE 15 // approx. 977 Hz //#define TIME_BASE 7 // approx. 1.95kHz //#define TIME_BASE 6 // approx. 2.2kHz //#define TIME_BASE 3 // approx. 3.9kHz Quote renatoa wrote: Are you using TC4 ? why not going with ICC ? TBH, I started using PWM because I was initially learning how to work with an Arduino/TC4 and that is the default. I have been meaning to look at the alternative control mechanism, but haven't had the time. I think ICC is also dependent on the presence of a zero cross detector, which I have had a quick look for, but have not managed to source yet. This is definitely something that I want to try. Edited by pjvdl on 07/29/2020 7:28 PM -- Paul
ECM Rocket espresso Eureka Mignon grinder 500g BBQ rotisserie roaster 1kg drum roaster |
|
|
|
| renatoa |
Posted on 07/30/2020 2:09 AM
|
|
Administrator Posts: 3104 Joined: September 30, 2016 |
When using PWM, the SSR command that comes from TC4 could be of an infinite degree of precision, but this not matter because is not sync'ed with the mains frequency, so you can chop (or miss) a random part of the sine. As a result, when you dial for example 50% heater, and using 1 Hz cycle, the output could be anywhere in the 49-51 sine waves passed through the SSR. From here, the 2% precision (for 50 Hz), and 1.67% = 1/60, for US mains. I found this fact following this intriguing statement that you can read in any PID leaflet "...set the control period for SSR outputs to 2 seconds...". After some digging, the explanation was been clear: this cycle time is required if you want 1% precision of control... elementary... if you see on screen 1...100%, then you want to feel on heater the difference down to 1% step. For 8Hz PWM, for each PWM pulse you have practically only 50/8 = 6 sines available to control. So you have only 7 levels of power control: 0, 1/6 = 16.7%, 33%, 50%, 67%, 83% and 100% This is dramatic decimation of control choices, that could led unusable my roaster for example... where 80% of roast time I play with figures between 72 and 77%, sometimes 1% in a minute change making a difference in final roast ! 1% of power is 3 C degrees in hot air temperature, how much this matters depend on your specific machine inertia, quite critical for FB, acceptable for heavy drums. With ICC the power modulation is done by passing or blocking the entire half-sine, (thus the need for a zero cross detection, as you well guessed) So if you you have 100 half pulses for 50 Hz mains, then you can have 1% resolution/precision, and this is true instantly, in any moment. Another advantages of using ICC: - don't exhibits transients, because the switching is always near zero of the sine, so less or no perturbations in the sensible house equipment. - the heater is less stressed with temperature swing, as for on-off - for halogen heaters, less annoying pulsing light |
|
|
|
| danst |
Posted on 07/30/2020 3:36 AM
|
 1/4 Pounder  Posts: 65 Joined: April 18, 2013 |
I see no problem with precision degree of 1 Hz with SSR and it is well suited for resistance heaters and their longevity. For heating control of electric drum roaster is 5% or even 10% scale of power enough. The nichrome heater is usable (for classic drum roaster) only when it holds all the power without airflow. It must be so designed, not as these airflow-heatings from heatguns etc. (this means several power units in series and parallel or one with thick wire, but long for reducing power- amperage and load, all this results in bigger space requirments) In a classic roaster, it must be possible to go on max even without forced airflow, above all in drying phase. With common kind of nichrome (what you are using) is the airflow too high for good power usage. The idea with inductive heating is for me a bit risky. Not easy for DIY. Proved solution are tubular elements. It must be space for it, just like for gas heating. I believe, it is a good idea to copy professional roasters. 1000g Ugly roaster, QM Alexia EVO, Bezzera BZ09, Niche Zero, Fiorenzato Doge 63, Mazzer Jolly(Mestre), Handground, T. Moccamaster, Aeropress.
|
|
|
|
| allenb |
Posted on 07/30/2020 12:47 PM
|
|
Administrator Posts: 3869 Joined: February 23, 2010 |
Something to consider with resistive wire forced air convection heaters as you are using. If engineered correctly and established heater watt density is not exceeded, you will be able to increase cfm to a point where the element will show little to no visible glow in a normally lit room at design full power. If you are not exceeding the design voltage then you're air flow is insufficient at full power. I can take any 1500 watt nichrome forced air convection heater and flow slightly more than optimum designed cfm and end up with no visible color. Danst brings up a good point about being able to operate during the drying phase with little to no non-recirculating air flow which allows a humid environment during the drying phase. Studies have been done, but don't ask me by whom, that show a more even and beneficial heat transfer during the first few minutes when steam is allowed to surround the beans while being driven from them. This obviously only applies to mechanically agitated roasters and recirculating fluidbeds. 1/2 lb and 1 lb drum, Siemens Sirocco fluidbed, presspot, chemex, cajun biggin brewer from the backwoods of Louisiana
|
|
|
|
| pjvdl |
Posted on 10/25/2020 7:20 AM
|
|
Newbie Posts: 38 Joined: April 05, 2020 |
After a bit of a hiatus due to other commitments, I have had some time to revisit the heater in my 1kg drum build. My preference based on the input of members of this group was a tubular element, but the manufactures that I contacted in Australia were not able to build one to the specs I require in the space available (approx 70mm high x 200mm wide x 250mm deep). Without this as an option, I decided to design an open-coil resistive wire heater. My calculations showed I needed a gauge of around 15 AWG. I have not been able to source Nichrome 80 in any gauge approaching this, but I could get Kanthal A1, which isn't ideal, but I figured I'd give it a try. Design parameters: Material: Kanthal A1 Gauge: 15 AWG Max Voltage: 156V (65% of 240V) Resistance: 15ohms Power density: 2.09 W/cm2 (13.5W/inch2) Winding my own open coil elements, I have mounted two of these in parallel on a S/S and mica frame. The fabrication is a little rough, but it does for a test while I wait for ceramics to fabricate a permenant solution. My tests showthat I can operate this element at full power with no air flow. Using it, I have roasted 1kg of beans to first crack in around 7 minutes as a first test, so plenty of power. This needs some more testing, but looks like it should be a good solution.
pjvdl attached the following images:


Edited by pjvdl on 10/25/2020 7:41 AM -- Paul
ECM Rocket espresso Eureka Mignon grinder 500g BBQ rotisserie roaster 1kg drum roaster |
|
|
|
| allenb |
Posted on 10/25/2020 11:16 AM
|
|
Administrator Posts: 3869 Joined: February 23, 2010 |
Wow, I can see you spent more than a couple of hours designing mica standoff plates and path of all the connections! That had to be some major work but looks good. A couple of questions. Will there be mica sheet beneath the Kanthal in case of melt down and element dropping? would be a good safety measure. What is the air flow path now? Is it able to access most of the coils before entering the rear of the drum? Great choice going with the Kanthal as it is reported to be very robust. 1/2 lb and 1 lb drum, Siemens Sirocco fluidbed, presspot, chemex, cajun biggin brewer from the backwoods of Louisiana
|
|
|
|
| pjvdl |
Posted on 10/25/2020 6:19 PM
|
|
Newbie Posts: 38 Joined: April 05, 2020 |
Quote allenb wrote: Wow, I can see you spent more than a couple of hours designing mica standoff plates and path of all the connections! That had to be some major work but looks good. A couple of questions. Will there be mica sheet beneath the Kanthal in case of melt down and element dropping? would be a good safety measure. What is the air flow path now? Is it able to access most of the coils before entering the rear of the drum? Great choice going with the Kanthal as it is reported to be very robust. Thanks Allen. I agree that mica beneath the element would be a good idea. I have not done this at this stage, because I have limited mica supply and want to reserve it for my final element build (using ceramic insulators), and I can only get mica sheets from aliexpress - which takes around 2 months to get to Australia! My testing has also shown that with the 80mm spaced supports, my 15 AWG element doesn't droop more than a few mm and I have a 10mm gap beneath it. I am still working on airflow. I previously had a baffle between the top of the element and the underside of the drum to force air across the element. With the current element design I have very little space though, so have removed it for the moment. This doesn't seem to be causing a problem though, as I am running my fan (max 160 cfm - overpowered I know!) at around 10 - 20% for the majority of the roast. For those that are interested, I have included a link to the spreadsheet that I used from my heater element calculations below: Resistive heater element design spreadsheet for Nichrome 80 and Kanthal A1 wire https://docs.goog...sp=sharing Edited by pjvdl on 10/25/2020 6:31 PM -- Paul
ECM Rocket espresso Eureka Mignon grinder 500g BBQ rotisserie roaster 1kg drum roaster |
|
|
|
| allenb |
Posted on 10/25/2020 7:45 PM
|
|
Administrator Posts: 3869 Joined: February 23, 2010 |
Thanks for sharing the link for calcs for the resistive element. One nice outcome of your current design is the heavy gauge of the wire which would be quite a feat to melt it and cause an issue where it could drop against the roaster body. With proper grounding, it would pop the circuit breaker immediately. So, does the air path go from an opening at the rear and blow across the coils towards the front of the roaster and then work it's obvious path around and back to the drum openings? This would be optimum. 1/2 lb and 1 lb drum, Siemens Sirocco fluidbed, presspot, chemex, cajun biggin brewer from the backwoods of Louisiana
|
|
|
|
| pjvdl |
Posted on 10/26/2020 1:59 AM
|
|
Newbie Posts: 38 Joined: April 05, 2020 |
Quote allenb wrote: So, does the air path go from an opening at the rear and blow across the coils towards the front of the roaster and then work it's obvious path around and back to the drum openings? This would be optimum. Exactly. In the photo, you can just see the opening at the back of the element (partially obscured from view by one of the mica supports) Out of interest, I am using a fan for push air through, rather than sucking from the cyclone. Seems to be quite effective and I don't need to worry about the fan having to deal with hot air. -- Paul
ECM Rocket espresso Eureka Mignon grinder 500g BBQ rotisserie roaster 1kg drum roaster |
|
|
|
| allenb |
Posted on 10/26/2020 9:10 AM
|
|
Administrator Posts: 3869 Joined: February 23, 2010 |
The reason most drum roasters are designed with pull through the drum versus push is due to the difficulty of sealing all possible alternate path openings that the pushing source could send the air through which, depending on how many gaps were left during construction could allow a good % of the total fan output to end up bypassing the intended path rather than be strictly routed past heat source and straight to the rear end of the drum and through the drum and out. By pulling at the funnel, there is much less chance of large variations in total cfm across the coffee in the drum. As long as the air from the fan isn't able to make a quick turn up and into the drum's rear perf plate, which would be allowing cool ambient air to be flowing across the beans and subsequently cooling the beans while the drum surface is heating them, then pushing is fine and can be just as effective. OTOH, even a pull design can end up with this problem if the air entry point doesn't allow directing the air across the heat source prior to entering the drum.
1/2 lb and 1 lb drum, Siemens Sirocco fluidbed, presspot, chemex, cajun biggin brewer from the backwoods of Louisiana
|
|
|
|
| pjvdl |
Posted on 10/26/2020 5:54 PM
|
|
Newbie Posts: 38 Joined: April 05, 2020 |
Quote allenb wrote: The reason most drum roasters are designed with pull through the drum versus push is due to the difficulty of sealing all possible alternate path openings that the pushing source could send the air through which, depending on how many gaps were left during construction could allow a good % of the total fan output to end up bypassing the intended path rather than be strictly routed past heat source and straight to the rear end of the drum and through the drum and out. By pulling at the funnel, there is much less chance of large variations in total cfm across the coffee in the drum. As long as the air from the fan isn't able to make a quick turn up and into the drum's rear perf plate, which would be allowing cool ambient air to be flowing across the beans and subsequently cooling the beans while the drum surface is heating them, then pushing is fine and can be just as effective. OTOH, even a pull design can end up with this problem if the air entry point doesn't allow directing the air across the heat source prior to entering the drum. This is an interesting point, although I think another advantage of using a push method with a DIY build is that it is more obvious where air is leaking, because you can actually feel it being pushed through the gaps. My experience is that sucked air is more difficult to perceive by hand. During my build, I could easily feel where air was following an undesirable path, because I could feel it by hand - particularly if I turned the heater on to heat the air prior. I found a number of gaps using this method, which allowed me to modify my design along the way. I have been left with a couple of tiny gaps between SS sheets that are bolted together, but expand (and therefore move slightly) when heated. I haven't worried about these yet, but if they become a problem, I plan to create some gaskets with high temperature gasket silicone. The other reason I decided on a push method was more of an asthetic one. If I went with a pull method, I would have needed to mount the fan on the top of the cyclone, which I personally felt wouldn't look as good. Certainly secondary, but was minor consideration 
-- Paul
ECM Rocket espresso Eureka Mignon grinder 500g BBQ rotisserie roaster 1kg drum roaster |
|
|
|
| renatoa |
Posted on 10/27/2020 3:20 AM
|
|
Administrator Posts: 3104 Joined: September 30, 2016 |
Don't forget the air temperature in both cases... pull = hot air, more expensive and quicker wear fan. |
|
|
|
| allenb |
Posted on 10/27/2020 7:13 AM
|
|
Administrator Posts: 3869 Joined: February 23, 2010 |
Quote The reason most drum roasters are designed with pull through the drum versus push is due to the difficulty of sealing all possible alternate path openings that the pushing source could send the air through... I failed to qualify this statement. This obviously only relates to electrically heated roasters or indirectly heated gas fired roasters utilizing a heat exchanger. 1/2 lb and 1 lb drum, Siemens Sirocco fluidbed, presspot, chemex, cajun biggin brewer from the backwoods of Louisiana
|
|
|
|
| pjvdl |
Posted on 10/27/2020 11:29 PM
|
|
Newbie Posts: 38 Joined: April 05, 2020 |
Ok. So i have spent the last couple of days running the machine with its new heater through its paces. I have now completed a number of roasts: 500g x 2 700g x 1 1000g x 2 and am starting to get a feel for the machine with my new improved heater. Observations: - Seems to have plenty of power for 1kg - copes well with 500g as well, although need to turn the power down, otherwise I am getting to FC in under 5 minutes - I am only using 10 - 20% fan through most of the roast, so should be a lower percentage of the heat through convection, with most through conduction/indirect IR I can't say I've noticed much difference in terms of flavour yet, but I am certainly no cupping expert, and my tests to date are by no means controlled! Time will tell as I better understand the nuances of the machine I think. I have also started playing with PID control (Artisan + Arduino + TC4+), with only limited success tuning the control loop so far. I need to get my head around this through more trial and error, but the slow response time of the machine makes it difficult to create a control loop that is responsive, but doesn't oscillate. I started with the default values in Artisan, but these were terrible for my machine, which has a response time of around 30 seconds (measured from time when the ET peaks to the time when BT peaks). Anyway, more time is needed on this ... -- Paul
ECM Rocket espresso Eureka Mignon grinder 500g BBQ rotisserie roaster 1kg drum roaster |
|
|
|
| pjvdl |
Posted on 04/27/2021 6:13 AM
|
|
Newbie Posts: 38 Joined: April 05, 2020 |
Well. It's been a few months since I last posted. Life has been busy, however I have been busy using my roaster with good success. That is not to say there haven't been some learnings along the way. And I am struggling with a niggling electronic issue that has me baffled (but more on that later). Firstly though, I am having good success roasting batches up to 1kg. In fact I have overheated a few and had them hitting 1st crack in under 6 minutes Onot ideal I think), so plenty of power in reserve. Airflow is also good (subject to my comments below), with minimal air (10% power) throughout most of the roast, only increasing to remove chaff towards the end. Learnings: - Allen's observation that most electric roasters use a pull fan instead of a push fan because they are difficult to seal has been borne out. This is something that I failed to consider early on. I am in the process of converting to an AC sirrocco fan that I picked up on Aliexpress - needs a few hours though because I will need to change my arduino configuration. Watch this space. - PID control on a drum roaster with a large heat mass has largely been a bust for me. The lag between the time the PID makes a control adjustment and the time I see a appreciable movement in output temperature is upward of a minute. This lack of responsiveness makes PID control difficult me thinks. Anyway, something that I will perservere with this a little more when I have some more time - PID control aside, I am finding that I can make a few simple, well timed changes to the heat at key points in the roast to achieve roasting profiles that are repeatable and seem good to me This brings me to the nagging electronics issue. I keep blowing the MCP3424 ADC chips that take the inputs from K-type thermocouples. Rathing than posting details here, I will post another dedicated post on this when I get a moment, as I am keen to tap the collective wisdom of this group - I am out of ideas! Anyway, thought you might all appreciate an update and some insights that I have gained over the last few months. On balance, this build has been far more challenging than I originially anticipated, but also incredibly rewarding. And family and friends are all loving the end product! This is certainly not the end of the journey, but thank you all to your valued input so far. I doubt I would have got this far without it. Edited by pjvdl on 04/27/2021 7:10 PM -- Paul
ECM Rocket espresso Eureka Mignon grinder 500g BBQ rotisserie roaster 1kg drum roaster |
|
|
|
| renatoa |
Posted on 04/28/2021 3:07 AM
|
|
Administrator Posts: 3104 Joined: September 30, 2016 |
Regarding PID, some experiments to find step response (open loop) behaviour should give you valuable hints how to control your machine without PID. |
|
|
|
| pjvdl |
Posted on 06/23/2021 3:10 AM
|
|
Newbie Posts: 38 Joined: April 05, 2020 |
Quote renatoa wrote: Regarding PID, some experiments to find step response (open loop) behaviour should give you valuable hints how to control your machine without PID. Thanks. I ran some simple step temperature change tests a while back, but this is still on my to do list! Will post back here once I have tested further. -- Paul
ECM Rocket espresso Eureka Mignon grinder 500g BBQ rotisserie roaster 1kg drum roaster |
|
|
|
| pjvdl |
Posted on 06/23/2021 3:20 AM
|
|
Newbie Posts: 38 Joined: April 05, 2020 |
Well. I haven't had much time to spend on this rc recently, but I have received some replacement parts and a new furnace sirocco style fan. This required that I rewire much of the system and reprogram the TC4+, so I also took the opportunity to review the wiring based on feedback from Allen, renatoa and others on this forum. The upshot of this exercise is that rewiring also fixed the problem with the MCP3424. I never found a definitive problem with the wiring, but I suspect that there was an undiagnosed short somewhere. Anyway, the fan is also much quiter and sucking the air from the drum is a definite improvement in containing chaff. The only slight issue I have now is that it does not seem quite as efficient in separating the chaff from the beans - I think because the CFM and pressure is not as high as the previous. Some minor tweeking will be needed here. All in all though, I'm pretty happy with the end product. Thanks again for all the help I have received on this forum! -- Paul
ECM Rocket espresso Eureka Mignon grinder 500g BBQ rotisserie roaster 1kg drum roaster |
|
|
|
| pjvdl |
Posted on 04/09/2022 7:25 PM
|
|
Newbie Posts: 38 Joined: April 05, 2020 |
Hi all. I have been happily roasting since my last post; getting used to how the drum roaster performs. In general, I've been very happy with its performance. It will happily roast 1kg batches. I am having a bit of an issue with the drum bearings though. I have a 12mm drum shaft and an using FL001 (flange) pillow bearings, which do the job, but I am using standard temperature bearings, which do not cope with the heat. I am struggling to find anything suitable for higher temperatures. The best I can find is something like https://www.bocabearings.com/products/skfl001-12mm-21409, which is rated to 160C. The internal roasting chamber is getting to around 350C and the drum is getting to around 250C, so although the bearings are mounted externally, I'm still concerned 160C is not high enough. Can anyone suggest a supplier of high temp pillow flange bearings for a 12mm shaft who would ship to Austraila? -- Paul
ECM Rocket espresso Eureka Mignon grinder 500g BBQ rotisserie roaster 1kg drum roaster |
|
|
|
| UmMerkur |
Posted on 04/11/2022 2:01 PM
|
|
Newbie Posts: 17 Joined: January 27, 2022 |
Quote pjvdl wrote: Hi all. I have been happily roasting since my last post; getting used to how the drum roaster performs. In general, I've been very happy with its performance. It will happily roast 1kg batches. I am having a bit of an issue with the drum bearings though. I have a 12mm drum shaft and an using FL001 (flange) pillow bearings, which do the job, but I am using standard temperature bearings, which do not cope with the heat. I am struggling to find anything suitable for higher temperatures. The best I can find is something like https://www.bocabearings.com/products/skfl001-12mm-21409, which is rated to 160C. The internal roasting chamber is getting to around 350C and the drum is getting to around 250C, so although the bearings are mounted externally, I'm still concerned 160C is not high enough. Can anyone suggest a supplier of high temp pillow flange bearings for a 12mm shaft who would ship to Austraila? I had the same struggle of finding a high-temp flange mounted bearing, so I decided to just mount the bearing on 1" standoffs to keep it away from the heat. If you have the extra length in your shaft you may think about that. I've attached an image of my CAD model, should be able to see what I'm talking about. I'm a little worried about the door hinge bearings, but those are much lower duty so maybe it will be okay?
UmMerkur attached the following image:

Behmor 1600+, Fresh Roast Plus 8, Poppery II; Lelit Bianca V2, Eureka Mignon Specialita', V60, Breville SGP
|
|
|
|
| allenb |
Posted on 04/11/2022 2:29 PM
|
|
Administrator Posts: 3869 Joined: February 23, 2010 |
The most I've heard of anyone doing, and that was due to grease separating and drooling, is go to high temp grease instead of standard. I know of no reason to look for any exotic bearings for high temp especially with the remedies just mentioned (space them away from the front plate a tad). Paul, what are your bearings doing causing you to replace them? 1/2 lb and 1 lb drum, Siemens Sirocco fluidbed, presspot, chemex, cajun biggin brewer from the backwoods of Louisiana
|
|
|
|
| pjvdl |
Posted on 04/11/2022 10:00 PM
|
|
Newbie Posts: 38 Joined: April 05, 2020 |
Quote allenb wrote: The most I've heard of anyone doing, and that was due to grease separating and drooling, is go to high temp grease instead of standard. I know of no reason to look for any exotic bearings for high temp especially with the remedies just mentioned (space them away from the front plate a tad). Paul, what are your bearings doing causing you to replace them? My front bearing completely disintegrated; caused by the bearing covers becoming heat affected and the lubricant (greese) breaking down. To be fair, these were relatively inexpensive bearings, so I think the covers were a cheap plastic. I was already thinking about separating the bearing from the heat as per UmMerkur's suggestion, so I think I will probably go with a higher quality SS bearing as I listed in my previous and separate it slightly from the drum face. The existing shaft has enough slack that I should be able to get a gap of 5 - 6mm. An air gap even this small should be enough that 160C rating will be sufficient. -- Paul
ECM Rocket espresso Eureka Mignon grinder 500g BBQ rotisserie roaster 1kg drum roaster |
|
|
|
| pjvdl |
Posted on 04/11/2022 10:01 PM
|
|
Newbie Posts: 38 Joined: April 05, 2020 |
Quote UmMerkur wrote: Quote pjvdl wrote: Hi all. I have been happily roasting since my last post; getting used to how the drum roaster performs. In general, I've been very happy with its performance. It will happily roast 1kg batches. I am having a bit of an issue with the drum bearings though. I have a 12mm drum shaft and an using FL001 (flange) pillow bearings, which do the job, but I am using standard temperature bearings, which do not cope with the heat. I am struggling to find anything suitable for higher temperatures. The best I can find is something like https://www.bocabearings.com/products/skfl001-12mm-21409, which is rated to 160C. The internal roasting chamber is getting to around 350C and the drum is getting to around 250C, so although the bearings are mounted externally, I'm still concerned 160C is not high enough. Can anyone suggest a supplier of high temp pillow flange bearings for a 12mm shaft who would ship to Austraila? I had the same struggle of finding a high-temp flange mounted bearing, so I decided to just mount the bearing on 1" standoffs to keep it away from the heat. If you have the extra length in your shaft you may think about that. I've attached an image of my CAD model, should be able to see what I'm talking about. I'm a little worried about the door hinge bearings, but those are much lower duty so maybe it will be okay? Thanks for the suggestion regarding the separation. I have been running my roaster for over a year with a similar door hinge setup and I haven't had any issues on that front, so you should be okay with yours. The photo below shows after a year's work (with a replacement main bearing which I had spare).
pjvdl attached the following image:
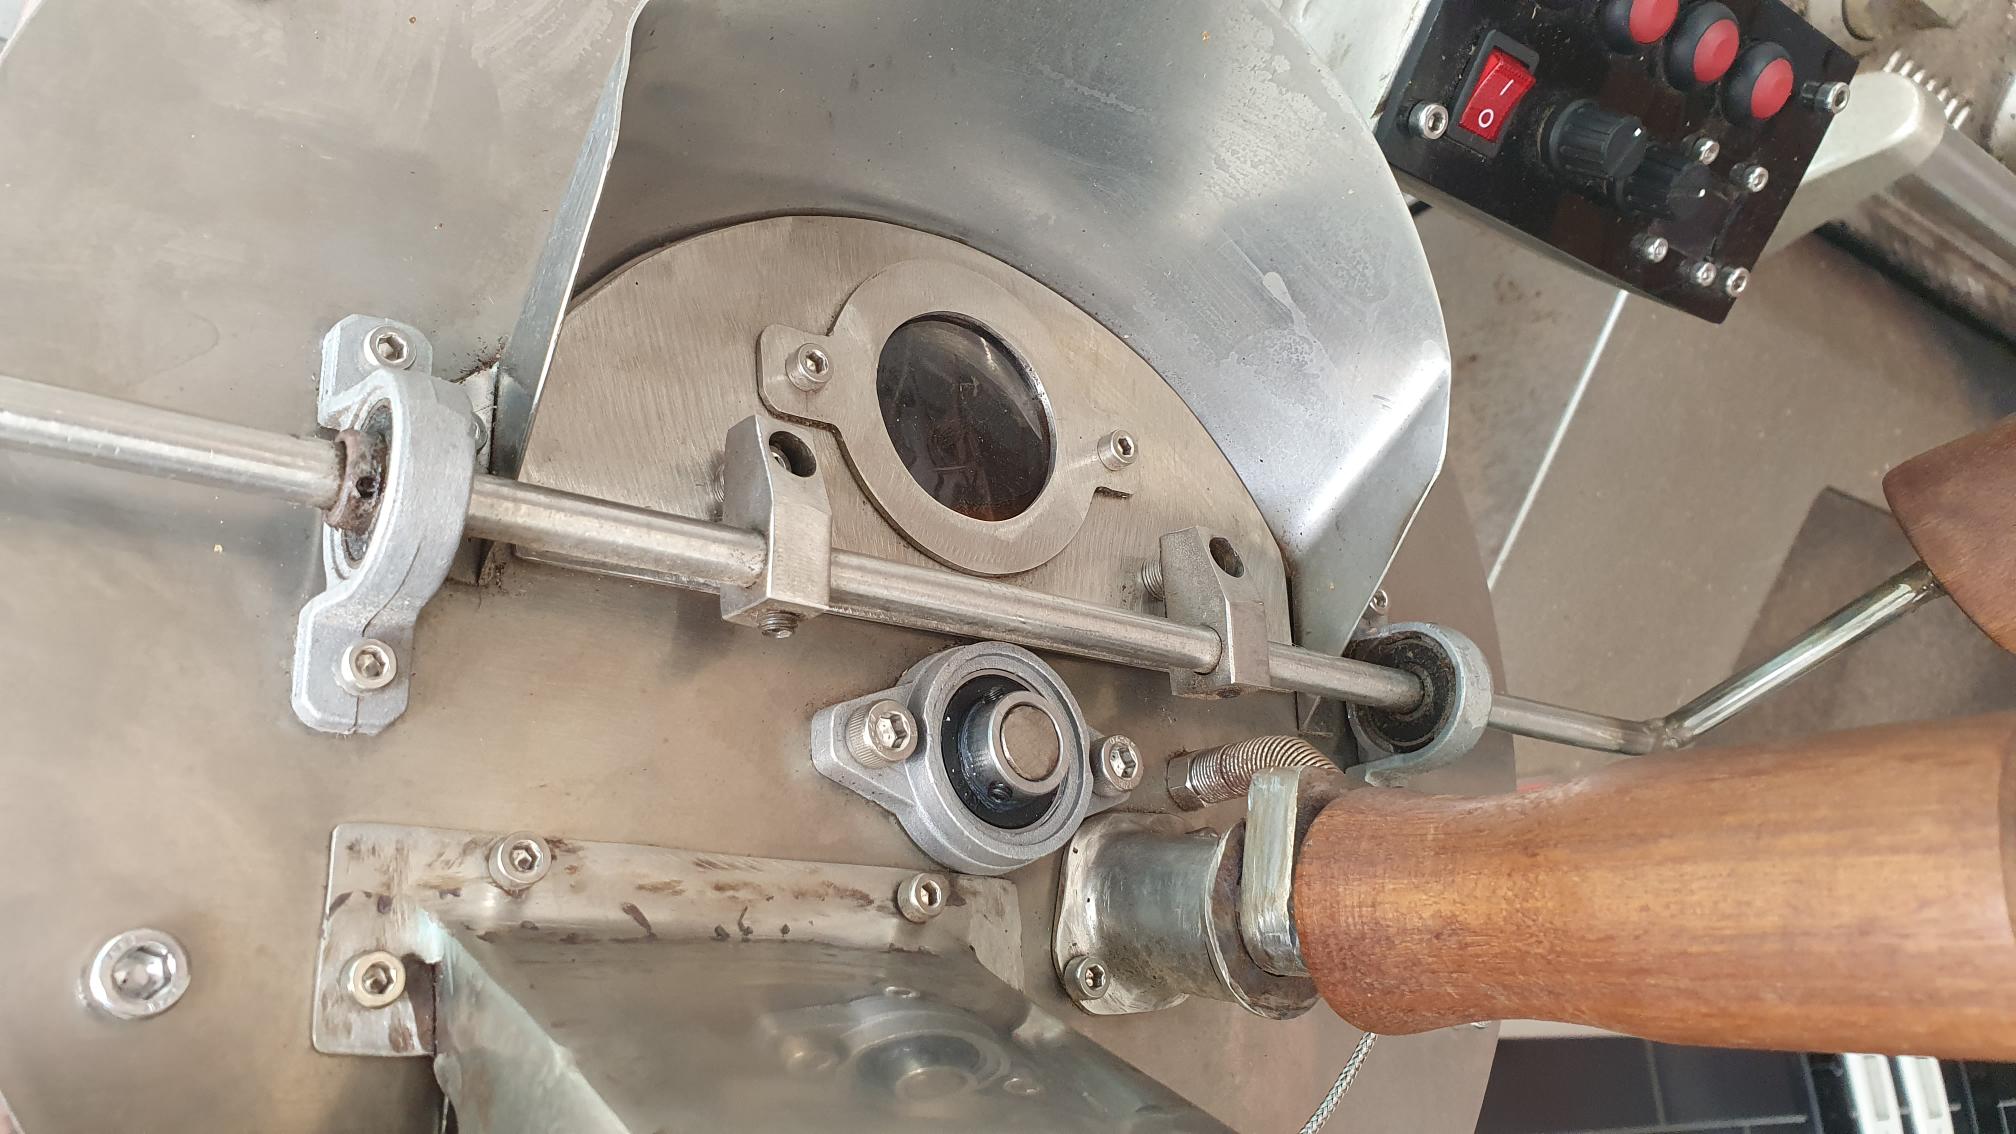
Edited by pjvdl on 04/11/2022 10:07 PM -- Paul
ECM Rocket espresso Eureka Mignon grinder 500g BBQ rotisserie roaster 1kg drum roaster |
|
|
|

| Jump to Forum: |
Powered by PHP-Fusion Copyright © 2024 PHP-Fusion Inc
Released as free software without warranties under GNU Affero GPL v3
Designed with ♥ by NetriXHosted by skpacman