
Login

Shoutbox
You must login to post a message.
renatoa
07/26/2024 3:49 PM
Bill grubbe and Jk, 
allenb
07/26/2024 5:15 AM
Spiderkw Welcome to HRO!

renatoa
07/24/2024 8:31 AM
ramiroflores and John123,

 ?
?
?renatoa
07/21/2024 1:18 AM
 , Luislobo
renatoa
07/19/2024 11:28 AM
Koepea,
Forum Threads
Newest Threads
Skywalker roaster modsBackground Roast Iss...
Hello from Arkansas
TC4ESP
Green coffee reviews
Hottest Threads
| Skywalker roaster... | [375] |
| TC4ESP | [115] |
| War on Farmers by... | [47] |
| Adventures in flu... | [26] |
| Hello! (soon) Roa... | [17] |
In Memory Of Ginny

Donations
Latest Donations
dmccallum - 10.00
JackH - 25.00
snwcmpr - 10.00
Anonymous - 2.00
Anonymous - 5.00
dmccallum - 10.00
JackH - 25.00
snwcmpr - 10.00
Anonymous - 2.00
Anonymous - 5.00
Users Online
Guests Online: 9
Members Online: 0
Total Members: 8,393
Newest Member: Bill grubbe
Members Online: 0
Total Members: 8,393
Newest Member: Bill grubbe
View Thread
Who is here? 1 guest(s)
 Tc4+ ot1 in artisan
|
|
| Gullygossner |
Posted on 08/21/2020 8:44 AM
|
|
1/4 Pounder  Posts: 95 Joined: January 06, 2019 |
I recently received my tc4+ and wired everything up last night. I am able to connect with artisan and see my thermocouple temperatures but the slider to control my heater ssr does not seem to be receiving commands. I had the same slider setup for a an esp8266 that I used prior and it worked with serial Command ot1;{} in artisan. The one change I did make to the wiring from the SSR is I used 18g wire which seems a little large for the tc4+ ot screw terminals. I am using the aArtisanQ_pid sketch, is there something in user.h that I need to change for SSR control? Do i have the right serial command nomenclature? |
|
|
|
| mg512 |
Posted on 08/21/2020 9:11 AM
|
 1/4 Pounder Posts: 189 Joined: March 04, 2018 |
Just to rule out an Artisan issue (unlikely though if it was working with your esp setup), does it work when you just send an OT1,100 command through the Arduino serial monitor? Assuming that doesn't make a difference, two things to check: One, is your fan on? aArtisanQ_PID has a setting to cut power to OT1 if the fan is off. Two, did you flash aArtisanQ_PID in PWM mode? If you flashed in PAC mode, it won't work even for OT1 if there isn't a ZCD connected, I think. |
|
|
|
| Gullygossner |
Posted on 08/21/2020 10:14 AM
|
|
1/4 Pounder Posts: 95 Joined: January 06, 2019 |
Quote mg512 wrote: Just to rule out an Artisan issue (unlikely though if it was working with your esp setup), does it work when you just send an OT1,100 command through the Arduino serial monitor? Assuming that doesn't make a difference, two things to check: One, is your fan on? aArtisanQ_PID has a setting to cut power to OT1 if the fan is off. Two, did you flash aArtisanQ_PID in PWM mode? If you flashed in PAC mode, it won't work even for OT1 if there isn't a ZCD connected, I think. Thank you for the troubleshooting tips. I suspect the issue will be in regards to the fan not being on. My SSR heater is controlling a turbo oven element so no fan power is required via artisan. I am fairly sure I flashed aArtisanQ_PID in PWM mode but will need to confirm that as well. Most likely I missed this portion of the code I am thinking. I flashed the firmware some time ago so I will look at it when I get home. //////////////////// // Base configurations (leave only one uncommented) //#define CONFIG_PWM // slow PWM on OT1 (heater); fast PWM output (3.922kHz) on IO3 (DC fan); ZCD not required //#define CONFIG_PAC2 // phase angle control on OT1 (heater) and OT2 (fan); IO2 used to read the ZCD; IO3 undefined //#define CONFIG_PAC2_IO3HTR // phase angle control on OT1 (heater) and OT2 (fan); IO2 reads the req'd ZCD; IO3 reserved for fast PWM output for heater #define CONFIG_PAC3 // phase angle control on OT1 (heater) and OT2 (fan); IO3 reads the req'd ZCD; IO3 not available for output Edited by Gullygossner on 08/21/2020 10:24 AM |
|
|
|
| renatoa |
Posted on 08/21/2020 11:59 AM
|
|
Administrator Posts: 3104 Joined: September 30, 2016 |
PAC3 is not what you want... You should have: #define CONFIG_PWM // slow PWM on OT1 (heater); fast PWM output (3.922kHz) on IO3 (DC fan); ZCD not required ... and all the other PAC modes commented. And also disabled the fan cutoff action: // cut power to Heater if fan duty is less than HTR_CUTOFF_FAN_VAL (to protect heater in air roaster). Set to 0 for no cutoff #define HTR_CUTOFF_FAN_VAL 0 |
|
|
|
| Gullygossner |
Posted on 08/22/2020 2:27 PM
|
|
1/4 Pounder Posts: 95 Joined: January 06, 2019 |
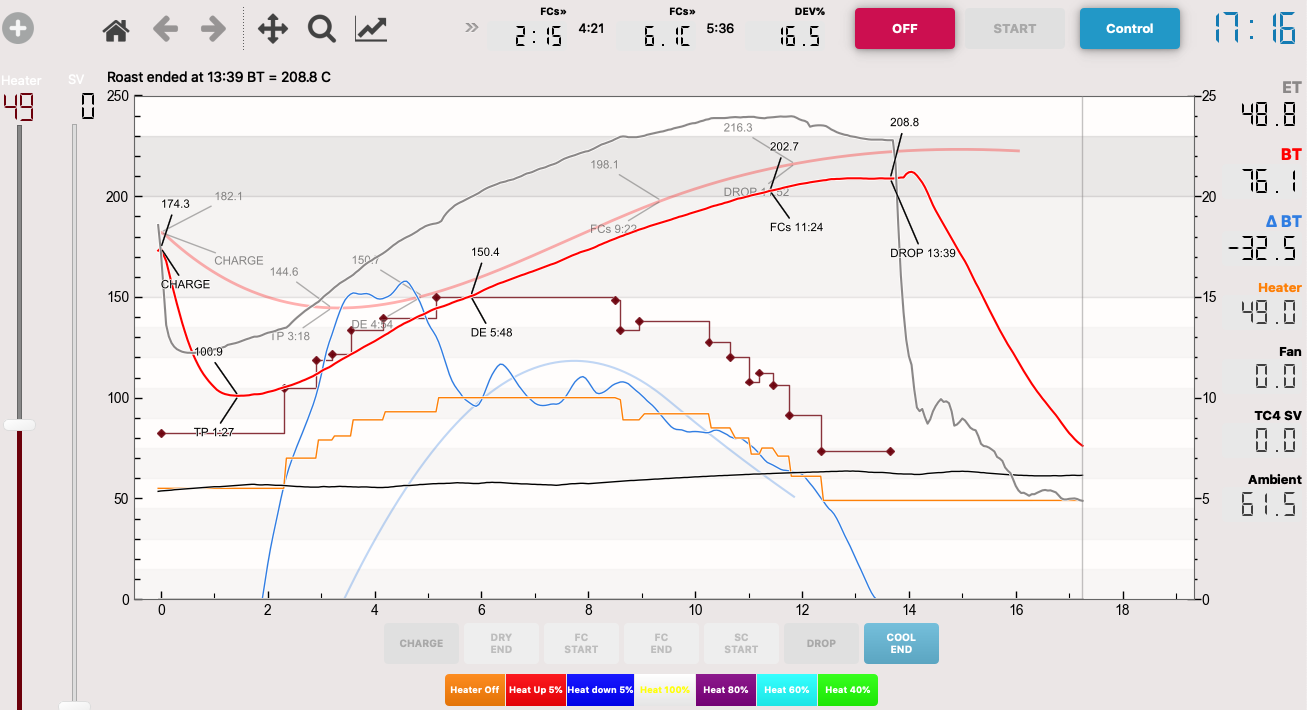
Thank you both for the help, thankfully the issue was in the PWM code. Completed my first roast with the TC4+ and am very pleased. I haven't been able to achieve the roast level I've been after for quite sometime with my KKTO setup and I believe I am back on track to getting what I want. My previous setup was an esp8266 with a max31855 and I was always scorching and going over my desired roast level. The addition of an ET probe is also a very beneficial addition.
Gullygossner attached the following image:
|
|
|
|
| mg512 |
Posted on 08/22/2020 3:36 PM
|
|
1/4 Pounder Posts: 189 Joined: March 04, 2018 |
Yay, happy to hear! Just out of curiosity, what exactly was the issue with your esp8266+max31855? |
|
|
|
| Gullygossner |
Posted on 08/22/2020 7:46 PM
|
|
1/4 Pounder Posts: 95 Joined: January 06, 2019 |
Quote mg512 wrote: Yay, happy to hear! Just out of curiosity, what exactly was the issue with your esp8266+max31855? The whole setup was slightly un-reliable, mostly due to my soldering skills i would think. I also had a fair amount of noise in the temperature readings but again this could be due to faulty filtering or poor soldering skills. The sketch I had used utilized a fast pwm which didn't seem to offer great termperature control for my setup but again this was more likely me misunderstanding the sketch parameters vs a hardware limitation. When I initially went down the esp8266 path I had intended on building the esp8266 tc4 setup renolta had designed but I never received a good portion of my order from eBay so just hooked a max31855 up and did what I could. I know enough about stuff to know it can be done and generally get to that end point but not necessarily know the full background of how something is completed. |
|
|
|
| renatoa |
Posted on 08/23/2020 2:10 AM
|
|
Administrator Posts: 3104 Joined: September 30, 2016 |
My experience with max circuits is very deceiving if you want to control the roast based on temperature feedback, because the 0.25 C degree resolution is simply not enough precise for this task. You need an averaging window too big, over 30 seconds, to have precise enough reading of RoR, and in the development phase you simply don't have this time, you must react faster. They are good just for observation, as a spectator, on high inertia machines, like drum roasters, but not to take power control decisions on hot air machines, like FB and TO, with lag times under 10 seconds, where hot air temperature effectively drives the roast. Edited by renatoa on 08/23/2020 9:41 AM |
|
|
|
| renatoa |
Posted on 08/23/2020 2:16 AM
|
|
Administrator Posts: 3104 Joined: September 30, 2016 |
Quote Gullygossner wrote: Completed my first roast with the TC4+ and am very pleased. I haven't been able to achieve the roast level I've been after for quite sometime with my KKTO setup and I believe I am back on track to getting what I want. Nice start ! For the next roast, please consider less power reduction in the browning phase. Use ET as a guide, it have to remain flat at maximum, not decreasing. If the stepped line is the power graph, then you decreased it too much on the final... I am not decreasing more than 10% never, typically from 77% I have after DE, I am decreasing 1% per minute until 72% before FC. Your power curve looks more as for a gas machine, but don't let you fooled and try mimic gas, because TO behaviour is far away... especially the IR part, that is has instant effect on beans, zero inertia. 1% of power change in a TO is perhaps equivalent to 5% for a gas machine. |
|
|
|
| Gullygossner |
Posted on 08/23/2020 7:52 AM
|
|
1/4 Pounder Posts: 95 Joined: January 06, 2019 |
Quote renatoa wrote: Quote Gullygossner wrote: Completed my first roast with the TC4+ and am very pleased. I haven't been able to achieve the roast level I've been after for quite sometime with my KKTO setup and I believe I am back on track to getting what I want. Nice start ! For the next roast, please consider less power reduction in the browning phase. Use ET as a guide, it have to remain flat at maximum, not decreasing. If the stepped line is the power graph, then you decreased it too much on the final... I am not decreasing more than 10% never, typically from 77% I have after DE, I am decreasing 1% per minute until 72% before FC. Your power curve looks more as for a gas machine, but don't let you fooled and try mimic gas, because TO behaviour is far away... especially the IR part, that is has instant effect on beans, zero inertia. 1% of power change in a TO is perhaps equivalent to 5% for a gas machine. Thank you for that feedback. You are correct in noting the stepped line as the power graph. Being my first roast with decent data it was a bit of a learning experience and it does reflect what you are stating with the power changes. What is a good rule of thumb for maximum ET temperature? I was shooting for about 240C but when it got near that I was concerned about going well above that temperature and scorching my beans so i backed down (to much obviously). |
|
|
|
| renatoa |
Posted on 08/23/2020 9:42 AM
|
|
Administrator Posts: 3104 Joined: September 30, 2016 |
I am in the same ballpark too, 238-245 C, depending on beans and load. 240 C is not high enough for scorching, unless it is applied too early, or too fast. You should try to not reach 240 C ET before minute 4, or watch RoR for a maximal rise around 30 C/ min value. Another hint is to not reach 100 C for BT before 1/4 of FC time. Something like 100 C at minute 2, if you plan having FC at minute 8. Noticed that this value is very close to your turning point, so is difficult to use it as a hint. Is your oven pot very well insulated, or not smoke exhaust at all, so heat losses are minimal ? Asking because my TP happens in the 75-80 C ballpark, under minute 1, charging about 180 C. One more question to clarify better your roast power management strategy... is the 55% power level during charge the same as the power level of preheat ? Mine is well under 40%, for 180 C preheat... if yours is the same, under 40%, and you raise power at 55% when charging, then this could be a good reason of scorching. What I learnt from many pros roasting on gas drums, is shall not change the power level when charging, and some seconds after TP, sounds logical and it works for TO, too. Edited by renatoa on 08/23/2020 9:55 AM |
|
|
|
| Gullygossner |
Posted on 08/23/2020 8:31 PM
|
|
1/4 Pounder Posts: 95 Joined: January 06, 2019 |
Quote renatoa wrote: I am in the same ballpark too, 238-245 C, depending on beans and load. 240 C is not high enough for scorching, unless it is applied too early, or too fast. You should try to not reach 240 C ET before minute 4, or watch RoR for a maximal rise around 30 C/ min value. Another hint is to not reach 100 C for BT before 1/4 of FC time. Something like 100 C at minute 2, if you plan having FC at minute 8. Noticed that this value is very close to your turning point, so is difficult to use it as a hint. Is your oven pot very well insulated, or not smoke exhaust at all, so heat losses are minimal ? Asking because my TP happens in the 75-80 C ballpark, under minute 1, charging about 180 C. One more question to clarify better your roast power management strategy... is the 55% power level during charge the same as the power level of preheat ? Mine is well under 40%, for 180 C preheat... if yours is the same, under 40%, and you raise power at 55% when charging, then this could be a good reason of scorching. What I learnt from many pros roasting on gas drums, is shall not change the power level when charging, and some seconds after TP, sounds logical and it works for TO, too. Yes my unit is well insulated I would say and sealed fairly decent. For the seals I am using instant pot gaskets which create a very good seal. the 55% power level at charge is the set point value I chose this time to reach 180C in preheat but 55% does not represent a levelled off heating, I just charged the unit when it reached 180C so I can try pre-heating longer at a lower heating set point next go around. I have been trying to use the strategy of waiting until after TP for the first heat increase but just need to get to know the roaster better. Thank you for chiming in and lending advice, I will definitely attempt the tips you mention on my next roast. |
|
|
|
| renatoa |
Posted on 08/24/2020 2:05 AM
|
|
Administrator Posts: 3104 Joined: September 30, 2016 |
You can preheat with 55% or even more, for faster preheating, but, when reaching 180 C, please reduce the power trying to find the right % where your temperature is stable around 180. Then, charge at that power and keep it unchanged until TP. Watch RoR after TP, it will start increase fast, then will slow down... is the right time when I start increase heat, to not lose momentum, not allowing RoR reduce the ramp. Increase rate of power is about 12% per minute, for my machine, so 1% every 5 seconds. 36% to 77% in about 3 minutes. Not a fixed time, depends on beans. My goal is to increase RoR up to about 24 C / min, and try keep it there until about 1 minute before dry end, when I stop power increase, when 240 C is reached. From there I let the machine natural curve do its job, only slight power reductions. Edited by renatoa on 08/24/2020 3:21 AM |
|
|
|

| Jump to Forum: |
Powered by PHP-Fusion Copyright © 2024 PHP-Fusion Inc
Released as free software without warranties under GNU Affero GPL v3
Designed with ♥ by NetriXHosted by skpacman