
Login

Shoutbox
You must login to post a message.
renatoa
07/26/2024 3:49 PM
Bill grubbe and Jk, 
allenb
07/26/2024 5:15 AM
Spiderkw Welcome to HRO!

renatoa
07/24/2024 8:31 AM
ramiroflores and John123,

 ?
?
?renatoa
07/21/2024 1:18 AM
 , Luislobo
renatoa
07/19/2024 11:28 AM
Koepea,
Forum Threads
Newest Threads
Skywalker roaster modsBackground Roast Iss...
Hello from Arkansas
TC4ESP
Green coffee reviews
Hottest Threads
| Skywalker roaster... | [375] |
| TC4ESP | [115] |
| War on Farmers by... | [47] |
| Adventures in flu... | [26] |
| Hello! (soon) Roa... | [17] |
In Memory Of Ginny

Donations
Latest Donations
dmccallum - 10.00
JackH - 25.00
snwcmpr - 10.00
Anonymous - 2.00
Anonymous - 5.00
dmccallum - 10.00
JackH - 25.00
snwcmpr - 10.00
Anonymous - 2.00
Anonymous - 5.00
Users Online
Guests Online: 6
Members Online: 0
Total Members: 8,393
Newest Member: Bill grubbe
Members Online: 0
Total Members: 8,393
Newest Member: Bill grubbe
View Thread
Who is here? 1 guest(s)
Page 1 of 2: 12
|
 First Fluid Bed Attempt
|
|
| wbbh |
Posted on 05/12/2021 5:04 PM
|
|
Newbie  Posts: 28 Joined: February 21, 2009 |
Credit to Omega for inspiring me to attempt this build. I chose to use Sanitary flange stainless steel to build the body. Testing air flow: Edited by wbbh on 05/13/2021 9:09 AM |
|
|
|
| Koffee Kosmo |
Posted on 05/12/2021 5:43 PM
|
 Administrator Posts: 1621 Joined: December 31, 2008 |
Excellent job What is the green bean capacity ? KK I home roast and I like it. Designer of the KKTO
Roaster Build information https://homeroast...ad_id=1142 https://docs.goog...lide=id.i0 Blog - http://koffeekosm...gspot.com/ Bezzera Strega, Mazzer Robur Grinder, Pullman Tamper Convex, (KKTO) Turbo Oven Home Roaster. |
|
|
|
| wbbh |
Posted on 05/12/2021 10:01 PM
|
|
Newbie Posts: 28 Joined: February 21, 2009 |
Quote Undetermined, but I'm pretty sure it will do at least two pounds. |
|
|
|
| allenb |
Posted on 05/14/2021 10:18 AM
|
 Administrator Posts: 3869 Joined: February 23, 2010 |
Hey wbbh, super looking build! Keep us up to date with how everything turns out.
1/2 lb and 1 lb drum, Siemens Sirocco fluidbed, presspot, chemex, cajun biggin brewer from the backwoods of Louisiana
|
|
|
|
| wbbh |
Posted on 05/14/2021 10:34 PM
|
|
Newbie Posts: 28 Joined: February 21, 2009 |
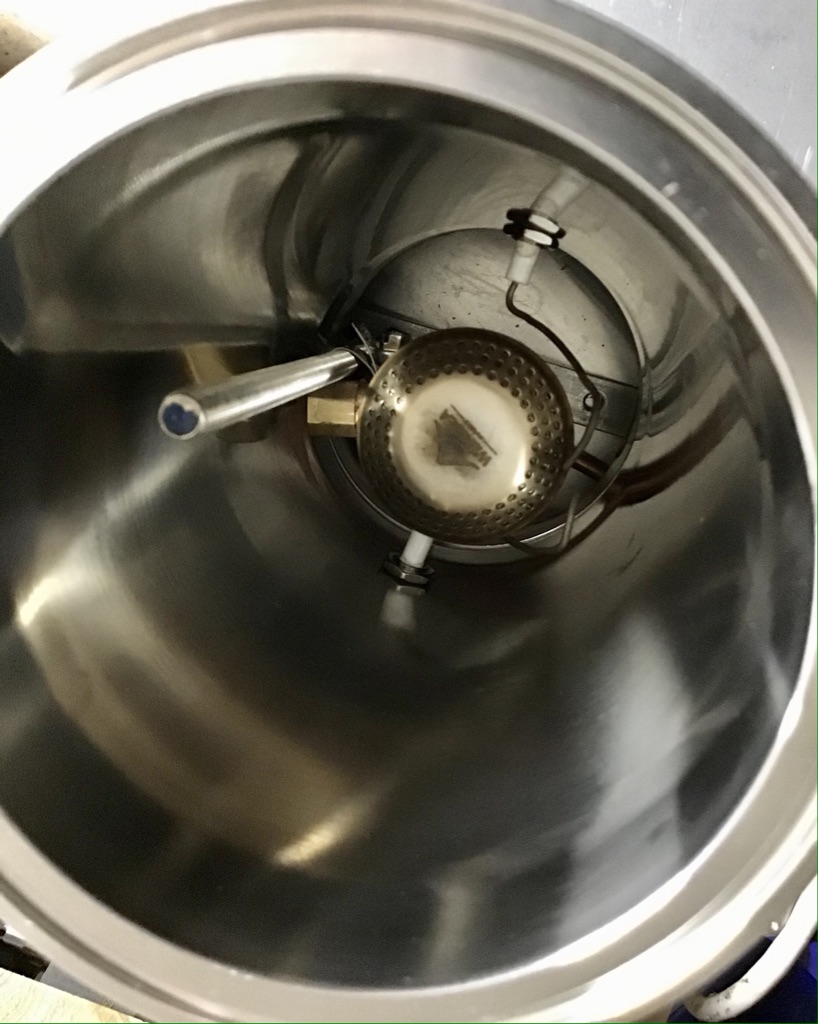
I got the propane burner installed, did a test, increased the pressure, but I'm not really getting enough heat. I'm baking the beans, not really roasting them. My next step is to drill out the propane burner to get more volume.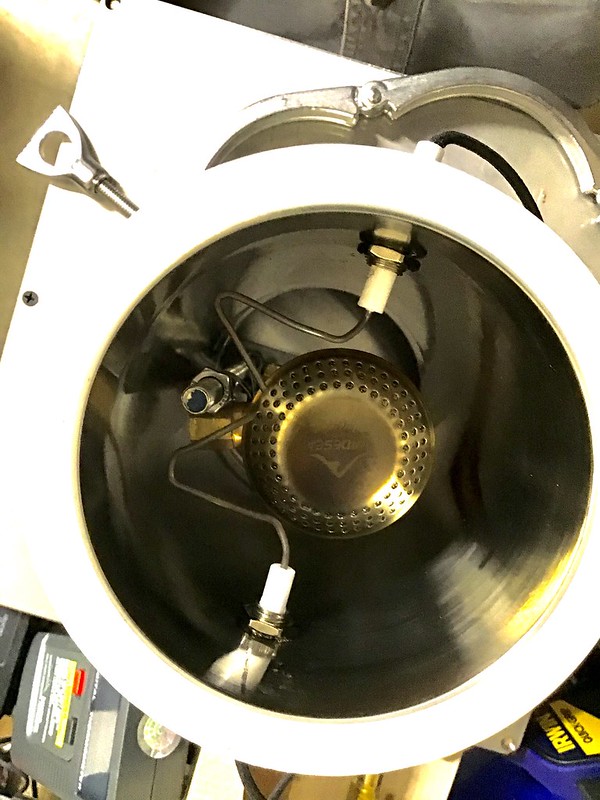 burner by , on Flickr burner by , on Flickr bakedbeans by , on Flickr bakedbeans by , on Flickr
Edited by wbbh on 05/14/2021 10:39 PM |
|
|
|
| Koffee Kosmo |
Posted on 05/15/2021 12:02 AM
|
|
Administrator Posts: 1621 Joined: December 31, 2008 |
You need a flame like jet exhaust KK I home roast and I like it. Designer of the KKTO
Roaster Build information https://homeroast...ad_id=1142 https://docs.goog...lide=id.i0 Blog - http://koffeekosm...gspot.com/ Bezzera Strega, Mazzer Robur Grinder, Pullman Tamper Convex, (KKTO) Turbo Oven Home Roaster. |
|
|
|
| allenb |
Posted on 05/15/2021 8:15 AM
|
|
Administrator Posts: 3869 Joined: February 23, 2010 |
The mushroom burner will work fine but as with any burner, the BTU rating must be matched to the BTUs needed for the batch size. I would reduce your air flow down to the point where you are getting just enough bean movement to adequately move the beans but not so much where they are in a fast flow. The mushroom burner I used in a fluidbed design was just enough to roast a 1 lb batch with some headroom but not sure if it would have been enough heat for a 2 lb batch. Shoot us some details so we can help troubleshoot: Burner BTU rating Propane pressure to burner at max Burner orifice size Temperature of heated air (max) 1/2 lb and 1 lb drum, Siemens Sirocco fluidbed, presspot, chemex, cajun biggin brewer from the backwoods of Louisiana
|
|
|
|
| wbbh |
Posted on 05/15/2021 12:49 PM
|
|
Newbie Posts: 28 Joined: February 21, 2009 |
Quote allenb wrote: The mushroom burner will work fine but as with any burner, the BTU rating must be matched to the BTUs needed for the batch size. I would reduce your air flow down to the point where you are getting just enough bean movement to adequately move the beans but not so much where they are in a fast flow. The mushroom burner I used in a fluidbed design was just enough to roast a 1 lb batch with some headroom but not sure if it would have been enough heat for a 2 lb batch. Shoot us some details so we can help troubleshoot: Burner BTU rating Propane pressure to burner at max Burner orifice size Temperature of heated air (max) It's a 3500 watt rated camp stove so about 11,000 BTUs 10 PSI The jet is marked with the number: "35" I have some number 77 drills coming to open the orrifce. While playing with air flows I could get between 690 and 1,100 F on the temperature probe just below the RC. I did adjust the airflow to just enough to keep the beans moving. I think I need to put more restriction on the airflow into the RC. I have some sheet steel stock on order but I was in a hurry to try out the roaster. When I tested out the air flow I coverd half the holes with some alumium flashing sheet, but though it was too thin and being alumimun not suitable for roasting. I used the screws/nuts/washers pictured as temporary restrictors. I intended the temp probe to be on the opposite side, but after installing the screws felt the rounded screw heads would not slow bean movement like the nuts. Since I have plenty of RC space and blower power but a minimal burner, should I consider say a propane tourch burner?  I really appreceiate the help. |
|
|
|
| allenb |
Posted on 05/15/2021 2:50 PM
|
|
Administrator Posts: 3869 Joined: February 23, 2010 |
The burner you have should be sufficient for 2 lbs charge. Unfortunately, getting a temperature read on RC entering air, with the tendency for stratification, is sketchy at best without some kind of turbulator or swirl plate to blend the burner heat with incoming blower air. One will usually find that moving the temp probe even as little as 1/2" will see a temp swing as much as 100-300 F so you are most likely not measuring a real average temp at all. But, you can probably play around with various perf plates configuration and air flows and get it to work fine without trying to get a fully homogenous ET mix.
1/2 lb and 1 lb drum, Siemens Sirocco fluidbed, presspot, chemex, cajun biggin brewer from the backwoods of Louisiana
|
|
|
|
| wbbh |
Posted on 05/15/2021 7:28 PM
|
|
Newbie Posts: 28 Joined: February 21, 2009 |
Quote allenb wrote: The burner you have should be sufficient for 2 lbs charge. Unfortunately, getting a temperature read on RC entering air, with the tendency for stratification, is sketchy at best without some kind of turbulator or swirl plate to blend the burner heat with incoming blower air. One will usually find that moving the temp probe even as little as 1/2" will see a temp swing as much as 100-300 F so you are most likely not measuring a real average temp at all. But, you can probably play around with various perf plates configuration and air flows and get it to work fine without trying to get a fully homogenous ET mix. Thank you, I will try playing with the perf plate. Would moving the burner down/away from the perf plate help with mixing? I might end up inserting the probe in the bottom flange of the RC if I cannot move it to a satisfactory placement. |
|
|
|
| allenb |
Posted on 05/16/2021 7:50 AM
|
|
Administrator Posts: 3869 Joined: February 23, 2010 |
Quote Would moving the burner down/away from the perf plate help with mixing? How many inches between top of burner up to perf plate? You want to make sure that there is at least some gap between the tip of the flame and the perf plate otherwise you will have a mix of extreme high temp and lower temp air and scorching is bound to happen. 1/2 lb and 1 lb drum, Siemens Sirocco fluidbed, presspot, chemex, cajun biggin brewer from the backwoods of Louisiana
|
|
|
|
| wbbh |
Posted on 05/16/2021 9:19 AM
|
|
Newbie Posts: 28 Joined: February 21, 2009 |
Quote allenb wrote: Quote Would moving the burner down/away from the perf plate help with mixing? How many inches between top of burner up to perf plate? You want to make sure that there is at least some gap between the tip of the flame and the perf plate otherwise you will have a mix of extreme high temp and lower temp air and scorching is bound to happen. 2.75 inches |
|
|
|
| allenb |
Posted on 05/16/2021 10:43 AM
|
|
Administrator Posts: 3869 Joined: February 23, 2010 |
Do you have a viewing port to determine if there is a sizeable gap between flame tip and perf plate?
1/2 lb and 1 lb drum, Siemens Sirocco fluidbed, presspot, chemex, cajun biggin brewer from the backwoods of Louisiana
|
|
|
|
| wbbh |
Posted on 05/16/2021 11:19 AM
|
|
Newbie Posts: 28 Joined: February 21, 2009 |
Quote allenb wrote: Do you have a viewing port to determine if there is a sizeable gap between flame tip and perf plate? No, I've got the fitting, but I'm waiting on the delivery of a carbide hole saw to do the installation. These SS pipe spools are a little tough to drill. Would there be any downside to lowering the burner? Edited by wbbh on 05/16/2021 10:27 PM |
|
|
|
| allenb |
Posted on 05/16/2021 11:42 AM
|
|
Administrator Posts: 3869 Joined: February 23, 2010 |
Quote wbbh wrote: Quote allenb wrote: Do you have a viewing port to determine if there is a sizeable gap between flame tip and perf plate? No, I've got the fitting, but I'm waiting ion the delivery of a carbide hole saw to do the installation. These SS pipe spools are a little tough to drill. Would there be any downside to lowering the burner? No downside at all, would be an advantage if you can swing it. I know what you mean on cutting stainless. tough stuff! 1/2 lb and 1 lb drum, Siemens Sirocco fluidbed, presspot, chemex, cajun biggin brewer from the backwoods of Louisiana
|
|
|
|
| wbbh |
Posted on 05/16/2021 10:54 PM
|
|
Newbie Posts: 28 Joined: February 21, 2009 |
Quote No downside at all, would be an advantage if you can swing it. I know what you mean on cutting stainless. tough stuff! I moved the burner down about 3 inches and added a solid baffle over about 2/3's of the perf plate. Gave it another try, much better, but I still think I need a llittle more heat by drilling out the burner jet by a tiny amount and covering more perf plate holes. I had some beans that didn't roast because I made the baffle plate flat and they hung up around the temperature probe. I'll make a new baffle that slopes downward towards the open perforations and move the temperature probe.
wbbh attached the following image:
|
|
|
|
| wbbh |
Posted on 05/21/2021 10:51 PM
|
|
Newbie Posts: 28 Joined: February 21, 2009 |
I added a perforated baffle above the burner and modified the sloping baffle on the bottom of the RC. I tried another roast and it was successful. I still had some beans getting scorched/burning. I believe they are getting stuck under the temperature probe and when I was adjusting the fan control. I removed the probe and I'm getting used to riding the fan speed control. I will probably drill a hole above the lower flange in the site glass RC assembly. I had to add a second plate on the bottom to prevent the air pressure from bending up the sloped plate and making it too hot. There is scorching evident on the sloping plate from my first test and the reason I added a baffle below the perf plate. The baffle plate: 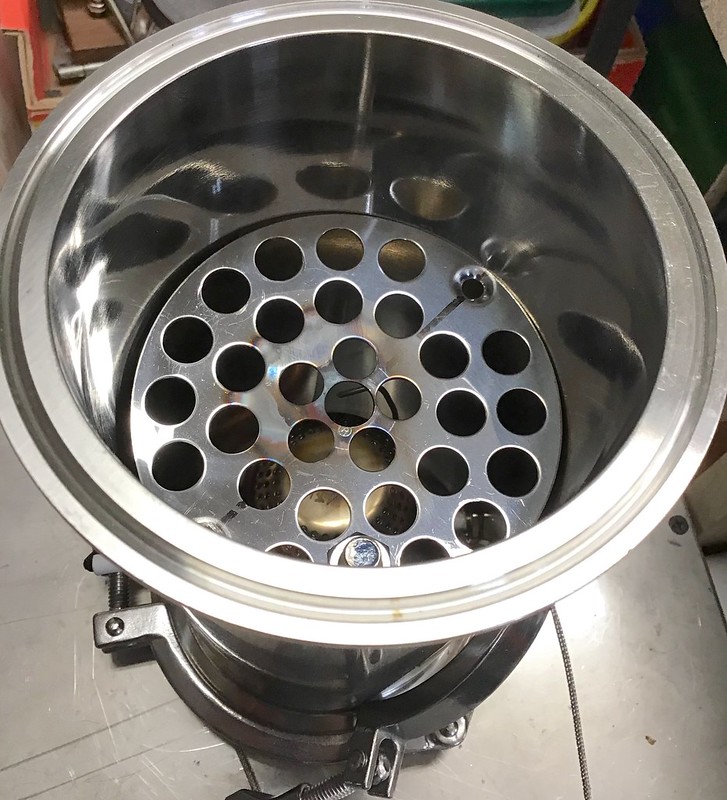 The bottom of the perf plate: 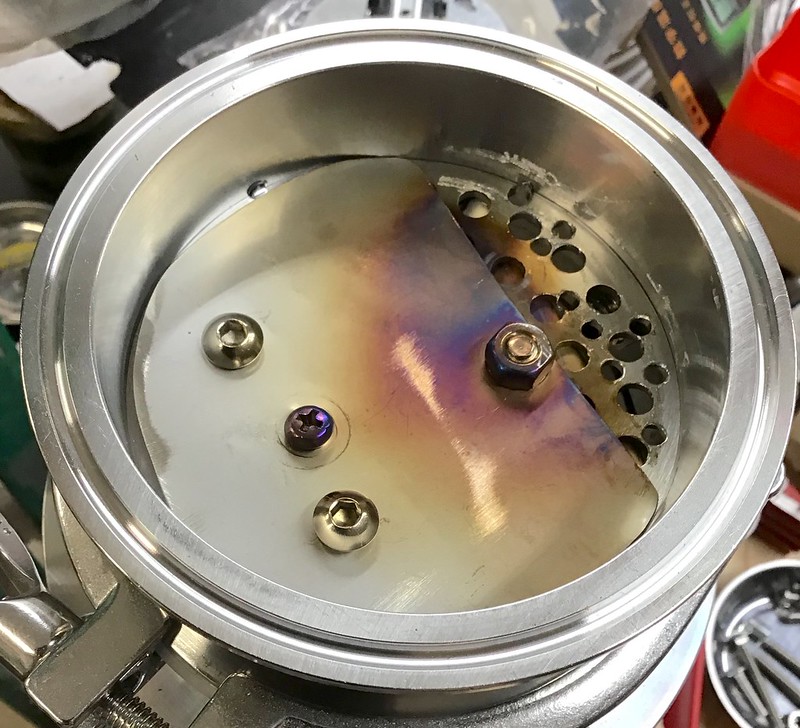 The top of the perf plate: 
Edited by wbbh on 05/21/2021 11:15 PM |
|
|
|
| wbbh |
Posted on 05/31/2021 3:44 PM
|
|
Newbie Posts: 28 Joined: February 21, 2009 |
I dropped one temperature probe into the top of the RC and drilled a hole for one in the bottom flange of the RC. |
|
|
|
| allenb |
Posted on 06/01/2021 8:29 AM
|
|
Administrator Posts: 3869 Joined: February 23, 2010 |
Please shoot us the temp readings for both sensors at start of roast, mid point and during 1st crack. Looking real good! I think you've got this roaster working for you now.
1/2 lb and 1 lb drum, Siemens Sirocco fluidbed, presspot, chemex, cajun biggin brewer from the backwoods of Louisiana
|
|
|
|
| wbbh |
Posted on 06/01/2021 1:35 PM
|
|
Newbie Posts: 28 Joined: February 21, 2009 |
Quote allenb wrote: Please shoot us the temp readings for both sensors at start of roast, mid point and during 1st crack. Looking real good! I think you've got this roaster working for you now. I'll give it a try. I'm tempted to drop a microphone into the top of the RC, I've got tinnitus and it's difficult to hear over the roar of the blower. I may try adding a filter housing of some sort to reduce the noise level. If I build a second version, the blower will be mounted below the roaster. |
|
|
|
| wbbh |
Posted on 06/12/2021 2:53 PM
|
|
Newbie Posts: 28 Joined: February 21, 2009 |
Quote allenb wrote: Please shoot us the temp readings for both sensors at start of roast, mid point and during 1st crack. Looking real good! I think you've got this roaster working for you now. 1.5 pounds of Brazil Cerado Natural Time Lower Temp Upper Temp 1 210 254 2 245 317 3 259 335 4 279 369 4 43 286 398 First Crack 6 304 446 7 325 421 8 331 433 Second Crack 9 338 450 10 40 End Then, unfortunately, I discovered the blower has ample power to eject beans out of the RC and onto the ground. |
|
|
|
| wbbh |
Posted on 12/05/2021 9:19 AM
|
|
Newbie Posts: 28 Joined: February 21, 2009 |
This is a partial list of parts used to build he roaster: Blower: https://www.amazo...B009Z0PDPI Blower speed controller: Yeeco AC 110V 4000W SCR Voltage Regulator Speed Control Driver Dimming Dimmer Thermostat Governing Temperature Governor Fan Motor Controller https://www.amazo...op?ie=UTF8 Sight Glass for Chamber: https://www.amazo...&psc=1 8 in spool: https://www.amazo...&psc=1 Connection to air box: https://www.amazo...&psc=1 Clamps for connections: https://www.amazo...&psc=1 Filter plate, bottom of the roast chamber: https://www.amazo...&psc=1 It isn�t required but I bought a 4� to 3� reducer and two 90 degree elbows to carry the chaff to the side and possibly a cyclone separator later. Burners: This is a similar burner: https://www.ebay....BMosSX-71h The mushroom from this burner: https://www.amazo...&psc=1 Igniter: https://www.amazo...&psc=1 Needle valve: https://www.amazo...&psc=1 Propane regulator assembly: https://www.amazo...&psc=1 Long Roasting Chamber: https://www.aliex...4c4dT9qUzi Philmore S38 Vernier Control Knob https://www.amazo...&psc=1 Edited by wbbh on 01/26/2023 2:11 PM |
|
|
|
| Bullrocky |
Posted on 01/23/2023 11:55 AM
|
|
Newbie Posts: 1 Joined: January 23, 2023 |
I'd like to know what burner you used. The link is not showing the burner now. can you show which one it is? also was wondering how you connected your blower to your roaster. |
|
|
|
| wbbh |
Posted on 01/26/2023 2:45 PM
|
|
Newbie Posts: 28 Joined: February 21, 2009 |
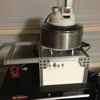
Quote Bullrocky wrote: I'd like to know what burner you used. The link is not showing the burner now. can you show which one it is? also was wondering how you connected your blower to your roaster. The burner is from a typical lightweight propane camping stove. I did drill out the jet to get more gas flow. I updated the link to a similar burner. The blower nozzle was a slip fit into a 1.5" PVC coupling glued into the air plenum box and sealed with some silicone sealant. This is a closeup of how I plumbed the burner by silver soldering a tube fitting to the burner. The burners do vary so you will likely have to adapt the burner you buy. I have seen others use a propane torch burner. 
wbbh attached the following image:

Edited by wbbh on 01/26/2023 2:50 PM |
|
|
|
| BadHabitRoasters |
Posted on 01/26/2023 7:13 PM
|
 Newbie Posts: 46 Joined: March 18, 2013 |
very cool! I see 2 roast cambers. Do you change out the size depending on roast load? |
|
|
|

Page 1 of 2: 12
| Jump to Forum: |
Powered by PHP-Fusion Copyright © 2024 PHP-Fusion Inc
Released as free software without warranties under GNU Affero GPL v3
Designed with ♥ by NetriXHosted by skpacman