
Login

Shoutbox
You must login to post a message.
renatoa
07/26/2024 3:49 PM
Bill grubbe and Jk, 
allenb
07/26/2024 5:15 AM
Spiderkw Welcome to HRO!

renatoa
07/24/2024 8:31 AM
ramiroflores and John123,

 ?
?
?renatoa
07/21/2024 1:18 AM
 , Luislobo
renatoa
07/19/2024 11:28 AM
Koepea,
Forum Threads
Newest Threads
Skywalker roaster modsBackground Roast Iss...
Hello from Arkansas
TC4ESP
Green coffee reviews
Hottest Threads
| Skywalker roaster... | [375] |
| TC4ESP | [115] |
| War on Farmers by... | [47] |
| Adventures in flu... | [26] |
| Hello! (soon) Roa... | [17] |
In Memory Of Ginny

Donations
Latest Donations
dmccallum - 10.00
JackH - 25.00
snwcmpr - 10.00
Anonymous - 2.00
Anonymous - 5.00
dmccallum - 10.00
JackH - 25.00
snwcmpr - 10.00
Anonymous - 2.00
Anonymous - 5.00
Users Online
Guests Online: 4
Members Online: 0
Total Members: 8,393
Newest Member: Bill grubbe
Members Online: 0
Total Members: 8,393
Newest Member: Bill grubbe
View Thread
Who is here? 1 guest(s)
 Rewire 230V popcorn machine fan & heater
|
|
| Ploni |
Posted on 12/01/2021 9:47 AM
|
|
1/4 Pounder  Posts: 85 Joined: October 17, 2021 |
Nice (& neat)! Thanks. Do you know: 1. if this model is still being manufactured or 2. if it is available generically under other brand names? |
|
|
|
| zamunda |
Posted on 12/01/2021 11:25 AM
|
 1/4 Pounder Posts: 173 Joined: November 17, 2020 |
Quote Ploni wrote: Do you know: 1. if this model is still being manufactured or 2. if it is available generically under other brand names? Sorry, did several searches but could not find any similar models (new/used)... ########################
### A lot can happen over coffee ### ######################## |
|
|
|
| Ploni |
Posted on 12/01/2021 11:50 AM
|
|
1/4 Pounder Posts: 85 Joined: October 17, 2021 |
I just purchased this unit brand-new on ebay.uk. Thank you for your input, z. Edited by Ploni on 12/02/2021 1:33 AM |
|
|
|
| renatoa |
Posted on 12/02/2021 7:38 AM
|
|
Administrator Posts: 3104 Joined: September 30, 2016 |
Of, let's move on and finish the actual setup, to have something to play until the other arrives from UK. You have attached the last three wires you have to add for the heater be active. The terminals 2 and 3 of the heater controller are tied together internally, so don't be worried that screw 3 is unconnected. ...
renatoa attached the following image:

|
|
|
|
| renatoa |
Posted on 12/02/2021 7:39 AM
|
|
Administrator Posts: 3104 Joined: September 30, 2016 |
And now, the final act... the first roast  Before starting any real test, beware ! if for whatever reason you hear airflow stop, immediately cut the main switch ! Else you have fire in some seconds. Now, prerequisites for the first real test... some calibrating before proceeding with beans. Start the machine, and if the heater display say 100, lower as fast as possible to 50, then set the airflow at maximum. Insert thermometer probe in the bottom of roast can, and play with heater buttons to establish a temperature around 200 C. When stable, note this heater value, then start increasing heater until you have 300C, note the value and lower the heater to zero fast, to cool the machine. Then stop air. ALWAYS use this order ! Start with some air, at least 50%, no heater, then increase heater... do the job... decrease heater to zero, let cool, cut air ! Never heater without air ! I expect to have these values in the 50% range for 200C, and 75% for 300 C. Weigh the beans, and start setting the heater to 200 C value. After one minute of preheat load the beans, and start a timer. If no movement help them with a wood spoon, they will start to move alone soon, in the next minute. When the beans start to move freely, and no more need for your attention, start increasing heater in two-three steps to reach the higher heater value found during calibration, lets say add 10% after one minute, then again 10% after one minute, and last 5%, and let there, no more touch the heater. About minute 3 you should see beans turning from they green hue to pale yellow, note the time when this turn happens. Don't wait the beans to become fully yellow, we need to know the moment when the color change begins. If the beans movement become too violent, and they shows signs to jump out, lower the air, but slowly, not big steps, just enough to calm the beans dance. We approaching the final act of the roasting... Probably about minute 6-7 you should start hearing cracks. Note also this moment, as soon as you hear the first burst of many cracks in a sequence. Another sign of this moment is that the machine will start ejecting abundant snow of chaff, you should expect doing some mess in the room where you roast, be prepared for cleaning after. From the moment when cracks begin you are the absolute master who decide the degree of the resulting roast, so be very focused on beans color, look, smell, everything... About 1-2 minutes later you have to decide roast is done and finish it by fast cutting the heater to zero, from controller, keep button pressed continuously, will be faster than multiple clicks. If you want an even faster heat cutting, you can install a switch on the white wire of the heater. That's all folks... have a good roast first experience ! |
|
|
|
| Ploni |
Posted on 12/02/2021 11:55 AM
|
|
1/4 Pounder Posts: 85 Joined: October 17, 2021 |
Wow! Thanks, renatoa. Welcome back. I'm going to look this over but won't be able to focus on it until Sunday, God willing. Have a great weekend. |
|
|
|
| allenb |
Posted on 12/02/2021 1:05 PM
|
 Administrator Posts: 3869 Joined: February 23, 2010 |
Quote About 1-2 minutes later you have to decide roast is done and finish it by fast cutting the heater to zero, from controller, keep button pressed continuously, will be faster than multiple clicks. If you want an even faster heat cutting, you can install a switch on the white wire of the heater. A word of warning to anyone who fails to utilize a power-on circuit that doesn't have fan automatically running before the roasting process is started. (heating circuit being down stream of fan. Fan needs to be on without your involvement prior to heat. I know from many meltdowns and I'm a very methodical, careful person. There will be one out of X roasts regardless of how careful you are. The reason is due to the many things we roasters are having to run through our brain preparing and starting a roast. The odds are, you will lose a heating element if not cause a fire as renatoa stated if you skimp on this feature. Happy and safe roasting! 1/2 lb and 1 lb drum, Siemens Sirocco fluidbed, presspot, chemex, cajun biggin brewer from the backwoods of Louisiana
|
|
|
|
| Ploni |
Posted on 12/03/2021 5:22 AM
|
|
1/4 Pounder Posts: 85 Joined: October 17, 2021 |
Quote renatoa wrote: Of, let's move on and finish the actual setup, to have something to play until the other arrives from UK. You have attached the last three wires you have to add for the heater be active. The terminals 2 and 3 of the heater controller are tied together internally, so don't be worried that screw 3 is unconnected. ... So, if I understand your attached image graphic, the first two L/N screw connections of the 24V unit each have two wires connected to them: 2 blue, 2 brown. A new brown wire should be connected from the second screw connection (which already has a brown wire connected to it) of the 24V unit to the first screw connection on the heater controller. And a new blue wire from the first screw connection (already with a blue wire connected to it) to the second screw connection on the heater controller. The white wire should be connected to the fourth screw connection on the heater controller. (The third screw connection remains empty.) |
|
|
|
| renatoa |
Posted on 12/03/2021 5:50 AM
|
|
Administrator Posts: 3104 Joined: September 30, 2016 |
Right The 1-2 leftmost terminals of heater controller are mains input, the same way as they are for the motor power box, so they are connected together. The 4th terminal of heater controller is the variable power output, and goes to white wire of the heater. You can do this in two steps: first connect only terminals 1-2, power the unit and see the heater controller display lit. No heater at that moment ! Play with the buttons, to become familiar, bring the output to 50%, the switch off and proceed with white wire. |
|
|
|
| Ploni |
Posted on 12/03/2021 6:14 AM
|
|
1/4 Pounder Posts: 85 Joined: October 17, 2021 |
Excellent. I hope to continue on Sunday. Thanks, ren. BTW, what do L & N on the mains stand for? Got it. Live or Line & Neutral Edited by Ploni on 12/03/2021 7:08 AM |
|
|
|
| Ploni |
Posted on 12/07/2021 9:29 AM
|
|
1/4 Pounder Posts: 85 Joined: October 17, 2021 |
Quote Hi, ren. I had the multitester plugged in incorrectly. I raised the heater in increments of 5% (fan always at 100%) but the temperature never got above 76�F (my multimeter only registers temp in Fahrenheit) until I got to 99%. Then, at 100%, it shot up to 480+F. 200�C = 392�F The cool air blows very (too?) well. Edited by Ploni on 12/07/2021 10:29 AM |
|
|
|
| renatoa |
Posted on 12/07/2021 10:17 AM
|
|
Administrator Posts: 3104 Joined: September 30, 2016 |
Does your skin tell same story as the thermometer at 99% ? I mean can you keep the hand in the air blowing, without pain ? Edited by renatoa on 12/07/2021 10:57 AM |
|
|
|
| Ploni |
Posted on 12/07/2021 10:32 AM
|
|
1/4 Pounder Posts: 85 Joined: October 17, 2021 |
Yes. Mistake (I changed it.) Yes. Even until 99% there's almost no noticable heat and lots of blowing air. It's only at 100% that I feel heat and, no, I cannot leave my hand above the heating unit. |
|
|
|
| renatoa |
Posted on 12/07/2021 11:00 AM
|
|
Administrator Posts: 3104 Joined: September 30, 2016 |
The heater controller could have different connections than the models known by me. Please disconnect the wires and measure if terminal screws 2 and 3 are tied together internally, i.e. zero ohms. |
|
|
|
| Ploni |
Posted on 12/07/2021 11:10 AM
|
|
1/4 Pounder Posts: 85 Joined: October 17, 2021 |
Disconnect all three wires to the heat controller? How exactly to check screws #2 & #3? Edited by Ploni on 12/07/2021 11:15 AM |
|
|
|
| renatoa |
Posted on 12/07/2021 11:29 AM
|
|
Administrator Posts: 3104 Joined: September 30, 2016 |
Yes, all three wires. Check 2-3 with an ohmmeter. Are there other labels than 1-2-3-4 ? In/Out or something similar... |
|
|
|
| Ploni |
Posted on 12/07/2021 11:37 AM
|
|
1/4 Pounder Posts: 85 Joined: October 17, 2021 |
#2 & #3 show .000 Yes. Above #1 & #2 is INPUT (above #1 is N; above #2 is I). Above #3 & #4 is OUTPUT (above #4 is L N). Edited by Ploni on 12/08/2021 8:56 AM |
|
|
|
| renatoa |
Posted on 12/08/2021 9:20 AM
|
|
Administrator Posts: 3104 Joined: September 30, 2016 |
Ok, let's try something different... Please, reconnect 1 and 2. Then, connect a 230V bulb, classic, not LED ! between 3 and 4, using some wires. Beware to have everything well insulated, to not short. Let's see if you can control the lamp intensity linearly, from 0 to 100%. |
|
|
|
| Ploni |
Posted on 12/08/2021 10:08 AM
|
|
1/4 Pounder Posts: 85 Joined: October 17, 2021 |
Where to get a "classic" bulb?! And what's a 230V bulb? I thought bulbs are differentiated by wattage. |
|
|
|
| renatoa |
Posted on 12/08/2021 11:23 AM
|
|
Administrator Posts: 3104 Joined: September 30, 2016 |
By classic I mean incandescence/halogen. Not LED or fluorescent. By 230V I mean for household/ceiling usage. Not a car bulb, which is for 12V, or even smaller 3/6V bulbs for flashlight/lantern. Wattage is not important for this test. If not such a bulb available, maybe you can have a table lamp... |
|
|
|
| Ploni |
Posted on 12/08/2021 11:26 AM
|
|
1/4 Pounder Posts: 85 Joined: October 17, 2021 |
I figured "classic" means incandescent. I never heard of a light bulb referred to by voltage. Okay. I found one. I'm putting it together now. One wire from #3 is taped to the bottom of the bulb and a wire from #4 is taped to the bottom side of the bulb. There's no light all the way up to 100%. Now I've switched the 2 wires and got light only at 100%. And maybe the bulb burned out. Nope. The bulb still works. Edited by Ploni on 12/08/2021 12:00 PM |
|
|
|
| renatoa |
Posted on 12/08/2021 11:59 AM
|
|
Administrator Posts: 3104 Joined: September 30, 2016 |
In this moment I am out of ideas... other than a defective heat controller. You can see here how should behave a good one: |
|
|
|
| Ploni |
Posted on 12/08/2021 12:02 PM
|
|
1/4 Pounder Posts: 85 Joined: October 17, 2021 |
Okay. Thanks for your help. Buying electronics from the Chinese doesn't make sense. It takes weeks to receive them and then, like Chinese products in general, they are poorly designed and constructed . . . and difficult to return for replacement or reimbursement. Maybe I should proceed with Larry Cotton's Wobble Roaster? I haven't had a cup of coffee in a month because I wanted to "clean my palate" in anticipation of building a roaster and drinking my first cup of HomeyRoast�. Oh well. Edited by Ploni on 12/09/2021 8:36 AM |
|
|
|
| zamunda |
Posted on 12/09/2021 10:55 AM
|
|
1/4 Pounder Posts: 173 Joined: November 17, 2020 |
Hello, If you really are in the need of your own home-roasted coffee you can get good results with a heat-gun only, does not require any building or modding: https://ineedcoffee.com/roasting-coffee-with-a-heat-gun-a-top-down-approach/ In the mean time, you can keep working/learning on modding/building your own roaster. ########################
### A lot can happen over coffee ### ######################## |
|
|
|
| Ploni |
Posted on 12/09/2021 11:12 AM
|
|
1/4 Pounder Posts: 85 Joined: October 17, 2021 |
That's very kind of you. Thank you, zamunda. As I wrote, I've been intrigued by Larry Cotton's Wobble Roaster which utilizes a heat gun as its heat source. Now I see he has a "wobble" device for a grill so I'm thinking it might be an efficient solution to use with my very effective electric cooking device. I've recorded temps on this cooking unit of over 450�F/232�C. Is that hot enough? What do you think?
Ploni attached the following images:

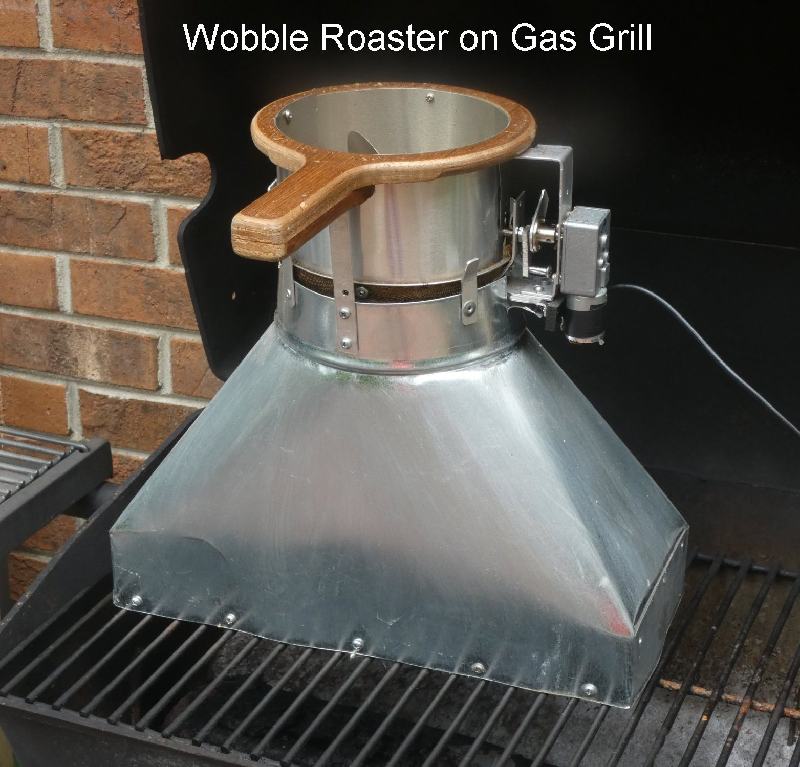
Edited by Ploni on 12/09/2021 11:32 AM |
|
|
|

| Jump to Forum: |
Powered by PHP-Fusion Copyright © 2024 PHP-Fusion Inc
Released as free software without warranties under GNU Affero GPL v3
Designed with ♥ by NetriXHosted by skpacman