
Login

Shoutbox
You must login to post a message.
renatoa
07/26/2024 3:49 PM
Bill grubbe and Jk, 
allenb
07/26/2024 5:15 AM
Spiderkw Welcome to HRO!

renatoa
07/24/2024 8:31 AM
ramiroflores and John123,

 ?
?
?renatoa
07/21/2024 1:18 AM
 , Luislobo
renatoa
07/19/2024 11:28 AM
Koepea,
Forum Threads
Newest Threads
Skywalker roaster modsBackground Roast Iss...
Hello from Arkansas
TC4ESP
Green coffee reviews
Hottest Threads
| Skywalker roaster... | [375] |
| TC4ESP | [115] |
| War on Farmers by... | [47] |
| Adventures in flu... | [26] |
| Hello! (soon) Roa... | [17] |
In Memory Of Ginny

Donations
Latest Donations
dmccallum - 10.00
JackH - 25.00
snwcmpr - 10.00
Anonymous - 2.00
Anonymous - 5.00
dmccallum - 10.00
JackH - 25.00
snwcmpr - 10.00
Anonymous - 2.00
Anonymous - 5.00
Users Online
Guests Online: 6
Members Online: 0
Total Members: 8,393
Newest Member: Bill grubbe
Members Online: 0
Total Members: 8,393
Newest Member: Bill grubbe
View Thread
Who is here? 1 guest(s)
Page 1 of 2: 12
|
 Some questions to start right to mod a roaster with TC4
|
|
| iPa |
Posted on 01/21/2022 9:04 PM
|
|
Newbie  Posts: 44 Joined: December 22, 2021 |
Quote Adam_M@au wrote: hi @iPa saw your pics, though our roasters are slightly different (mine had the removable side panel with filter), it looks like the internals may be identical. how far have you got on setting up the tc4 ? I am at the middle of assembling all elements. Arduino board is ready with some settings mod and PID value shared by renatoa. Quote a couple of questions on your machine, is it the 300gram model ? It�s the D350G given at 300gr, with a light roast, you can slightly increase the amount at 350gr Quote have you measured the power draw ? mine was marketed with a 2800W heater. Only ones time with a 300gr batch, duration 17minutes, target beans temperature 206�C, heater target temperature on last stage 212�C, maximum power was 2200W (214V 10,3A), energy for the full process 0.550kWh. Quote how powerful is the blower in your model ? i can evacuate the glass chamber by turning the blower up to full. 200W |
|
|
|
| iPa |
Posted on 01/26/2022 8:01 AM
|
|
Newbie Posts: 44 Joined: December 22, 2021 |
Quote hi @iPa saw your pics, though our roasters are slightly different (mine had the removable side panel with filter), it looks like the internals may be identical. Hi @Adam_M could tell me values of this settings on your roaster ? Thx 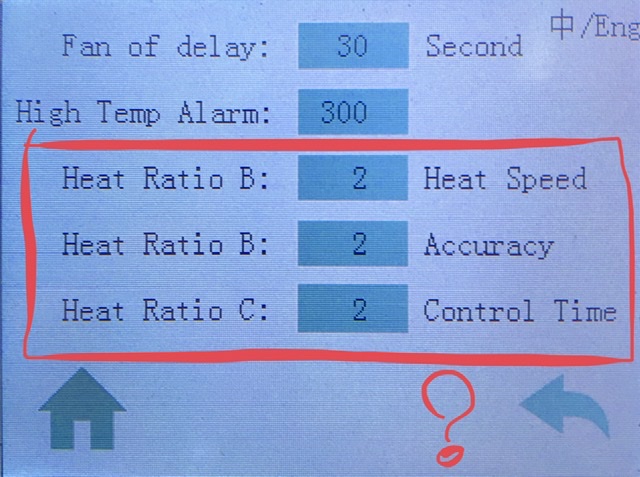 |
|
|
|
| Adam_M@au |
Posted on 01/28/2022 10:03 PM
|
|
Newbie Posts: 8 Joined: January 21, 2022 |
hi @iPa sure, apologies i've been busy tearing the roaster apart to check out some hardware. lots of Silicone  interesting, the translation is different on my model (newer model i think) Fan of Delay: 30 Second High Temp Alarm: 350 The next three are labelled differently, Heat Mode: 2 (does not show Heat Speed) Temp Correct: 10 (does not show Accuracy) Temp Diff: 2 (does not show Control Time) I suspect those last three are PID values used by the controller. |
|
|
|
| Adam_M@au |
Posted on 01/28/2022 10:31 PM
|
|
Newbie Posts: 8 Joined: January 21, 2022 |
while pulling it apart I found the controller is a STM32F103RB chip (64 pin LQFP package), I wonder if it can be reprogrammed. there is a main electronics board which appears to be driven by the controller, outputting the thermocouple via SPI and what I suspect is a zero cross signal back to the controller. I need to attach a scope to verify, I suspect the main heater is controlled via a PWM signal to the triac, there is a signal pin for the FAN which I believe turns on a relay powering the fan. the heater coil I measured at ~19.5 ohms, as I understand it, that equates to over 2800W heater on my mains (240V) |
|
|
|
| renatoa |
Posted on 01/29/2022 12:58 AM
|
|
Administrator Posts: 3104 Joined: September 30, 2016 |
If not fused against unauthorized reprogramming... it could. The general schematic you described, sounds logical, is the typical way how these things works. That's why I asked at the beginning of thread about such details, to suggest attaching an existing solution to the main entry points of such electronics: temperature and power control. |
|
|
|
| Adam_M@au |
Posted on 01/29/2022 1:27 AM
|
|
Newbie Posts: 8 Joined: January 21, 2022 |
Quote renatoa wrote: If not fused against unauthorized reprogramming... it could. The general schematic you described, sounds logical, is the typical way how these things works. That's why I asked at the beginning of thread about such details, to suggest attaching an existing solution to the main entry points of such electronics: temperature and power control. I want to try and get some better photo's of the boards with better lighting, and i'll upload pics. the controller board has additional IO's that should be connected to the STM32 IC ready to solder some headers on for use. there is a write protect jumper already populated, so possibly will allow re-flashing (though without the source code it would need to be written from scratch). In the minimum, the LCD could be reused and the main driver board could be controlled off an ESP32 if the main controller board was not able to be reflashed (or code written to suit). |
|
|
|
| renatoa |
Posted on 01/29/2022 2:22 AM
|
|
Administrator Posts: 3104 Joined: September 30, 2016 |
Re-writing from scratch would be a too long job for the average free time programmer. Has no sense to try this just to reuse a processor, imo Better try to identify the LCD type, and thermocouple chip, to check if there are libraries available for existing open source world. |
|
|
|
| Adam_M@au |
Posted on 01/29/2022 3:15 AM
|
|
Newbie Posts: 8 Joined: January 21, 2022 |
The LCD Touch Controller is a XPT2046 The LCD looks to be controlled directly via 16 IO pins, though I can not find any examples on the web using more than 8. The TC chip on the main driver board is a MAX6675 The Triac driving the heater is a JST41Z-800BW |
|
|
|
| renatoa |
Posted on 01/29/2022 4:08 AM
|
|
Administrator Posts: 3104 Joined: September 30, 2016 |
There is an Arduino library for a SPI version of this display: https://github.co...ouchscreen The MAX chip is already supported by TC4ESP, even if not yet published. The triac should be connected to the CPU by an optocoupler, please check how is the gate connected in the triac neighborhood. If heater is manually controlled by a pot/knob, then optocoupler is a must to add. |
|
|
|
| Adam_M@au |
Posted on 01/29/2022 4:35 AM
|
|
Newbie Posts: 8 Joined: January 21, 2022 |
Triac is good, it's connected via a MOC3052M optocoupler |
|
|
|
| renatoa |
Posted on 01/29/2022 4:45 AM
|
|
Administrator Posts: 3104 Joined: September 30, 2016 |
You have there all you need for a roaster  |
|
|
|
| iPa |
Posted on 01/29/2022 8:06 PM
|
|
Newbie Posts: 44 Joined: December 22, 2021 |
Below some close pictures of every boards. The thermocouple driver is a MAX6675 My heater resistance is 16 ohm so 3300W as indicated on the label. I don't think to spend time on the original hardware, to use this roaster in standalone the original hardware/software does the job quite well. To monitor the roast with Artisan I added an ambient sensor below the beans bed (ET), a second BT sensor and use a Mastech6514 (works really well on my Macbook, no issue). To use it with TC4 PID and Artisan, my external TC4 cabinet is almost finished, first test soon. I chose an external cabinet, for the access (it's not easy in the roaster box), and first need to learn to discover about TC4 solution, then later I could make a choice.  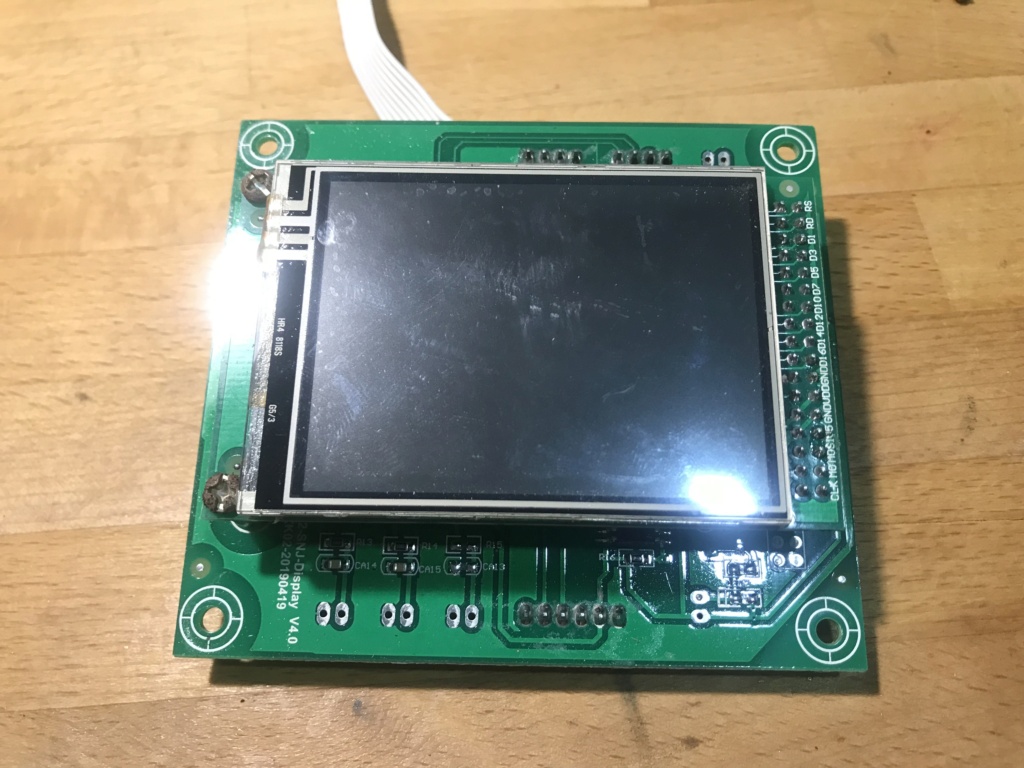 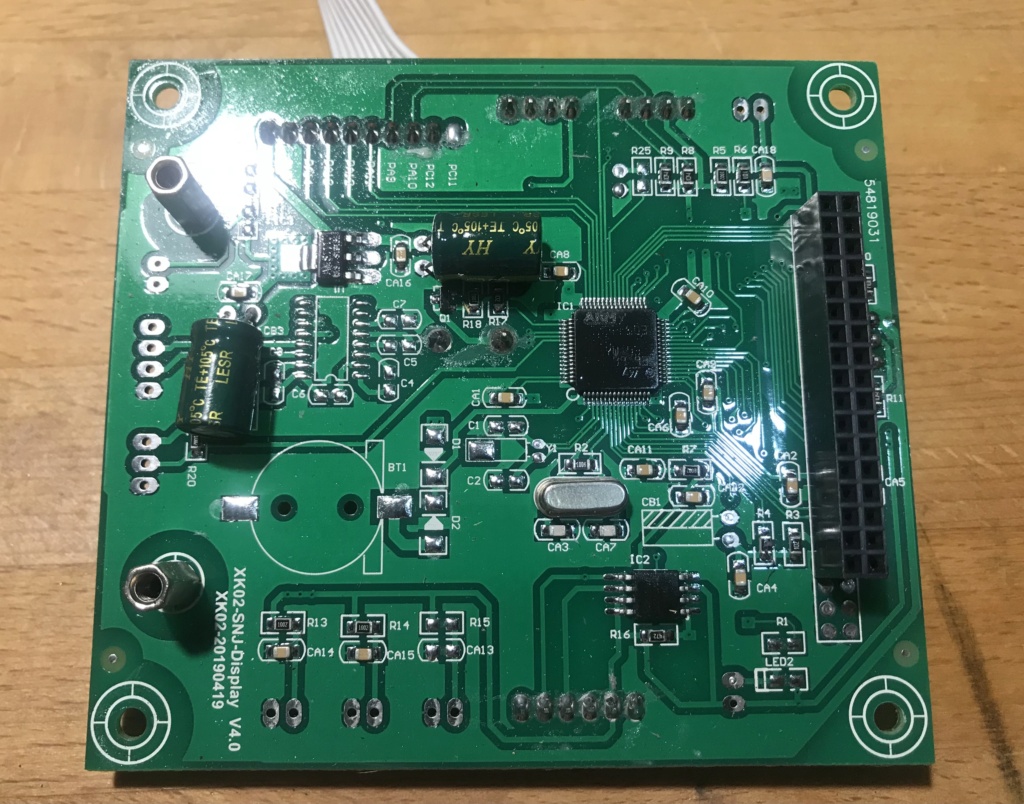 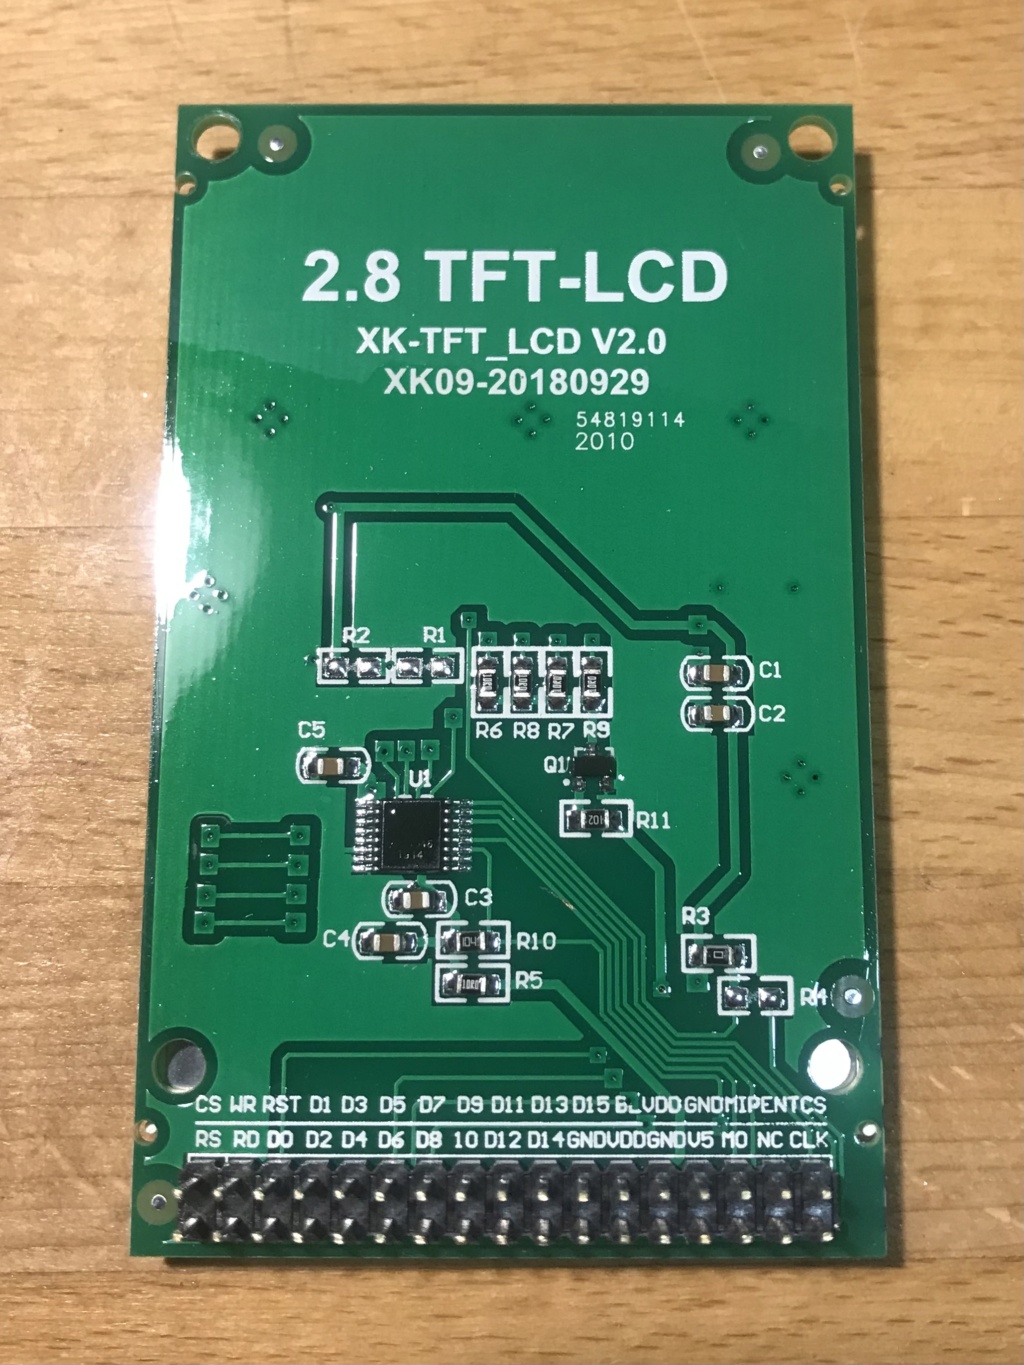 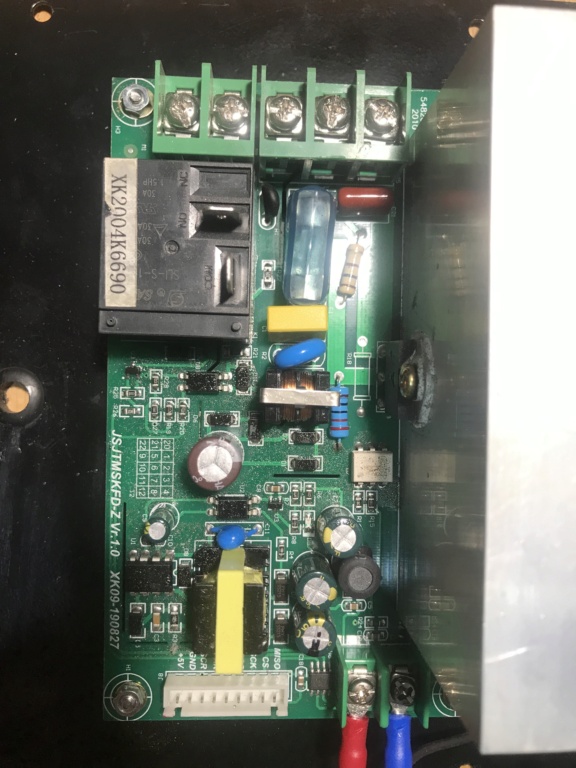 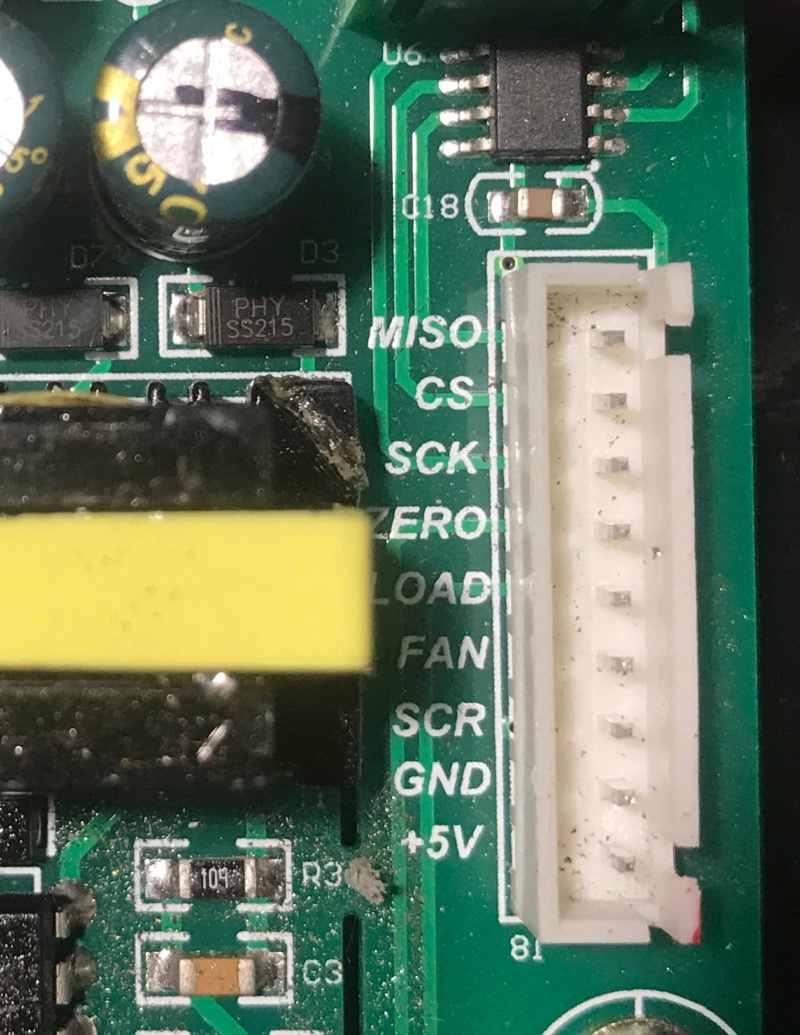
Edited by iPa on 01/30/2022 8:30 PM |
|
|
|
| iPa |
Posted on 01/30/2022 10:18 PM
|
|
Newbie Posts: 44 Joined: December 22, 2021 |
This morning first blank test with the new TC4 cabinet: - Blower all ok, min, max and cool values adjusted. - Heater output tested with a 1600W stove, all ok, and really very low heating of the ssr. Not enough time for more today. 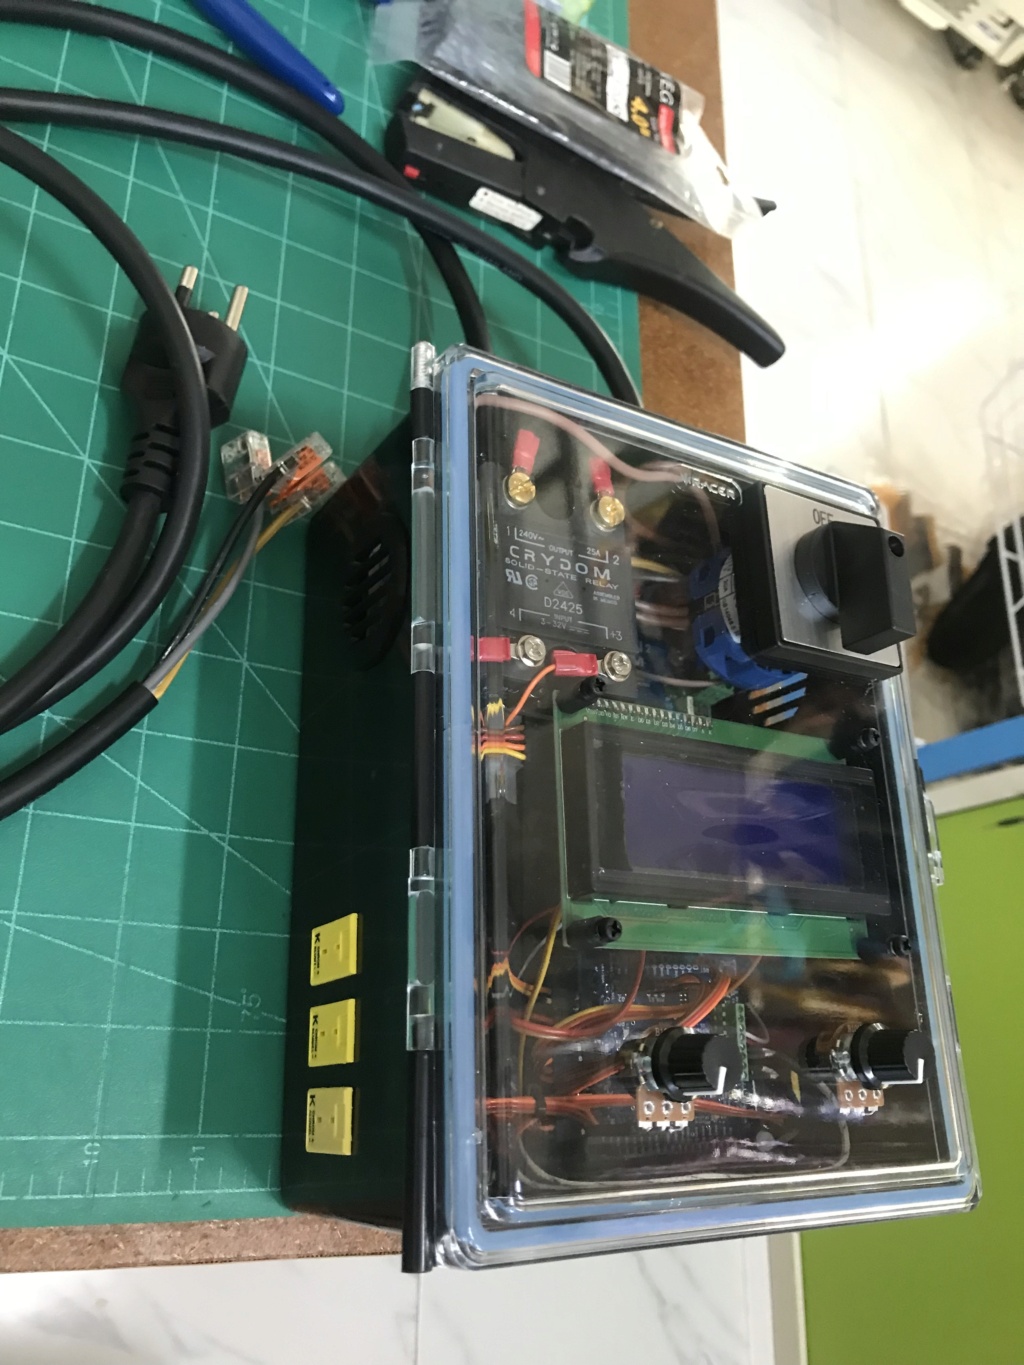
Edited by iPa on 01/30/2022 10:33 PM |
|
|
|
| iPa |
Posted on 02/01/2022 1:36 AM
|
|
Newbie Posts: 44 Joined: December 22, 2021 |
First roast ! I think the beginning was promising, but then 2 weird behaviors. What can explains 1 (and how to improve), change grain behavior, when they becomes exothermic, no because it�s the heater increasing suddenly, so ? For the second, heater seems to heat again after a while. At the drop event I send a PID OFF, maybe I should send a ��heater 0�� too, isn�t it ? At the beginning of tests, I noticed the blower was not smooth, some heretics speed changes, probably wrong trig from the zero detector, here in Thailand the powerline are very dirty and unstable, so I gave up and keep only the original fan dimmer on the roaster, in fact it�s ok like this. 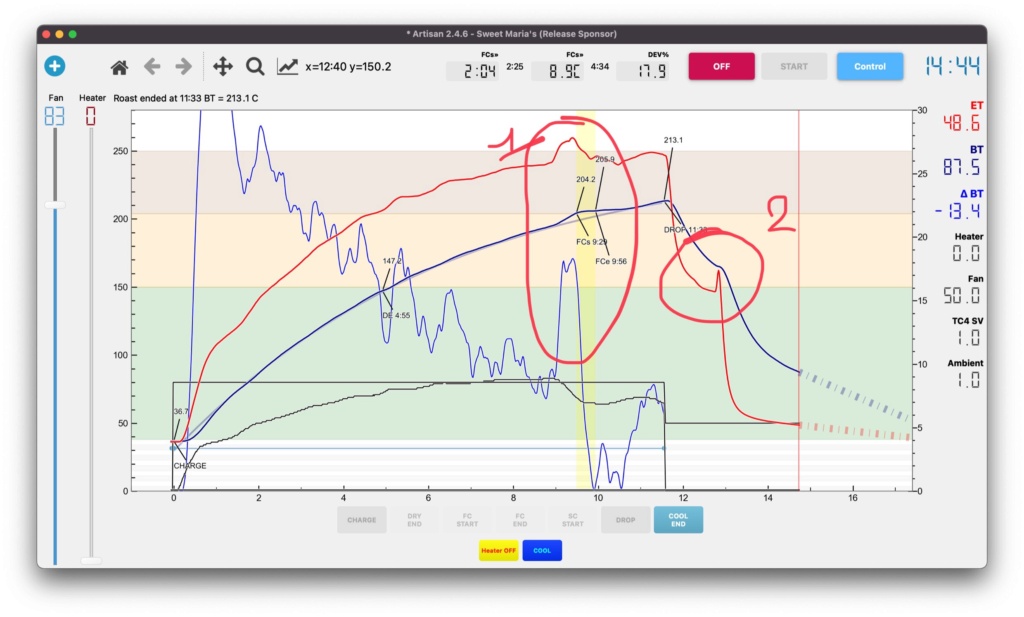
Edited by iPa on 02/01/2022 1:51 AM |
|
|
|
| renatoa |
Posted on 02/01/2022 2:13 AM
|
|
Administrator Posts: 3104 Joined: September 30, 2016 |
Both PID;OFF and PID;STOP cut the heater, I would rather consider that glitch a reading issue. To attenuate the BT bump at first crack, stop increasing power after minute 8. When you learn how to "read" the approach of the FC, you could even step down 1% in the minute before FC, but be prepared to increase back immediately, to avoid the crash. Edited by renatoa on 02/01/2022 2:20 AM |
|
|
|
| iPa |
Posted on 02/01/2022 2:21 AM
|
|
Newbie Posts: 44 Joined: December 22, 2021 |
Quote renatoa wrote: Both PID;OFF and PID;STOP cut the heater, I would rather consider that glitch a reading issue. Asap I understood that the heater was heating again, I pressed my �heater off� button then ET was immediately falling again (the glitch). I will try another roast soon. |
|
|
|
| iPa |
Posted on 02/01/2022 2:34 AM
|
|
Newbie Posts: 44 Joined: December 22, 2021 |
How to send more than one serial command ? Which separator to use ? Thank you |
|
|
|
| renatoa |
Posted on 02/01/2022 2:48 AM
|
|
Administrator Posts: 3104 Joined: September 30, 2016 |
No need to send both commands, PID;STOP is enough, it covers all actions of PID;OFF, plus the fan related actions.
Edited by renatoa on 02/01/2022 5:51 AM |
|
|
|
| iPa |
Posted on 02/01/2022 7:28 AM
|
|
Newbie Posts: 44 Joined: December 22, 2021 |
I spend time to read the graph and with the simulator. I think these two issue have the same origin. Maybe something wrong with the ssr, so I added a ssr heatsink fan, a heater voltmeter (like the one for the fan) to keep an eye on it on the next roast. |
|
|
|
| iPa |
Posted on 02/04/2022 10:41 PM
|
|
Newbie Posts: 44 Joined: December 22, 2021 |
Heater SSR replaced, this time no weird behavior. Added a SSR sensor. 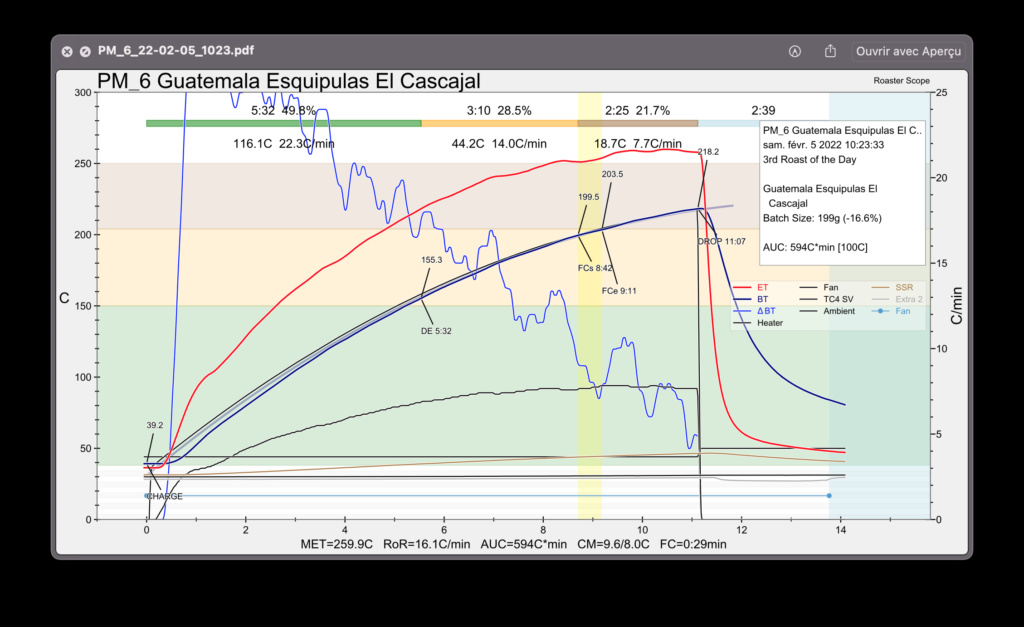 
Edited by iPa on 02/05/2022 7:49 AM |
|
|
|
| Adam_M@au |
Posted on 02/18/2022 2:41 AM
|
|
Newbie Posts: 8 Joined: January 21, 2022 |
@iPa I've seen a video of another person who has 'extended' their glass chamber, I'm curious, what are the dimensions of the 300g glass chamber ? my 150g model is (roughly) 85mm OD, 75mm ID and 130mm tall |
|
|
|
| iPa |
Posted on 02/18/2022 4:18 AM
|
|
Newbie Posts: 44 Joined: December 22, 2021 |
Quote Adam_M@au wrote: @iPa what are the dimensions of the 300g glass chamber ? my 150g model is (roughly) 85mm OD, 75mm ID and 130mm tall 96mm ID 106mm OD 220mm length |
|
|
|
| Adam_M@au |
Posted on 02/18/2022 6:30 AM
|
|
Newbie Posts: 8 Joined: January 21, 2022 |
Cheers. I've ordered one of these to extend (replace) the chamber in mine: https://www.aliex...180286hZOZ will definitely be tall, but there is plenty of power in the fan to move the beans, should help prevent the beans from escaping. I keep ending up with too many beans in the chaff through different stages of the roast. It would be interesting to setup a top that if you turn the dial to 11 it will blow the roasted beans out of the chamber into a container. Edited by renatoa on 02/18/2022 6:48 AM |
|
|
|
| iPa |
Posted on 02/18/2022 7:00 AM
|
|
Newbie Posts: 44 Joined: December 22, 2021 |
I have these issue too especially during the cooling stage. Last roaster version they add a deflector (picture 1) I am trying with stainless ball, it�s not perfect but better than without (75% less). I will try to add a fan grid too. 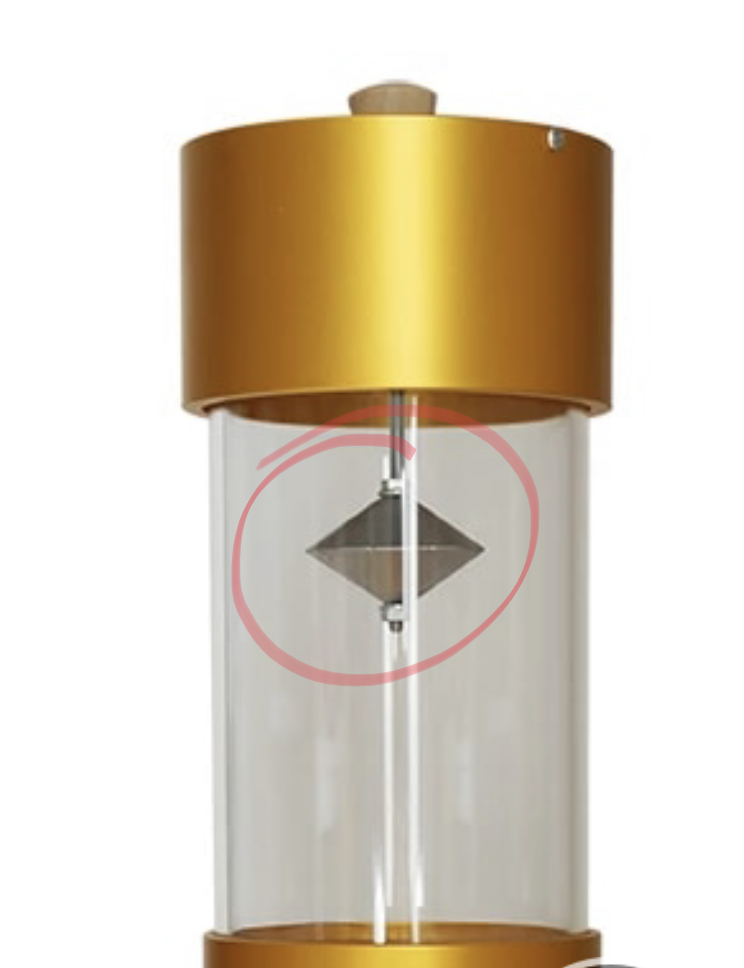 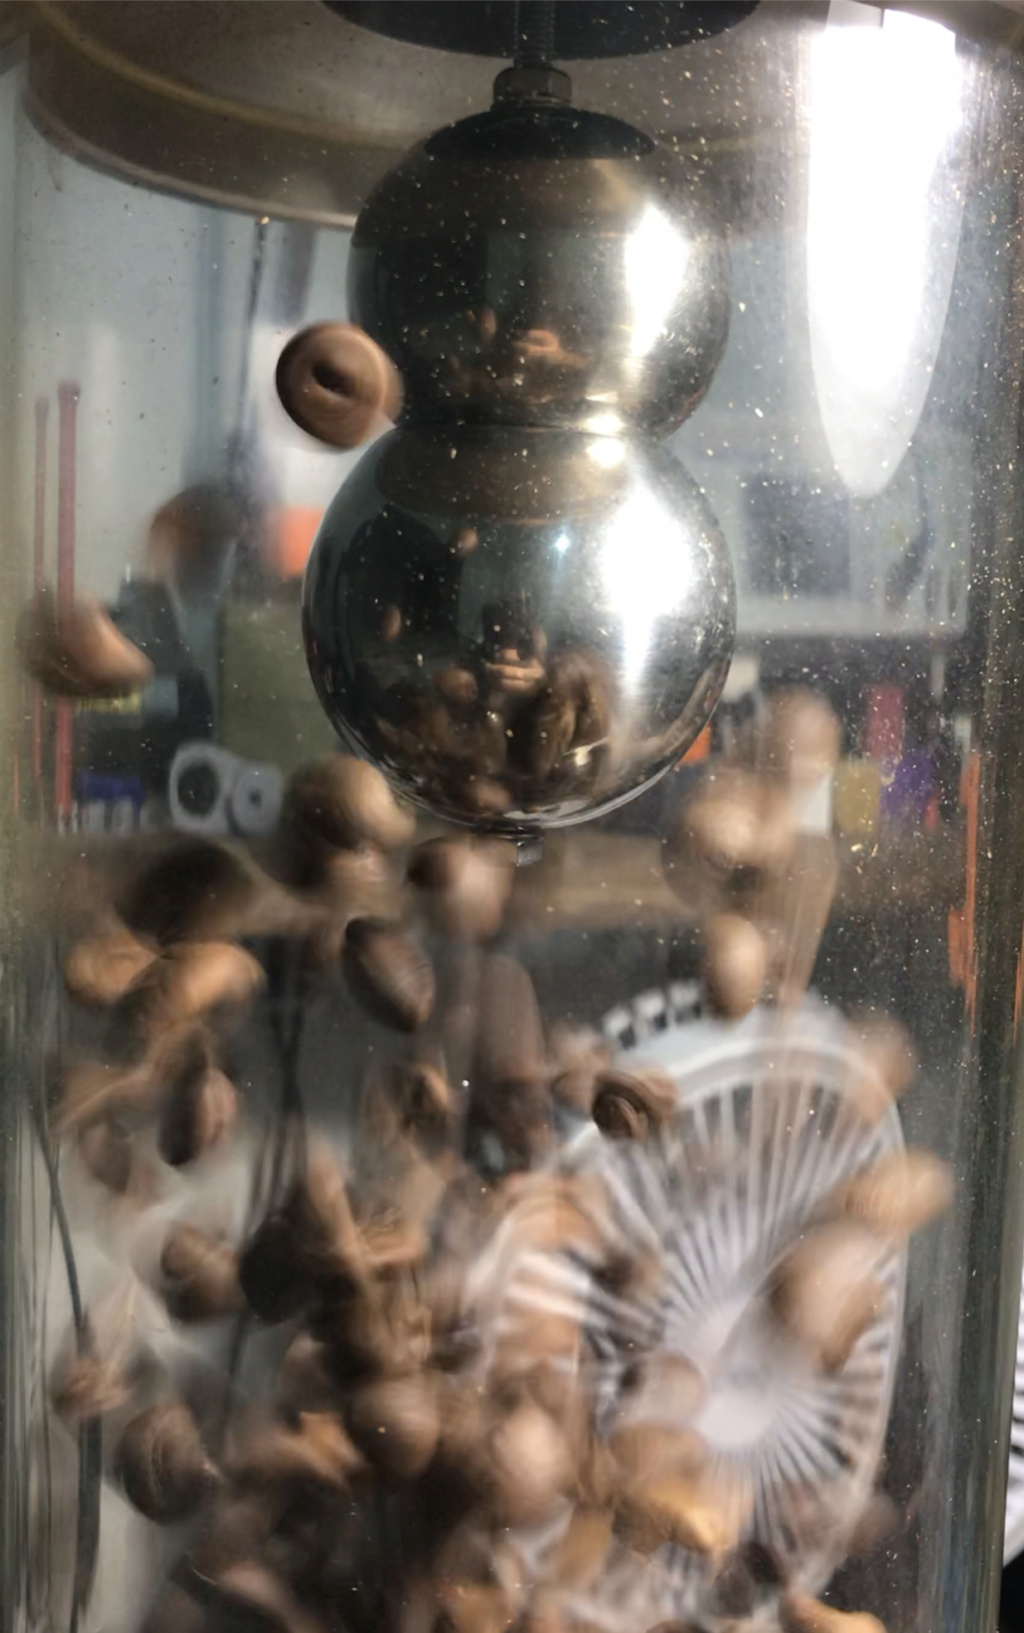 |
|
|
|
| iPa |
Posted on 02/18/2022 10:11 PM
|
|
Newbie Posts: 44 Joined: December 22, 2021 |
A new deflector, I have not tested yet. 2 stainless funnel mounted top-top, some TIG welding points. This one not fit the hole so need to be mounted inside, looking for an idea, maybe with a grid fan, water drainage grid, � 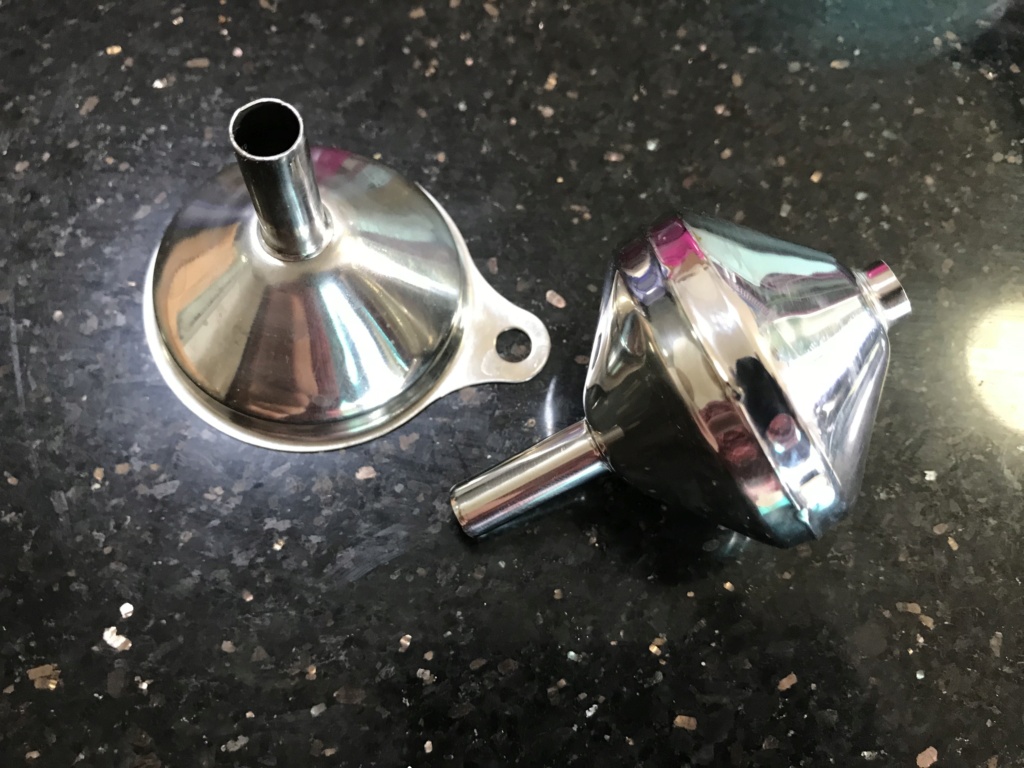 |
|
|
|

Page 1 of 2: 12
| Jump to Forum: |
Powered by PHP-Fusion Copyright © 2024 PHP-Fusion Inc
Released as free software without warranties under GNU Affero GPL v3
Designed with ♥ by NetriXHosted by skpacman