Login
Shoutbox
You must login to post a message.
renatoa
07/26/2024 3:49 PM
Bill grubbe and Jk, 

allenb
07/26/2024 5:15 AM
Spiderkw Welcome to HRO!


renatoa
07/24/2024 8:31 AM
ramiroflores and John123,

 ?
?

 ?
?renatoa
07/21/2024 1:18 AM
 , Luislobo
renatoa
07/19/2024 11:28 AM
Koepea, 

Forum Threads
Newest Threads
Skywalker roaster modsBackground Roast Iss...
Hello from Arkansas
TC4ESP
Green coffee reviews
Hottest Threads
| Skywalker roaster... | [375] |
| TC4ESP | [115] |
| War on Farmers by... | [47] |
| Adventures in flu... | [26] |
| Hello! (soon) Roa... | [17] |
Donations
Latest Donations
dmccallum - 10.00
JackH - 25.00
snwcmpr - 10.00
Anonymous - 2.00
Anonymous - 5.00
dmccallum - 10.00
JackH - 25.00
snwcmpr - 10.00
Anonymous - 2.00
Anonymous - 5.00
Users Online
Guests Online: 5
Members Online: 0
Total Members: 8,393
Newest Member: Bill grubbe
Members Online: 0
Total Members: 8,393
Newest Member: Bill grubbe
View Thread
Who is here? 1 guest(s)
Page 1 of 2: 12
|
|
1-6 lbs Roaster Build - Nothing Fancy
|
|
| UmMerkur |
Posted on 01/31/2022 5:17 AM
|
|
Newbie  Posts: 17 Joined: January 27, 2022 |
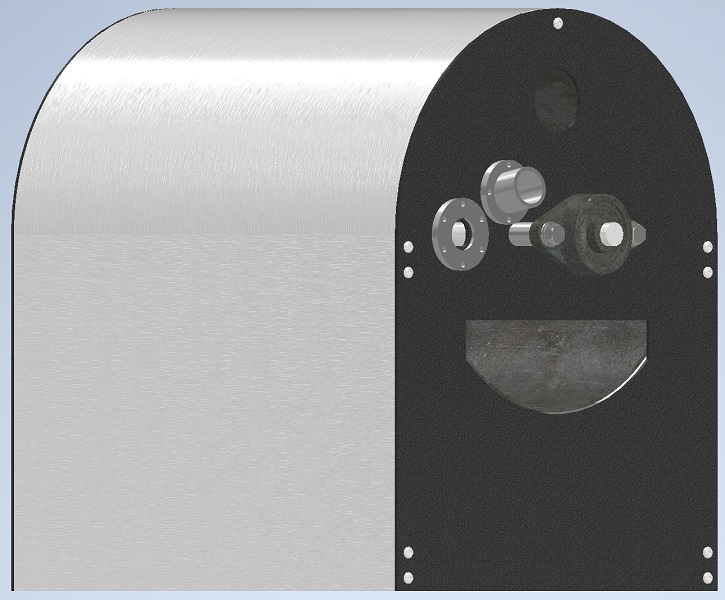
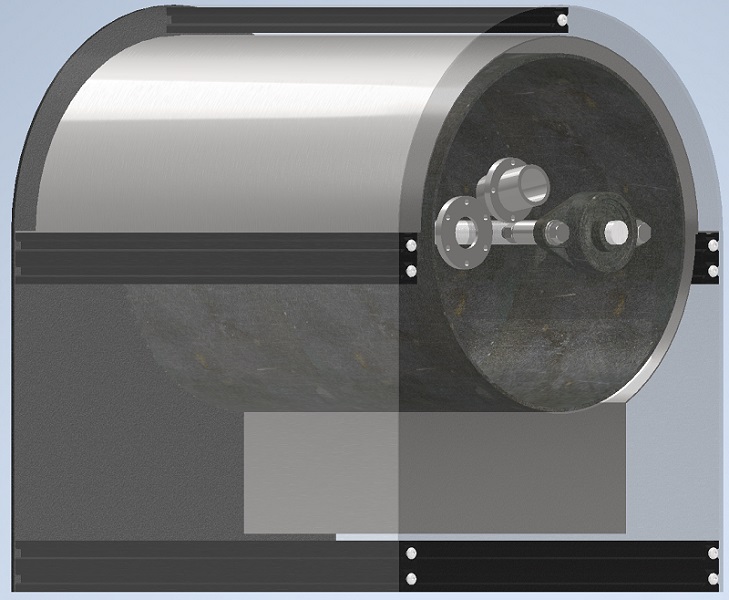
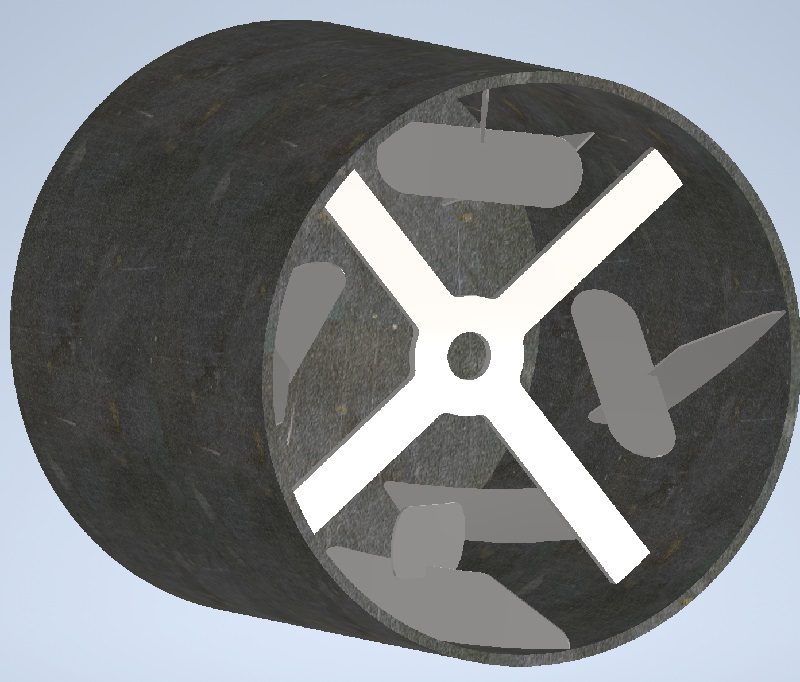
The plan: a 1 to 6 pound roaster, propane powered, mostly manual control. I do have some questions and advice is always welcome. Many thanks to Dan, allenb, oldgrumpus, and others for inspiration. 1. Drum By my estimation 6 lbs of green would require around 20 L drum volume, this is going off the "mass in kg = 1/6 drum volume in L" estimate. So, a 10.75 by 13.50 inch drum would net me 20 L, and 3.35 kg green mass. Do these numbers sound reasonable? I'm somewhat basing this on Mill City's 3 kg roaster but it seems to jive with some others as well. Going to try for 1/8th inch (~3 mm) thickness, we'll see what I find at the scrap yard. Any ideas for drums? 2. Burner Since I have the parts already laying around I plan on using a jet style propane burner. Something like 10 jets at about 4000 BTU/hr each, with high pressure propane. From what's out there it seems 30-40 kBTU would be what I need. 3. Vanes There's some options here. Short full-length low-angle (aggressive) vanes? Or taller segmented vanes at a less aggressive angle? I would think to have good bean agitation and air-time at the lower end of the load-range shorter vanes would make more sense, and so that the beans can get some air and not just get stuck on the vanes and stay in contact with the drum surface. So maybe short segmented vanes? Commercially they seem to be all over the place each with their own special sauce. I'll probably just do some experimenting. 4. CFM How much CFM is needed? I have my eyes on a 160 CFM blower, sounds like it's probably too much through a 2.25 inch pipe. It might pull double duty as cooling tray fan as well. 5. Chaff collection/Cyclone Do I buy the one from eastcaroga on eBay that's made with HVAC vents and glue, or make my own out of sheet metal? First option is much faster... and I can always put a nice looking tube around it (no-touchy shield). I'll try to attach some in-progress images of the CAD model I have so far. It's a work in progress.
UmMerkur attached the following images:
Edited by UmMerkur on 01/31/2022 5:22 AM |
|
|
|
| oldgrumpus |
Posted on 01/31/2022 5:07 PM
|
|
1/2 Pounder  Posts: 225 Joined: July 25, 2012 |
Looking at the location of the tryer and the sight-glass... You may want to look at this video. The tryer could be placed where the beans are falling. I've placed mine on the side that the beans are falling while airborne. Consider putting sight glass near the bulk of the bean mass, but not too close to the center of the mass since that is the best location for the bean-temperature probe. Clever Coffee Dripper
Grinder: Macap M4 Roaster: Completed drum roaster project photos shown here: Photos https://goo.gl/ph...Da6K4wfqw5 Videos https://www.youtu...Bd1NrdpSUH Build thread https://homeroast...post_38189 |
|
|
|
| UmMerkur |
Posted on 01/31/2022 5:22 PM
|
|
Newbie  Posts: 17 Joined: January 27, 2022 |
There will be a sight glass on the door as well, I'm putting one on the panel just to have another point of reference to make sure the beans are doing what they are supposed to. Or rather, what I want them to do. Is it necessary? Probably not, but it makes me feel better. As for the trier location, I just put it somewhere, it has already moved in the drawing :P I'll be doing what yourself and many others have done with the acrylic sheets to see where good locations are and to make sure my vane layout works before I send off the front panel and door to be laser cut. |
|
|
|
| oldgrumpus |
Posted on 01/31/2022 5:24 PM
|
|
1/2 Pounder  Posts: 225 Joined: July 25, 2012 |
The drum if 20L is very close to 5 gallons. I have a kerosene heater and noticed recently that the fuel is sold in a beautifully manufactured container. It is butt-welded sheet metal however it is thinner that your specification. Advantage = more responsive, disadvantage is it might be easier to scorch. I used a water-well casing that was considered scrap at a company that does well drilling. My biggest challenge was "whittling" it down on a lathe since it was about 1/4 inch thick. Even though I eventually got it down to 1/8 inch it is still quite heavy. Mine is about 10-1/2" x 15-1/4". I like the massiveness and helps to get a nice, smooth roast profile. Nevertheless, the can might be worth considering. Another choice might be a propane tank, although I'm pretty sure it would also be a bit thinner than 1/8"
oldgrumpus attached the following image:
Clever Coffee Dripper
Grinder: Macap M4 Roaster: Completed drum roaster project photos shown here: Photos https://goo.gl/ph...Da6K4wfqw5 Videos https://www.youtu...Bd1NrdpSUH Build thread https://homeroast...post_38189 |
|
|
|
| UmMerkur |
Posted on 01/31/2022 5:48 PM
|
|
Newbie  Posts: 17 Joined: January 27, 2022 |
Yeah those are very nice containers. They are usually quite thin, maybe 22 gauge. Plus the rolled seams usually have some kind of plastic seal in them, I'd probably want to just cut off both ends and make a new back plate. Dunno how thick propane tanks are, I'd guess 2 mm? Might work but they're a bit, well, not square. What I'll probably do is take some 11 gauge (0.120 in) steel sheet I have laying around to a local fab shop and have them roll and weld it. Edited by UmMerkur on 02/01/2022 12:19 PM |
|
|
|
| oldgrumpus |
Posted on 01/31/2022 10:51 PM
|
|
1/2 Pounder  Posts: 225 Joined: July 25, 2012 |
And just FIY I looked inside of mine. I have an empty can and it has no plastic. Just very clean bare steel inside.
Clever Coffee Dripper
Grinder: Macap M4 Roaster: Completed drum roaster project photos shown here: Photos https://goo.gl/ph...Da6K4wfqw5 Videos https://www.youtu...Bd1NrdpSUH Build thread https://homeroast...post_38189 |
|
|
|
| allenb |
Posted on 02/03/2022 9:46 AM
|
|
Administrator  Posts: 3869 Joined: February 23, 2010 |
There's another option although expensive assuming your machine shop fab cost to roll/weld/trim doesn't end up costing the same as this seamless steel tubing from Totten Tubes https://www.totte...und-tubing. I received a quote from them yesterday for this: 10" OD x .120 wall Carbon Steel Round Tube (10x120HSS) Length 10" precision laser cut ends with no burrs. Cost shipped from California to east coast $200.00 1/2 lb and 1 lb drum, Siemens Sirocco fluidbed, presspot, chemex, cajun biggin brewer from the backwoods of Louisiana
|
|
|
|
| oldgrumpus |
Posted on 02/03/2022 10:34 AM
|
|
1/2 Pounder  Posts: 225 Joined: July 25, 2012 |
That is an excellent suggestion. I wish I’d have done that with my roaster build. My “free” well casing had a high cost in labor. $200 isn’t too much to spend on such a critical component especially knowing it will be very close to perfectly round…
Clever Coffee Dripper
Grinder: Macap M4 Roaster: Completed drum roaster project photos shown here: Photos https://goo.gl/ph...Da6K4wfqw5 Videos https://www.youtu...Bd1NrdpSUH Build thread https://homeroast...post_38189 |
|
|
|
| allenb |
Posted on 02/03/2022 1:40 PM
|
|
Administrator  Posts: 3869 Joined: February 23, 2010 |
I agree and also wish I had done the same on one of my drum roasters of the past. Unfortunately, that still leaves the fab and welding on of the back plate if one doesn't have the expertise and/or equipment and fab and welding of the vanes although there is the option of attaching the vanes via brackets and machine screws which works perfectly well. Many first time builders get stuck when they get to the design aspect pertaining to how the drum will be mounted to the inside the drum shaft collar and spokes and be able to adjust the drum concentricity to zero runout. I've always used threaded rod screwed into drilled and tapped holes in the shaft collar radial face and then used lock washers and nuts on both sides of the drum. Takes some trial and error to get the runout dialed in but beats the cost of a machine shop doing the work with it mounted on a lathe and some precision welding. 1/2 lb and 1 lb drum, Siemens Sirocco fluidbed, presspot, chemex, cajun biggin brewer from the backwoods of Louisiana
|
|
|
|
| UmMerkur |
Posted on 02/03/2022 3:52 PM
|
|
Newbie  Posts: 17 Joined: January 27, 2022 |
Thanks for the suggestion Allen, I'll be sending them an RFQ and see what they say. I believe 12" OD is a common size and 0.25" wall would work for me, 11.5" ID. I have access to, or have myself, the tools for fabrication - just missing a tube roller that can do thick steel. Most metal working equipment I have at home, including welders, grinders, etc. and I can use the lathes and mills at work for everything else. So I'm not worried about all that. My degree is in electrical engineering (PhD) so I better be good at the wiring part but I have dabbled in fabrication as a hobby for many years. Concentricity/runout is always an issue but I think with a good round tube it shouldn't be too hard to get close enough. Cut the spokes a little short and use shims to adjust. Or even drill and tap the drum and adjust with set screws. Then weld once satisfied. A lot of roaster drums I've seen (at least the smaller ones) just weld the tube supports/spokes (made from flat sheet) to the main shaft, I might end up doing some kind of clamping collars to keep some adjustment and takedown ability. My CAD model is fully parametric and based on the drum dimensions so any adjustments can be made once I have the drum. |
|
|
|
| allenb |
Posted on 02/04/2022 11:44 AM
|
|
Administrator  Posts: 3869 Joined: February 23, 2010 |
1. Drum By my estimation 6 lbs of green would require around 20 L drum volume, this is going off the "mass in kg = 1/6 drum volume in L" estimate. So, a 10.75 by 13.50 inch drum would net me 20 L, and 3.35 kg green mass. Do these numbers sound reasonable? I'm somewhat basing this on Mill City's 3 kg roaster but it seems to jive with some others as well. Looks good 2. Burner Since I have the parts already laying around I plan on using a jet style propane burner. Something like 10 jets at about 4000 BTU/hr each, with high pressure propane. From what's out there it seems 30-40 kBTU would be what I need. 30-40kBTU should work well and give you some headroom 3. Vanes Short full-length low-angle (aggressive) vanes? Or taller segmented vanes at a less aggressive angle? My preference on that size drum with a max 6 lb load would be to not go shorter than 1 1/4" tall for the forward vanes (attached directly to the drum) and 1 3/8" on the return vanes. I prefer a less aggressive angle on the forward vanes to lessen the tendency for stacking the bean mass at the front plate. 25° (base line being the longitudinal axis ) is plenty aggressive and will empty a drum quickly but not do the pile up against front plate. For return vanes, I prefer a more aggressive angle since they don't have the bean capture rate of the forward vanes. Try 40° for these. 4. CFM How much CFM is needed? I have my eyes on a 160 CFM blower, sounds like it's probably too much through a 2.25 inch pipe. It might pull double duty as cooling tray fan as well. 160 cfm is good if going double duty. Use dampers on both paths and only pull enough through the drum to allow adequate chaff removal 5. Chaff collection/Cyclone Do I buy the one from eastcaroga on eBay that's made with HVAC vents and glue, or make my own out of sheet metal? First option is much faster... and I can always put a nice looking tube around it (no-touchy shield). I suspect your roaster will end up being a Lamborghini of drum roasters as oldgrumpus pulled off with his. With that said, I would keep the cyclone sexy and not go for one needing a shroud. Edited by allenb on 02/04/2022 12:00 PM 1/2 lb and 1 lb drum, Siemens Sirocco fluidbed, presspot, chemex, cajun biggin brewer from the backwoods of Louisiana
|
|
|
|
| CK |
Posted on 02/04/2022 4:06 PM
|
|
1/2 Pounder  Posts: 252 Joined: December 07, 2018 |
Quote UmMerkur wrote: 5. Chaff collection/Cyclone Do I buy the one from eastcaroga on eBay that's made with HVAC vents and glue, or make my own out of sheet metal? First option is much faster... and I can always put a nice looking tube around it (no-touchy shield). These are great if the shipping wait times aren't a problem. They now make them in a bigger 32mm size. https://www.aliex...58815.html |
|
|
|
| UmMerkur |
Posted on 02/06/2022 3:02 PM
|
|
Newbie  Posts: 17 Joined: January 27, 2022 |
Quote CK wrote: These are great if the shipping wait times aren't a problem. They now make them in a bigger 32mm size. https://www.aliex...58815.html Yeah I've seen that style cyclone before, but I would probably need at least 3 for the volume of air I'd be pulling through them. Would be kind of cool to combine a few, might be neat looking. Allen: Thanks for the feedback, much appreciated. I'll try something for the vanes and see if it works. I've seen some drums where the forward vanes are fairly tall and segmented getting very close to the front plate but they taper them towards the front to avoid that piling issue. |
|
|
|
| renatoa |
Posted on 02/07/2022 2:20 AM
|
|
Administrator  Posts: 3104 Joined: September 30, 2016 |
Not sure if different model... mine is 30mm... too little difference for double price. Combining four units seems easy with these plastic parts, cloned as metal: https://www.aliex...70532.html The really simple approach to build is a thien baffle, made from a tin can. And metal pipes, at least for entrance... http://www.jpthie... Edited by renatoa on 02/07/2022 2:28 AM |
|
|
|
| UmMerkur |
Posted on 02/09/2022 10:12 PM
|
|
Newbie  Posts: 17 Joined: January 27, 2022 |
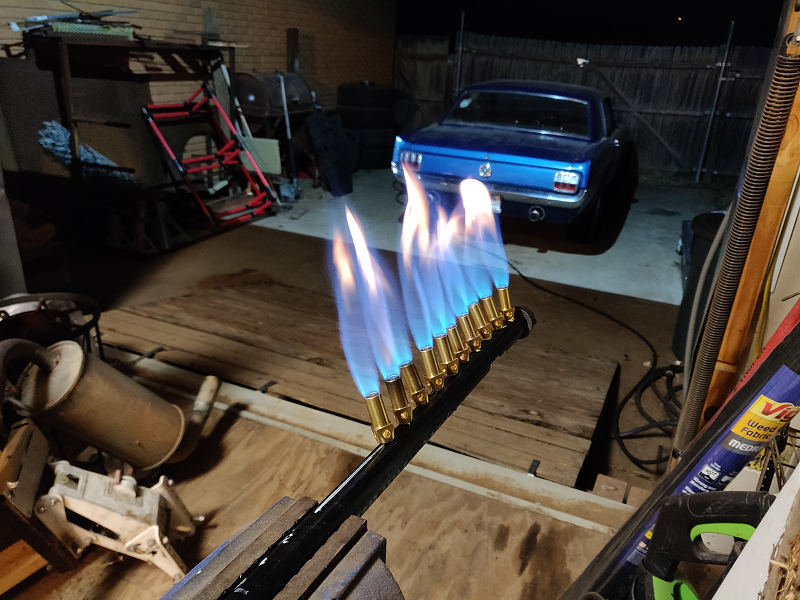
Got my burner put together and tried it out. Seems to work. I'm still trying to decide on the chaff collector cyclone, although I did snag a 227 CFM blower off eBay for a good price.
UmMerkur attached the following image:
|
|
|
|
| UmMerkur |
Posted on 02/11/2022 12:01 AM
|
|
Newbie  Posts: 17 Joined: January 27, 2022 |
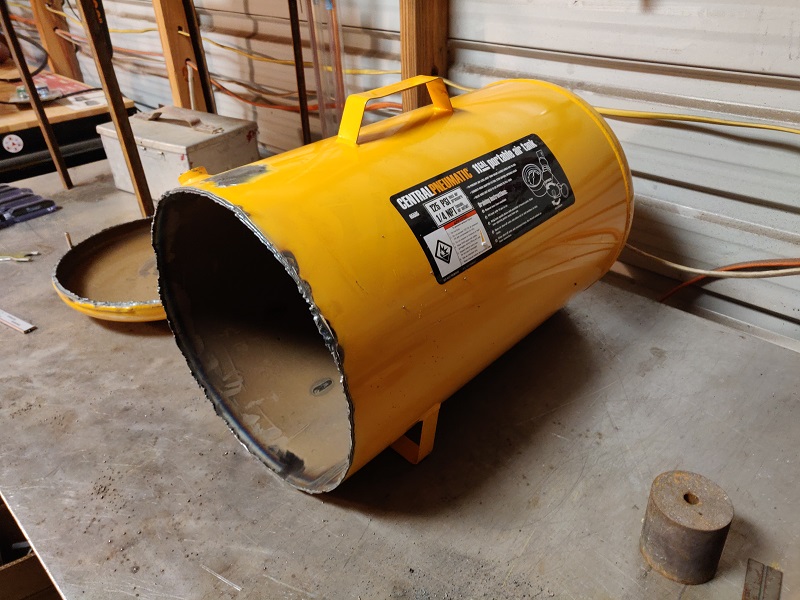
Found myself a drum. 11 gallon portable air tank from the Hazard Fraught, $60 before coupons. ID: 11.87" Wall Thickness: ~0.065" (probably 15 gauge) So I figure 12" long would work. Since it's somewhat thin I might do a double wall to try and even out the heating. I.e. a layer of 18 gauge (0.05") with a small air gap (maybe 100 thou or so). Will it work? Who knows, but I'm willing to try. Should I leave the back as is and just perforate that? Feels dirty for some reason... It's not square... Another question: how much space behind the drum is needed? I have 2.25 inches at the moment (3.25 in CAD but that includes 1" of insulation), is that enough? It sounds like enough, but I could be wrong.
UmMerkur attached the following images:
|
|
|
|
| UmMerkur |
Posted on 04/07/2022 11:50 PM
|
|
Newbie  Posts: 17 Joined: January 27, 2022 |
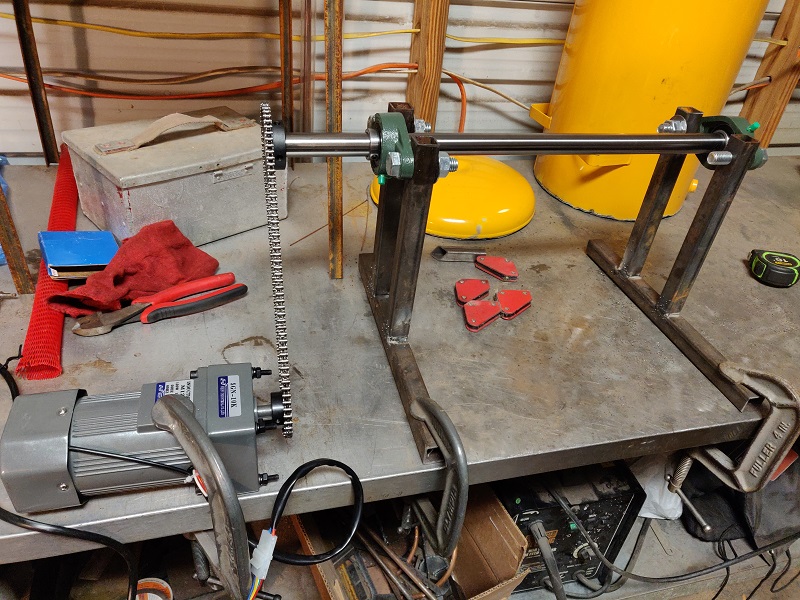
I figure I'm due for a bit of an update here. I have automated fire: https://youtu.be/... The spark, flame sense, and solenoid control is via a Dinosaur Electronics UIB S (universal ignitor board small) originally designed to be used with 12V RV water heaters. It turns on the solenoid valve, sparks, and waits for the flame to light (monitored through a small current to the electrode). Once lit it turns off the spark. If the fire flames out, it closes the solenoid valve for safety. Not super happy with the burner I put together. It works fine but the flames are very tall. I may order the burner from sausagemaker which should be good for around the same BTUh (40k-ish) with the right size orifice. They say 31.3k, but I've seen the same burner used in on-demand water heaters at higher BTUh. Either way, I'll have to tune in the orifice size once it's all put together. The CAD model has progressed. Still need to model the vanes, ugh, geometry. I use calculus almost every day, but geometry hurts my brain. Other than that, it's fairly complete. Lastly, I've put together a rotisserie for the drum so I can start putting that together. The spokes are in progress, once those are done the drum will come together. Then I need to make time to take it to work and true the ends. Anyways, that's all for today. Hopefully the next update doesn't take as long. Edit: okay one more thing, I've modeled the vanes. Forward vanes are 1.5" tall at 25 degrees; reverse are also 1.5" tall, 4.5" long, at 45 degrees to axial axis (70 degrees to forward vanes). I may need to add an extra "kicker" along the drum wall, we'll see.
UmMerkur attached the following images:
Edited by UmMerkur on 04/08/2022 5:22 AM |
|
|
|
| oldgrumpus |
Posted on 04/08/2022 10:23 PM
|
|
1/2 Pounder  Posts: 225 Joined: July 25, 2012 |
Looks great so-far! I really like your ignitor. Great idea. Can you tell where you purchased it from? As far as the flame goes, it seems to be lacking enough air? Is there an air inlet? Keep up the momentum!! Can't wait for the next installment! |
|
|
|
| UmMerkur |
Posted on 04/09/2022 12:12 AM
|
|
Newbie  Posts: 17 Joined: January 27, 2022 |
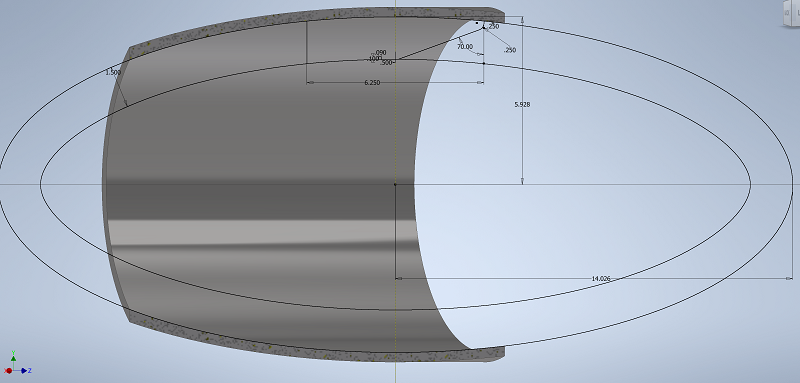
Sure, the board and electrode came from Amazon: https://www.amazo...0002MG2IK/ - board https://www.amazo...003G9IYQY/ - electrode The 12V power supply I had laying around. The board needs 12V and ground, and has one output for your solenoid valve. The ignitor electrode goes to the spade on the cylindrical high voltage transformer. The electrode must have a path to ground to the board so it can sense the flame. The flame looks like that because I had the pressure fairly low. Those jet burners go nuts and shoot flames a good foot high. I'm sending off the vanes to be laser cut today, should get them next week. For anyone interested, I wanted to use flat vanes so I could get them laser cut. The part that attaches to drum is not a circular radius but an ellipse. It's a cylindrical section. Here's the math: D: internal diameter of drum angle: your vane angle from axial (25 degrees in my case) h=D*tan(90deg-angle) - this is the height of the cylindrical section a=0.5*sqrt(D^2 + h^2) - major axis of ellipse b=D/2 - minor axis of ellipse So when you cut the drum at that angle the shape it forms is elliptical.
UmMerkur attached the following image:
Edited by UmMerkur on 04/09/2022 5:32 AM Behmor 1600+, Fresh Roast Plus 8, Poppery II; Lelit Bianca V2, Eureka Mignon Specialita', V60, Breville SGP
|
|
|
|
| allenb |
Posted on 04/09/2022 7:40 AM
|
|
Administrator  Posts: 3869 Joined: February 23, 2010 |
Something to really pay close attention to before finalizing the vanes and spoke locations is their ability to stay clear of your intended thermometry for BT and trier. Also, remember to keep a gap of at least 3/4" between all rotating parts and stationary items or you will have major thumping when ever a perfect grouping of beans are back to back when passing between things. Keep return vanes not further back than 1 1/2" from front plate or else bean stacking will not be effectively dealt with. On the jet burners, those are fine and are preferred over other burners. Use an adjustable regulator and dial the pressure back a tad to allow a higher % of air to fuel. This also allows adjusting the flame tip height to coincide with design needs. 1/2 lb and 1 lb drum, Siemens Sirocco fluidbed, presspot, chemex, cajun biggin brewer from the backwoods of Louisiana
|
|
|
|
| UmMerkur |
Posted on 04/09/2022 3:24 PM
|
|
Newbie  Posts: 17 Joined: January 27, 2022 |
Thanks Allen, Yes there will be about 3/4" of space between the front of the drum and any vanes. The spokes will be recessed 3 inches and the front of the reverse vanes are 2 inches from the front of the drum. I'm going to put a small reverse vane on the drum just behind the forward vanes similar to how North/Mill City does it. So there's at least 2 inches for my trier, or 3 if I go closer to the center axis. But, the reverse vanes can be moved, so if during testing it's not quite right I just have to break a tack weld to move them. I have a needle valve on the burner, which is how I got the lower pressure for the video (about 0.5" WC). One thing I've noticed with the jet burners is that they like to be impinged on something, usually in ring burners it's another burner. Without the impingement the flame isn't very stable. Behmor 1600+, Fresh Roast Plus 8, Poppery II; Lelit Bianca V2, Eureka Mignon Specialita', V60, Breville SGP
|
|
|
|
| UmMerkur |
Posted on 04/10/2022 8:10 PM
|
|
Newbie  Posts: 17 Joined: January 27, 2022 |
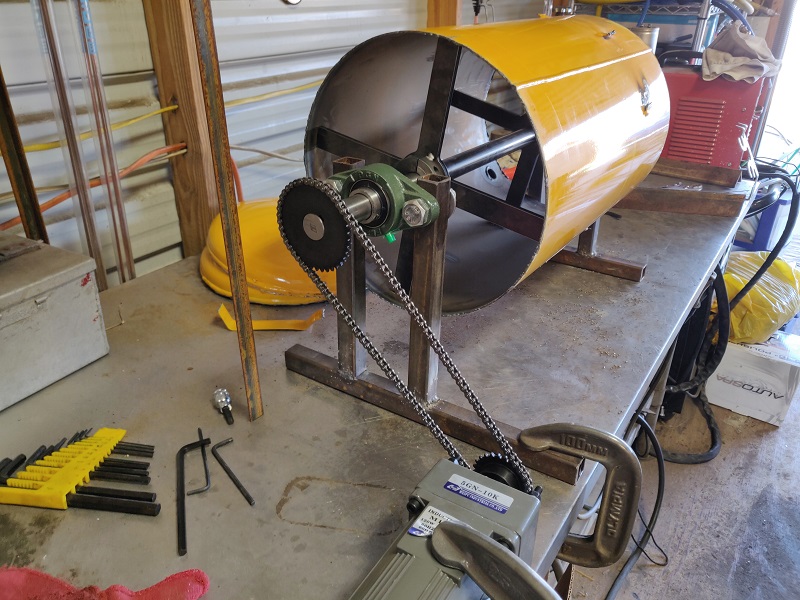
Made some progress on the drum. Split shaft collars mounted to spokes; spokes pounded into place (it's a nice tight fit), and one set tacked to drum. I found out after the fact that the grooved side of split shaft collars is the perpendicular reference face which is spec'd to be perpendicular to the bore. I doubt it matters here, especially once the heat from welding is added to the equation. Next up, take it to work and put it on the lathe to square the ends and cut to length. Then comes more welding: 1/8th inch strips of steel to make the air space and finally the outer skin. I opted to use TIG instead of soldering since I don't feel like spending the money on 'safe' soldering/brazing rod free of elements bad for human health.
UmMerkur attached the following images:
Behmor 1600+, Fresh Roast Plus 8, Poppery II; Lelit Bianca V2, Eureka Mignon Specialita', V60, Breville SGP
|
|
|
|
| UmMerkur |
Posted on 04/17/2022 10:07 PM
|
|
Newbie  Posts: 17 Joined: January 27, 2022 |
Worked on the drum some more. Stripped the paint and trimmed close to final length, 12.25 inches. 1/8th by 1/2 ring tacked in place along front of drum, this will space the outer skin. Will also be adding axial strips.
UmMerkur attached the following images:
Behmor 1600+, Fresh Roast Plus 8, Poppery II; Lelit Bianca V2, Eureka Mignon Specialita', V60, Breville SGP
|
|
|
|
| UmMerkur |
Posted on 06/05/2022 12:15 AM
|
|
Newbie  Posts: 17 Joined: January 27, 2022 |
Time for an update me thinks. Haven't had a whole lot of time to work on this, but did get some laser cut parts in and am getting closer to finishing the drum. Worked on squaring the ends today with an angle grinder.
UmMerkur attached the following images:
Edited by UmMerkur on 06/05/2022 2:12 AM Behmor 1600+, Fresh Roast Plus 8, Poppery II; Lelit Bianca V2, Eureka Mignon Specialita', V60, Breville SGP
|
|
|
|
| AJRoaster |
Posted on 06/20/2022 5:55 PM
|
|
Newbie  Posts: 9 Joined: March 09, 2021 |
This looks great. Did you come across an ideal occupancy i.e. what % of total volume should the maximum amount batch size, and minimum amount of batch size be? I think this is key and imo and is different for drum vs fluid bed. |
|
|
|
Page 1 of 2: 12
| Jump to Forum: |
Powered by PHP-Fusion Copyright © 2024 PHP-Fusion Inc
Released as free software without warranties under GNU Affero GPL v3
Designed with ♥ by NetriXHosted by skpacman


