
Login

Shoutbox
You must login to post a message.
renatoa
07/26/2024 3:49 PM
Bill grubbe and Jk, 
allenb
07/26/2024 5:15 AM
Spiderkw Welcome to HRO!

renatoa
07/24/2024 8:31 AM
ramiroflores and John123,

 ?
?
?renatoa
07/21/2024 1:18 AM
 , Luislobo
renatoa
07/19/2024 11:28 AM
Koepea,
Forum Threads
Newest Threads
Skywalker roaster modsBackground Roast Iss...
Hello from Arkansas
TC4ESP
Green coffee reviews
Hottest Threads
| Skywalker roaster... | [375] |
| TC4ESP | [115] |
| War on Farmers by... | [47] |
| Adventures in flu... | [26] |
| Hello! (soon) Roa... | [17] |
In Memory Of Ginny

Donations
Latest Donations
dmccallum - 10.00
JackH - 25.00
snwcmpr - 10.00
Anonymous - 2.00
Anonymous - 5.00
dmccallum - 10.00
JackH - 25.00
snwcmpr - 10.00
Anonymous - 2.00
Anonymous - 5.00
Users Online
Guests Online: 7
Members Online: 0
Total Members: 8,393
Newest Member: Bill grubbe
Members Online: 0
Total Members: 8,393
Newest Member: Bill grubbe
View Thread
Who is here? 1 guest(s)
Page 1 of 2: 12
|
 Starting a TO build
|
|
| zamunda |
Posted on 05/14/2022 12:51 PM
|
 1/4 Pounder  Posts: 173 Joined: November 17, 2020 |
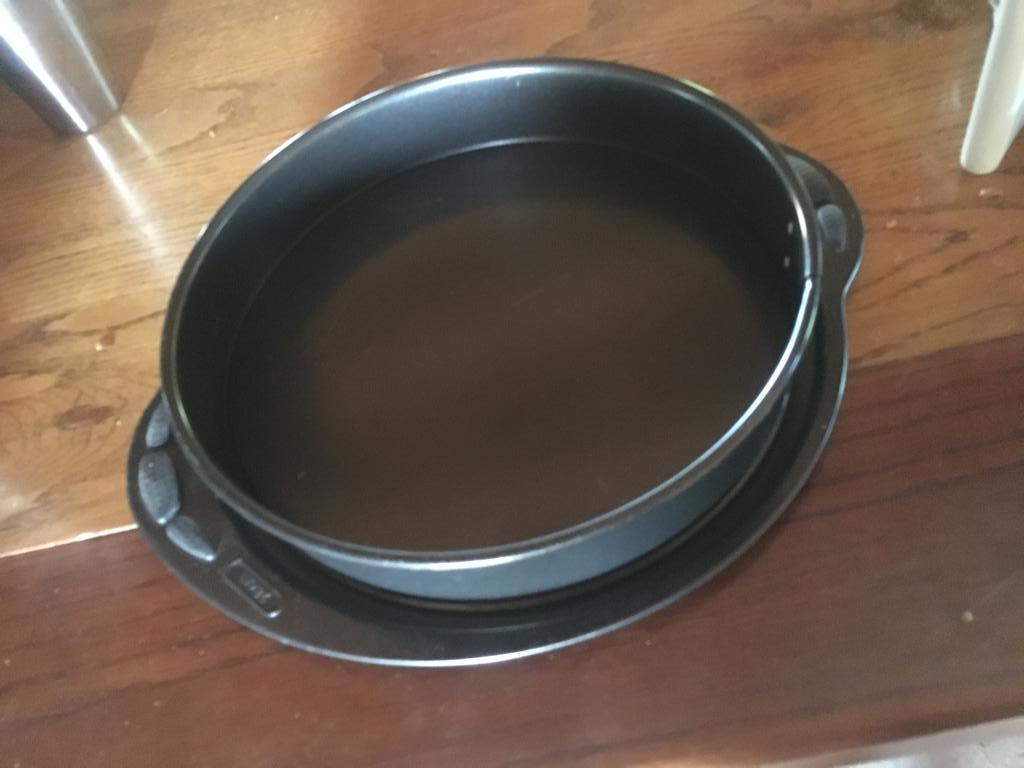
Hello, I want to start my TO-build and purchased a 15 Euro oven including an extension ring and a 3 Euro springform pan from Pyrex. My idea was to use the springform upside down as the floor of the oven and then mount a motor under this floor to agitate the beans. However, is there a minimal/optimal distance between beans and lamp? Could this be a good starting point (see the pics)... Thanks in advance.
zamunda attached the following images:


########################
### A lot can happen over coffee ### ######################## |
|
|
|
| Koffee Kosmo |
Posted on 05/14/2022 5:27 PM
|
 Administrator Posts: 1621 Joined: December 31, 2008 |
There is no minimum distance to the beans The overall volume is key at 7 to 9 lt Question - How is the chaff removed / separated from the beans For the motor mounting Consider adding feet to the white frame to raise it and also add a motor mounting brace to the underside KK I home roast and I like it. Designer of the KKTO
Roaster Build information https://homeroast...ad_id=1142 https://docs.goog...lide=id.i0 Blog - http://koffeekosm...gspot.com/ Bezzera Strega, Mazzer Robur Grinder, Pullman Tamper Convex, (KKTO) Turbo Oven Home Roaster. |
|
|
|
| renatoa |
Posted on 05/15/2022 2:24 AM
|
|
Administrator Posts: 3104 Joined: September 30, 2016 |
If intending to use mixed IR-convection roasting, by removing or customizing the lamp screen plate, then under 3" you can experience issues with partially burned beans where IR hits directly if beans movement is slow. The extension ring is spot on for this job, having 8 cm height. Alone, the ring volume is 6.5 lt. Add the roasting pan and the lid dome volumes, and you are in the right ballpark. An outer insulation would help for sure, a wool muffler/comforter is enough for this job. Wool burn at 5-600 C degrees, much safer than cotton, which is almost pure cellulose, as half of a coffee bean  Such ovens usually comes with a white tin plate, placed under the glass bowl, as in the attached picture, yours have one? Used that plate for motor mount, mounting the white plate on plastic white frame with raisers adjusted to the motor height, then the roast oven on the white tin plate with ceramic insulators.
renatoa attached the following image:

Edited by renatoa on 05/15/2022 2:32 AM |
|
|
|
| zamunda |
Posted on 05/15/2022 3:31 AM
|
|
1/4 Pounder Posts: 173 Joined: November 17, 2020 |
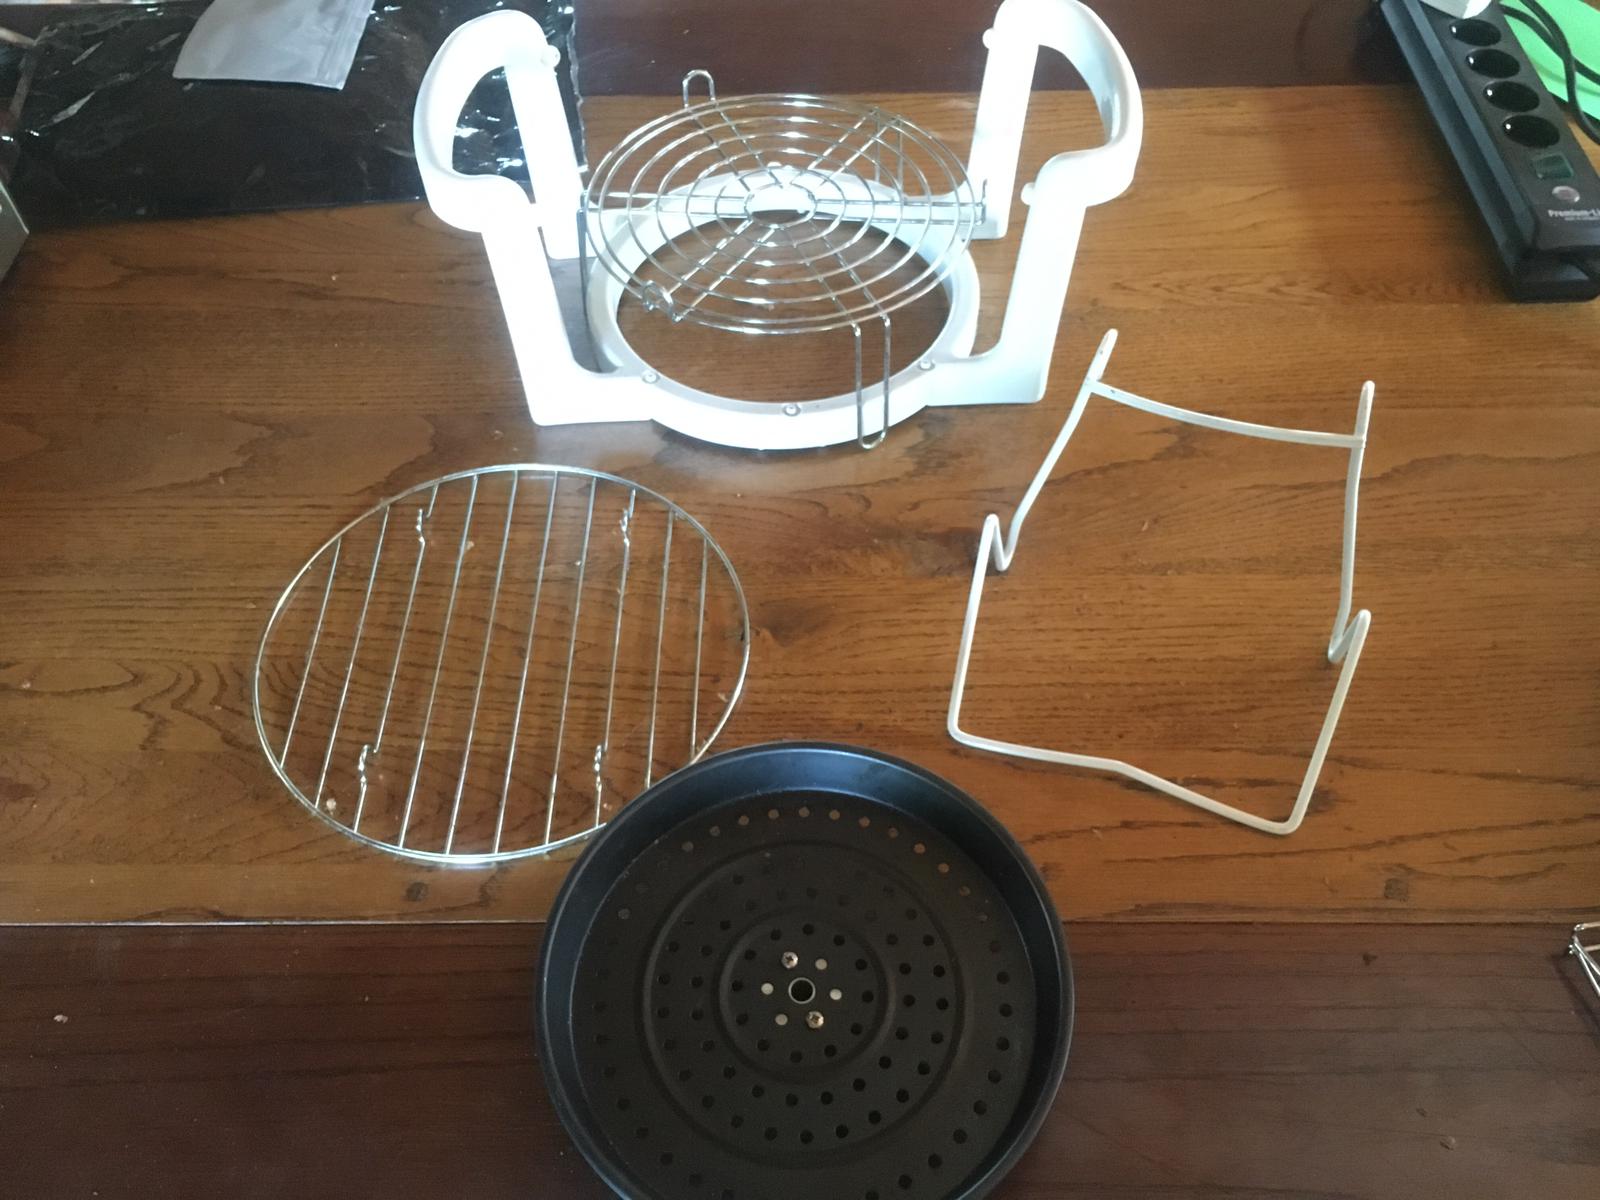
Hello Renatoa, These are the accesoires the oven came with: I do not see the one from your picture. BTW: I am very new to turbo-ovens, had not used or seen one before I came to this forum.
zamunda attached the following image:
########################
### A lot can happen over coffee ### ######################## |
|
|
|
| renatoa |
Posted on 05/15/2022 4:15 AM
|
|
Administrator Posts: 3104 Joined: September 30, 2016 |
The wire raiser, combined with the perforated black plate will give you something very close to my arrangement. They aren't mandatory to be a monolith with the plastic white frame, imo. |
|
|
|
| Koffee Kosmo |
Posted on 05/15/2022 6:43 AM
|
|
Administrator Posts: 1621 Joined: December 31, 2008 |
Quote zamunda wrote: Hello Renatoa, These are the accesoires the oven came with: I do not see the one from your picture. BTW: I am very new to turbo-ovens, had not used or seen one before I came to this forum. If you are new to Turbo Oven coffee roasters You need to study the threads posted and dedicated to Turbo roaster builds They are tried and tested designs with lots of build details My personal roaster has been roasting up a storm since 2008 KK I home roast and I like it. Designer of the KKTO
Roaster Build information https://homeroast...ad_id=1142 https://docs.goog...lide=id.i0 Blog - http://koffeekosm...gspot.com/ Bezzera Strega, Mazzer Robur Grinder, Pullman Tamper Convex, (KKTO) Turbo Oven Home Roaster. |
|
|
|
| zamunda |
Posted on 05/15/2022 11:25 AM
|
|
1/4 Pounder Posts: 173 Joined: November 17, 2020 |
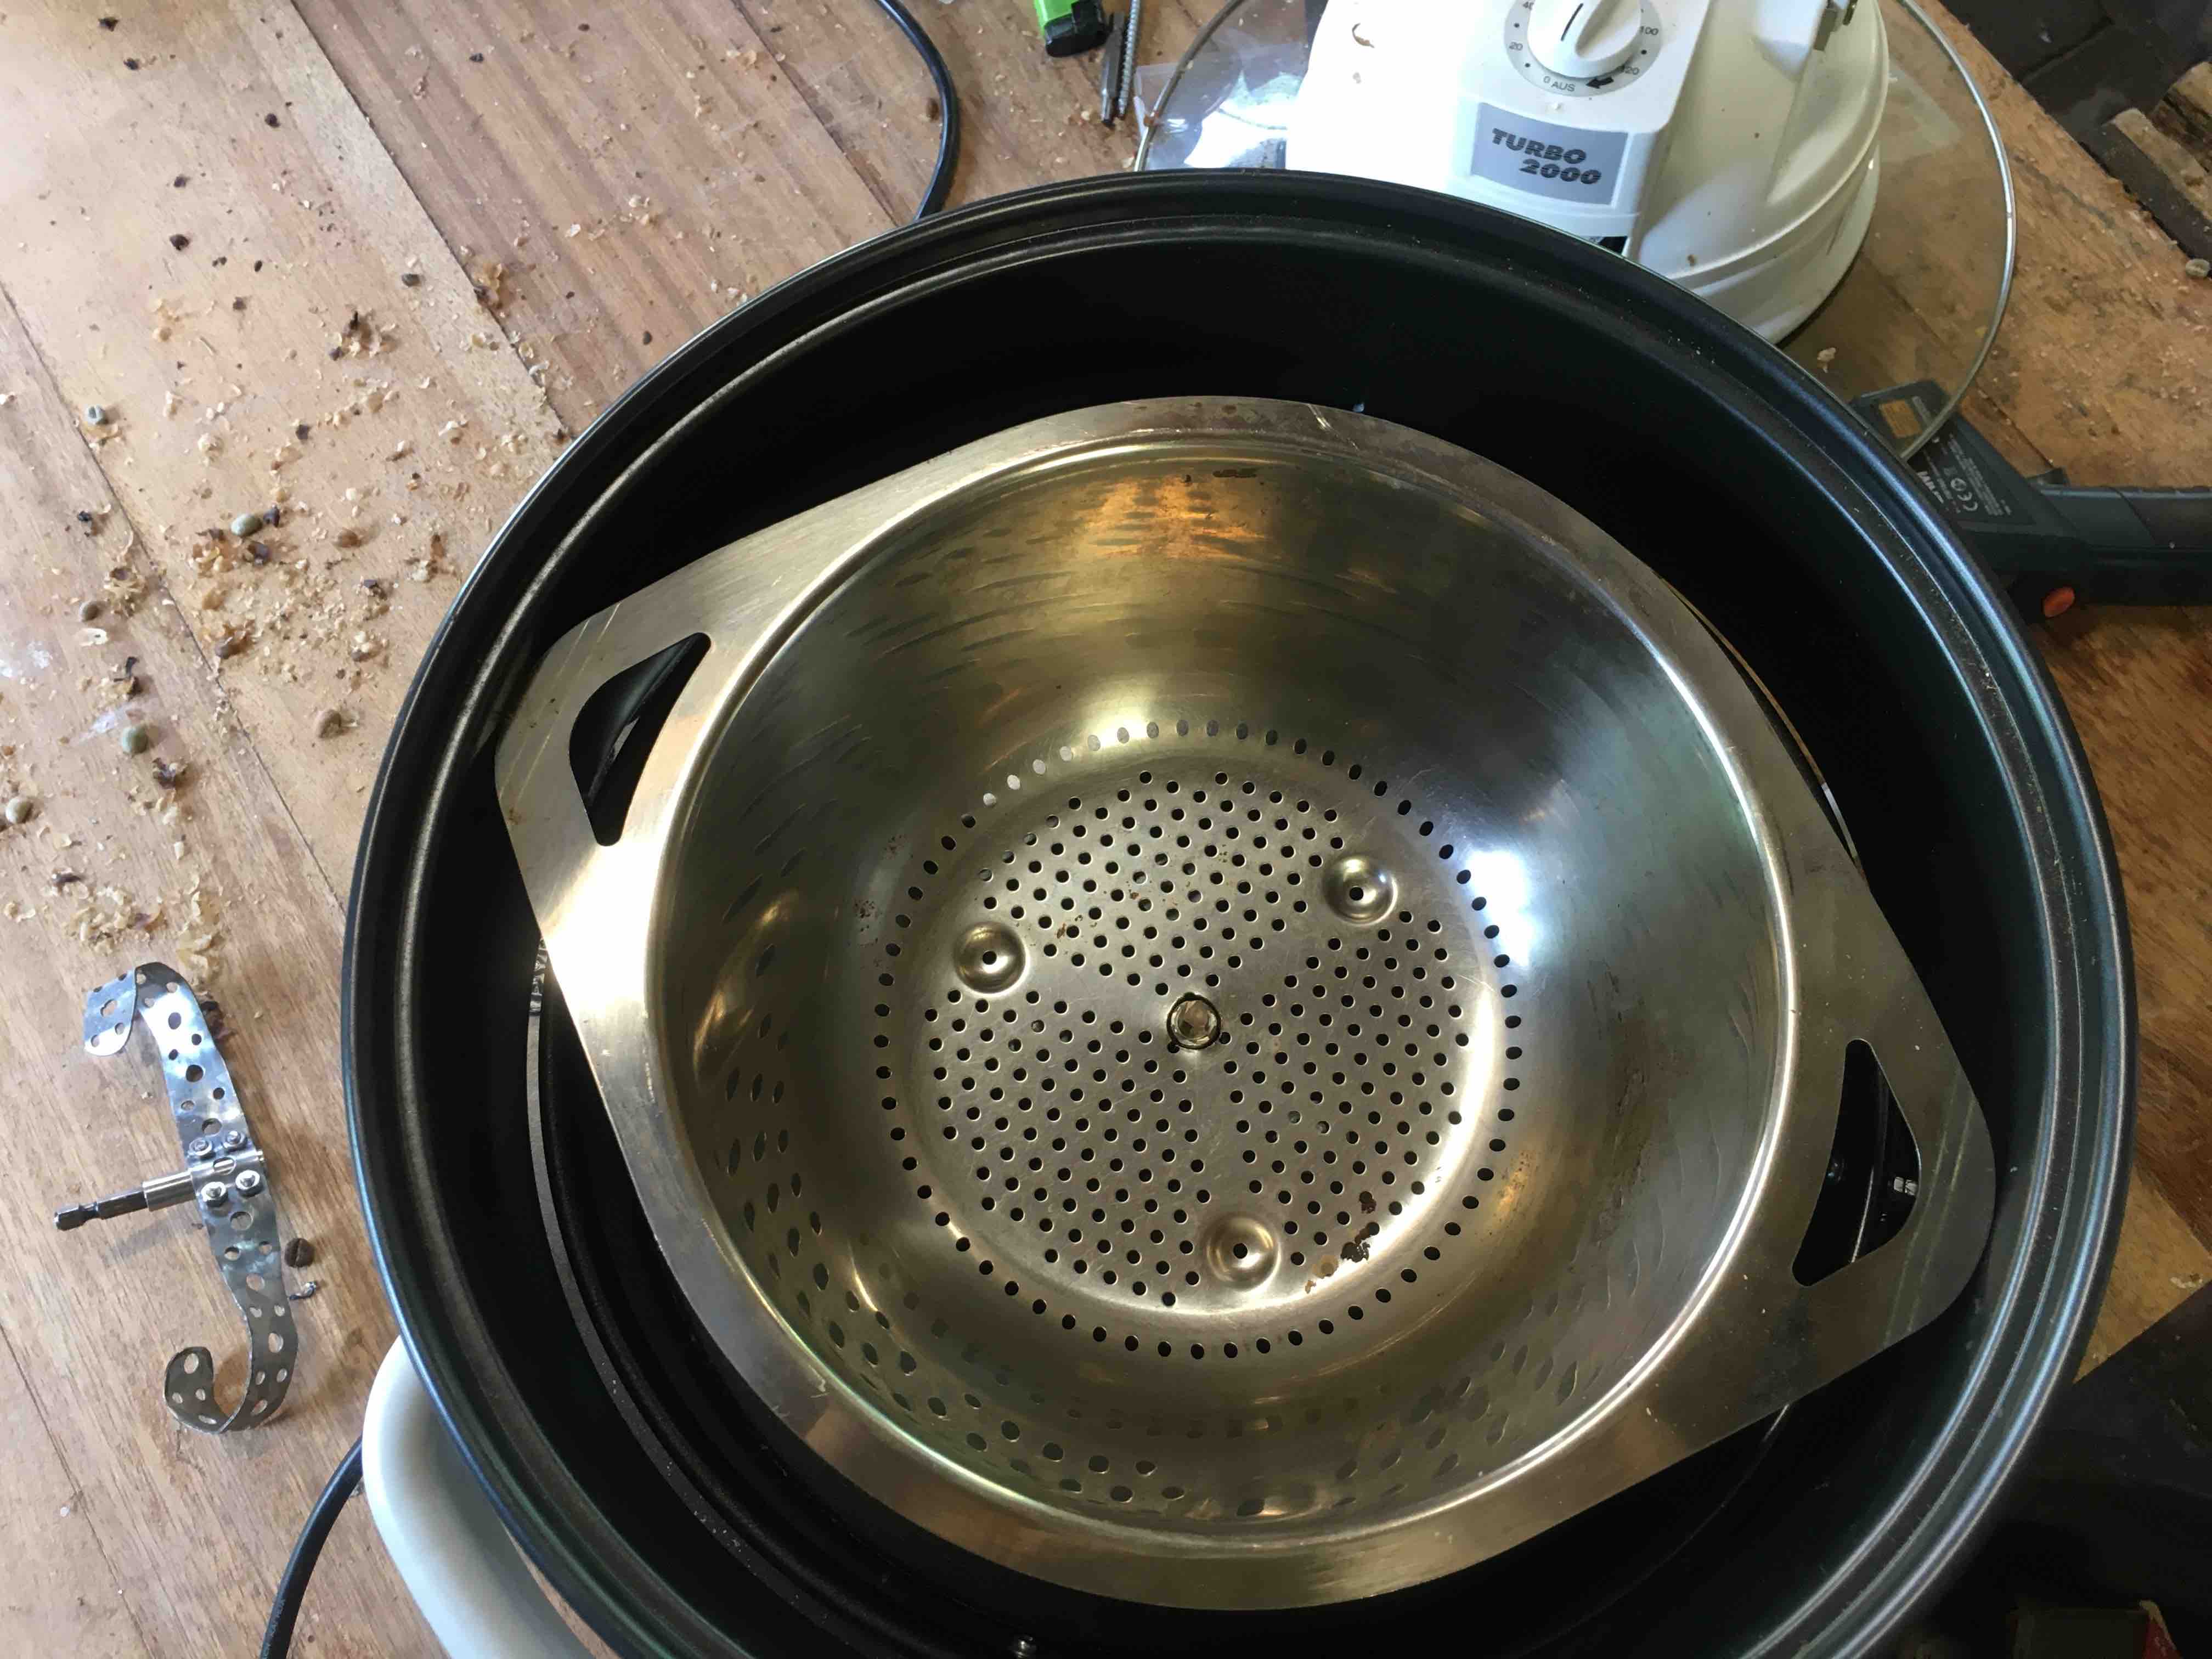
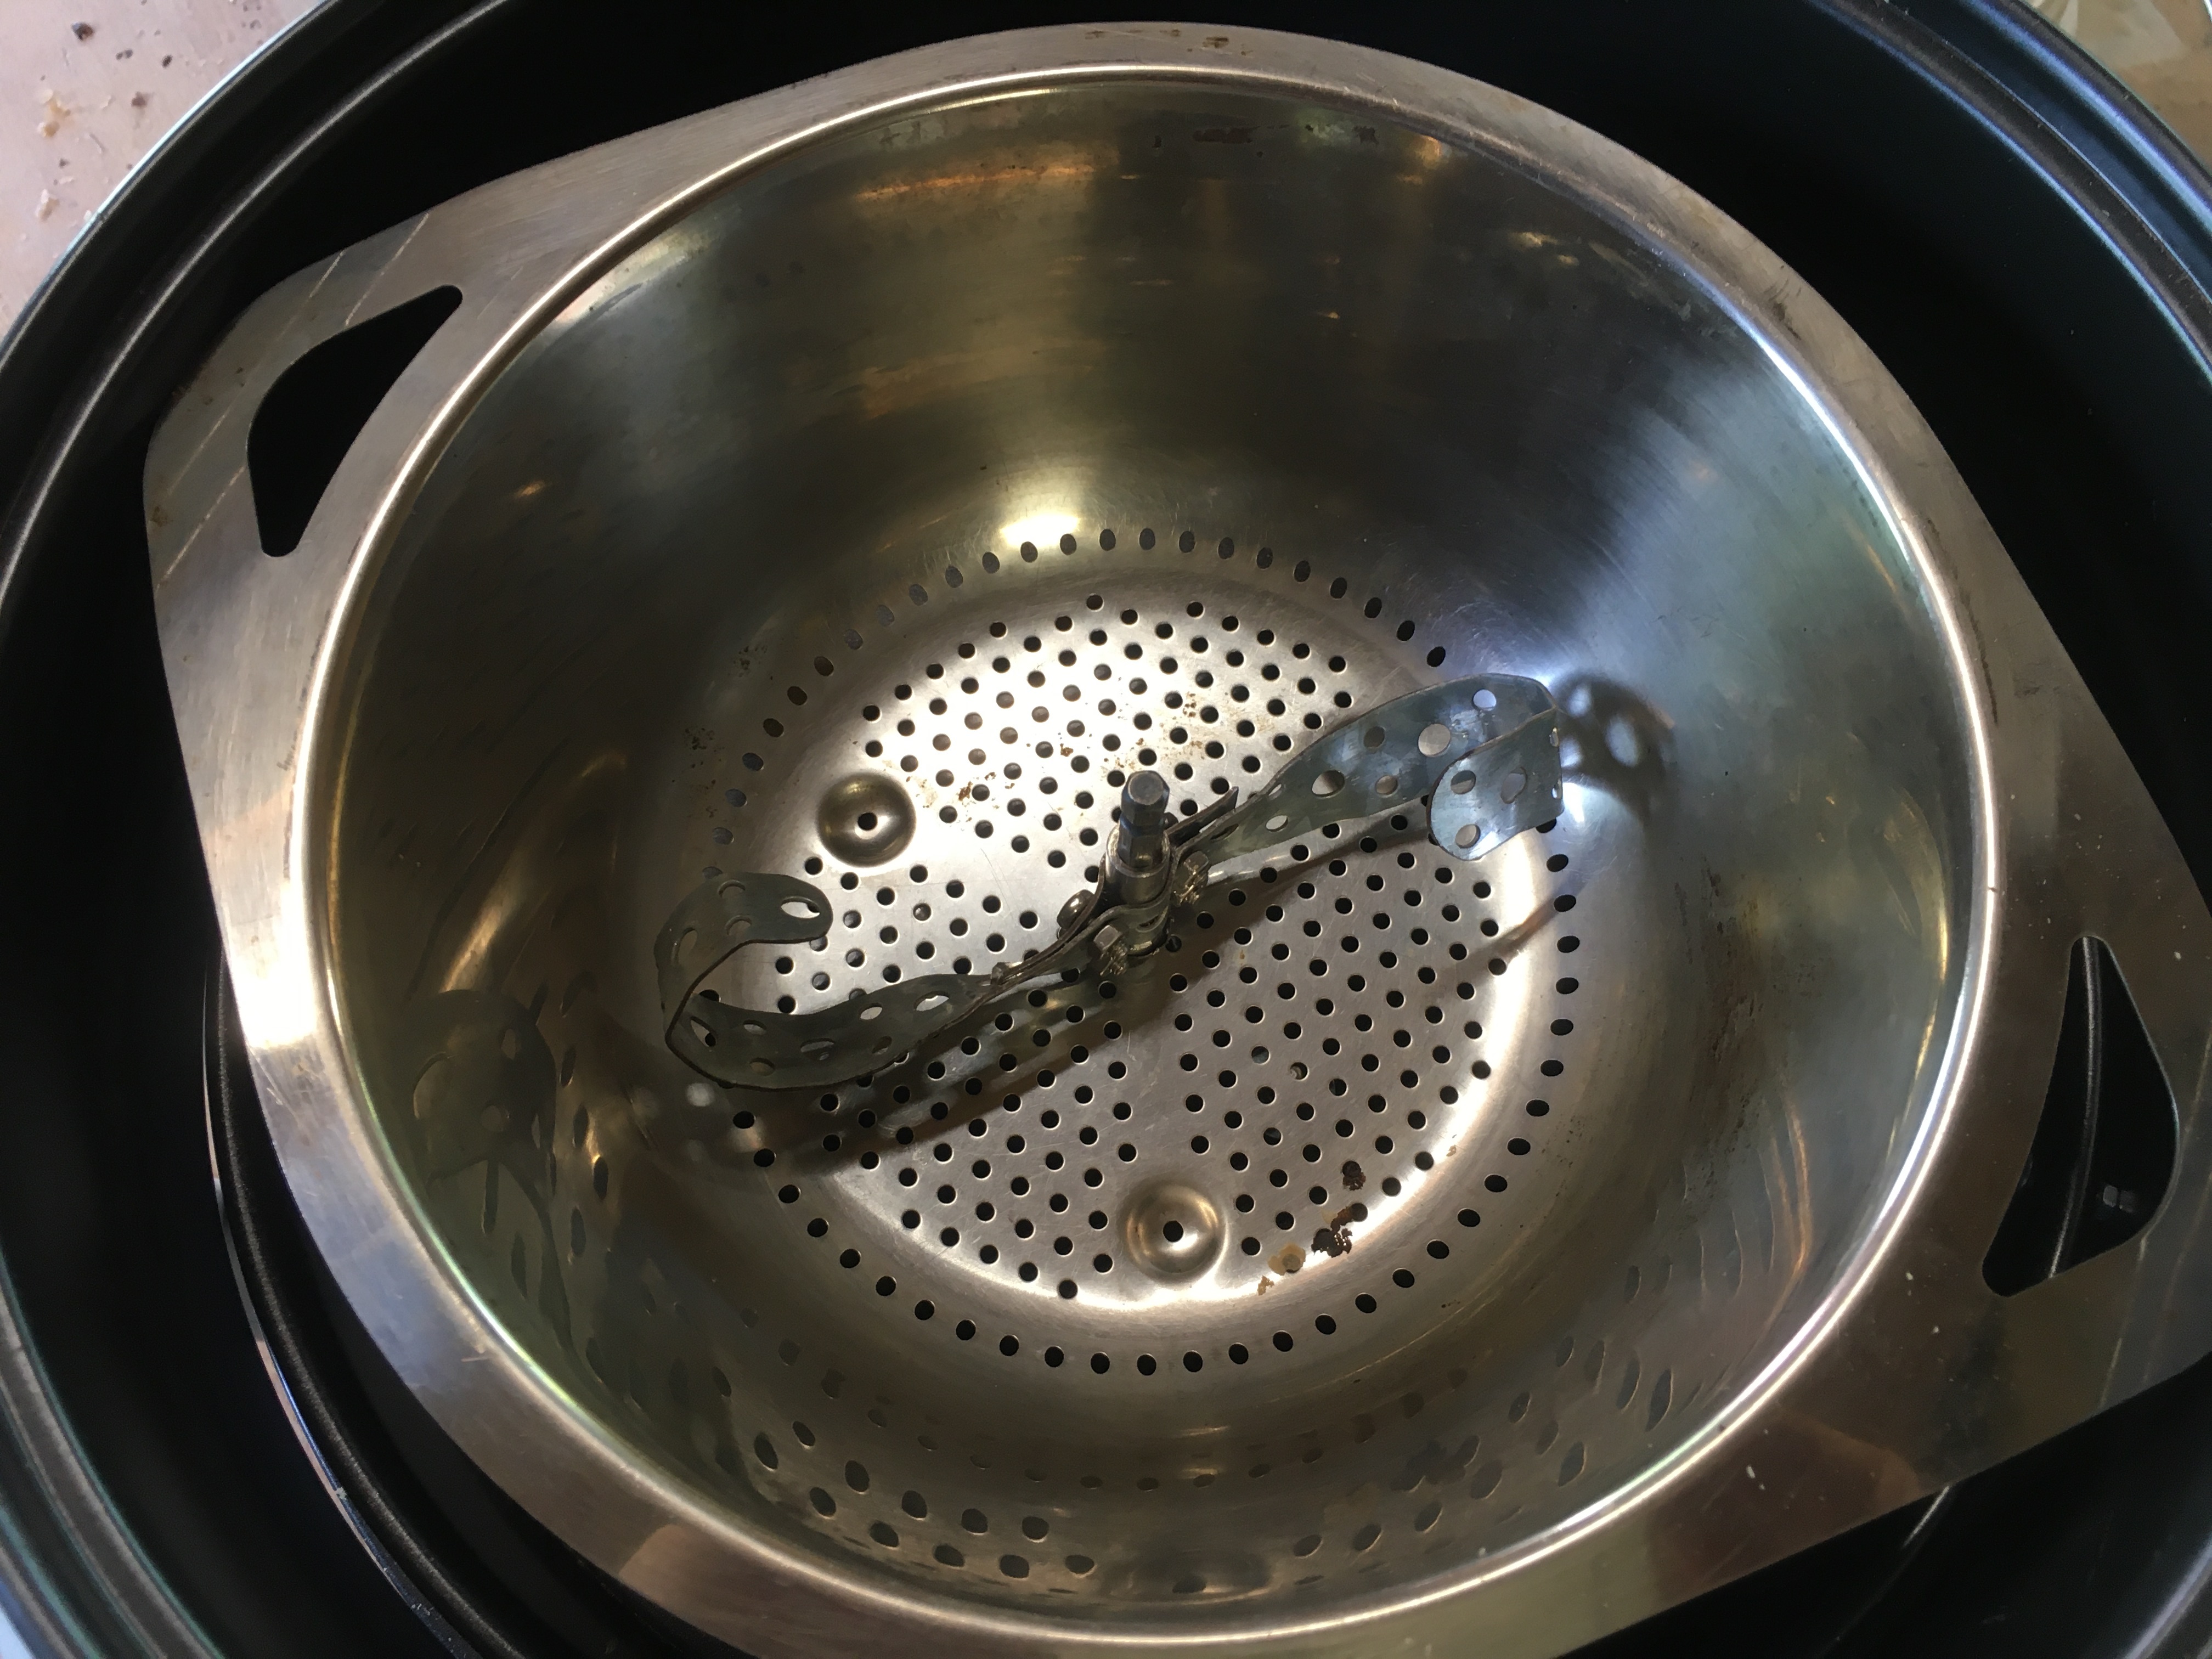
Hello, This is what I did so far:
Have to improve the paddle, also holes of the innerplate are to big since some beans pass. Maybe have to look for another seef or colander...
zamunda attached the following images:


Edited by zamunda on 05/15/2022 11:45 AM ########################
### A lot can happen over coffee ### ######################## |
|
|
|
| renatoa |
Posted on 05/15/2022 12:20 PM
|
|
Administrator Posts: 3104 Joined: September 30, 2016 |
Too slow rotation, I am afraid ... |
|
|
|
| zamunda |
Posted on 05/15/2022 1:03 PM
|
|
1/4 Pounder Posts: 173 Joined: November 17, 2020 |
Hello Renatoa, More speed and changed the paddle... However, off-camera I tested some beans but these get stuck under the paddle...have to solve that somehow... Edited by zamunda on 05/15/2022 1:10 PM ########################
### A lot can happen over coffee ### ######################## |
|
|
|
| Koffee Kosmo |
Posted on 05/15/2022 6:56 PM
|
|
Administrator Posts: 1621 Joined: December 31, 2008 |
The speed should be approximately 70 rpm Or if you can�t get that fast with your motor - then go with 4 blades Re beans stuck under the agitator blade If you can add an escape slot in the middle of the blade blade that will help But if you add a spring on the bottom it will eliminate that issue completely Have a look at the speed and a photo of the agitator with spring on the blog link in my signature below Or for more speed and agitation tests on my YouTube channel KK I home roast and I like it. Designer of the KKTO
Roaster Build information https://homeroast...ad_id=1142 https://docs.goog...lide=id.i0 Blog - http://koffeekosm...gspot.com/ Bezzera Strega, Mazzer Robur Grinder, Pullman Tamper Convex, (KKTO) Turbo Oven Home Roaster. |
|
|
|
| zamunda |
Posted on 05/16/2022 3:34 AM
|
|
1/4 Pounder Posts: 173 Joined: November 17, 2020 |
Hello Koffee Kosmo, Thanks for this info, I'll look into that! Keep you posted! Quote Koffee Kosmo wrote: The speed should be approximately 70 rpm Or if you can�t get that fast with your motor - then go with 4 blades Re beans stuck under the agitator blade If you can add an escape slot in the middle of the blade blade that will help But if you add a spring on the bottom it will eliminate that issue completely Have a look at the speed and a photo of the agitator with spring on the blog link in my signature below Or for more speed and agitation tests on my YouTube channel KK ########################
### A lot can happen over coffee ### ######################## |
|
|
|
| zamunda |
Posted on 05/20/2022 5:24 AM
|
|
1/4 Pounder Posts: 173 Joined: November 17, 2020 |
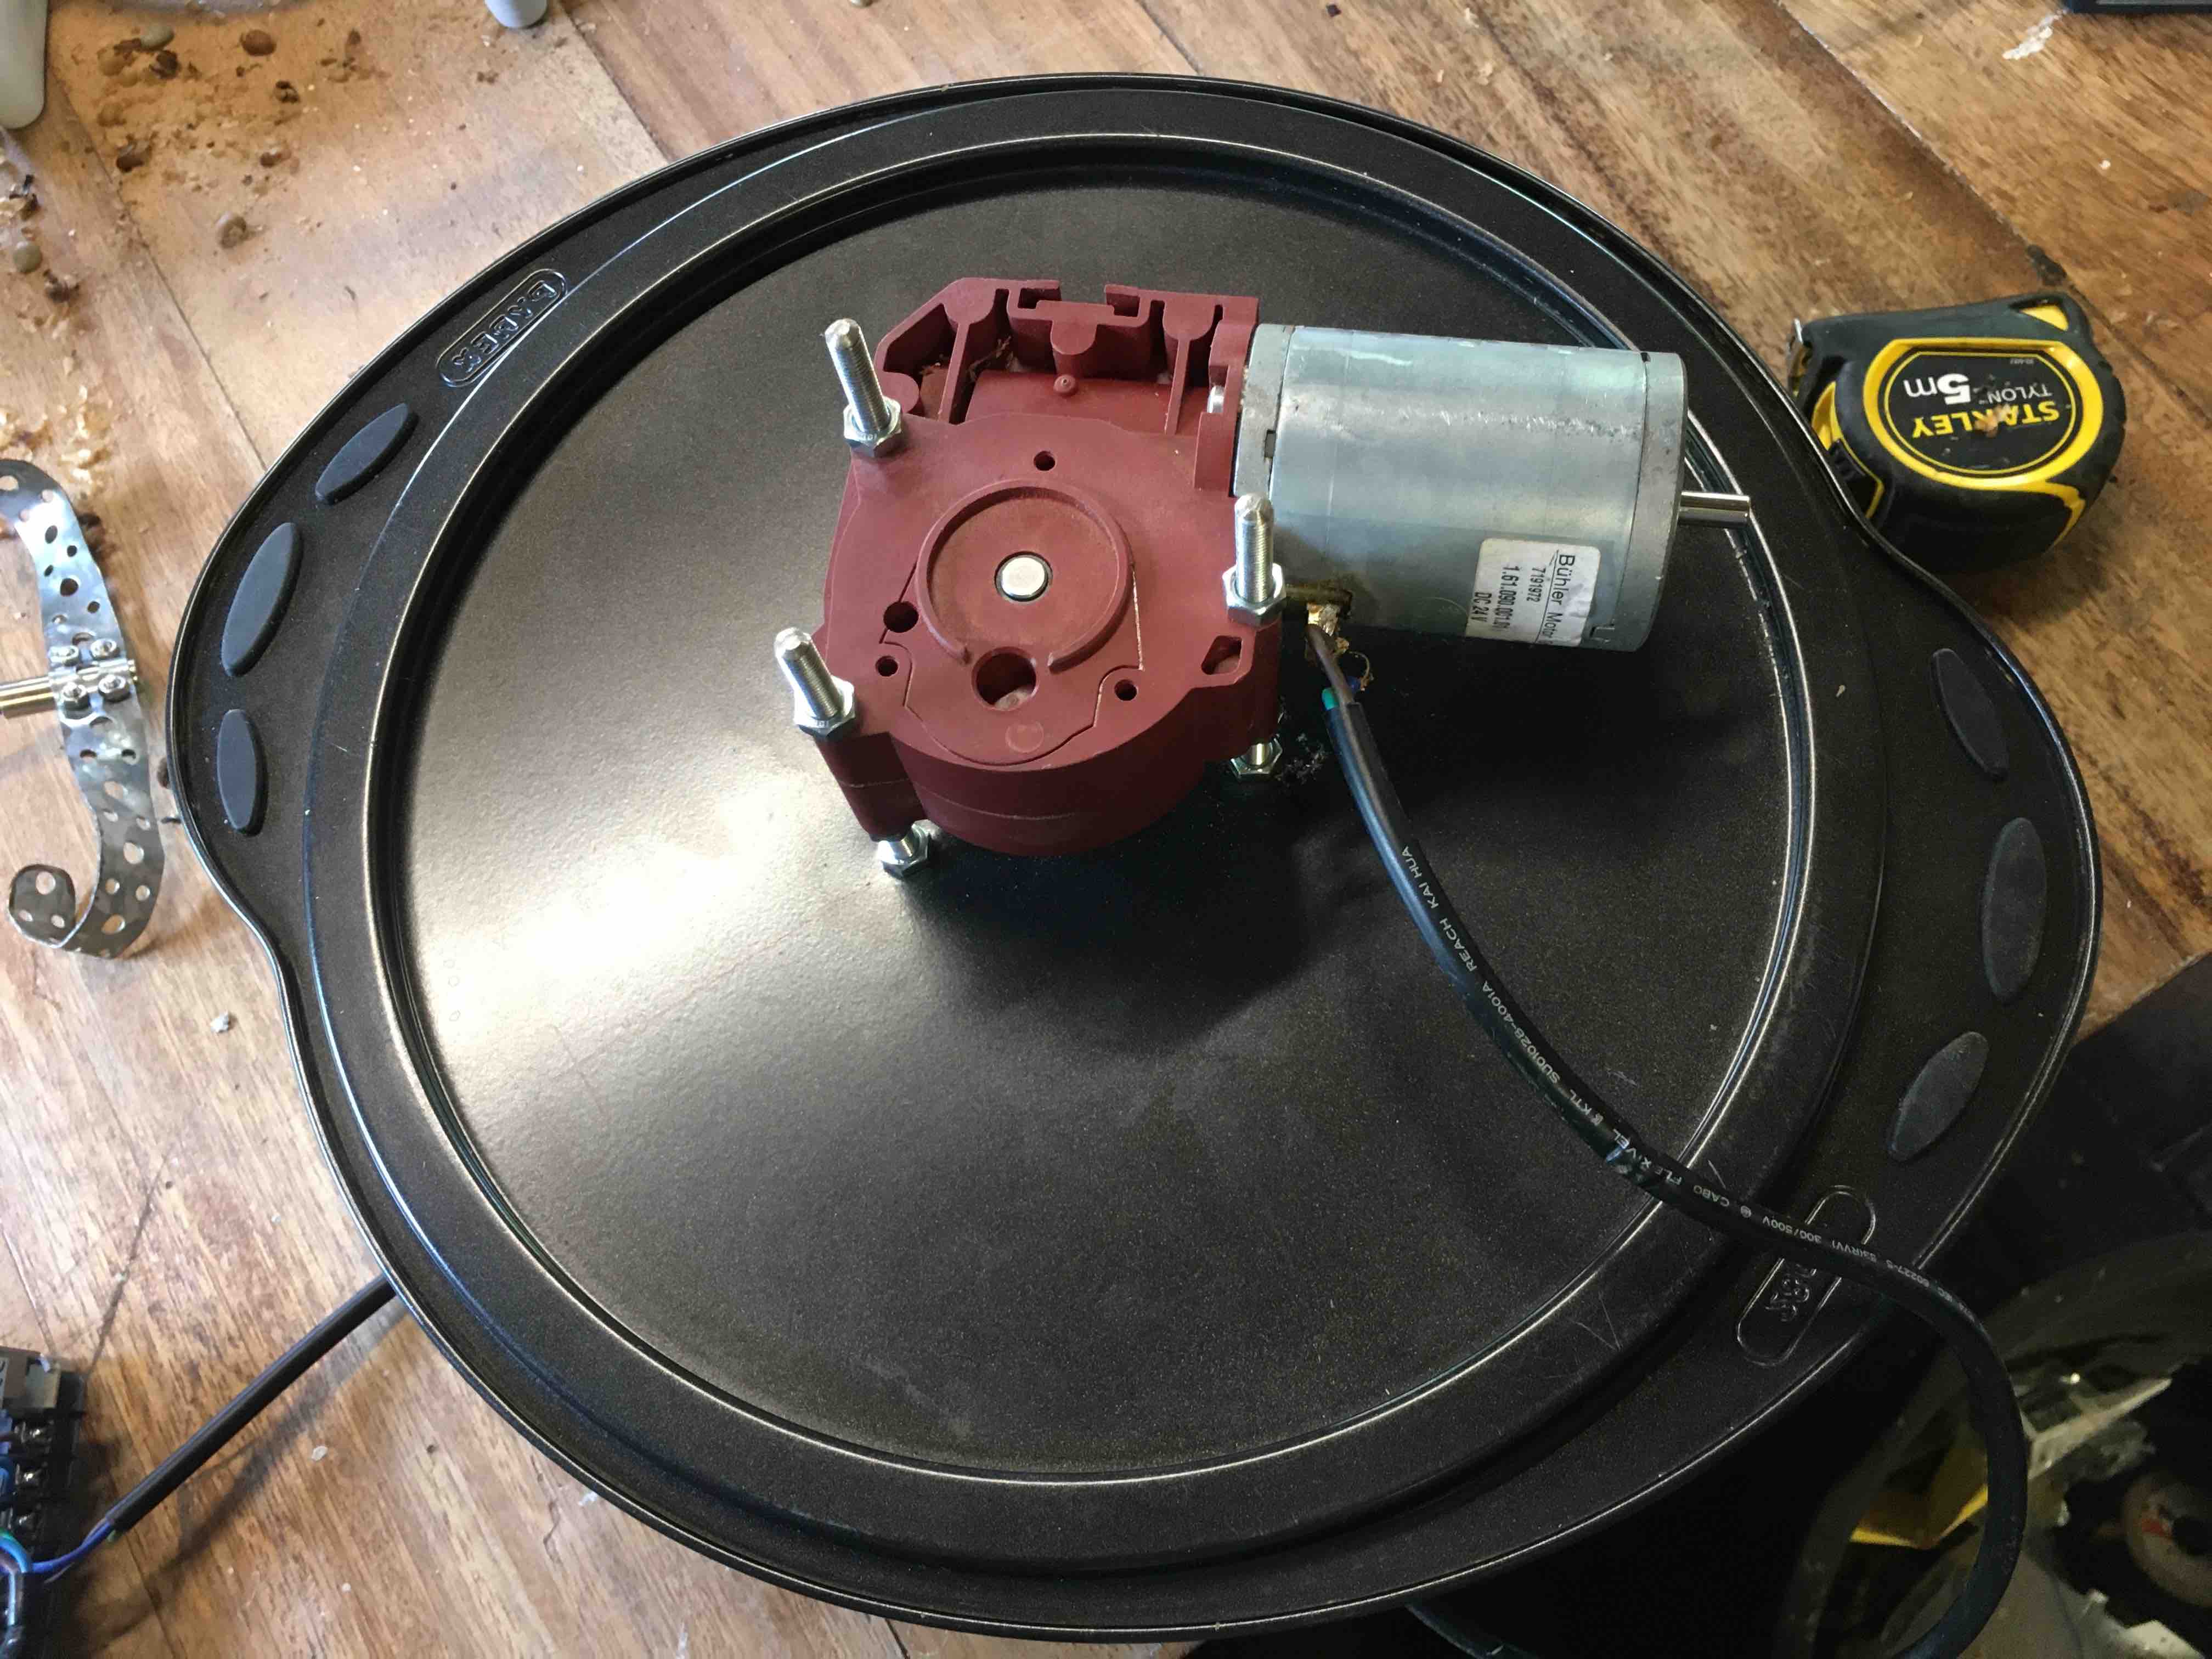
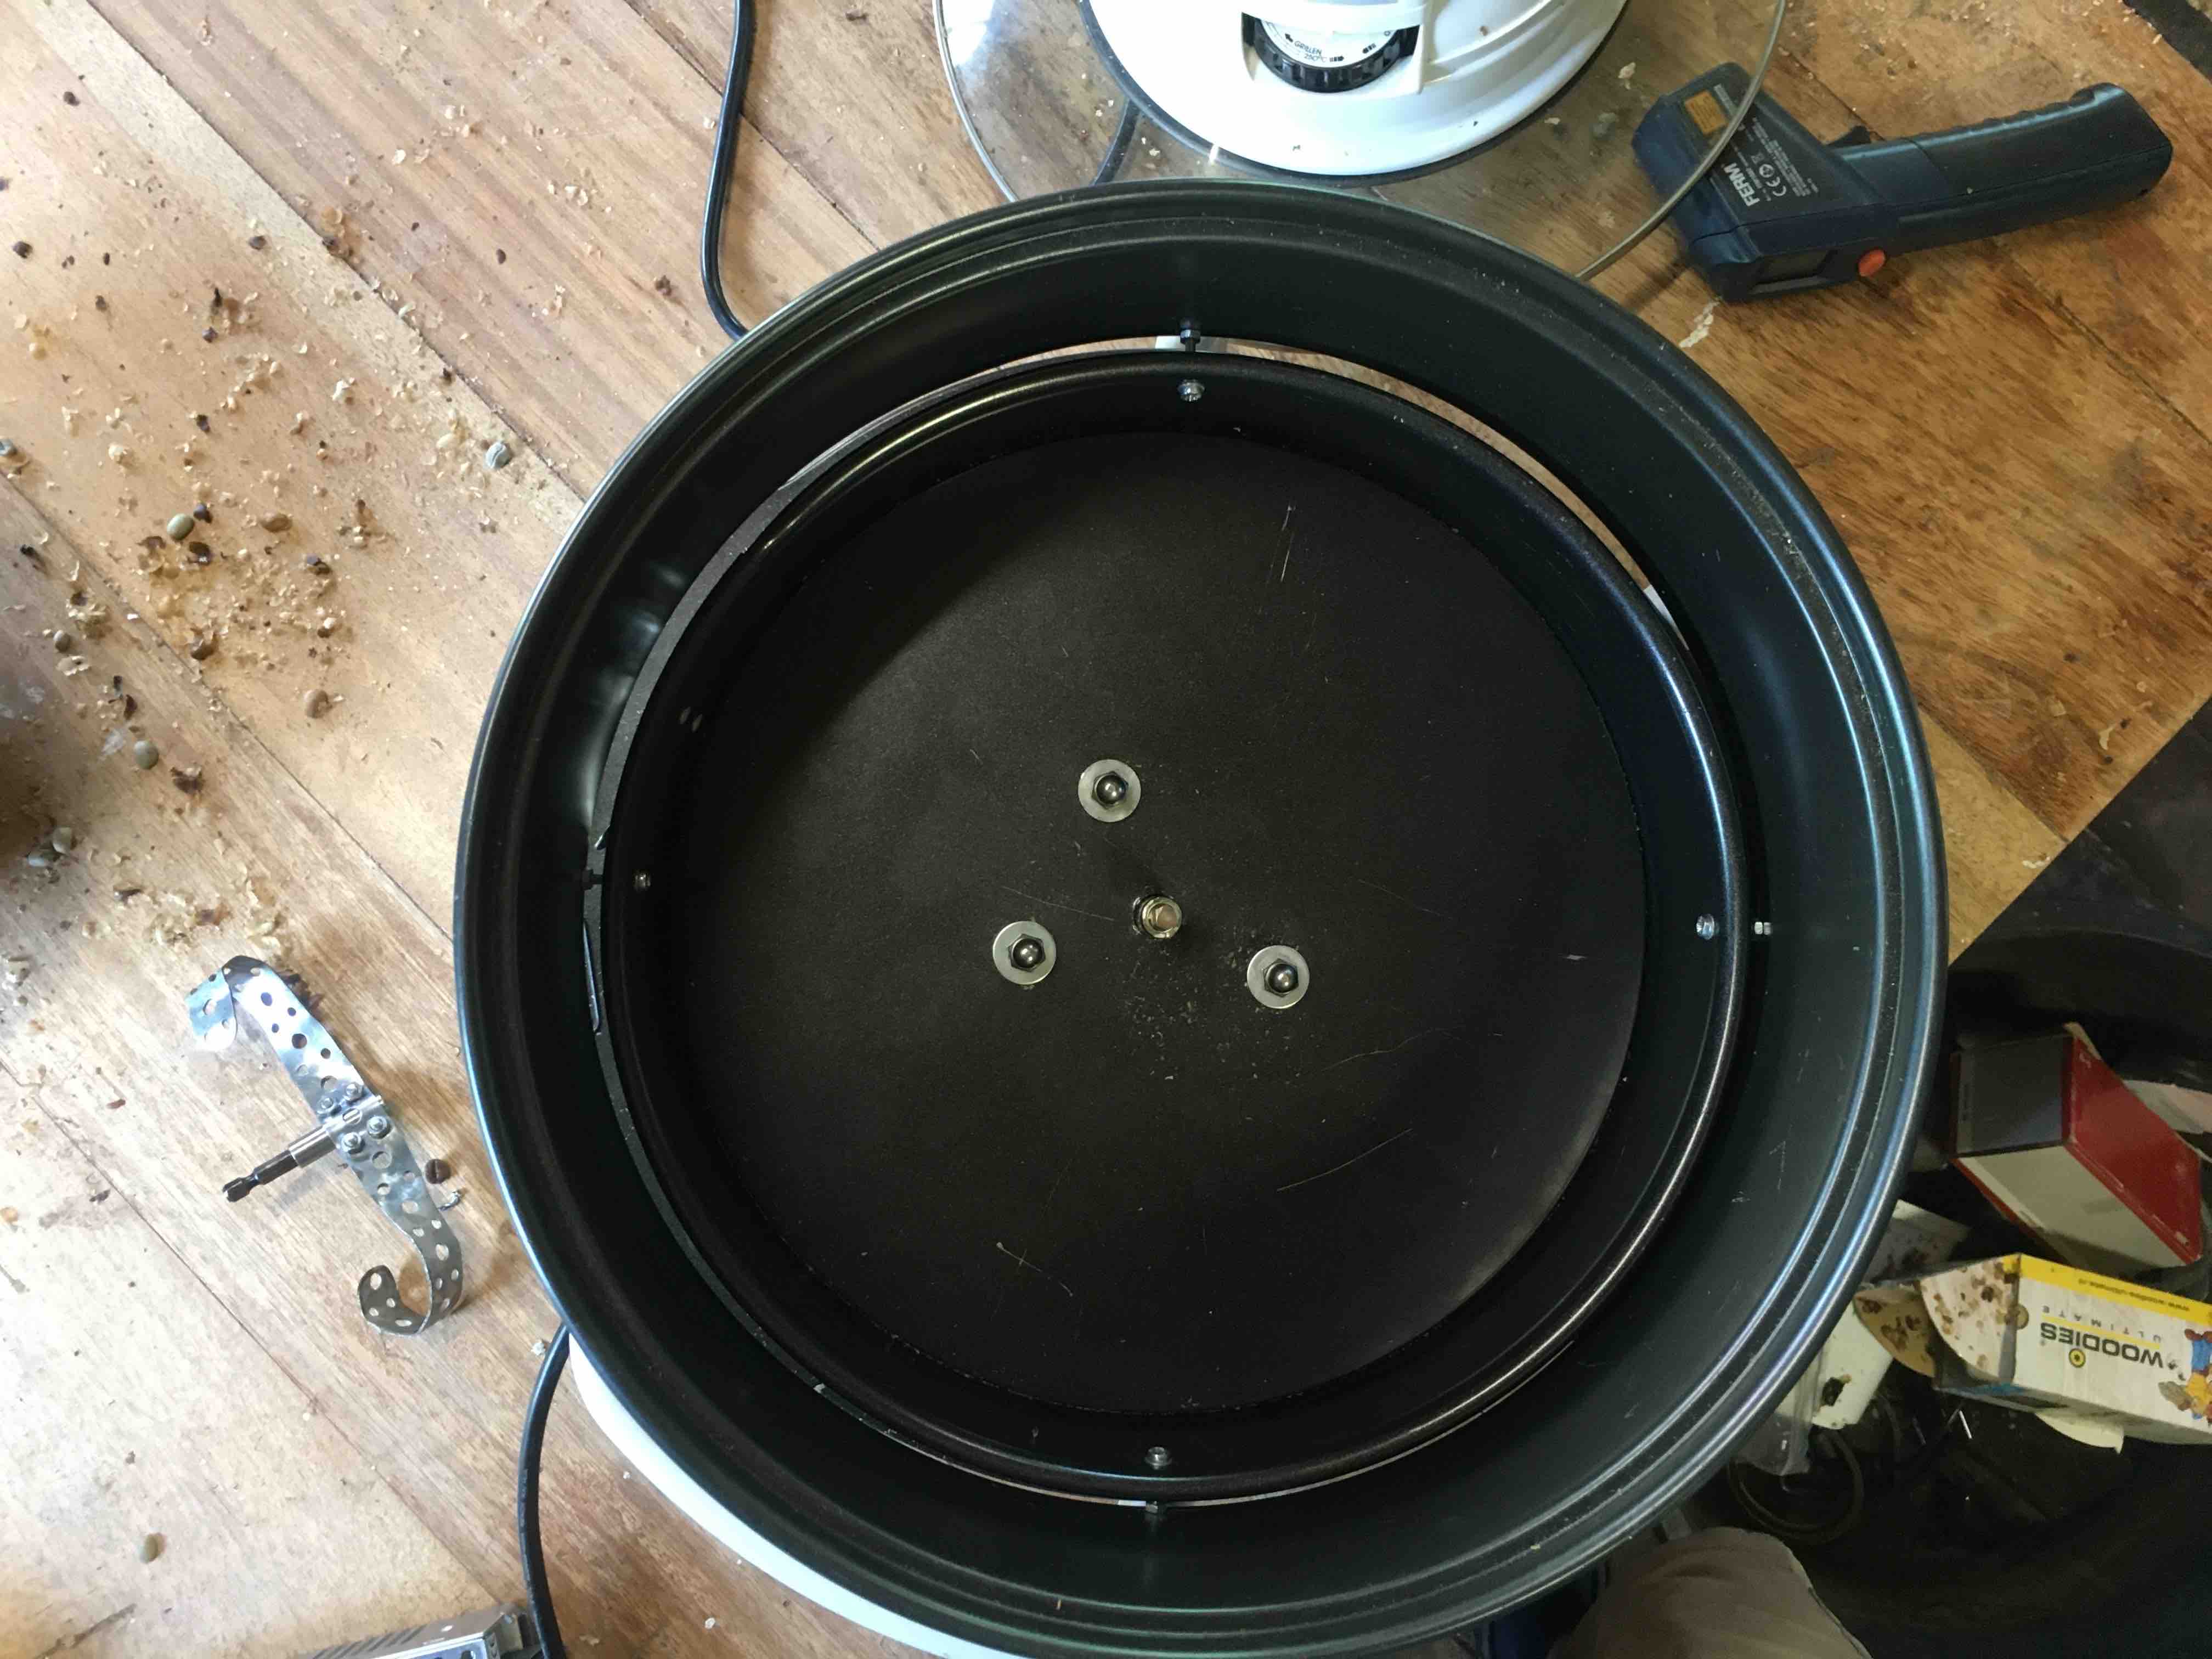
Hello, An update here... Below are some pics 1. Motor mounted under a spring form plate, ring is a bit smaller than the extension ring from the TO (28cm vs 30cm) 2. Upperside of the spring form plate with hexagonial axis for mounting bit-holder 3. Seef used as roasting chamber 4. Paddle mounted on the bit-holder 5. Paddle mount on the axis 6. First roast (500grs) Here a vid of the agitation (250grs): Please let me know what you think, the TO should be isolated better, also there is a space between the spring form and the extension ring which I should close somehow. Regards,
zamunda attached the following images:

Edited by zamunda on 05/20/2022 5:35 AM ########################
### A lot can happen over coffee ### ######################## |
|
|
|
| renatoa |
Posted on 05/20/2022 5:40 AM
|
|
Administrator Posts: 3104 Joined: September 30, 2016 |
Who said building a TO based roaster is difficult ? What other pound sized class roaster can be done so fast, with so little resources/expense? |
|
|
|
| zamunda |
Posted on 05/20/2022 6:03 AM
|
|
1/4 Pounder Posts: 173 Joined: November 17, 2020 |
Quote renatoa wrote: Who said building a TO based roaster is difficult ? What other pound sized class roaster can be done so fast, with so little resources/expense? TO: 15 Euro (thrift shop) Seef: 2,50 Euro (thrift shop) Motor: 20 Euro (thrift shop) Spring form: 3 Euro (thrift shop) Bit-holder: 2 Euro Small items: ~ 3 Euro ########################
### A lot can happen over coffee ### ######################## |
|
|
|
| renatoa |
Posted on 05/20/2022 6:23 AM
|
|
Administrator Posts: 3104 Joined: September 30, 2016 |
Nothing about the power management ? Please, don't ruin this build adding a computer |
|
|
|
| zamunda |
Posted on 05/20/2022 7:08 AM
|
|
1/4 Pounder Posts: 173 Joined: November 17, 2020 |
Quote Do not plan to add a computer, just added a thermocouple for reading the temp just outside the roasting chamber. Did a preheat of about 3 minutes at 225C and then dropped manual temp control of oven to 200C after charge and waited to see what happened. When first crack arrived it was not very pronounced at the first batch of 500grs. Then I read somewhere that the lamp shield should be removed for more efficiciency. So I removed that and then did a second batch of 250grs and first crack was far more consistent and roast came out more even. I would like to keep this build as manual as possible, just by eyeballing and smelling, playing with the temperature during roast and batch weight as variables. What about isolating the oven: is this a must or optional? Thanks! ########################
### A lot can happen over coffee ### ######################## |
|
|
|
| renatoa |
Posted on 05/20/2022 7:19 AM
|
|
Administrator Posts: 3104 Joined: September 30, 2016 |
When you remove lamp shield then you have a significant quota of IR is hitting the upper beans directly, as sun rays. This make the lateral walls heat losses not so critical, but raise another issue: on-off control, using a thermostat is now less desirable. That's because IR has no thermal inertia, and is not averaged as is convection by air masses permanently in a vortex. When lamp lit at 100%, IR hits at full power, and this could damage the beans if lamp too close, or vertical agitation not optimal, i.e. same beans staying too much surfaced, without going to bottom and let other getting the IR hit. For this reason, a linear power variator is a better approach for any type of roast where IR quota is comparable with convection. Edited by renatoa on 05/20/2022 8:42 AM |
|
|
|
| zamunda |
Posted on 05/20/2022 7:36 AM
|
|
1/4 Pounder Posts: 173 Joined: November 17, 2020 |
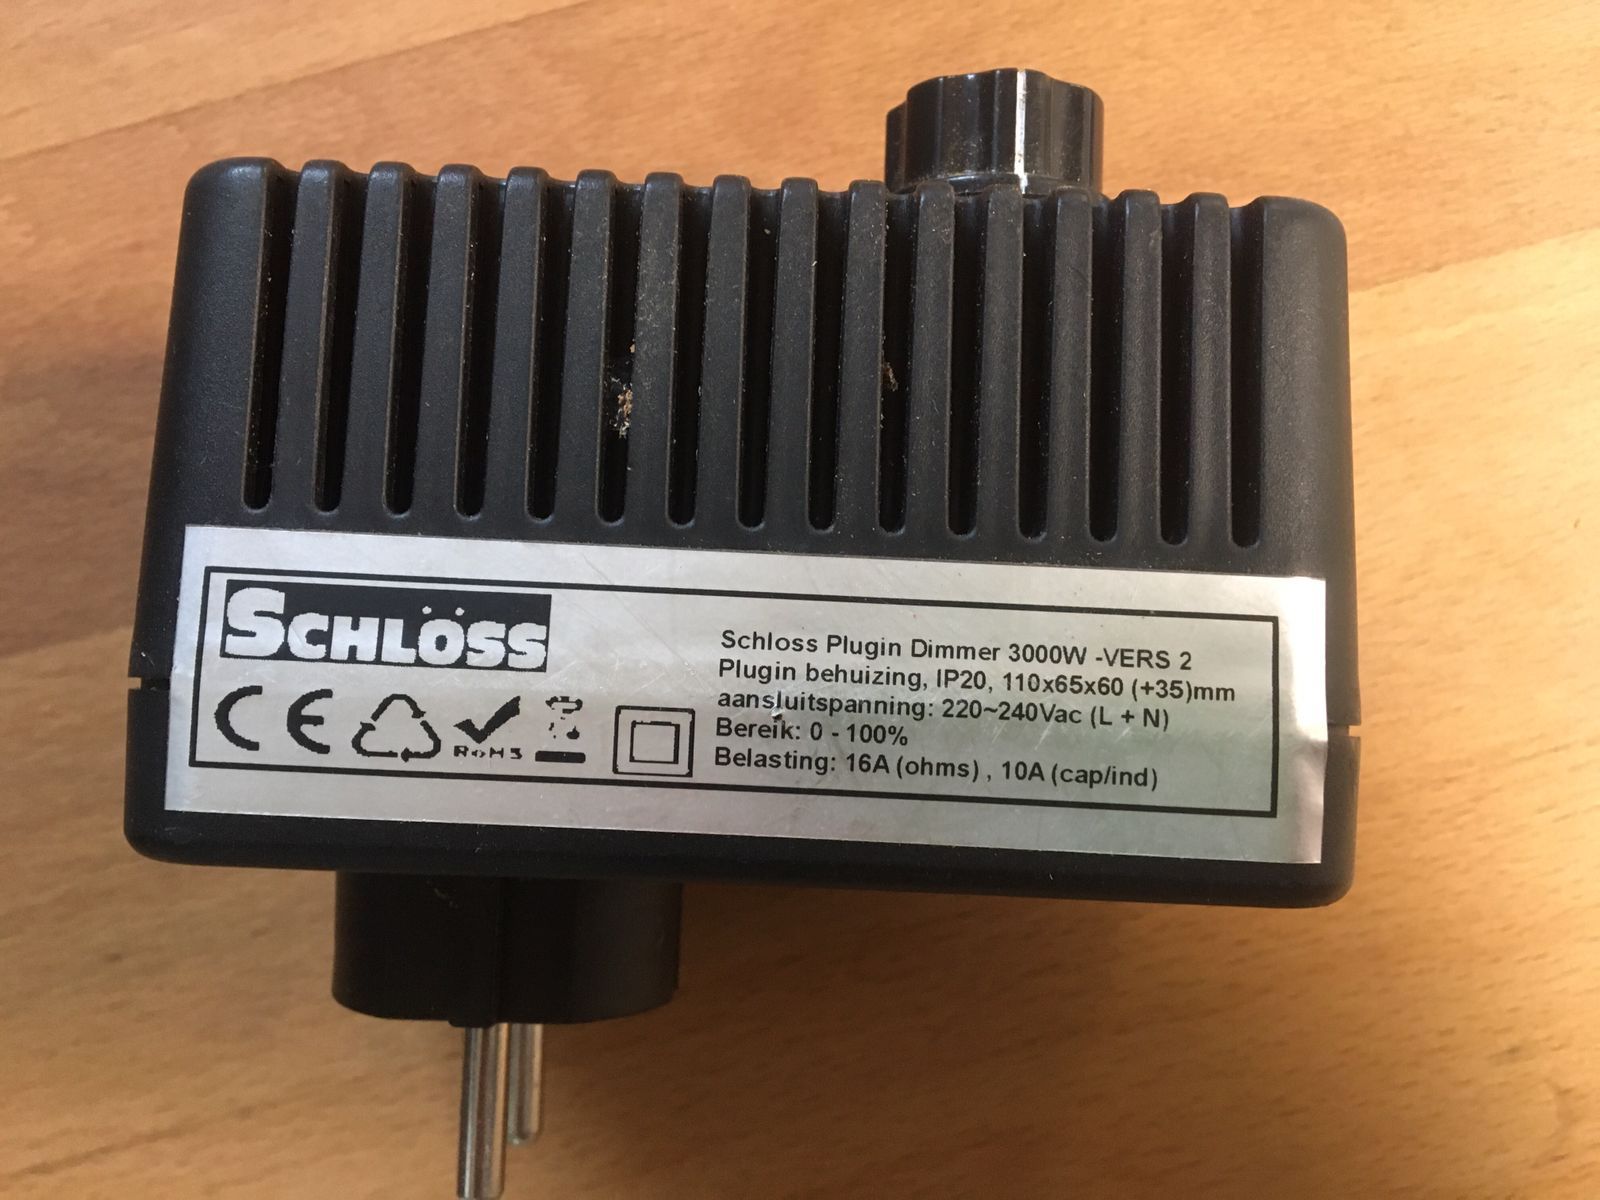
Quote renatoa wrote: When you remove lamp shield then you have a significant quota of IR hitting the upper beans directly, as sun rays. This make the lateral walls heat losses not so critical, but raise another issue: on-off control, using a thermostat is now less desirable. That's because IR has no thermal inertia, and is not averaged as is convection by air masses permanently in a vortex. When lamp lit at 100%, IR hits at full power, and this could damage the beans if lamp too close, or vertical agitation not optimal, i.e. same beans staying too much on surface. For this reason, a linear power variator is a better approach for any type of roast where IR quota is comparable with convection. Thanks for your explaination. At what distance the beans are too close? They are know at 10-12 cm I guess. Could I use this model for power variation (see below)? I used this with a popcorn-machine in the past. Thanks
zamunda attached the following images:

Edited by zamunda on 05/20/2022 8:08 AM ########################
### A lot can happen over coffee ### ######################## |
|
|
|
| renatoa |
Posted on 05/20/2022 8:49 AM
|
|
Administrator Posts: 3104 Joined: September 30, 2016 |
Yep, 16 Amps is more than enough, 1300W on 230V means a draw in the 6Amps ballpark. On my machine I never exceed 75% for 250 grams, or 80% for 330g. The average "profile" is to preheat at about 30%, charge beans, let soak for 1 minute at preheat setting, then ramp about 10% per minute, up to 60-70% at minute 4-5, when dry ends. Let there about 2-3 minutes, then lower about 5-10% in the 1-2 minutes before FC. Adjust these figures to have FC about minute 8. |
|
|
|
| zamunda |
Posted on 05/20/2022 9:08 AM
|
|
1/4 Pounder Posts: 173 Joined: November 17, 2020 |
Quote renatoa wrote: Yep, 16 Amps is more than enough, 1300W on 230V means a draw in the 6Amps ballpark. On my machine I never exceed 75% for 250 grams, or 80% for 330g. The average "profile" is to preheat at about 30%, charge beans, let soak for 1 minute at preheat setting, then ramp about 10% per minute, up to 60-70% at minute 4-5, when dry ends. Let there about 2-3 minutes, then lower about 5-10% in the 1-2 minutes before FC. Adjust these figures to have FC about minute 8. Thanks, I'll try... OK, so I connect the TO directly to the power-variator and set/let the thermostat of the TO at max, that is 225C? ########################
### A lot can happen over coffee ### ######################## |
|
|
|
| zamunda |
Posted on 05/20/2022 10:09 AM
|
|
1/4 Pounder Posts: 173 Joined: November 17, 2020 |
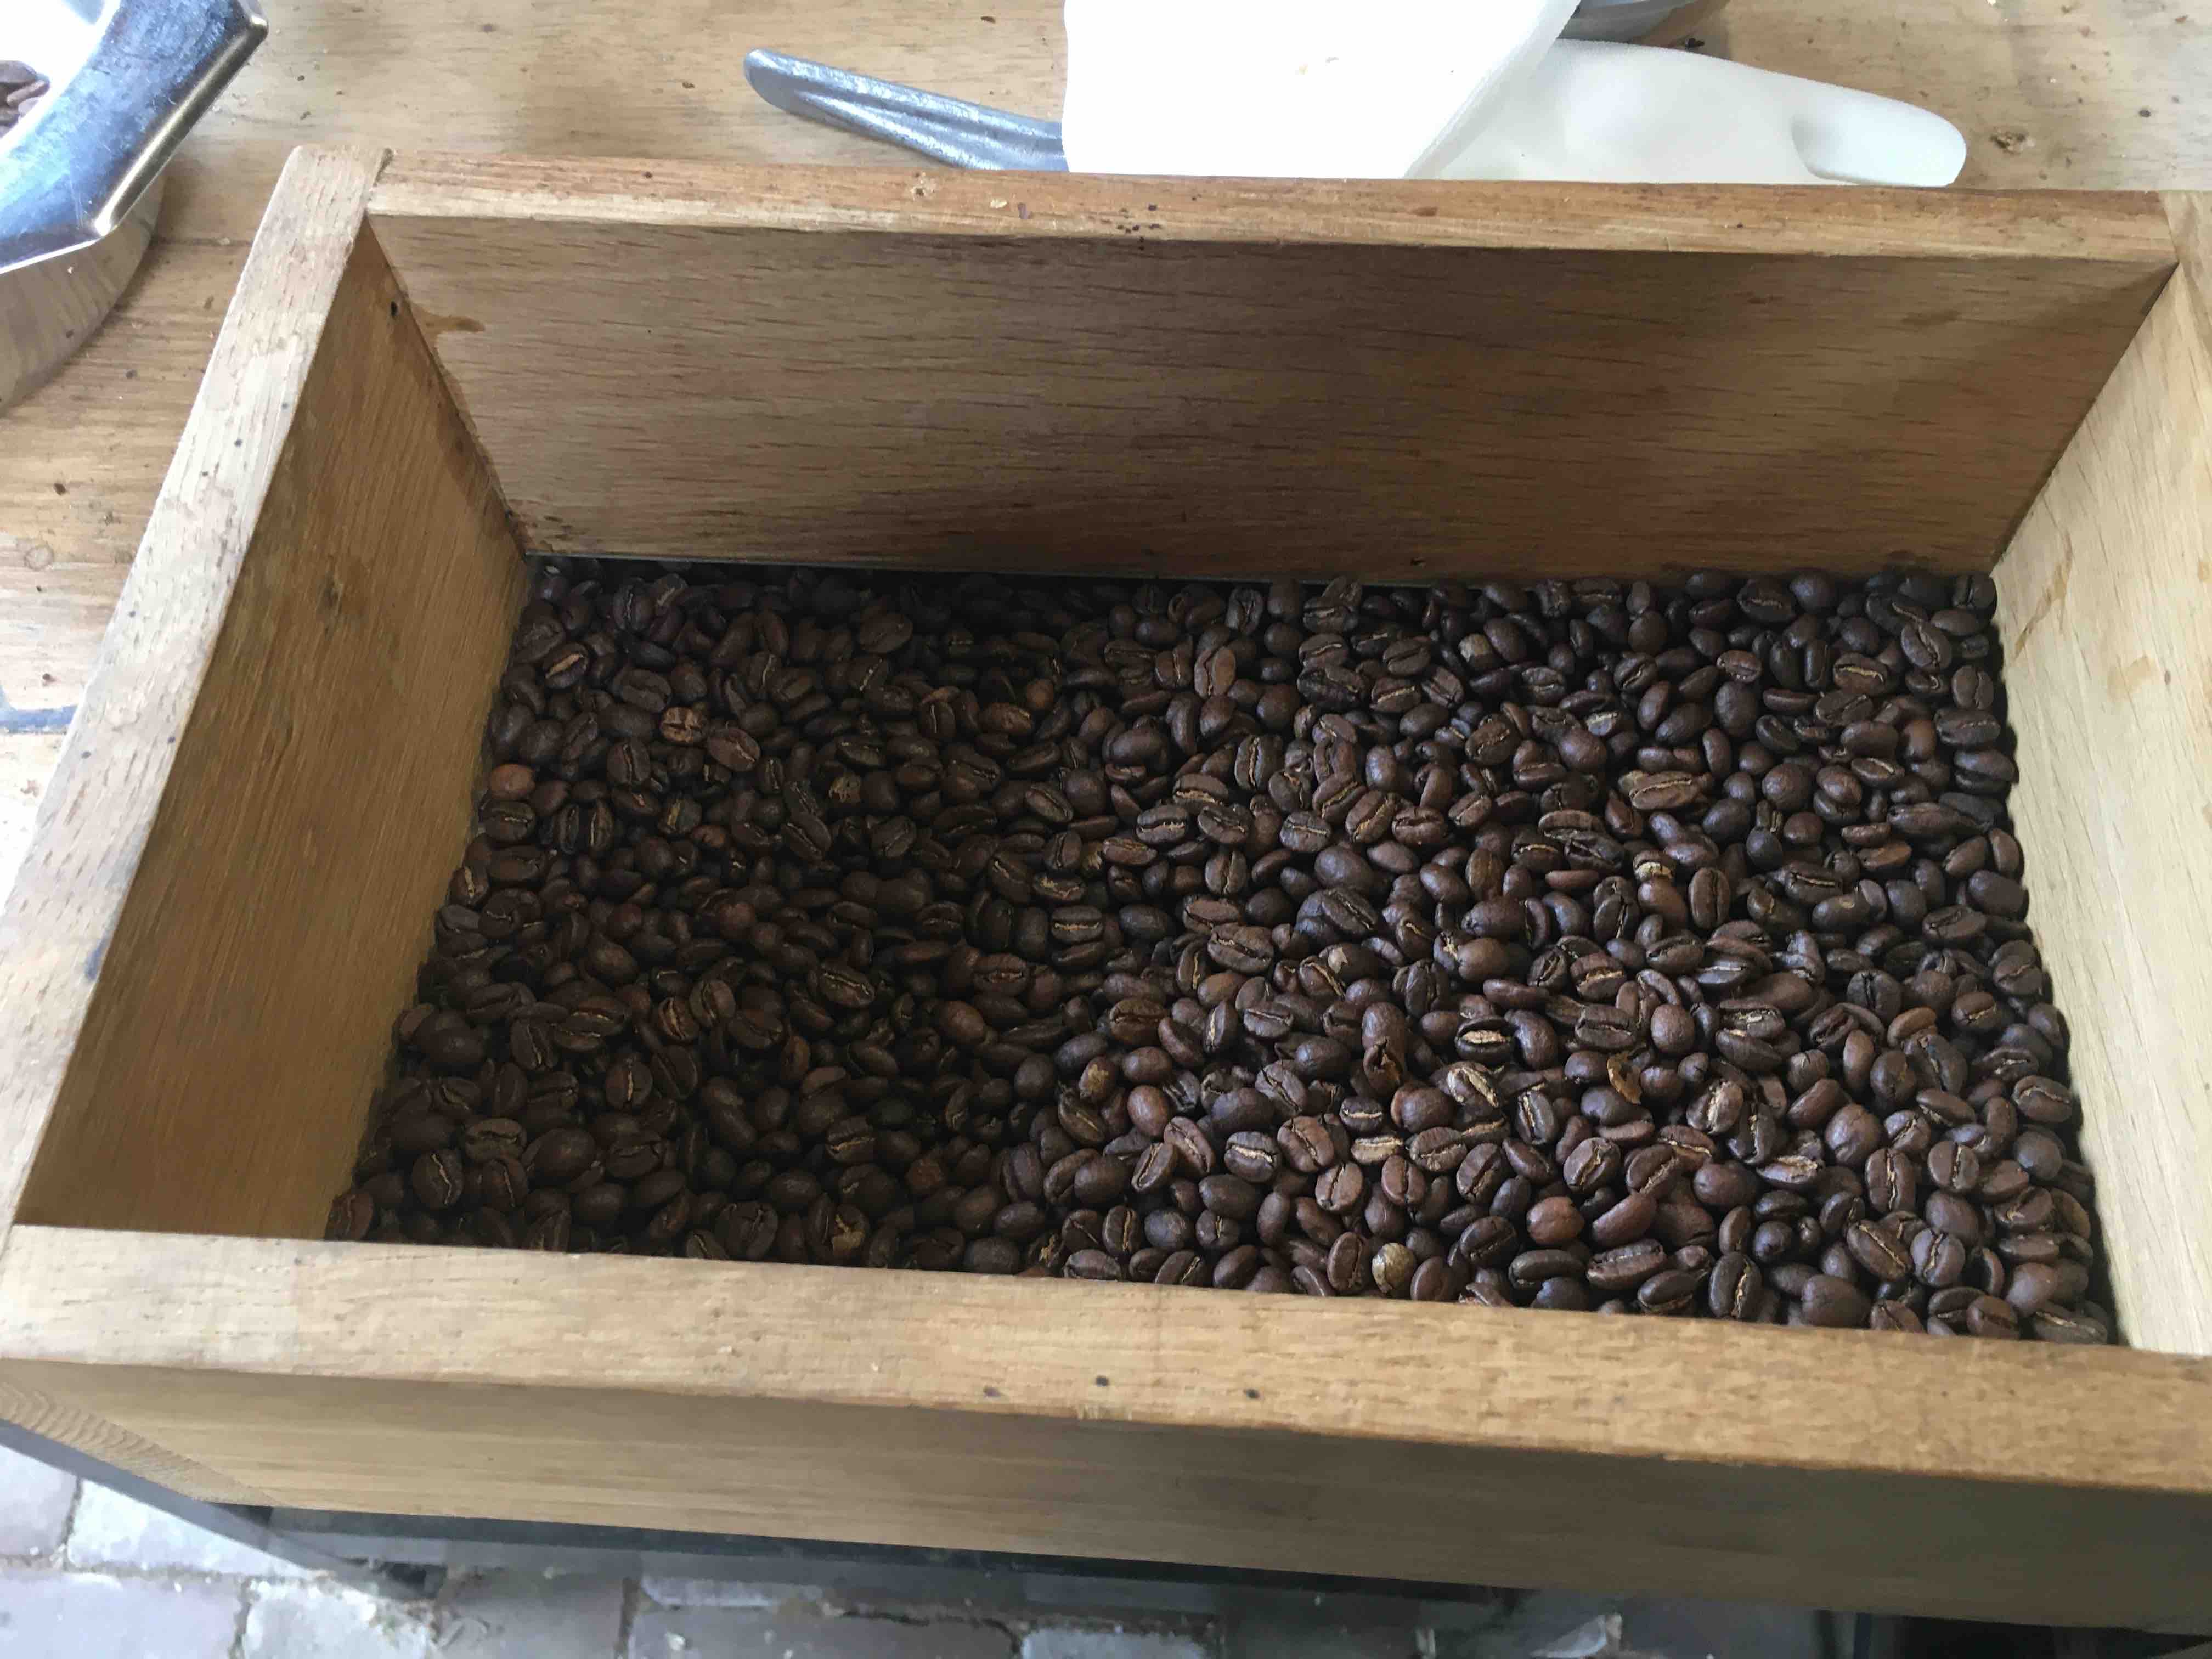
Quote zamunda wrote: OK, so I connect the TO directly to the power-variator and set/let the thermostat of the TO at max, that is 225C? That is what I did and loaded 350 grams at 80% heat (did not follow the profile exactly yet) but I am happy with the result that came out! ########################
### A lot can happen over coffee ### ######################## |
|
|
|
| renatoa |
Posted on 05/20/2022 10:09 AM
|
|
Administrator Posts: 3104 Joined: September 30, 2016 |
Mmmm... not so simple The motor is preferably to not pass through power variator, the a/c sine wave chopping done by the variator is not pleasing for all motor types. The variator output should go to the lamp only, and thermostat bypassed. What solution used for chaff/smoke exhaust ? |
|
|
|
| zamunda |
Posted on 05/20/2022 10:23 AM
|
|
1/4 Pounder Posts: 173 Joined: November 17, 2020 |
Quote renatoa wrote: Mmmm... not so simple The motor is preferably to not pass through power variator, the a/c sine wave chopping done by the variator is not pleasing for all motor types. The variator output should go to the lamp only, and thermostat bypassed. OK, I understand. Quote What solution used for chaff/smoke exhaust ? Not yet... ########################
### A lot can happen over coffee ### ######################## |
|
|
|
| Koffee Kosmo |
Posted on 05/20/2022 5:33 PM
|
|
Administrator Posts: 1621 Joined: December 31, 2008 |
The agitation looks much better Test with a few coloured beans to see how they travel through the bean mass I have spent countless hours fine tuning the agitator to have a complete mixing action rather than to push a mass of coffee beans around the roasting bowl The main purpose of the agitator shape is to mix the beans in a specific way that is to move the beans from the centre out and back to the centre again The action also cycles the beans from top to bottom in a helix pattern while also allowing the beans some intermittent rest time. As for the heat shield I have not removed it completely on my unit Best of both worlds is to cut out 90% and still retain an outer ring https://i.postimg...-C91-A.jpg KK I home roast and I like it. Designer of the KKTO
Roaster Build information https://homeroast...ad_id=1142 https://docs.goog...lide=id.i0 Blog - http://koffeekosm...gspot.com/ Bezzera Strega, Mazzer Robur Grinder, Pullman Tamper Convex, (KKTO) Turbo Oven Home Roaster. |
|
|
|
| renatoa |
Posted on 05/21/2022 1:20 AM
|
|
Administrator Posts: 3104 Joined: September 30, 2016 |
At least a cut in the middle, having the size of turbine circle, will avoid chaff to clogg and burn on the the lamp shield. This is the most recommended step to do after the first roasting attempts enthusiasm gone. |
|
|
|

Page 1 of 2: 12
| Jump to Forum: |
Powered by PHP-Fusion Copyright © 2024 PHP-Fusion Inc
Released as free software without warranties under GNU Affero GPL v3
Designed with ♥ by NetriXHosted by skpacman