
Login

Shoutbox
You must login to post a message.
renatoa
07/26/2024 3:49 PM
Bill grubbe and Jk, 
allenb
07/26/2024 5:15 AM
Spiderkw Welcome to HRO!

renatoa
07/24/2024 8:31 AM
ramiroflores and John123,

 ?
?
?renatoa
07/21/2024 1:18 AM
 , Luislobo
renatoa
07/19/2024 11:28 AM
Koepea,
Forum Threads
Newest Threads
Skywalker roaster modsBackground Roast Iss...
Hello from Arkansas
TC4ESP
Green coffee reviews
Hottest Threads
| Skywalker roaster... | [375] |
| TC4ESP | [115] |
| War on Farmers by... | [47] |
| Adventures in flu... | [26] |
| Hello! (soon) Roa... | [17] |
In Memory Of Ginny

Donations
Latest Donations
dmccallum - 10.00
JackH - 25.00
snwcmpr - 10.00
Anonymous - 2.00
Anonymous - 5.00
dmccallum - 10.00
JackH - 25.00
snwcmpr - 10.00
Anonymous - 2.00
Anonymous - 5.00
Users Online
Guests Online: 4
Members Online: 0
Total Members: 8,393
Newest Member: Bill grubbe
Members Online: 0
Total Members: 8,393
Newest Member: Bill grubbe
View Thread
Who is here? 1 guest(s)
 Poppery ii First Home Roaster...
|
|
| Lawrence |
Posted on 11/07/2022 10:29 AM
|
|
Newbie  Posts: 7 Joined: November 03, 2022 |
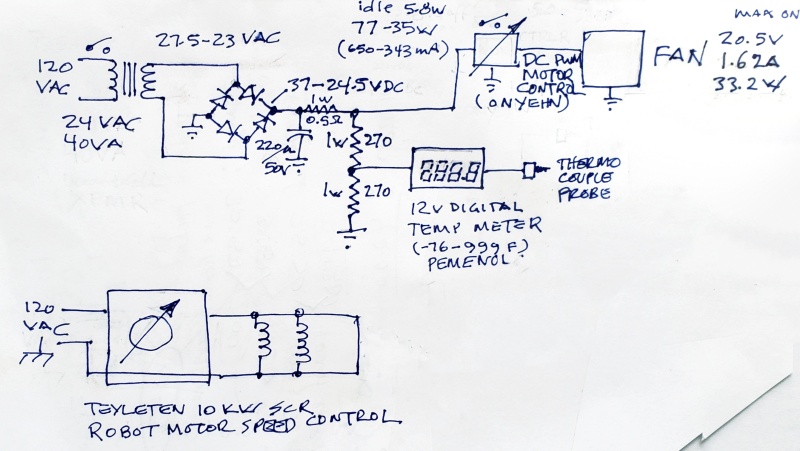
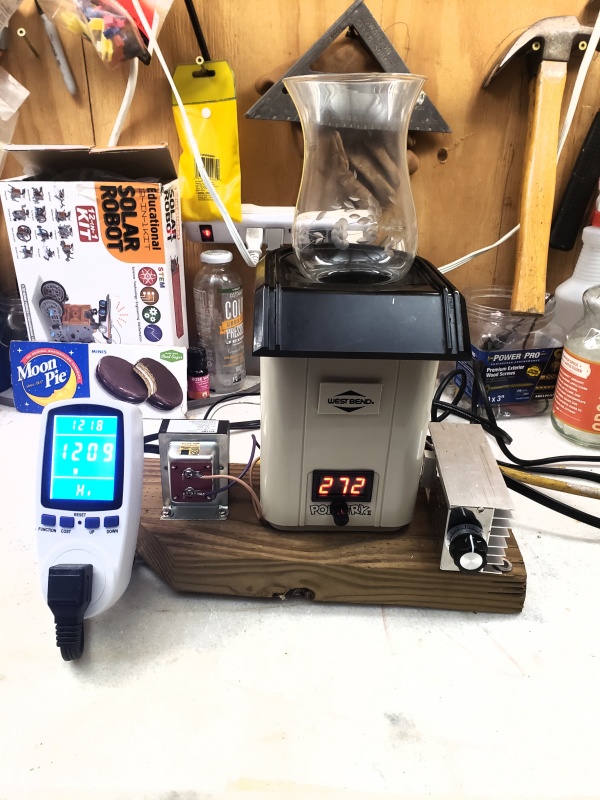
Reading through this treasure trove of excellent contributors and really excited to be getting started here. I chose the Westbend Poppery ii because it was what I had, and followed the most basic mods others here have found success with. Had initially roasted a few batches in an open skillet and this seems a good improvement. Have had some surprisingly happy results. Initial roasts are way better than anything I can buy currently, yet tantalizingly far short of being the really great endless cup we look for. Everything is fly-by-wire, but that seems fitting at this stage way more than needing an app and computer just for the weighing scale as the world seems headed to. Spent $54 on parts, and scavenged a cord and a few components off some old junk. Everything seems pretty responsive and even, and I can easily get roast times 6-12 minutes. Controlling the stage timing works well enough and there is more than plenty of heat and wind for 120g batch size. My mind is already planning the next bigger and better roaster I most likely don't need.  Not really knowing what I am doing at all, and would love some feedback on the progress I made.... Temp probe isn't in a corner, but still reliably reading 370-377 for first crack. Probably would eventually want to see some slick rate of rise digital readout if what everyone else seems to be saying is true... or, am I at the limit of what this is useful for?
Lawrence attached the following images:


|
|
|
|
| allenb |
Posted on 11/07/2022 12:37 PM
|
 Administrator Posts: 3869 Joined: February 23, 2010 |
Hey Lawrence and big welcome to HRO! It appears the roaster building/modding bug has infected you as is the case with most of us coffee nuts. Looks like a great setup you've created and will be capable of pulling off some excellent roasts when feeding it top quality green coffee. Controlling stage/timing should be all you need for now. While rate of rise is nice to have in some instances, I've found I don't rely on it anymore and am getting excellent results just by giving the coffee a real good kick in the pants at the start to allow hitting yellow between 3 and 3 1/2 minutes and then bumping heat input up enough to get me to first crack in another 3 1/2 to 4 minutes and ending in another 1 to 1 1/2 minutes. I've found with anything under 1 lb in a fluidbed, completing a roast in 7 to a max of 8 minutes is the sweet spot for pulling maximum complexity and sparkle out of the coffee. As renatoa has mentioned in several posts, the most important thing with measuring bean temperature is not the actual spot on the dial to try and mimic but to use the temperature reading seen at first crack and be able to stop the roast at a predetermined number of degrees past 1st crack that gets you to the degree of development you find you like. One of the reasons many of us don't bother much with automation anymore is due to the fact that any given coffee has a tendency to be in a different mood from one day to the next and as soon as you think you have nailed the "perfect" time/temp profile, you will not be able to repeat the results the next day so we tend to worry more about not doing something real stupid during a roast instead of matching exactly what we did the day before. Now, when you start roasting 20 kilo batches at your new roastery business, you will need to start worrying about being a lot more consistent with profiles! Happy roasting!
1/2 lb and 1 lb drum, Siemens Sirocco fluidbed, presspot, chemex, cajun biggin brewer from the backwoods of Louisiana
|
|
|
|
| allenb |
Posted on 11/07/2022 12:59 PM
|
|
Administrator Posts: 3869 Joined: February 23, 2010 |
One more thing. Something I failed to mention which is extremely important is the issue of bean quality. Just because a green coffee shows a cupping score of 90 or higher, whether it be from Sweet Marias or any of the normally trustworthy sources, it does not guarantee you will be getting a coffee capable of producing an excellent cup although the chances are much better than rolling the dice and buying an assortment of $4 dollar a lb low rated coffees and hoping for great results. The reason I mention this is because many a new roaster has tried and tried to achieve that perfect roast and fail over and over only to find they were trying to achieve a gold cup from green coffee that wasn't up to the task. You've got to sample lots of different green coffees before you can determine if your roasting strategies are working for you. For an example, I recently bought a high priced green with a 92 score and found that while it had some interesting notes to it, it was a total bore and without any noticeable body no matter how you roasted it. Allen 1/2 lb and 1 lb drum, Siemens Sirocco fluidbed, presspot, chemex, cajun biggin brewer from the backwoods of Louisiana
|
|
|
|
| HarryDog |
Posted on 11/08/2022 8:10 AM
|
 1/2 Pounder  Posts: 349 Joined: July 20, 2022 |
Hi Lawrence, best of luck as I keep trying to improve my rig, improve one thing want to improve the next. I hope to be roasting again by the weekend, but snow and cold weather is slowing me down. |
|
|
|
| Lawrence |
Posted on 11/08/2022 11:22 AM
|
|
Newbie Posts: 7 Joined: November 03, 2022 |
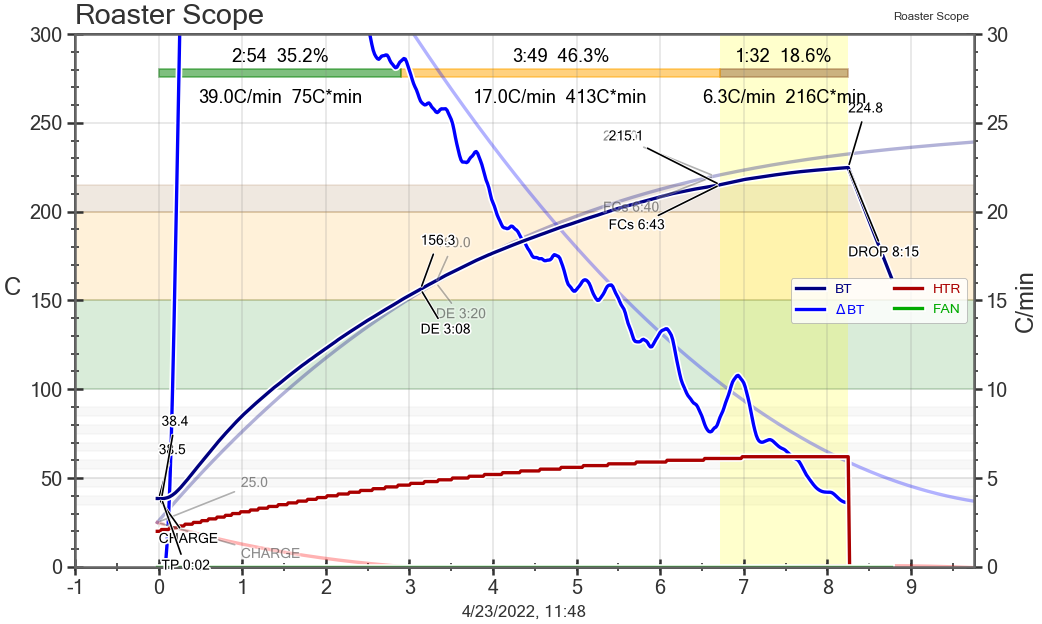
Thanks *tremendous* for the information and encouragements!. The roaster continues to run well. Trying to use it correctly though seems areal challenge. So far having roasted less than a dozen batches total and feeling excited with the progress. The roast color is even and no scorching is noticeable. The beans seem slightly lighter on the inside when cracked open at the end. I think I am liking 12 degrees past first crack best as a sweet spot, but cannot figure out how to separate that from other variables like charge temperature, final temperature, stage time percents and drying percentage... Aiming for a medium-light roast and my intuition says I want to slow the rate of rise initially, maybe even a pre-300 degree short stall?? I tried that, and it made my favorite cup so far from these Nicaraguan Jinotega beans from Sweet Maria. I studied three different drop temperatures and in the first and third left the temperature pretty well alone, just varying fan speed, but in the second profile dropped the temperature in minutes 1 by a fair amount and then came back up in minute 3... What do you think of these temperature curves? How can I improve anything here?
Lawrence attached the following image:

|
|
|
|
| HarryDog |
Posted on 11/08/2022 12:09 PM
|
|
1/2 Pounder Posts: 349 Joined: July 20, 2022 |
I would try a lower charge temp, Renatoa likes 150c. This was ok on my 1100 watt popper but I think too hot for my current 1400 watt popper at least the way I was roasting, Try a charge temp of 110c and see what you think. Try to slow the drying phase, shorten yellow a bit and lengthen the finishing phase a bit. 40/43/17 How does it cup? I have not roasted any Nicaraguan beans yet but I have experienced some more fruitiness in this range. Disclaimer is I'm learning as I go. |
|
|
|
| renatoa |
Posted on 11/08/2022 1:07 PM
|
|
Administrator Posts: 3104 Joined: September 30, 2016 |
On a popper you can start as low as you want, even 60 C is good. Actually the 100C mark is advised to be reached at 1/4 of roast time, thus about minute two. On a glass chamber FB the approach is a bit different though, glass needs first a good preheat, to accumulate enough energy and don't steal it from beans. However, once properly heated, the same apply for glass too, you can start even 70-80C low, and have a good profile. An extreme sample is attached, a 74g roast in a SR540 chinese clone, rated for 140g, when started at 40C, almost no turning point. ~~~
renatoa attached the following image:
|
|
|
|
| Lawrence |
Posted on 11/08/2022 2:13 PM
|
|
Newbie Posts: 7 Joined: November 03, 2022 |
Really like the direction of this discussion a lot! the 120C is cupping much better than the higher CT ones. Notes are more fruity and less flat overall than the last roast. Definitely going to need to rest this one up a week and see how it is. Will experiment with CT down to 60C, and see what happens with it during that time for sure. Noticing my next already required mod is a larger value on the heating coils control potentiometer as could not get good fine control at the top extreme. Rate of rise can change very fast with this thin aluminum chamber. Would it be helpful to hose-clamp some 1/4" iron plates onto the outsides of it for thermal mass?? Going to order some more green beans from different parts of the world. Having fun with this!
Lawrence attached the following image:

|
|
|
|
| HarryDog |
Posted on 11/08/2022 5:43 PM
|
|
1/2 Pounder Posts: 349 Joined: July 20, 2022 |
I used exhaust wrap on my first roaster, it worked well but the stink was horrible, Kiln insulation might be better but I don't have any to test. Don't think metal is a good option as it will take much longer to return to a good roast starting temp, not sure? If you settle on a Charge Temp that is in the same temp area maybe it will be ok. I also did a number of roasts from ambient temp but was also lengthening my roast times and only had two roasts that I liked. Look forward to your 60c CT results. |
|
|
|
| Lawrence |
Posted on 11/08/2022 8:07 PM
|
|
Newbie Posts: 7 Joined: November 03, 2022 |
Going to split out the middle another 4% as you suggest and play with heat-soaking start-ups a bit. Should have an update tomorrow. See if I can get all the baked notes ironed completely out.... Going to be several days until I can modify the heater for more control at the top end... Will experiment with adding thermal mass and see what it does too... maybe there is an exciting coffee hiding in these beans after all! : D Edited by Lawrence on 11/08/2022 8:54 PM |
|
|
|

| Jump to Forum: |
Powered by PHP-Fusion Copyright © 2024 PHP-Fusion Inc
Released as free software without warranties under GNU Affero GPL v3
Designed with ♥ by NetriXHosted by skpacman