
Login

Shoutbox
You must login to post a message.
renatoa
07/26/2024 3:49 PM
Bill grubbe and Jk, 
allenb
07/26/2024 5:15 AM
Spiderkw Welcome to HRO!

renatoa
07/24/2024 8:31 AM
ramiroflores and John123,

 ?
?
?renatoa
07/21/2024 1:18 AM
 , Luislobo
renatoa
07/19/2024 11:28 AM
Koepea,
Forum Threads
Newest Threads
Skywalker roaster modsBackground Roast Iss...
Hello from Arkansas
TC4ESP
Green coffee reviews
Hottest Threads
| Skywalker roaster... | [375] |
| TC4ESP | [115] |
| War on Farmers by... | [47] |
| Adventures in flu... | [26] |
| Hello! (soon) Roa... | [17] |
In Memory Of Ginny

Donations
Latest Donations
dmccallum - 10.00
JackH - 25.00
snwcmpr - 10.00
Anonymous - 2.00
Anonymous - 5.00
dmccallum - 10.00
JackH - 25.00
snwcmpr - 10.00
Anonymous - 2.00
Anonymous - 5.00
Users Online
Guests Online: 2
Members Online: 0
Total Members: 8,393
Newest Member: Bill grubbe
Members Online: 0
Total Members: 8,393
Newest Member: Bill grubbe
View Thread
Who is here? 2 guest(s)
 Hi from USA
|
|
| Cymen |
Posted on 01/29/2023 9:30 PM
|
|
Newbie  Posts: 12 Joined: January 13, 2023 |
I joined recently after searching for some information online about building a roaster. For now, I opted to buy a Fresh Roast SR800 and did my first 5 roasts with that 5 days ago (170g each). I tried to wait a full 7 days to let the beans rest before trying them for espresso but I couldn't make it. So far, everything is drinkable. I did 4 roasts of an espresso blend (I bought 10 pounds of this to learn on) and another roast of a Peruvian decaf (SWP, bought 5 pounds to learn on). I didn't realize that decaf would roast different from regular and I took it farther and probably hotter than intended as it ended up with spots of oil after resting for a couple of days. However, the taste of this decaf is amazing in milk drinks. So far, I like the flavor of the regular espresso blend but curious to see how it changes after 7-14 days (if I can make it that long before using it up). I live in a cold climate (5F/-15C this evening) and our kitchen fan does not vent outside so rigged up a ventilation system to blow out a window with some foam board in the window going to a 4" vent hose connected to a bilge blower pulling from a box with a steamer insert taped into one side sitting on top of a larger box. This contraption lets me ventilate the roaster and then I can take the smaller box with the steaming insert off of the top and turn it over and use it to cool the beans at the end of the roast. This is working great so far. I'm here though because at some point I'd probably like to build a roaster. I'm still thinking all that through however I observed many builds using the Corning Bake-A-Round pyrex tube and I purchased one of those so I could hold it in my hands to get a sense of the size. I'm still thinking that through and enjoying reading the build threads. |
|
|
|
| Koffee Kosmo |
Posted on 01/29/2023 11:33 PM
|
 Administrator Posts: 1621 Joined: December 31, 2008 |
Quote Cymen wrote: I joined recently after searching for some information online about building a roaster. For now, I opted to buy a Fresh Roast SR800 and did my first 5 roasts with that 5 days ago (170g each). I tried to wait a full 7 days to let the beans rest before trying them for espresso but I couldn't make it. So far, everything is drinkable. I did 4 roasts of an espresso blend (I bought 10 pounds of this to learn on) and another roast of a Peruvian decaf (SWP, bought 5 pounds to learn on). I didn't realize that decaf would roast different from regular and I took it farther and probably hotter than intended as it ended up with spots of oil after resting for a couple of days. However, the taste of this decaf is amazing in milk drinks. So far, I like the flavor of the regular espresso blend but curious to see how it changes after 7-14 days (if I can make it that long before using it up). I live in a cold climate (5F/-15C this evening) and our kitchen fan does not vent outside so rigged up a ventilation system to blow out a window with some foam board in the window going to a 4" vent hose connected to a bilge blower pulling from a box with a steamer insert taped into one side sitting on top of a larger box. This contraption lets me ventilate the roaster and then I can take the smaller box with the steaming insert off of the top and turn it over and use it to cool the beans at the end of the roast. This is working great so far. I'm here though because at some point I'd probably like to build a roaster. I'm still thinking all that through however I observed many builds using the Corning Bake-A-Round pyrex tube and I purchased one of those so I could hold it in my hands to get a sense of the size. I'm still thinking that through and enjoying reading the build threads. Welcome to the forum Re - The roaster you would like to build First determine how large ( as in weight ) a roast you want to roast in one go and factor in increase of consumption Do you want to roast just one large batch or several batches ? Be aware that it takes relatively the same amount of electricity to roast a small batch as a larger batch KK I home roast and I like it. Designer of the KKTO
Roaster Build information https://homeroast...ad_id=1142 https://docs.goog...lide=id.i0 Blog - http://koffeekosm...gspot.com/ Bezzera Strega, Mazzer Robur Grinder, Pullman Tamper Convex, (KKTO) Turbo Oven Home Roaster. |
|
|
|
| Cymen |
Posted on 02/02/2023 10:46 PM
|
|
Newbie Posts: 12 Joined: January 13, 2023 |
I need to roast some more with my Fresh Roast SR800 before I'm certain but I think I'd like a batch size range of 250-550g. It would be nice to go bigger however I want to keep the total size fairly portable. I also don't know yet if I'll have enough electricity for a fluid bed roaster so it might be better to go for a drum roaster. I found an inexpensive older used Kaldi for sale and I'm going to try to get that so I can see what it's like. Part of the reason I'd build is I want to go to remote locations where I might not be able to easily get a roaster mailed back and forth for repair. Being able to fix it myself and/or it being robustly built would a be a good thing. The FreshRoast is nice but it definitely does not feel robust and requires some care to avoid damaging it (glass roast chamber loosely attaches to base, plastic top chaff collector that can easily crack if dropped, etc). |
|
|
|
| Koffee Kosmo |
Posted on 02/02/2023 11:13 PM
|
|
Administrator Posts: 1621 Joined: December 31, 2008 |
Quote Cymen wrote: I need to roast some more with my Fresh Roast SR800 before I'm certain but I think I'd like a batch size range of 250-550g. It would be nice to go bigger however I want to keep the total size fairly portable. I also don't know yet if I'll have enough electricity for a fluid bed roaster so it might be better to go for a drum roaster. I found an inexpensive older used Kaldi for sale and I'm going to try to get that so I can see what it's like. Part of the reason I'd build is I want to go to remote locations where I might not be able to easily get a roaster mailed back and forth for repair. Being able to fix it myself and/or it being robustly built would a be a good thing. The FreshRoast is nice but it definitely does not feel robust and requires some care to avoid damaging it (glass roast chamber loosely attaches to base, plastic top chaff collector that can easily crack if dropped, etc). After mulling over your answer Over the counter purchase that meets your needs is the Behmor 1600 The DIY version that I recommend is the - Turbo Oven roaster either my design or @JackH version Also have a look at the DIY roaster section again to see what takes your fancy and meets your requirements Keep us in the loop with what direction you choose KK I home roast and I like it. Designer of the KKTO
Roaster Build information https://homeroast...ad_id=1142 https://docs.goog...lide=id.i0 Blog - http://koffeekosm...gspot.com/ Bezzera Strega, Mazzer Robur Grinder, Pullman Tamper Convex, (KKTO) Turbo Oven Home Roaster. |
|
|
|
| renatoa |
Posted on 02/03/2023 2:20 AM
|
|
Administrator Posts: 3104 Joined: September 30, 2016 |
Also, as robustness and easiness of build (and repair) you could look for a flour sifter and hotgun design. Especially the wobble disk of Larry Cotton seems very appealing to me: https://homeroast...ad_id=6345 |
|
|
|
| Cymen |
Posted on 02/06/2023 4:58 PM
|
|
Newbie Posts: 12 Joined: January 13, 2023 |
I probably should have just come out and said it but what I really want is to build a roaster I can take on a long sailing trip on a sailboat. A big sailboat with solar and lithium along with diesel engines and most likely a diesel generator. Odds are, the boat will be 240v instead of 120v (in case it's not clear, I don't have the boat yet and will not for a number of years). If things go well, getting any parts shipped in would be impractical so I'd want to be able to repair it whererever we happen to be. That said, I think I'm going to build a different roaster first to get some experience because the boat is a number of years out in the future. The build I keep coming back to is oldgearhead's one here: https://www.homer...ad_id=2207 I'm interested in the ability to boost efficiency by recirculating the hot air. So I think I'll build that one. Maybe I could adapt it to 240v when the time comes. I'm probably not making super practical choices but I do really like the FreshRoast so far with the visibility into the roast chamber. I just want a more robust version of it that I could adapt to 240v and also tinker with recirculation to boost efficiency. I do like the simplicity of the flour sifter and heat gun however I would need to shield it quite a bit on a boat as typically there seems to be more wind on the water than on land. I'd have this problem anyway but the flour sifter/heat gun seems particularly prone to environment changes like that. I did consider the turbo oven. I checked local resale/thrift stores and I think they only had the Nuwave oven that doesn't get hot enough. It does seem like a good option assuming I could fine one in 240v which is not likely here (USA). I also worry that I wouldn't be able to repair it although I do understand they tend to be reliable. Even so, I still want the ability to repair it which I think comes more readily with making your own. |
|
|
|
| renatoa |
Posted on 02/07/2023 1:05 AM
|
|
Administrator Posts: 3104 Joined: September 30, 2016 |
Beware that FB roaster are the most inefficient builds as energy consumers, which you never have enough on a boat. Even with recirculation. I would rather look to a turbo oven lid design, which has its own recirculation embedded by design, and for this reason is the most efficient from all the builds I know/did. For example 300 grams using 64% of 1300W = 832 Watts. And also is a closed oven, so not affected by wind. |
|
|
|
| Cymen |
Posted on 02/07/2023 2:00 PM
|
|
Newbie Posts: 12 Joined: January 13, 2023 |
@renatoa That does make sense and is more pragmatic. I also like that these builds seem a bit simpler to do. And there are 220/240v turbo ovens so the voltage isn't a problem. I do agree that energy is almost always in short supply on a boat. I was worried about repair but I realized these units are small enough that one could always bring a full spare and hopefully that would be good enough. I'll think about this more while I get up to speed on the basics of roasting. Although that is going well in that I'm able to drink everything so far (not that all of what I roasted is to my taste). |
|
|
|
| Koffee Kosmo |
Posted on 02/08/2023 7:15 AM
|
|
Administrator Posts: 1621 Joined: December 31, 2008 |
And on the vessel ( boat) the turbo oven can double up as a heat source for food cooking that is a win win Just keep the glass bowl that comes as part of the set and if you keep the turbo oven clean you should be able to do both cooking and coffee roasting KK I home roast and I like it. Designer of the KKTO
Roaster Build information https://homeroast...ad_id=1142 https://docs.goog...lide=id.i0 Blog - http://koffeekosm...gspot.com/ Bezzera Strega, Mazzer Robur Grinder, Pullman Tamper Convex, (KKTO) Turbo Oven Home Roaster. |
|
|
|
| allenb |
Posted on 02/08/2023 1:22 PM
|
 Administrator Posts: 3869 Joined: February 23, 2010 |
Hey KK , what is your current method for heat control in your roaster? Are you able to set a power level that works for an entire roast or are you stepping the power up in a couple of steps and having to back it off at first crack?
1/2 lb and 1 lb drum, Siemens Sirocco fluidbed, presspot, chemex, cajun biggin brewer from the backwoods of Louisiana
|
|
|
|
| Koffee Kosmo |
Posted on 02/08/2023 3:52 PM
|
|
Administrator Posts: 1621 Joined: December 31, 2008 |
Quote allenb wrote: Hey KK , what is your current method for heat control in your roaster? Are you able to set a power level that works for an entire roast or are you stepping the power up in a couple of steps and having to back it off at first crack? Because I currently do 1 kg roasts, then some modifications are required The turbo oven defuser plate is removed or cut away 90% of it Also alter the thermostat plate so the oven does not cycle on and off during roast - so it’s continually on The method is to preheat at full heat capacity Drop in beans - wait for first crack at around 12 minutes At this point it only takes approximately 2 minutes to second crack So I actually remove the turbo oven after 1 minute and let it cruise to second crack under the beans own heat Then cool Depending on the country the beans are grown and hardness of the beans, those times may have appropriately 30 seconds difference on either side KK I home roast and I like it. Designer of the KKTO
Roaster Build information https://homeroast...ad_id=1142 https://docs.goog...lide=id.i0 Blog - http://koffeekosm...gspot.com/ Bezzera Strega, Mazzer Robur Grinder, Pullman Tamper Convex, (KKTO) Turbo Oven Home Roaster. |
|
|
|
| allenb |
Posted on 02/09/2023 7:42 AM
|
|
Administrator Posts: 3869 Joined: February 23, 2010 |
Can you clarify the change to the diffuser plate? Is that the metal ring surrounding the blower and heater? I’m going to be continuing experimenting with my turbo roaster in the next couple of weeks. I would like to try finding a low enough power level using a variac that would allow me to use one power setting for the entire roast as you are able to do.
1/2 lb and 1 lb drum, Siemens Sirocco fluidbed, presspot, chemex, cajun biggin brewer from the backwoods of Louisiana
|
|
|
|
| renatoa |
Posted on 02/09/2023 8:36 AM
|
|
Administrator Posts: 3104 Joined: September 30, 2016 |
He means something as in the attached image. A round cut to reveal completely the turbine, for full unobstructed airflow, and no chaff clogging, and leave only one inch ring for lamp protection. A single level power roast, other than maximum power, I am afraid would be far from ideal. You have attached a typical roast of mine, with power control steps generated by TC4ESP, based on some algorithm. Somewhat unattended until approaching development. The start power is 32%, used for preheat somewhere in the 180C ballpark, the maximum power (around DE) is about 66%, then lowered to 58% in the FC-development phase. Probably a two steps approach could work. I mean start with 32%, TP around 1 minute, soak 1 minute, set to 48% at minute 2, then 64% at minute 3, and keep there to the end. But a single level start to end... 
renatoa attached the following images:
Edited by renatoa on 02/09/2023 9:18 AM |
|
|
|
| renatoa |
Posted on 02/09/2023 9:20 AM
|
|
Administrator Posts: 3104 Joined: September 30, 2016 |
If you want a setup without any electronics around, and an (almost) unattended roast, I think this can be done reasonable with the lid thermostat and the diode trick. It's about a diode that cut the power to half in the dry phase, helping to prevent roasting defects due to full power at charge. Then, at a moment, about dry end, you switch the diode in the thermostat circuit. Will have both a limit of the temperature to 235-250C, according to desired roast, and also smoothing the power transitions, because the full on-off regime will be replaced by a milder 50%-100% switching. |
|
|
|
| allenb |
Posted on 02/09/2023 2:01 PM
|
|
Administrator Posts: 3869 Joined: February 23, 2010 |
I went back and reconsidered the mode of heat transfer with a turbo being to a large degree, radiant, which if left at full throttle will cause a much higher rate of rise when beans darken and would have the potential for 1st crack to wiz by The removal of the front baffle/screen makes sense and I had to do this early on as it collected chaff. 1/2 lb and 1 lb drum, Siemens Sirocco fluidbed, presspot, chemex, cajun biggin brewer from the backwoods of Louisiana
|
|
|
|
| renatoa |
Posted on 02/10/2023 3:20 AM
|
|
Administrator Posts: 3104 Joined: September 30, 2016 |
If the shield is left as a ring of same size as the lamp, wide enough to block the direct IR beam to beans, then the radiation component is balanced enough with convection, imo. I would not advise for total removal. |
|
|
|
| Koffee Kosmo |
Posted on 02/10/2023 5:07 AM
|
|
Administrator Posts: 1621 Joined: December 31, 2008 |
Quote renatoa wrote: He means something as in the attached image. A round cut to reveal completely the turbine, for full unobstructed airflow, and no chaff clogging, and leave only one inch ring for lamp protection. A single level power roast, other than maximum power, I am afraid would be far from ideal. You have attached a typical roast of mine, with power control steps generated by TC4ESP, based on some algorithm. Somewhat unattended until approaching development. The start power is 32%, used for preheat somewhere in the 180C ballpark, the maximum power (around DE) is about 66%, then lowered to 58% in the FC-development phase. Probably a two steps approach could work. I mean start with 32%, TP around 1 minute, soak 1 minute, set to 48% at minute 2, then 64% at minute 3, and keep there to the end. But a single level start to end... That is exactly “as in the photo” of how I have cut away the defuser plate KK I home roast and I like it. Designer of the KKTO
Roaster Build information https://homeroast...ad_id=1142 https://docs.goog...lide=id.i0 Blog - http://koffeekosm...gspot.com/ Bezzera Strega, Mazzer Robur Grinder, Pullman Tamper Convex, (KKTO) Turbo Oven Home Roaster. |
|
|
|
| jwmelvin |
Posted on 02/10/2023 12:51 PM
|
|
Newbie Posts: 10 Joined: December 21, 2022 |
Quote I went back and reconsidered the mode of heat transfer with a turbo being to a large degree, radiant, which if left at full throttle will cause a much higher rate of rise when beans darken and would have the potential for 1st crack to wiz by. I just want to thank you for pointing this out. I roast in a modified Behmor (Artisan controlling heat and fan), and this understanding of how radiant heat transfer changes when beans darken seems important to understanding why one has to cut the power so much towards the end of the roast. It may be a big part of why the Behmor can be difficult to make predictable, but I think that with emissivity in mind, I may get better results going forward. |
|
|
|
| renatoa |
Posted on 02/10/2023 1:05 PM
|
|
Administrator Posts: 3104 Joined: September 30, 2016 |
Not exactly cut at all... just lower... the problem with radiant heat is that you don't know exactly how much ! Is hard to measure a radiant, you rather observe its effects... and sometimes is too late |
|
|
|
| allenb |
Posted on 02/10/2023 6:42 PM
|
|
Administrator Posts: 3869 Joined: February 23, 2010 |
Quote jwmelvin wrote: Quote I went back and reconsidered the mode of heat transfer with a turbo being to a large degree, radiant, which if left at full throttle will cause a much higher rate of rise when beans darken and would have the potential for 1st crack to wiz by. I just want to thank you for pointing this out. I roast in a modified Behmor (Artisan controlling heat and fan), and this understanding of how radiant heat transfer changes when beans darken seems important to understanding why one has to cut the power so much towards the end of the roast. It may be a big part of why the Behmor can be difficult to make predictable, but I think that with emissivity in mind, I may get better results going forward. Yes, the big change in absorptivity going from green to brown unfortunately creates the inverse of what would be desirable. Would be much better to have the ability to jump start the roast with a high rate of rise during the first 3 minutes and taper off through the roast. As renatoa mentioned, hard to measure an infrared elements energy transfer since power in watts does not determine energy absorbed. 1/2 lb and 1 lb drum, Siemens Sirocco fluidbed, presspot, chemex, cajun biggin brewer from the backwoods of Louisiana
|
|
|
|
| allenb |
Posted on 02/10/2023 6:53 PM
|
|
Administrator Posts: 3869 Joined: February 23, 2010 |
Quote Koffee Kosmo wrote: Quote renatoa wrote: He means something as in the attached image. A round cut to reveal completely the turbine, for full unobstructed airflow, and no chaff clogging, and leave only one inch ring for lamp protection. A single level power roast, other than maximum power, I am afraid would be far from ideal. You have attached a typical roast of mine, with power control steps generated by TC4ESP, based on some algorithm. Somewhat unattended until approaching development. The start power is 32%, used for preheat somewhere in the 180C ballpark, the maximum power (around DE) is about 66%, then lowered to 58% in the FC-development phase. Probably a two steps approach could work. I mean start with 32%, TP around 1 minute, soak 1 minute, set to 48% at minute 2, then 64% at minute 3, and keep there to the end. But a single level start to end... That is exactly “as in the photo” of how I have cut away the defuser plate KK I’m glad I was able to view this photo. My turbo head baffle does not obstruct any of the IR emission from the halogen lamp so I will need to add a baffle. To be clear, I should leave a small portion of the lamp unobstructed? 1/2 lb and 1 lb drum, Siemens Sirocco fluidbed, presspot, chemex, cajun biggin brewer from the backwoods of Louisiana
|
|
|
|
| Koffee Kosmo |
Posted on 02/10/2023 7:27 PM
|
|
Administrator Posts: 1621 Joined: December 31, 2008 |
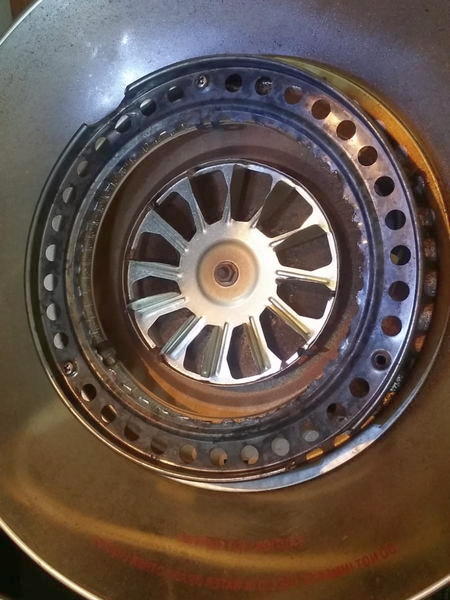
This is a photo of my TO diffuser plate mod [img]  [/img] [/img]
I home roast and I like it. Designer of the KKTO
Roaster Build information https://homeroast...ad_id=1142 https://docs.goog...lide=id.i0 Blog - http://koffeekosm...gspot.com/ Bezzera Strega, Mazzer Robur Grinder, Pullman Tamper Convex, (KKTO) Turbo Oven Home Roaster. |
|
|
|
| allenb |
Posted on 02/10/2023 7:47 PM
|
|
Administrator Posts: 3869 Joined: February 23, 2010 |
So all directly downward radiant energy is unimpeded so most IR is making it to the coffee ?
1/2 lb and 1 lb drum, Siemens Sirocco fluidbed, presspot, chemex, cajun biggin brewer from the backwoods of Louisiana
|
|
|
|
| renatoa |
Posted on 02/11/2023 3:36 AM
|
|
Administrator Posts: 3104 Joined: September 30, 2016 |
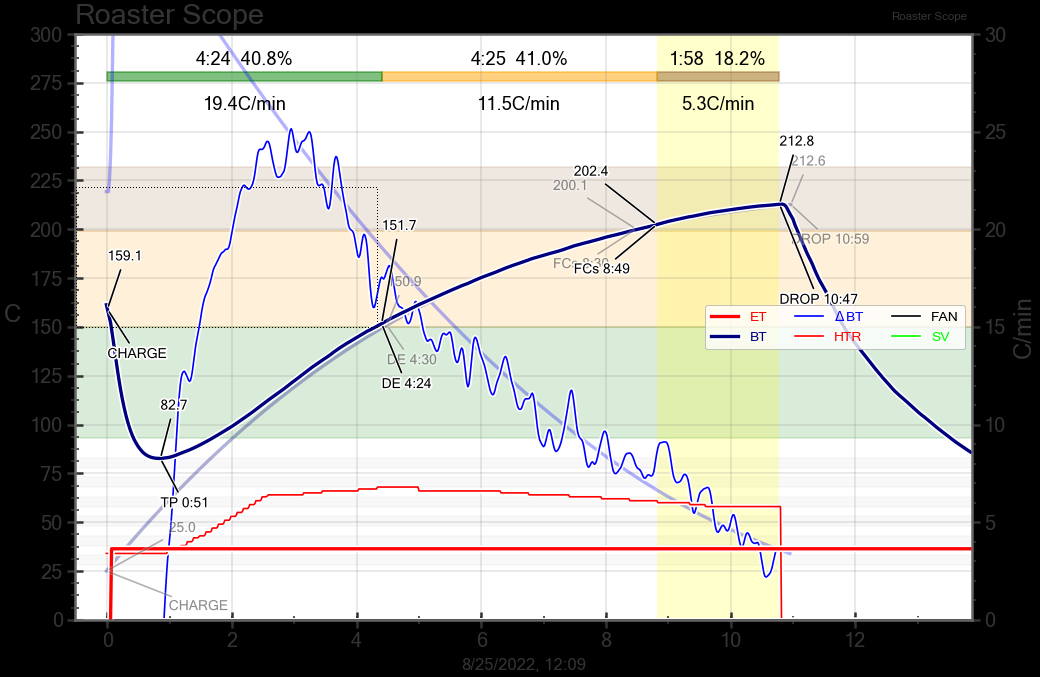
Is a matter of how wide you cut the remaining ring. Start with a first cut having the turbine diameter, and see how you like it. When I did this first attempt I didn't noticed any change in roast progress, it was still majoritary convective, as with uncut screen, very little IR effect. Could roast to the end without heat reduction before FC, but power level required was bigger, about 5-10% more power needed for same roasting time. The only gain was no chaff accumulating in the center of screen. This could be of interest for your intended roast style, keeping power constant as much as possible. Attached is a roast from that time, using the smallest cut screen, temperature is ET, not BT, and RoR the same. Notice the constant power to the end, the lower red line.
renatoa attached the following image:

Edited by renatoa on 02/11/2023 3:45 AM |
|
|
|
| Koffee Kosmo |
Posted on 02/11/2023 11:56 PM
|
|
Administrator Posts: 1621 Joined: December 31, 2008 |
Quote allenb wrote: So all directly downward radiant energy is unimpeded so most IR is making it to the coffee ? I have found it to be the best option - based on trial and error I started off with drilling holes with a hole saw and then progressively went all the way to what you see in the photo above So just use that fold depression in the metal as a line guide and cut the centre away for best results KK
Koffee Kosmo attached the following image:

I home roast and I like it. Designer of the KKTO
Roaster Build information https://homeroast...ad_id=1142 https://docs.goog...lide=id.i0 Blog - http://koffeekosm...gspot.com/ Bezzera Strega, Mazzer Robur Grinder, Pullman Tamper Convex, (KKTO) Turbo Oven Home Roaster. |
|
|
|

| Jump to Forum: |
Powered by PHP-Fusion Copyright © 2024 PHP-Fusion Inc
Released as free software without warranties under GNU Affero GPL v3
Designed with ♥ by NetriXHosted by skpacman