
Login

Shoutbox
You must login to post a message.
renatoa
07/26/2024 3:49 PM
Bill grubbe and Jk, 
allenb
07/26/2024 5:15 AM
Spiderkw Welcome to HRO!

renatoa
07/24/2024 8:31 AM
ramiroflores and John123,

 ?
?
?renatoa
07/21/2024 1:18 AM
 , Luislobo
renatoa
07/19/2024 11:28 AM
Koepea,
Forum Threads
Newest Threads
Skywalker roaster modsBackground Roast Iss...
Hello from Arkansas
TC4ESP
Green coffee reviews
Hottest Threads
| Skywalker roaster... | [376] |
| TC4ESP | [115] |
| War on Farmers by... | [47] |
| Adventures in flu... | [26] |
| Hello! (soon) Roa... | [17] |
In Memory Of Ginny

Donations
Latest Donations
dmccallum - 10.00
JackH - 25.00
snwcmpr - 10.00
Anonymous - 2.00
Anonymous - 5.00
dmccallum - 10.00
JackH - 25.00
snwcmpr - 10.00
Anonymous - 2.00
Anonymous - 5.00
Users Online
Guests Online: 3
Members Online: 0
Total Members: 8,394
Newest Member: Bill grubbe
Members Online: 0
Total Members: 8,394
Newest Member: Bill grubbe
View Thread
Who is here? 1 guest(s)
 Skywalker, the ALM chinese one pound roaster
|
|
| Mike_Mathis |
Posted on 12/12/2023 1:30 PM
|
|
1/4 Pounder  Posts: 125 Joined: August 06, 2019 |
Fascinating! It appears they have reinvented the coffee roasting wheel.......or somebody has.
*Kaffelogic Nano 7
*Skywalker V1 *2023 BC-2 |
|
|
|
| renatoa |
Posted on 12/12/2023 1:46 PM
|
|
Administrator Posts: 3104 Joined: September 30, 2016 |
Their main credit is to make this roaster affordable. NIR roasting exists for long time, and very similar designs are on Aliexpress for many years (at least 5 years models I am following), but at triple price. An example: https://vi.aliexp...13031.html Edited by renatoa on 12/13/2023 2:35 AM |
|
|
|
| Lostx403 |
Posted on 12/12/2023 2:39 PM
|
|
Newbie  Posts: 17 Joined: December 07, 2023 |
That's one of the reasons I'm interested and excited to test out this roaster, the affordability factor of the unit is very alluring, home roasting is a bit of a niche market and once you get past the air popper/roasting options the price shoots up significantly... $1k+ I have several friends that all want to get into roasting but the price scares everyone away. This unit being sub-$500 and does a decent quantity per roast is very attractive. Looking forward to comparing results to my Sandbox R1, I was looking at moving to a Kaleido M10 but if the Skywalker produces decent results I may just roll with it for a good while. |
|
|
|
| Mike_Mathis |
Posted on 12/12/2023 4:22 PM
|
|
1/4 Pounder Posts: 125 Joined: August 06, 2019 |
renatoa, obviously you have been keeping up with coffee roasting tech much longer than I have. Do you believe you guys will be able to make this roaster work with alternative controls? From what I am reading, it will probably be outside my reach. I'll probably have to rely on it working as is, which is ok because that's what I signed up for. I'm fascinated by how you guys can pick apart the control logic on this unit.
*Kaffelogic Nano 7
*Skywalker V1 *2023 BC-2 |
|
|
|
| renatoa |
Posted on 12/13/2023 4:55 AM
|
|
Administrator Posts: 3104 Joined: September 30, 2016 |
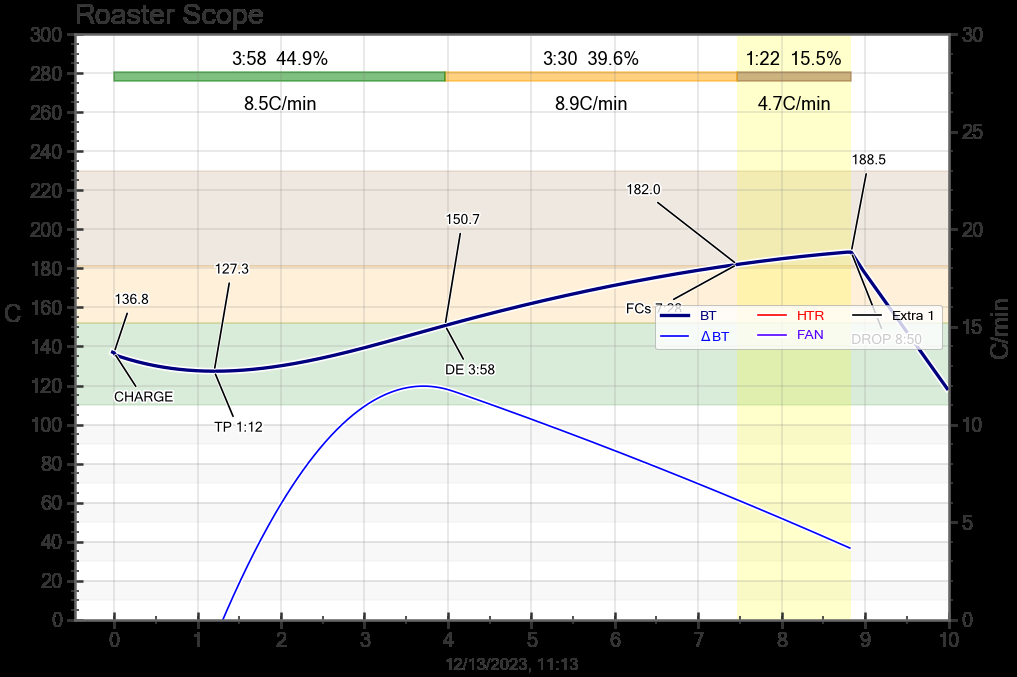
The more I use it, the more I am convinced about the lack of usefulness of a tethered roast, other than ... - logging and archiving for post roast analysis. - Or automatically detect and tag roast event: charge, TP and drop. - Or handsfree playback of a previous roast. For any or all of the above, yes, worth replacement of electronics. But definitely not for driving the machine in real time with the eyes in a screen. Attached is a graph of one of my manual roasts, plotted based on hand written roasting notes. It is completely atypical, you can't reproduce it with other home machine, and vice-versa, you can't reproduce with Skywalker a roast from the "outside" world. At start side, the TP is unusual high, in the 120-130 C ballpark, compared with 100C ballpark for other machines. At end side, the FC is unusual low, in the 180 C ballpark, compared with 200C the "normal". These two milestones results in an unusually small temperature swing for a Skywalker profile, about 60C degrees, that led also to an unusual RoR profile, as average and range/evolution. Average RoR during drying is also unusual, we are used with averages double than the browning RoR... now they are equal. So, one of the main purposes of tethering roast, sharing a profile with other fellows, or trying to reproduce a profile of other roast... both becomes without meaning, at least until Skywalker become dominant machine in home roasting 
renatoa attached the following image:
|
|
|
|
| Mike_Mathis |
Posted on 12/13/2023 8:28 AM
|
|
1/4 Pounder Posts: 125 Joined: August 06, 2019 |
I hope you let us know how this roast transfers to the cup. I don't know how much post-roast smoothing you have in Artisan, but even though the numbers are strange, the ROR curve is impressive. Considering you were on manual you made some really good adjustments.
*Kaffelogic Nano 7
*Skywalker V1 *2023 BC-2 |
|
|
|
| renatoa |
Posted on 12/13/2023 10:57 AM
|
|
Administrator Posts: 3104 Joined: September 30, 2016 |
My credit is minimal in the drawing of profile above. All I did was to input some numbers, and Artisan did the rest. It looks so nice because is done in designer mode, using only one point per minute, the dots being connected with lines resulting from math interpolation formulas (Bezier probably). It is not a plot of a real time process, where data comes in a stream with a reading per second, and having a lot of real world noise. The adjustments also were minimal, the curve is actual coming from the machine natural behavior. You can inspect the heater/fan changes and roast data used to draw this profile, they are posted previous page, #45 Edited by renatoa on 12/13/2023 11:06 AM |
|
|
|
| renatoa |
Posted on 12/13/2023 1:17 PM
|
|
Administrator Posts: 3104 Joined: September 30, 2016 |
Last minute finding... what it seems to be a design issue. Hard to see/notice chaff accumulation under the drum, in the front left bottom corner, close to left side of drop door. Probably there is an air vortex in that place, that favor this accumulation. Especially when we see how clean is the neighborhood... without any special care from my part. Picture taken through the chaff tray opening, very low position. It's the first time I find a good use for the provided brush. Some touches and the chaff is gone, but... I am pretty sure that corner will catch chaff again, so... ideas for a permanent fix ?
renatoa attached the following image:
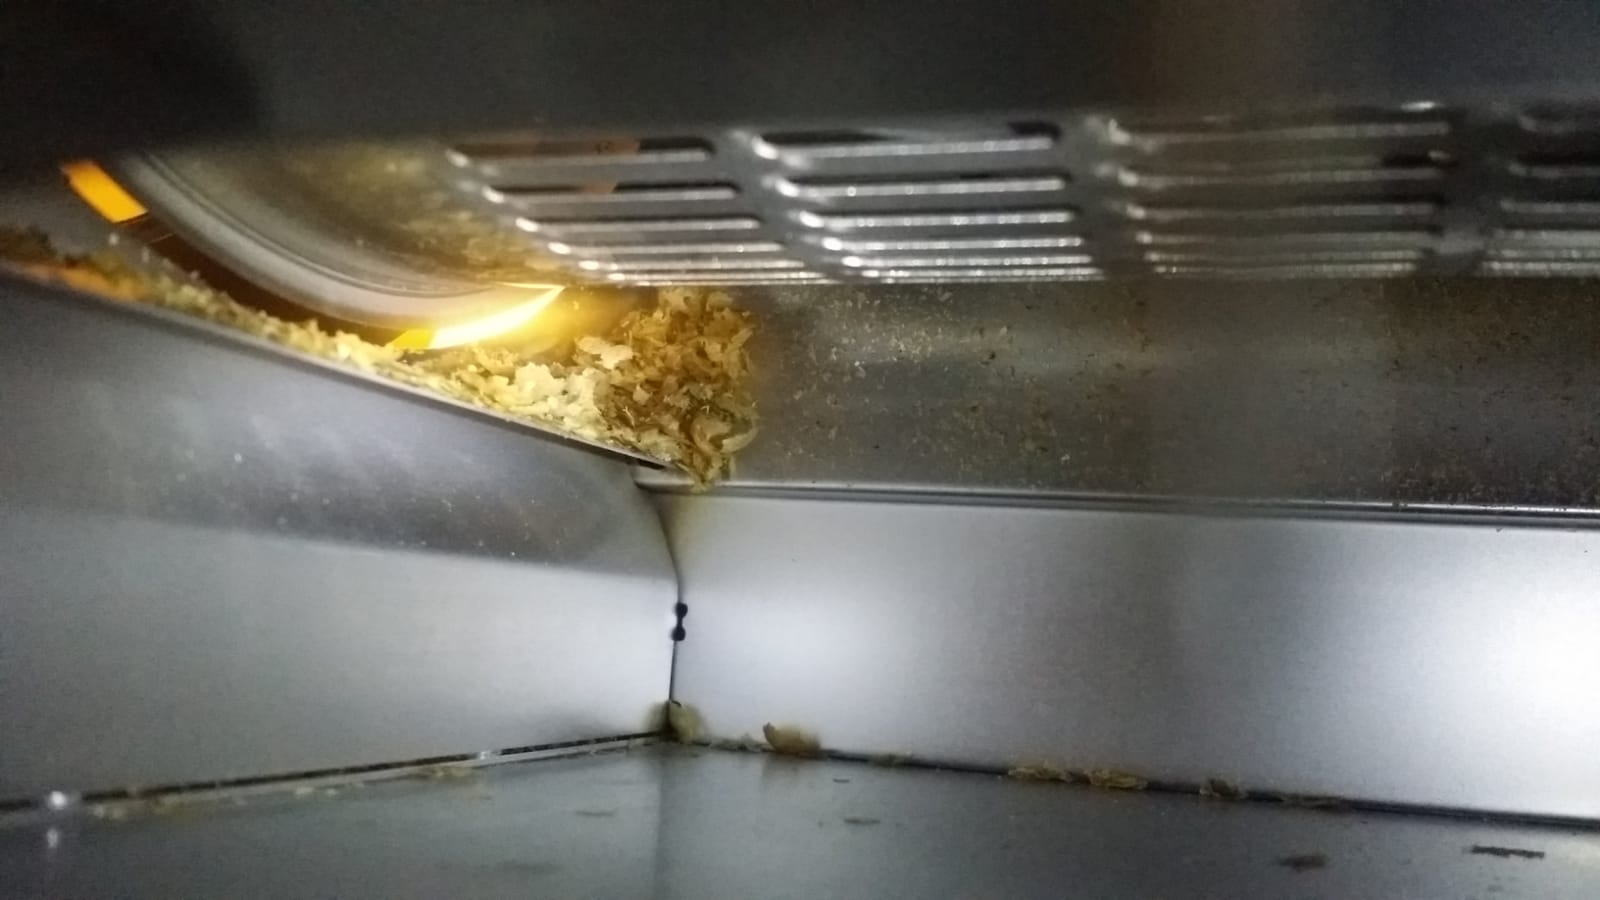
Edited by renatoa on 12/13/2023 1:27 PM |
|
|
|
| HarryDog |
Posted on 12/13/2023 4:51 PM
|
 1/2 Pounder  Posts: 349 Joined: July 20, 2022 |
I saw it on my first clean, looked in to see what I could see. Tack in a small corner gusset big enough so nothing can sit on the ledge. Might still get the odd flake? I don't have a welder but might be time. |
|
|
|
| renatoa |
Posted on 12/14/2023 2:52 AM
|
|
Administrator Posts: 3104 Joined: September 30, 2016 |
I plan first patch that corner with Aluminium tape, welding is too much job for this small issue. |
|
|
|
| HarryDog |
Posted on 12/14/2023 7:32 AM
|
|
1/2 Pounder Posts: 349 Joined: July 20, 2022 |
Quote Not sure how long the tape will last but good for testing, I have not checked the temp in that area but it might not be bad, can check with an IR gun next roast and see. What about using high temp silicone and a piece of metal? I have used the silicone on the outside of my FB but not on the inside? |
|
|
|
| renatoa |
Posted on 12/14/2023 8:15 AM
|
|
Administrator Posts: 3104 Joined: September 30, 2016 |
Resuming the usability series posts, today about the roast itself. Will start with preheat... as already stated is not PID, so you should experience over/under shoots, the normal behavior of on-off control. Oscillations having at least 5 C degrees amplitude, over and under. This is also due to the lack of airflow during preheat, which is not a good idea, combined with 100% heater could shorten the lamp life. In manual mode you can reduce these oscillations by lowering power to the roast start level and adding airflow, when the preheat setpoint is approaching, about 20-30C degrees below. For example, 65% Heater and 65% air would reduce the over/under shoot to 2 degrees. In manual mode you should anyway set the start power and airflow before charging beans, but it's a good idea to dial about 50% airflow immediately after starting preheat, and even more, reduce the heat to about 80%, for the heater lamp health. The most annoying issue I've had with the preheat is the lack of a cancel function. The only way to cancel the roast is to stop machine, leaving it hot inside, which is not desirable. Powering on again and dialing 100% airflow until cools down to some... 60C... is not the obvious routine that might come to the mind of a newbie to such a machine. Beware, is the airflow that is cooling the oven, not the cooling beans tray function, they are completely separate compartments ! So refrain pressing C button when you want cool the roaster itself, not the beans! |
|
|
|
| renatoa |
Posted on 12/14/2023 9:06 AM
|
|
Administrator Posts: 3104 Joined: September 30, 2016 |
About the roast itself there there's not much to say, other than it's already in the manual. Will highlight only those not mentioned. The RoR function, that attracted me at first sight as a main feature for this roaster, was a huge deception, given the way it is implemented... computed only per minute intervals of time... so it could barely be considered an information of interest, almost useless to drive the roast process. A detail not mentioned in the manual, RoR is displayed also in Auto modes, not only in Manual mode. In Auto the profile number is alternating with RoR every some seconds. About the bright sides... a huge feature, that I can't praise enough. Even it is not hidden, is clearly mentioned in the manual, but even at second read I wasn't aware how useful could be this feature in Manual mode, to assist the roaster in development phase for the drop moment. Is about these paragraphs in the manual: Quote • Heater will stop working when the temperature reach to 230°C. • User also can set the temperature to dropping beans by single press "+", "-"of Temperature. The usefulness of this feature might not be so obvious at first reading due to the manual wording. Short story, is about a way to automatically drop heater at a preset temperature, which could improve the precision and repeatability of your roasts. Long story, when in Manual mode, any moment after starting roast, if you press +/- under Temperature display will see 230 (for Celsius). This is a preset maximum temperature when the roaster stops if you forget about roasting, or you are unable to operate the machine. As a side note, this value is enormous high... not so much above 200 C there is already charcoal in this machine, if looking at my roasts that were always dropped under 194C. I don't plan to experiment, but I am afraid that at 230C there is already risk of fire. Ok, this 230 C temperature can be lowered any moment to a new value, that become the new automatic heater down, and end of the roast. When reaching the new set value, the beeper will buzz two times, and R button LED start flashing, signaling the end of roast. The timer will stop counting. Big warning! This automation will not open the drop door for you, nor pull the cooling beans tray! You must still be there physically present, and do these operations as quickly as you can. Then press C for cooling.How much to set this new temperature threshold? Table 2 at page 11 in the manual could give you some hints. Just experiment, starting with values corresponding to your desired roast level. In my case, I drop the value to 200C immediately after starting the roast, then, after I hear the first cracks, in the 181-182C ballpark, I set the drop temperature 10C degrees higher, and see how it works. According to the table, 9-12 degrees is the range of light roasts. That's all folks... not sure if there is much more to tell about this machine... if I forgot something just ask. |
|
|
|
| Robotic Kitten |
Posted on 12/14/2023 5:33 PM
|
|
Newbie Posts: 24 Joined: December 04, 2023 |
Ordered mine at the end of November. Apparently the seller ran out of stock and is waiting for new arrival. Hopefully would ship by the end of this year. |
|
|
|
| Mike_Mathis |
Posted on 12/14/2023 8:36 PM
|
|
1/4 Pounder Posts: 125 Joined: August 06, 2019 |
I ordered mine on Nov 28th and the website states shipped. It also states delivery by Dec 9th. It also states current location in mainland China. I know #2 isn't true. I believe #3. Hey renatoa, do you happen to know how much the bean probe extends into the roast chamber? *Kaffelogic Nano 7
*Skywalker V1 *2023 BC-2 |
|
|
|
| renatoa |
Posted on 12/15/2023 3:09 AM
|
|
Administrator Posts: 3104 Joined: September 30, 2016 |
About 4-5 cm, will measure exactly next time when opening to fix that corner accumulating chaff issue. |
|
|
|
| Mike_Mathis |
Posted on 12/15/2023 11:18 AM
|
|
1/4 Pounder Posts: 125 Joined: August 06, 2019 |
On the corner chaff collecting issue, I wonder if a properly formed piece of thin gauge SS and J-B Weld might suffice. J-B is amazing stuff. The basic epoxy putty states good for 550°F. There are other varieties for hi-heat. Edit: I took care of this issue with a handheld, rechargeable, battery-powered blower. It cleans everything out. Edited by Mike_Mathis on 01/21/2024 11:40 PM *Kaffelogic Nano 7
*Skywalker V1 *2023 BC-2 |
|
|
|
| HarryDog |
Posted on 12/16/2023 8:43 AM
|
|
1/2 Pounder Posts: 349 Joined: July 20, 2022 |
I was getting a strange clunk every once in awhile, thought it might be tin expanding or the back plate flexing so I pulled the top exit chamber off, I found two things, the fan makes a clunking noise as I spin it and chaff is getting out the exit getting stopped by the exit screen. I'm using the exhaust pipe so removing it every 4-5 roasts and using a vacuum to suck up and out the chaff might be a good idea. Might cause air flow issues as it builds up. Does everyone's fan make this clunking noise? |
|
|
|
| sloppyjosh |
Posted on 12/17/2023 1:14 PM
|
|
Newbie Posts: 30 Joined: December 01, 2023 |
Quote HarryDog wrote: I was getting a strange clunk every once in awhile, thought it might be tin expanding or the back plate flexing so I pulled the top exit chamber off, I found two things, the fan makes a clunking noise as I spin it and chaff is getting out the exit getting stopped by the exit screen. I'm using the exhaust pipe so removing it every 4-5 roasts and using a vacuum to suck up and out the chaff might be a good idea. Might cause air flow issues as it builds up. Does everyone's fan make this clunking noise? My fan did. If you remove the cover from it then there should be 2 screws in the middle of it. One of those was loose on mine. The clunk went away after I tightened it. |
|
|
|
| renatoa |
Posted on 12/17/2023 2:21 PM
|
|
Administrator Posts: 3104 Joined: September 30, 2016 |
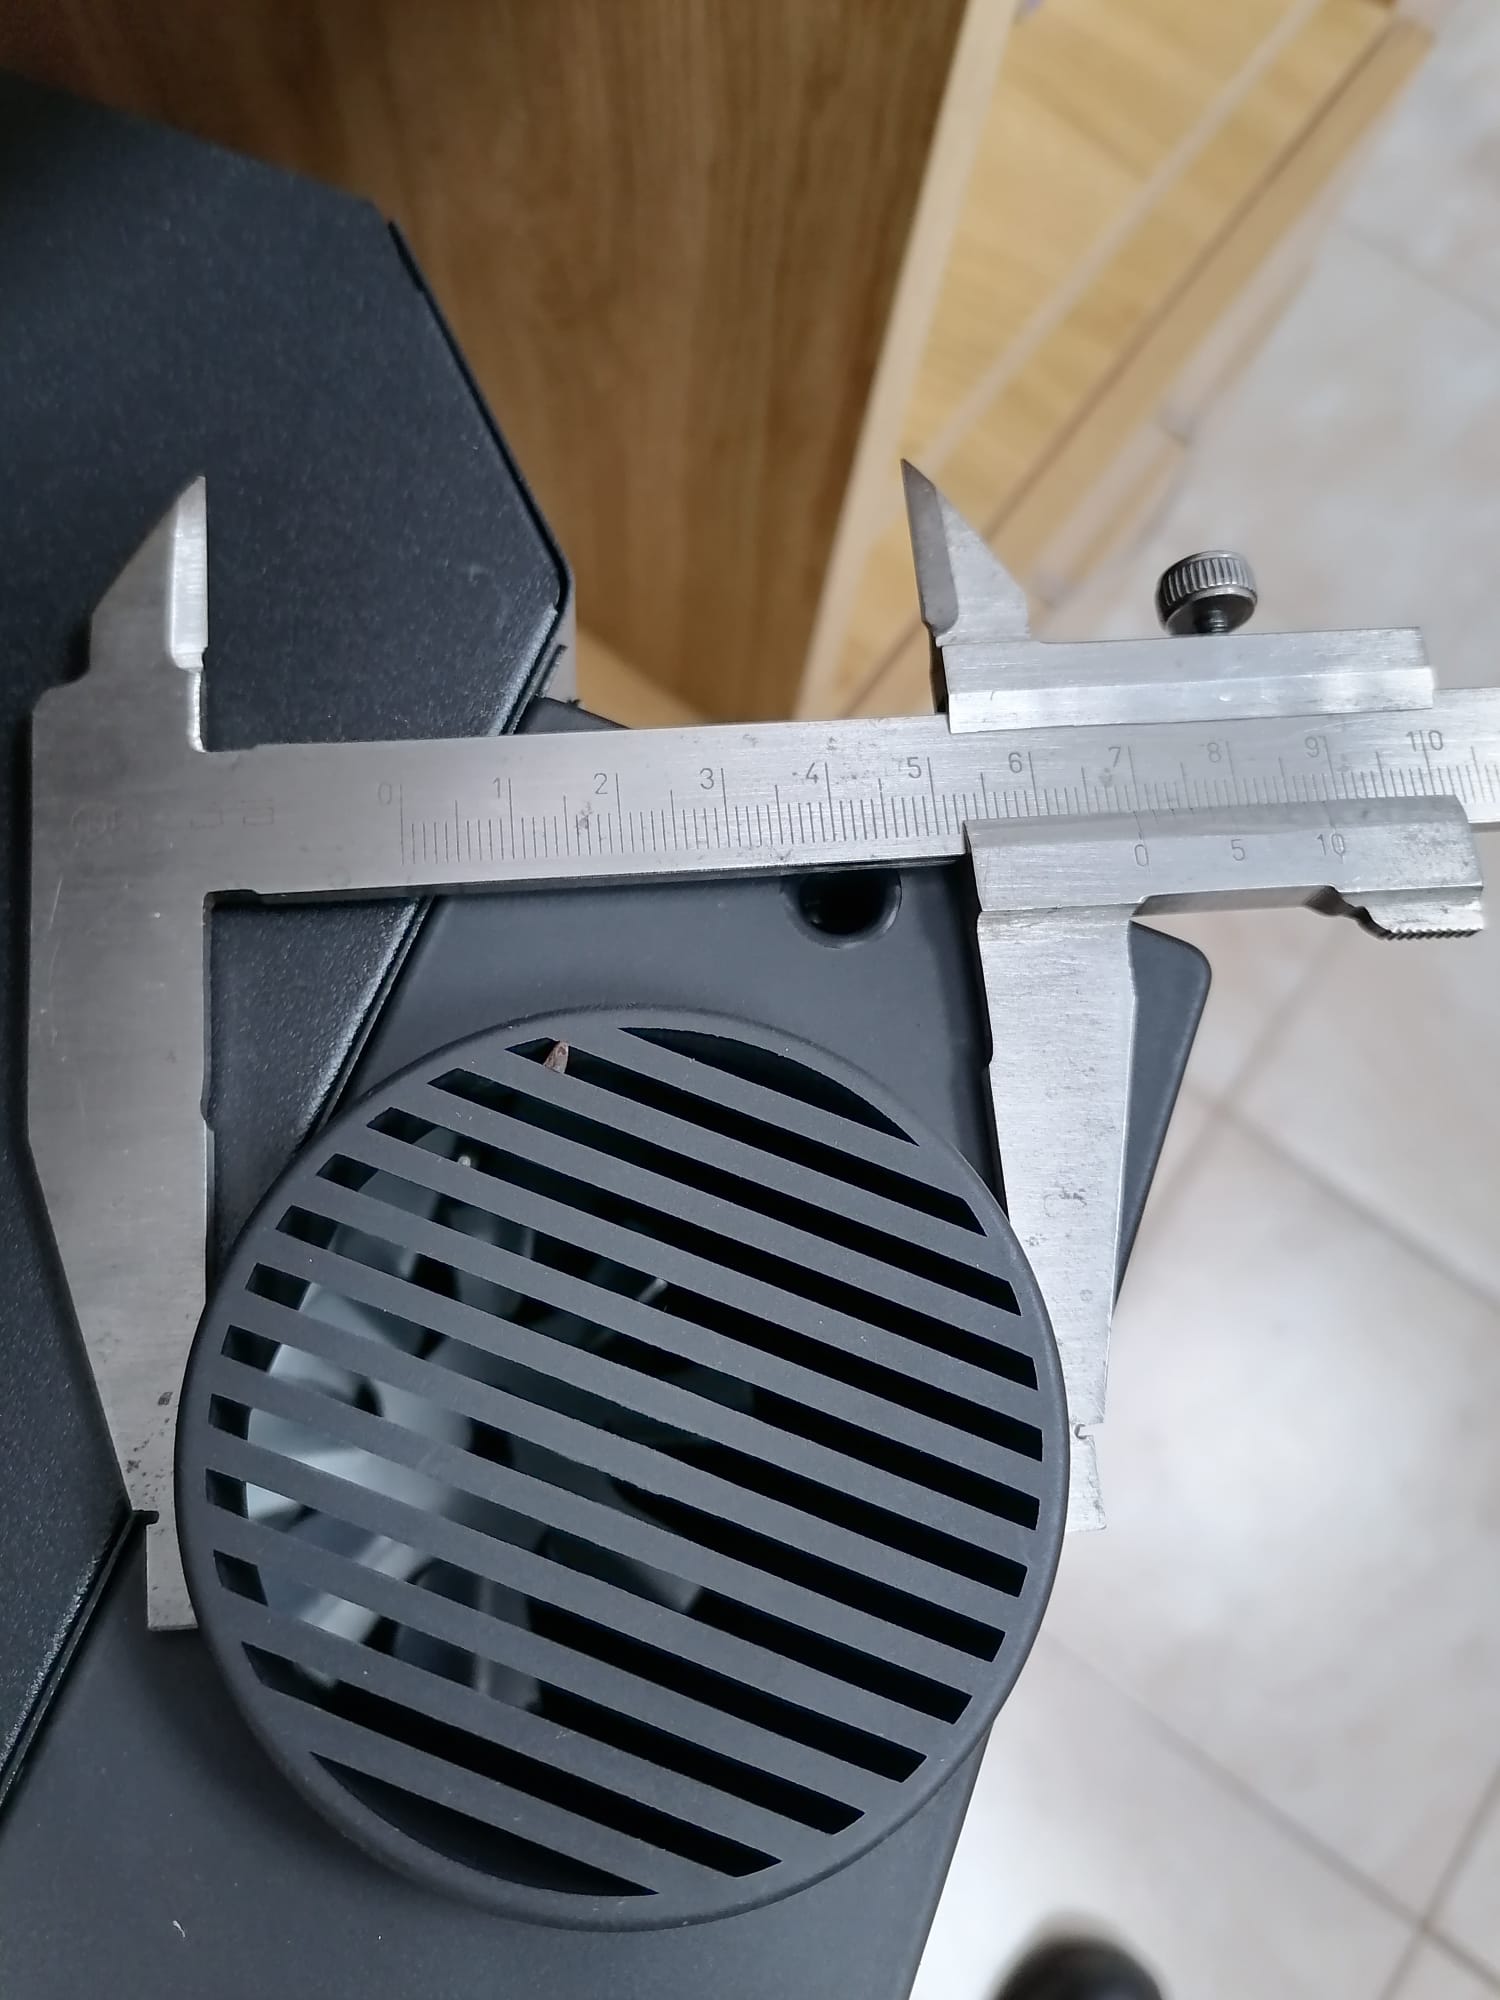
Two units bought by fellows in my community arrived with the fan turbine fallen off the shaft, due to transportation maybe... It seems the turbine mount system is very unreliable... 
renatoa attached the following image:
|
|
|
|
| HarryDog |
Posted on 12/17/2023 2:55 PM
|
|
1/2 Pounder Posts: 349 Joined: July 20, 2022 |
Thanks guys, it was a loose screw, just a tiny bit and after tightening I can spin the fan without any noise. I should have put a screwdriver on it to make sure they were tight. I put a small dab of high temp silicone in hopes of keeping them tight or keep them from coming right out. Will see but I think this might be the noise during roasts as well. |
|
|
|
| renatoa |
Posted on 12/18/2023 3:48 AM
|
|
Administrator Posts: 3104 Joined: September 30, 2016 |
Me too had a noise from the motor coupling to the drum flange. Between them was a steel clip, a kind of elastic coupling, which made a periodic clang-clang noise when the drum rotated. Replaced with a plastic piece and the noise stopped. |
|
|
|
| renatoa |
Posted on 12/18/2023 10:52 AM
|
|
Administrator Posts: 3104 Joined: September 30, 2016 |
Quote allenb wrote: Quote 750W (75%) is indeed too much for half pound. It's unfortunate that the temperature sensing during the first 2 minutes is reading higher than actual. Not sure how far off it is but even with 1500 watts of IR only heat input with 1/2 lb charge, BT will be nowhere near the mid 200's F (130 C) at 1 min into the roast. While it's ok to use "relative" temperature readings to guide a roast, getting the initial first 2 minutes right in regards to that first big hit of heat at charge, then quickly tapering off, will be impossible to finesse with any accuracy with the current setup. As we all know, with IR as the sole source of heat, there needs to be a very high power level at start due to the low IR absorption rate with the coffee's green surface color then, backing way down as they brown. Any thoughts on how BT sensing could be improved? I plan to approach charge different than it's now. The preheat logic pulses on-off 100% around the preheat set value. When we charge, even the lamp is off, the temperature drops by about 5 degrees just due the simple fact we removed the entrance door... enough for the preheat logic to push up the heat at 100%. This last until we press R twise, to start roast timer. I see the problem in the fact that high temperature is applied straight at charge moment... Why not approach classical the preheat of this machine by reducing the power according to desired temperature level, instead relying on the control panel on-off logic? As I already wrote, 40% heater with 65% fan is good for 178-179 C, continuous regime. Probably if we try operating this machine as a drum roaster, i.e. preheat with low power, let soak some time, then power up to 60-70% according to the profile requirements, would lower the TP significantly. Already experimented with 160C preheat, charge at 55%, and TP lowered nicely in the normal range, at 104C. Will try next roast with 40% power during charge, then 60% after TP, and let you know the results. Edited by renatoa on 12/18/2023 11:13 AM |
|
|
|
| allenb |
Posted on 12/18/2023 11:32 AM
|
 Administrator Posts: 3869 Joined: February 23, 2010 |
What I would do is first verify that you're reading mostly beans during 1 to 1.5 minutes and that it isn't a sensing anomaly with other contributors to the measurement. Have you determined BT at first sign of yellow? Should be between 151 and 160 C. This would tell you if you are getting decent accuracy during the first 3 min of the roast. If it turns out that BT during 1st phase of the roast as measured with your current sensing probe/placement is reading high, then you will not want to reduce power level at the start of the roast as you will negatively affect roast progression. I've done a lot of experimentation using various RoR at charge through yellow and one thing I've concluded is getting charge temp and RoR optimized during this stage is almost as critical as getting the development stage correct. 1/2 lb and 1 lb drum, Siemens Sirocco fluidbed, presspot, chemex, cajun biggin brewer from the backwoods of Louisiana
|
|
|
|
| renatoa |
Posted on 12/18/2023 11:49 AM
|
|
Administrator Posts: 3104 Joined: September 30, 2016 |
Yes, it's around 150C, rather under than above. I mean at 150C are visible yellow, not just a pale hue change. Sounds logical to be under 150C, if FC is at 181-182C. |
|
|
|

| Jump to Forum: |
Powered by PHP-Fusion Copyright © 2024 PHP-Fusion Inc
Released as free software without warranties under GNU Affero GPL v3
Designed with ♥ by NetriXHosted by skpacman