
Login

Shoutbox
You must login to post a message.
renatoa
07/26/2024 3:49 PM
Bill grubbe and Jk, 
allenb
07/26/2024 5:15 AM
Spiderkw Welcome to HRO!

renatoa
07/24/2024 8:31 AM
ramiroflores and John123,

 ?
?
?renatoa
07/21/2024 1:18 AM
 , Luislobo
renatoa
07/19/2024 11:28 AM
Koepea,
Forum Threads
Newest Threads
Skywalker roaster modsBackground Roast Iss...
Hello from Arkansas
TC4ESP
Green coffee reviews
Hottest Threads
| Skywalker roaster... | [375] |
| TC4ESP | [115] |
| War on Farmers by... | [47] |
| Adventures in flu... | [26] |
| Hello! (soon) Roa... | [17] |
In Memory Of Ginny

Donations
Latest Donations
dmccallum - 10.00
JackH - 25.00
snwcmpr - 10.00
Anonymous - 2.00
Anonymous - 5.00
dmccallum - 10.00
JackH - 25.00
snwcmpr - 10.00
Anonymous - 2.00
Anonymous - 5.00
Users Online
Guests Online: 7
Members Online: 0
Total Members: 8,393
Newest Member: Bill grubbe
Members Online: 0
Total Members: 8,393
Newest Member: Bill grubbe
View Thread
Who is here? 2 guest(s)
 Skywalker roaster mods
|
|
| sloppyjosh |
Posted on 12/07/2023 12:02 PM
|
|
Newbie  Posts: 30 Joined: December 01, 2023 |
I did that this morning before work. Here's what the profile looks like. My thought was just to try to hold the fan constant and adjust the heater as needed. FC on this bean was really hard to hear... Bean is Finca La Santa SMB Boquete. 250g in, 216g out. 14.5% loss. I don't know why I turned the heat up at the very end. I was actually pretty surprised to see that the temps matched up quite well once I charged and the beans hit the turn around. With the chamber empty, The skywalker probe tended to read about 15 degrees high. My probe came loose right at the end and you see that big jump, I think it got out of the bean mass and just into the air.
sloppyjosh attached the following images:

|
|
|
|
| Robotic Kitten |
Posted on 12/07/2023 7:50 PM
|
|
Newbie Posts: 24 Joined: December 04, 2023 |
Quote sloppyjosh wrote: When you sort the data by the values of either the first or second column, you can see what I mean. Consider these rows, they all have the same value for the first.. 1011 Code Download source 1011,820, 102 But now we can sort by the second row and see the same thing. All with 2nd value 29. Code Download source 309 29 410 This occurs at low temps for the first value, and high temps for the second one.. I think you are right on the money. I'd love to know if inside the roaster's controller there's a pull down resistor, but what if they are using the two taps to artificially increase the resolution? I mean the 2nd value is a 10bit ADC resolution to cover the low temperature range and when the ADC value gets too low (when temperature increases into the 2nd half -- higher range), then it switches to the 1st value? In other words, 1st tap with 10bit resolution covers the temperatures up to 200 degrees (arbitrary, as there quite an overlap between the two) and 2nd tap covers the temperatures from 200 and up for another 10bits. PS: my order was finally shipped today |
|
|
|
| sloppyjosh |
Posted on 12/08/2023 10:18 AM
|
|
Newbie Posts: 30 Joined: December 01, 2023 |
Quote Robotic Kitten wrote: Quote sloppyjosh wrote: When you sort the data by the values of either the first or second column, you can see what I mean. Consider these rows, they all have the same value for the first.. 1011 Code Download source 1011,820, 102 But now we can sort by the second row and see the same thing. All with 2nd value 29. Code Download source 309 29 410 This occurs at low temps for the first value, and high temps for the second one.. I think you are right on the money. I'd love to know if inside the roaster's controller there's a pull down resistor, but what if they are using the two taps to artificially increase the resolution? I mean the 2nd value is a 10bit ADC resolution to cover the low temperature range and when the ADC value gets too low (when temperature increases into the 2nd half -- higher range), then it switches to the 1st value? In other words, 1st tap with 10bit resolution covers the temperatures up to 200 degrees (arbitrary, as there quite an overlap between the two) and 2nd tap covers the temperatures from 200 and up for another 10bits. PS: my order was finally shipped today That's kind of what I was thinking.. and when I was manually playing around with simulating different inputs to the controller, I could see there's some value where it seemed to flip from one to the other.. the logic wasn't quite as simple as if A is > x then get temp from B.. but there was a definite shift.. I think it was somewhere in the mid 200s but I'd have to find that in my notes again to be sure. I wasn't sure if the two voltages would read differently.. or if so.. how much differently, etc.. so this morning I pulled the back off the roaster again, soldered wires to the two taps coming off the voltage dividers. I then heated the machine up to the highest temp it would let me. I measured the voltage coming off as the temps fell. .I actually recorded a video that captures the display of the controller and the measured voltage. Then I switched to the other tap and recorded a video of the same process. Hopefully I can use this to sort it out. |
|
|
|
| sloppyjosh |
Posted on 12/08/2023 8:26 PM
|
|
Newbie Posts: 30 Joined: December 01, 2023 |
Well. Unfortunately. I think I fried the ADC on the board. I was probing voltages with an oscilloscope, my probe slipped and I believe it sorted the input of the ADC to one of the transistors that switch the vent fan. I heard the quiet, all too familiar crackle. The control panel no longer reads a temp now. I've contacted the seller to see if I can buy a new logic board. Next up.. we see how well it'll work with a TC4+ |
|
|
|
| Robotic Kitten |
Posted on 12/08/2023 11:08 PM
|
|
Newbie Posts: 24 Joined: December 04, 2023 |
Quote sloppyjosh wrote: Well. Unfortunately. I think I fried the ADC on the board. I was probing voltages with an oscilloscope, my probe slipped and I believe it sorted the input of the ADC to one of the transistors that switch the vent fan. I heard the quiet, all too familiar crackle. The control panel no longer reads a temp now. I've contacted the seller to see if I can buy a new logic board. Next up.. we see how well it'll work with a TC4+ Dang it. that's unfortunate. BTW, the other reddit post have linked the manufacturer, maybe ping them too |
|
|
|
| sloppyjosh |
Posted on 12/09/2023 6:07 AM
|
|
Newbie Posts: 30 Joined: December 01, 2023 |
I already messaged the store I bought it from to see if I can buy a new logic board. I had some more time to look at it to figure out what happened. Looks like I bridged the input of the ADC to the 24V+ power supply line. Apparently, the microcontroller doesn't like this haha. |
|
|
|
| renatoa |
Posted on 12/10/2023 8:48 AM
|
|
Administrator Posts: 3104 Joined: September 30, 2016 |
Being in your shoes, instead trying to repair I would rather replace the concept. And silently I am planing this move atm for my machine, even if didn't broke anything, yet... knock in the wood  If someone want this, there are three points of insertion for a TC4 connection to the internal roaster board, the broken one: - heater triac control circuitry... to connect to OT1 of TC4 - fan mosfet control circuitry... to connect to IO3 of TC4 - decide if keeping the actual probe, or replace with a TC If interested we can investigate together the first two points in the list above. Switching to an open roasting solution would improve a lot the workflow compared to actual solution, with features that are missing now, that would streamline a lot the roasting experience: - ability to cancel a preheat - automatic charge detection and start timer without touch anything - automatic TP detection and tag - dry end and first crack real time predictions computation, for better judgment of power change moments - real time more useful RoR computation, same purpose as above - automatic drop detection and cutting heat, then start cooling, all handsfree - logging/storage and playback of last roast, or save it as a profile for future usage. PS: I forgot the bean cooling fans control... there is no support in TC4 atm for such function, but it's easy to add in the automatic drop detection module. Same for drum motor, but different logic. It should start with preheat, but stop... some time after drop, to allow all beans ejection. Edited by renatoa on 12/10/2023 11:39 AM |
|
|
|
| sloppyjosh |
Posted on 12/10/2023 11:51 AM
|
|
Newbie Posts: 30 Joined: December 01, 2023 |
Quote renatoa wrote: Being in your shoes, instead trying to repair I would rather replace the concept. And silently I am planing this move atm for my machine, even if didn't broke anything, yet... knock in the wood If someone want this, there are three points of insertion for a TC4 connection to the internal roaster board, the broken one: - heater triac control circuitry... to connect to OT1 of TC4 - fan mosfet control circuitry... to connect to IO3 of TC4 - decide if keeping the actual probe, or replace with a TC If interested we can investigate together the first two points in the list above. Switching to an open roasting solution would improve a lot the workflow compared to actual solution, with features that are missing now, that would streamline a lot the roasting experience: - ability to cancel a preheat - automatic charge detection and start timer without touch anything - automatic TP detection and tag - dry end and first crack real time predictions computation, for better judgment of power change moments - real time more useful RoR computation, same purpose as above - automatic drop detection and cutting heat, then start cooling, all handsfree - logging/storage and playback of last roast, or save it as a profile for future usage. Great minds think alike, my friend  I was thinking about how easy it would be to completely rebuild a controller for this. I was thinking about how easy it would be to completely rebuild a controller for this.I ordered triac and mosfets last night. Can't find a good triac board in the US so it might be slow to get here. I considered cutting the triac section off of my broken board and using it. Looks pretty easy to do. In the mean time I used what I had on hand for experimentation. Controlling the heater with SSR, but it's too slow. Infrared heater takes so long to heat up and is very quick to cool down. TC4+ can't control the drum, cooling fans, or filter fan. So something like the drop detection, cut heat, and start cooling won't work. I'm going to run all of those through MOSFETs for control. Edit: You must have edited while I was writing post. Is there any reason to actually use a TC4+ itself? It's easy enough to emulate one to continue to work with Artisan. Otherwise, it doesn't bring much if it already needs additional mosfets to control the drum and other fans and would need to be adapted to control the triac as well. An Arduino, 4 channel mosfet board, triac dimmer, and thermocouple should cover everything. Edited by sloppyjosh on 12/10/2023 12:08 PM |
|
|
|
| renatoa |
Posted on 12/10/2023 1:58 PM
|
|
Administrator Posts: 3104 Joined: September 30, 2016 |
Quote Controlling the heater with SSR, but it's too slow Probably manual on-off control I guess... because a SSR could be very fast, when controlled as a dimmer, using phase angle. Is nothing else than a triac, plus control circuitry. Quote TC4+ can't control the drum, cooling fans, or filter fan. Not if used strictly as was designed, but it can. There are still 3-4 GPIO unused pins, and with some line of code... Wasn't clear enough but the term TC4 was used as a generic designation for a TC4 software fork done for Skywalker, not the original TC4. Quote So something like the drop detection, cut heat, and start cooling won't work. Oh, yes, all of them works, in the TC4ESP fork... so can work in other configurations too. Quote Is there any reason to actually use a TC4+ itself? It's easy enough to emulate one to continue to work with Artisan. If you mean the TC4(+) shield, there is no reason to use it if you decide to not change the probe with a TC. The TC4 code though, on an Arduino board alone, without shield, worth using, instead rewriting again thousand lines of code, and saving months of work. |
|
|
|
| Robotic Kitten |
Posted on 12/11/2023 11:55 AM
|
|
Newbie Posts: 24 Joined: December 04, 2023 |
Quote renatoa wrote: Quote So something like the drop detection, cut heat, and start cooling won't work. Oh, yes, all of them works, in the TC4ESP fork... so can work in other configurations too. Ah, so there's ESP fork of TC4. Is it only for ESP8266 platform? Maybe makes sense porting to ESP32, as a more modern hardware, can do BLE on the same radio and has more ADC channels https://docs.espr...s/adc.html And not that I really need it, but it would be a fun project porting it to ESPHome. Then my Home Assistant would know when I'm roasting coffee 
Edited by renatoa on 12/11/2023 12:29 PM |
|
|
|
| renatoa |
Posted on 12/11/2023 12:29 PM
|
|
Administrator Posts: 3104 Joined: September 30, 2016 |
I know ESP32, lots of issues for this and others professional projects, that required to be reverted to 8266 or switch to other architecture. ESP32 ADC are junk, not even 8 bits linearity. |
|
|
|
| Robotic Kitten |
Posted on 12/12/2023 10:41 AM
|
|
Newbie Posts: 24 Joined: December 04, 2023 |
Quote renatoa wrote: I know ESP32, lots of issues for this and others professional projects, that required to be reverted to 8266 or switch to other architecture. ESP32 ADC are junk, not even 8 bits linearity. Wow. I just read about it. I did not know it was that bad. |
|
|
|
| jwmelvin |
Posted on 12/15/2023 7:55 AM
|
|
Newbie Posts: 10 Joined: December 21, 2022 |
Not exactly a mod, but I'm curious about availability of replacement heating elements. Have any of you owners looked into it? |
|
|
|
| renatoa |
Posted on 12/15/2023 8:25 AM
|
|
Administrator Posts: 3104 Joined: September 30, 2016 |
The closest I found are these: https://heaterlam...1200W.html https://vi.aliexp...38250.html |
|
|
|
| sloppyjosh |
Posted on 12/17/2023 9:28 AM
|
|
Newbie Posts: 30 Joined: December 01, 2023 |
Well I'm back up and running. Control is now an arduino nano with, 4 MOSFETs to control the fans, the SCR from the skywalker's board (I cut it off at the gaps under the optoisolators) to control the heater. I replaced the temp probe with a thermocouple and used a MAX6675 to read it. Really not terribly difficult to do. Haven't integrated it with the full TC4 firmware yet, but I've implemented a subset of commands to allow me to control it with Artisan. Haven't done a roast yet, but expect I'll try one today. |
|
|
|
| sloppyjosh |
Posted on 12/17/2023 9:54 PM
|
|
Newbie Posts: 30 Joined: December 01, 2023 |
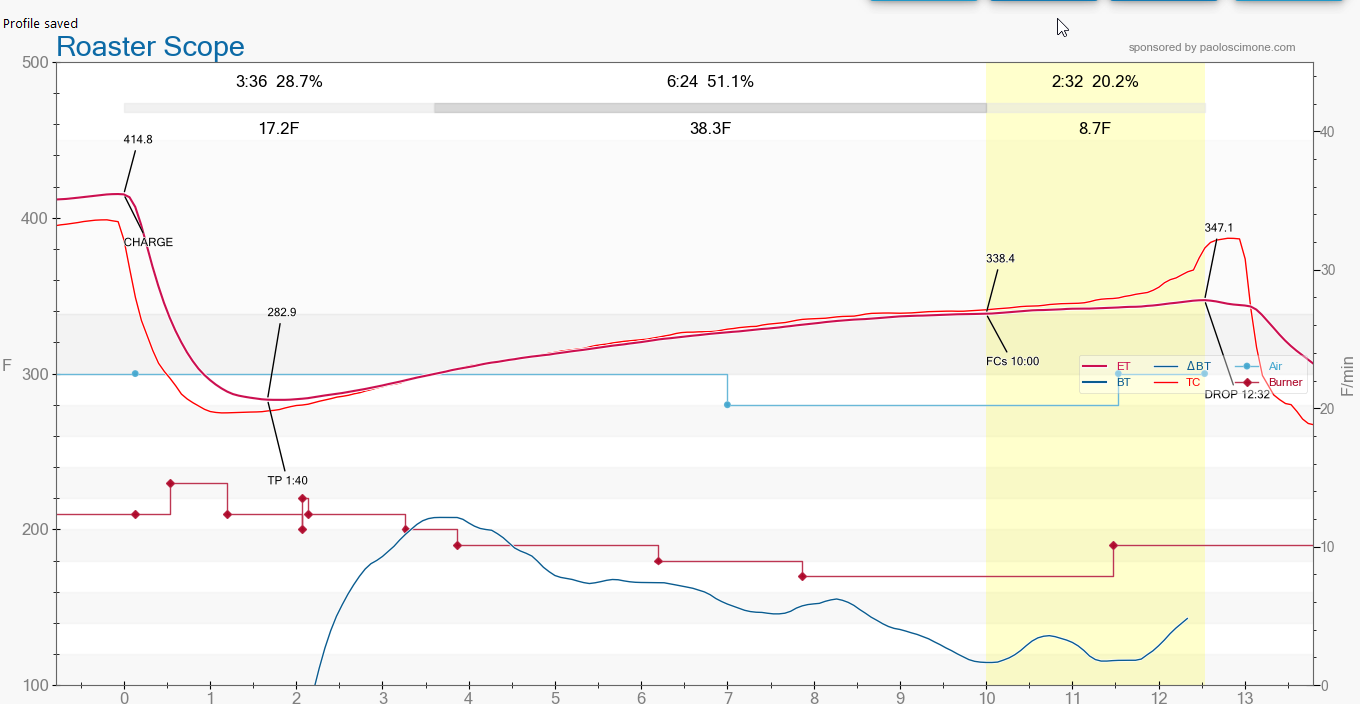
Artisan Roast profile attached.. 227g Tanzania Kilimanjaro Peaberry. Not sure what caused the ROR to crash around 5 min. Right now I'm monitoring power by a watt meter... I started pushing about 750 watts (which, I think is too much for 227g) and ended around 600 watts. I think next time, if I stick with 227g (that's 1/2lb) I might try to lower both of those by about 150W or so.. The whole thing just seemed too fast. 227 also seems like a very light charge for this machine, I might go up to about 300g.. Not sure. I'm not completely pleased with how it's running, mostly with the heat control.. I need to make it so that the value I pass to the OT1 command is linearly correlated to the wattage. Right now, I'm passing 0-255 and once it gets up to about 180, it's pushing 1000W. Getting that mapping so that 100 = 1000W, 90 = 900W, etc.. would really make it feel a lot more intuitive. Otherwise.. it seems to be working. Unrelated -- I think.. I had 1 single bean catch on fire during this roast. I'm not sure if it somehow got left inside from the previous roast, or if it maybe landed perfectly on the heater, etc.. I don't imagine that's anything to do with my mods though.
sloppyjosh attached the following image:

|
|
|
|
| renatoa |
Posted on 12/18/2023 3:21 AM
|
|
Administrator Posts: 3104 Joined: September 30, 2016 |
750W (75%) is indeed too much for half pound. The automatic profiles of the original machine have as starting points 70% for washed, and 65% for naturals, probably found in tests with the "optimal" load of 350-400 grams. In my tests I found for 250 grams that a 200C preheat, then 60% start value, followed by 2 steps, first at dry end, down to 50%, then the second 40% at 170C led to a satisfactory 8 minute profile, better than good enough. As I already wrote about the thermal dynamics of this machine, there is no need for steps smaller than 5%, will not move significantly the profile. I had burnt beans every roast, even 2-3, not only one. I got one even from the manufacturer, found it at first machine inspection, caught between the bottom wall and one of the vanes. Not sure what are you using for power control, I suggest have a look at ICC method of TC4, is better than phase angle, imo, because there aren't sharp current edges, nor transients that led to EMI. Basically the triac acts a high speed switch synced with zero cross, letting go or block completely sine halves, not chopping them as does phase angle. At 50% practically you have one half sine ON, the other OFF, and so on... is rather rectified DC, than AC As a side note, the original machine is using for control a slow PWM pulsing method, having about one second cycle, the pulsing can be noticed visually through the charge chute. This method is also implemented in TC4, and don't need zero cross detection. Over time I used both, ICC and slow PWM, never PAC. |
|
|
|
| renatoa |
Posted on 12/18/2023 6:19 AM
|
|
Administrator Posts: 3104 Joined: September 30, 2016 |
An important detail, when comparing power profiles of users in different locations, is the mains voltage. The 1000W of the heater is rated for a standard mains, having a voltage of 230/115V. The mains voltage is not fixed, and IS different from a location to other, or even during a day, according to the network load. In EU the limits of this variation are +10%-5%, percents related to voltage. This translates to double value for power. 10% more voltage means 21% more power on same load. Thus, if you change profiles with someone, is mandatory to relate them to the mains voltage. 6V difference for EU mains, i.e. 224V vs 230v vs 236V for EU) or 3V difference for US, means the 5% power step of Skywalker, or the difference between the natural and washed profiles in Auto mode. This should clarify why different people get different roasting times/results when roasting same beans sourced from same vendor, but roasted in different places. This detail should be known for long time, for any electric roaster controlled using a power profile (opposed to a temperature profile), but resurrected once again during yesterday discussions with a fellow in other town, that gets same times as me using 5% "more" power on display. That's because his voltage is 231V and mine is 238V, the result is that his 70% equates to my 65%. Confusing enough ? |
|
|
|
| allenb |
Posted on 12/18/2023 8:31 AM
|
 Administrator Posts: 3869 Joined: February 23, 2010 |
Quote 750W (75%) is indeed too much for half pound. It's unfortunate that the temperature sensing during the first 2 minutes is reading higher than actual. Not sure how far off it is but even with 1500 watts of IR only heat input with 1/2 lb charge, BT will be nowhere near the mid 200's F (130 C) at 1 min into the roast. While it's ok to use "relative" temperature readings to guide a roast, getting the initial first 2 minutes right in regards to that first big hit of heat at charge, then quickly tapering off, will be impossible to finesse with any accuracy with the current setup. As we all know, with IR as the sole source of heat, there needs to be a very high power level at start due to the low IR absorption rate with the coffee's green surface color then, backing way down as they brown. Any thoughts on how BT sensing could be improved? 1/2 lb and 1 lb drum, Siemens Sirocco fluidbed, presspot, chemex, cajun biggin brewer from the backwoods of Louisiana
|
|
|
|
| Mike_Mathis |
Posted on 12/18/2023 8:35 AM
|
|
1/4 Pounder  Posts: 125 Joined: August 06, 2019 |
Wow renatoa, your post is only slightly confusing, but much more informative! At the roasting table in my garage, I usually have 123.5 to 126V (verified by two sources). This will call for some math. However, the most eye-opening aspect of your post is if the beans roast out of character then a reason could be deduced from your info. Thanks for your valued groundwork on the idiosyncrasies of this machine.
*Kaffelogic Nano 7
*Skywalker V1 *2023 BC-2 |
|
|
|
| renatoa |
Posted on 12/18/2023 9:54 AM
|
|
Administrator Posts: 3104 Joined: September 30, 2016 |
Again, not only this machine ! Behmor roaster for example, the edition for EU/AUS/nonUS, has the choice of 220-230-240V. Not a different build for each voltage, just a setting used to adjust power levels during roast accordingly. +/-10V @ 230V translates as +/-9% as power difference, surely matters. |
|
|
|
| sloppyjosh |
Posted on 12/18/2023 8:25 PM
|
|
Newbie Posts: 30 Joined: December 01, 2023 |
Quote allenb wrote: Quote 750W (75%) is indeed too much for half pound. It's unfortunate that the temperature sensing during the first 2 minutes is reading higher than actual. Not sure how far off it is but even with 1500 watts of IR only heat input with 1/2 lb charge, BT will be nowhere near the mid 200's F (130 C) at 1 min into the roast. While it's ok to use "relative" temperature readings to guide a roast, getting the initial first 2 minutes right in regards to that first big hit of heat at charge, then quickly tapering off, will be impossible to finesse with any accuracy with the current setup. As we all know, with IR as the sole source of heat, there needs to be a very high power level at start due to the low IR absorption rate with the coffee's green surface color then, backing way down as they brown. Any thoughts on how BT sensing could be improved? Could be the probe that I'm using? It's a bare thermocouple attached to a stainless steel rod that extends about 2" into the chamber. The stock probe is, I believe, 3mm probe that's about 1.5". I have a 3mm on the way but it's still about a week out. I've also got current and voltage sensors so I should be able to calculate wattage in real time. |
|
|
|
| renatoa |
Posted on 12/19/2023 1:53 AM
|
|
Administrator Posts: 3104 Joined: September 30, 2016 |
My unit stock probe is significantly shorter, about 24mm, and 4mm diameter. It seems to be fast enough, imo, it senses the removal of charge door, or trier, in less than 5 seconds. |
|
|
|
| sloppyjosh |
Posted on 12/19/2023 8:19 AM
|
|
Newbie Posts: 30 Joined: December 01, 2023 |
Quote renatoa wrote: My unit stock probe is significantly shorter, about 24mm, and 4mm diameter. It seems to be fast enough, imo, it senses the removal of charge door, or trier, in less than 5 seconds. I'm certain that's the same as mine.. I was going from my (obviously faulty) memory. I also suspect the position of my probe is, perhaps, why we see the temps as high as they are when I charge the roaster. The vanes on the drum are pushing the beans to the front of the roaster, so if I push the probe further inside, it may not be ideally located in the bean mass, especially when roasting a small .5lb charge. Re: Power management I have some dimmers from RobotDyn on the way that I'm going to use for controlling the power. I wired this one up just kind of as a bit of fun to see if I could get it to work.. but it's not as clean as I'd want.. I have some ideas why but I need a proper scope to troubleshoot. Thankfully Santa is bringing me one but I'll catch some disapproving glares if I snatch it from under the tree this early haha. Also, if any of this is going to be useful to someone else, I'd rather use parts that folks can buy than suggest they chop their board apart. Do you think any additional temperature probes would be useful? Ambient? Exhaust? Once I get the RobotDyn board, voltage sensor, and current sensor I'm going to rebuild on an Arduino Uno in a more permanent configuration. |
|
|
|
| renatoa |
Posted on 12/19/2023 8:54 AM
|
|
Administrator Posts: 3104 Joined: September 30, 2016 |
The RobotDyn dimmer is nothing else than a bare SSR, of instant fire type. Alone it does nothing, it needs command pulses to control the power, by either of the three methods mentioned. The control input is misleading labelled PWM, only slow PWM (more than one second cycle) can be used for an useful control. Any other faster PWM, not synced with zero cross, would led to random fire and power levels. Exhaust could be maybe useful to predict the FC approaching, when having troubles with acoustic detection of FC, ET having a rise about 10-20 seconds in advance. But not usable for a power reduction prediction... when ET start to rise, it's already too late to reduce power. Ambient... given the fact that even Artisan ignore it... just log and nothing else... draw the conclusion. Sure, ambient is important, obviously will not using same power levels in the winter or in the summer, especially when roasting in a garage without heating or air conditioning... But not aware about well done studies, that equate ambient degrees to power levels shift... so... The beans are moving in both senses, with a bias to back to front movement, which is logical, to ensure the complete purge at drop. This two way movement happens because there are two vanes pushing beans back to front, and one vane doing the reverse, creating some kind of waves that collides in the beans mass. The convection acts in the sense of cooling beans mainly, there is no source of hot air having a significant role in the roast. |
|
|
|

| Jump to Forum: |
Powered by PHP-Fusion Copyright © 2024 PHP-Fusion Inc
Released as free software without warranties under GNU Affero GPL v3
Designed with ♥ by NetriXHosted by skpacman