
Login

Shoutbox
You must login to post a message.
renatoa
07/26/2024 3:49 PM
Bill grubbe and Jk, 
allenb
07/26/2024 5:15 AM
Spiderkw Welcome to HRO!

renatoa
07/24/2024 8:31 AM
ramiroflores and John123,

 ?
?
?renatoa
07/21/2024 1:18 AM
 , Luislobo
renatoa
07/19/2024 11:28 AM
Koepea,
Forum Threads
Newest Threads
Skywalker roaster modsBackground Roast Iss...
Hello from Arkansas
TC4ESP
Green coffee reviews
Hottest Threads
| Skywalker roaster... | [375] |
| TC4ESP | [115] |
| War on Farmers by... | [47] |
| Adventures in flu... | [26] |
| Hello! (soon) Roa... | [17] |
In Memory Of Ginny

Donations
Latest Donations
dmccallum - 10.00
JackH - 25.00
snwcmpr - 10.00
Anonymous - 2.00
Anonymous - 5.00
dmccallum - 10.00
JackH - 25.00
snwcmpr - 10.00
Anonymous - 2.00
Anonymous - 5.00
Users Online
Guests Online: 9
Members Online: 0
Total Members: 8,393
Newest Member: Bill grubbe
Members Online: 0
Total Members: 8,393
Newest Member: Bill grubbe
View Thread
Who is here? 4 guest(s)
 Skywalker roaster mods
|
|
| YUL MTL |
Posted on 03/05/2024 2:59 PM
|
|
Newbie  Posts: 4 Joined: March 03, 2024 |
Quote Grazie mille! |
|
|
|
| marimohead |
Posted on 04/01/2024 5:04 PM
|
 Newbie Posts: 2 Joined: March 21, 2024 |
Quote ctjameson wrote: So I took the original setup and cleaned it up a lot. Designed a case for the header-less model Leonardo and made it a USB-C female instead of a cord attached directly to it. This makes it much more modular. I’m super happy with how it turned out. I’ll release the files later this afternoon when I get back to my computer. Sweet Maria’s delivery today, going to do a couple lbs tomorrow and report back. Do you need to solder anything inside the SW with this arduino setup? Yellow usb cable looks to be going into the usb port originally used by the SW controller right? Very nice looking, looks like a small NUC |
|
|
|
| renatoa |
Posted on 04/02/2024 1:14 AM
|
|
Administrator Posts: 3104 Joined: September 30, 2016 |
The Josh mod can be made without opening SkyW, just plug the Arduino into the control panel/display USB. However, is highly advisable to open a new roaster, in order to solve somewhat the heatsink (lack of) airflow. For an US model is quite mandatory, imo. At least drilling some holes. |
|
|
|
| marimohead |
Posted on 04/02/2024 3:26 AM
|
|
Newbie Posts: 2 Joined: March 21, 2024 |
Quote renatoa wrote: highly advisable to open a new roaster, in order to solve somewhat the heatsink (lack of) airflow. For an US model is quite mandatory, imo. At least drilling some holes. Is the easiest way to reuse the filter fan and fan header next to the usb port? Then no soldering is required, only drilling holes in the case and attach the fan to the outside, correct? thanks  |
|
|
|
| renatoa |
Posted on 04/02/2024 6:35 AM
|
|
Administrator Posts: 3104 Joined: September 30, 2016 |
That's a good idea, filter will clog quickly and became useless anyway... But personally I don't like doing mods that change external appearance. Just personal, nothing business Depending on fan size I would evaluate a hole in the electronics plastic case, closest to heatsink you can get. |
|
|
|
| Mike_Mathis |
Posted on 04/02/2024 9:14 AM
|
|
1/4 Pounder  Posts: 125 Joined: August 06, 2019 |
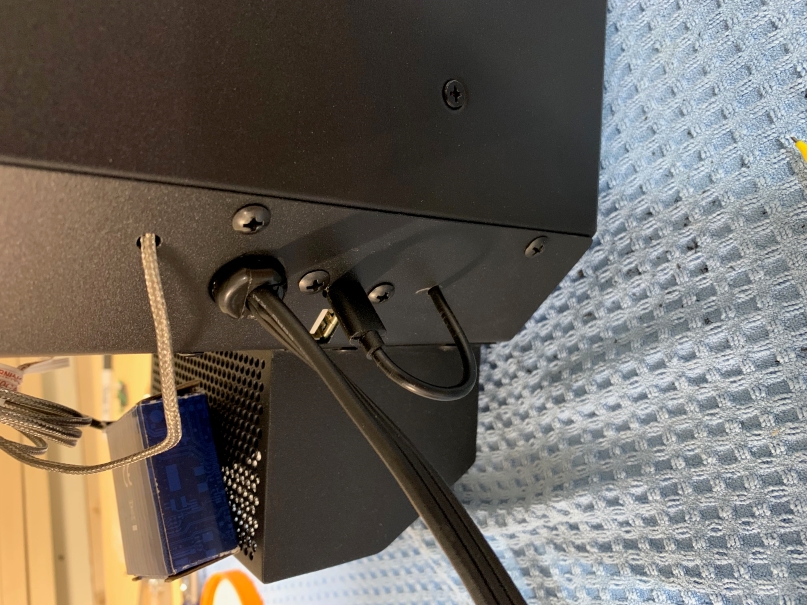
Quote marimohead wrote: Is the easiest way to reuse the filter fan and fan header next to the usb port? Then no soldering is required, only drilling holes in the case and attach the fan to the outside, correct? thanks Here is how I did it. This plug goes to a 3010 fan mounted on the "coffin with 20 holes in it". This port is "auto on / high speed" when roasting starts. renatoa thinks it's ugly.  j/k j/k
Mike_Mathis attached the following image:
Edited by Mike_Mathis on 04/02/2024 7:41 PM *Kaffelogic Nano 7
*Skywalker V1 *2023 BC-2 |
|
|
|
| HarryDog |
Posted on 04/02/2024 8:38 PM
|
 1/2 Pounder  Posts: 349 Joined: July 20, 2022 |
It's working!!! I completed my chip move, it got to 38c on the 100% preHeat and idled around 200c at 34.7c Ran the PreHeat for 10min. Still runs. You only see two screw heads from the outside, ugly on the inside. The chip was bone dry, no paste on it, I put some MX-4 on it to help transfer that heat.
HarryDog attached the following image:
|
|
|
|
| Mike_Mathis |
Posted on 04/03/2024 7:55 AM
|
|
1/4 Pounder Posts: 125 Joined: August 06, 2019 |
HarryDog, I like your "outside the box" thinking........it is literally  . .Great job my man! *Kaffelogic Nano 7
*Skywalker V1 *2023 BC-2 |
|
|
|
| renatoa |
Posted on 04/03/2024 9:20 AM
|
|
Administrator Posts: 3104 Joined: September 30, 2016 |
Actually, it's "inside the box" |
|
|
|
| renatoa |
Posted on 04/03/2024 2:24 PM
|
|
Administrator Posts: 3104 Joined: September 30, 2016 |
Quote Beauty is in the eye of be(an)holder |
|
|
|
| hugojack |
Posted on 04/07/2024 11:51 AM
|
|
Newbie Posts: 4 Joined: April 07, 2024 |
Hello! I am new here (first post). I have the skywalker roaster and have done 3 roasts in auto mode with ok results. Is there somewhere (link) or someone that can explain to me step by step (like I'm in kindergarten) what I need buy and do to upgrade and optimize this machine. I have read the last 12 pages and am still confused. Thanks in advance. |
|
|
|
| allenb |
Posted on 04/07/2024 12:27 PM
|
 Administrator Posts: 3869 Joined: February 23, 2010 |
hugojack, big welcome to HRO! The Skywalker roaster appears to be new enough to classify it as a work in progress with different mods giving different results. I don't think there has been enough time for there to be a consensus on a "best practice" mod yet. But, if you let everyone know your skill level with electronics tinkering and if you've previously worked with microcontrollers like the Arduino with TC4 or other sensor interface, our members can probably direct you in a direction that will improve the stock roaster. 1/2 lb and 1 lb drum, Siemens Sirocco fluidbed, presspot, chemex, cajun biggin brewer from the backwoods of Louisiana
|
|
|
|
| renatoa |
Posted on 04/07/2024 1:07 PM
|
|
Administrator Posts: 3104 Joined: September 30, 2016 |
If you are in US, or your model is 115V, the first mandatory mod is the SCR heatsink cooling. There are at least three goods ways how to do this exposed back in this thread, I can't recommend any of them without knowing your tinkering or soldering skills. The second mandatory thing you must understand and learn, there is no mod to fix this, just good practice, is to not overuse the heater lamp without reason, as is the default preheat of this machine, using 100% power and no airflow. Always preheat in manual mode, under same conditions as during a roast: maximum 75% power and minimum 50% airflow. Charge funnel optimization? Optional. Do you have access to a 3D printer, or prefer a tin can solution ? |
|
|
|
| HarryDog |
Posted on 04/07/2024 1:33 PM
|
|
1/2 Pounder Posts: 349 Joined: July 20, 2022 |
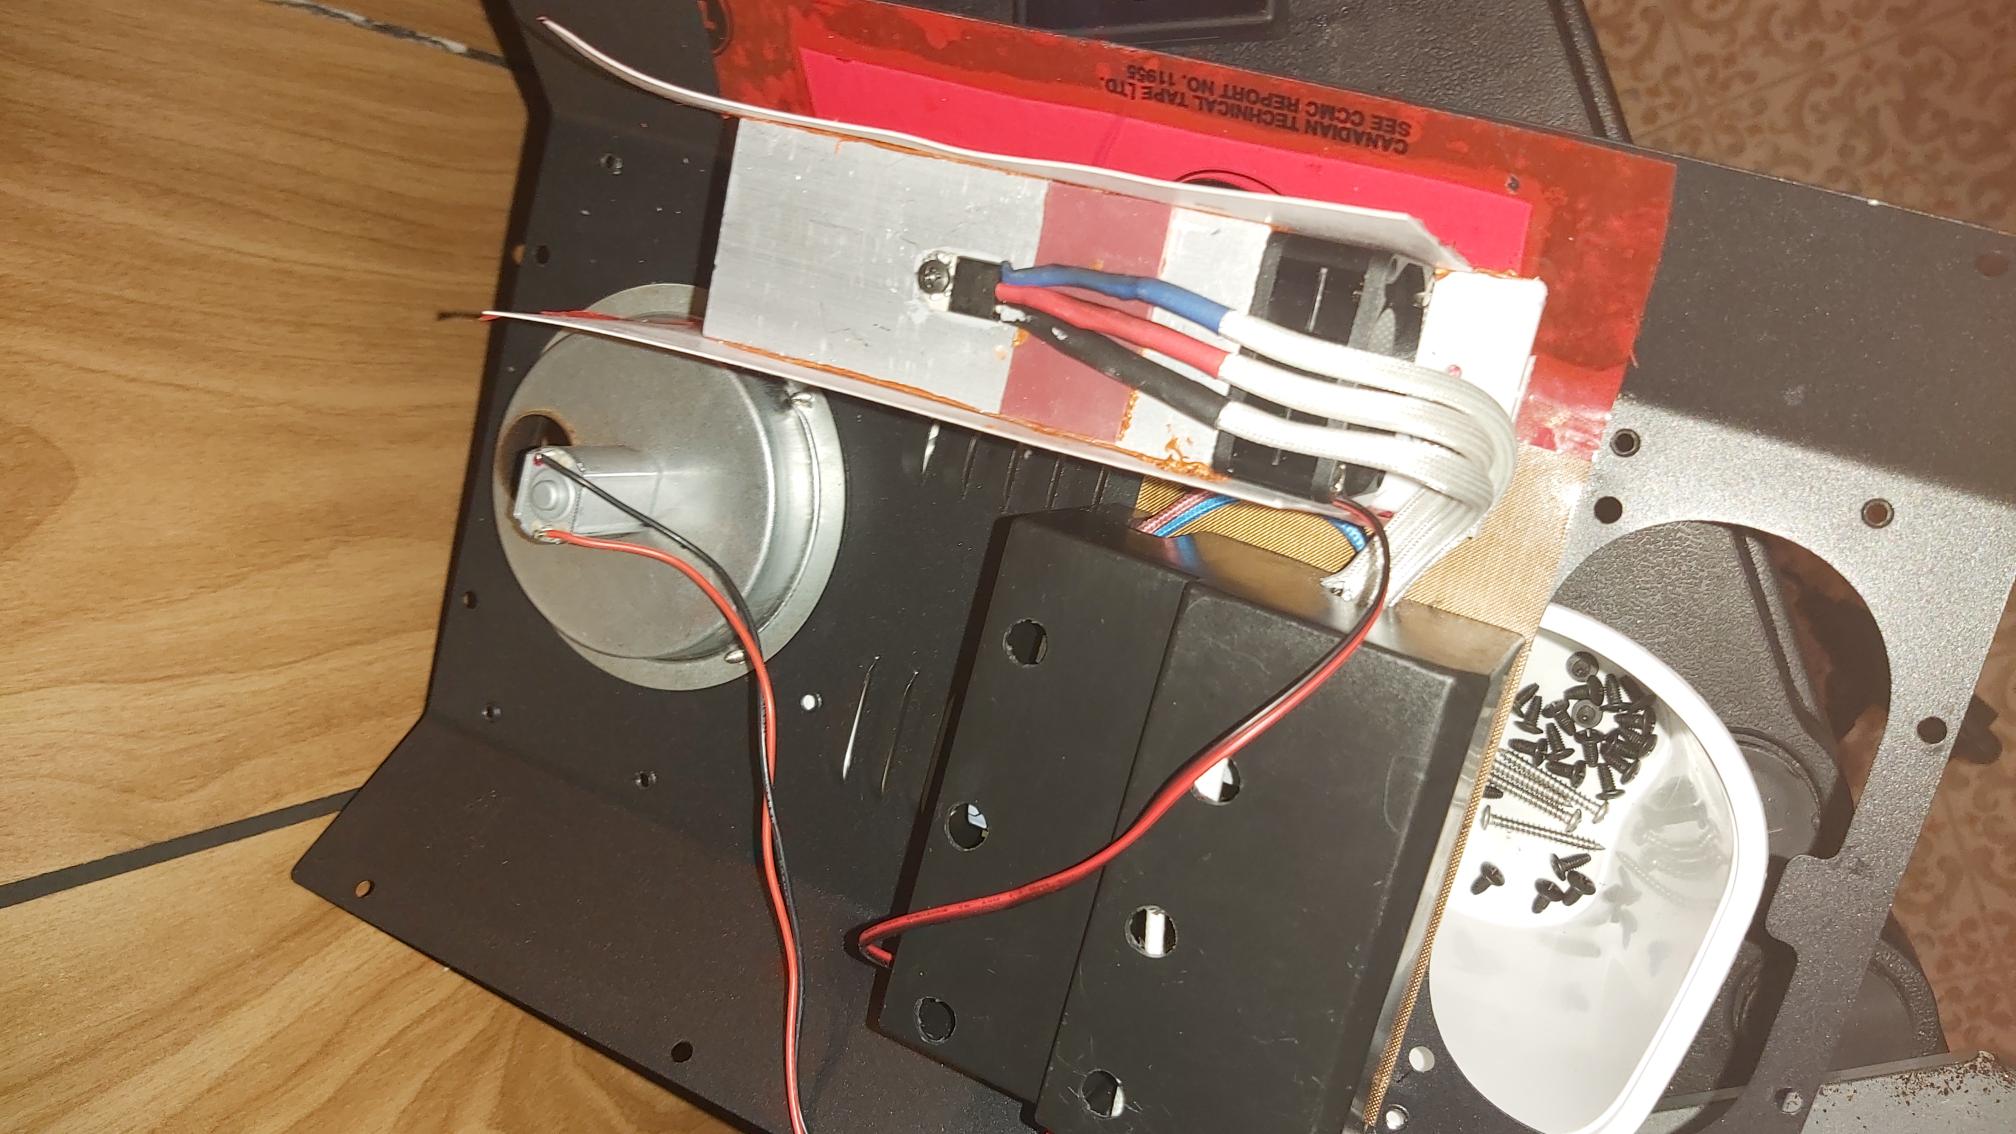
Hello HugoJack, I want to point out that this roaster is made in China, you will find oddities in the wiring so I can point out two that I have seen. One is on the top power supply board the pins for 24v are reversed to the connector so you need to swap the leads in the fan connector if you want to power a fan from it. Second you can see in my picture of my last mod (Post #282), the motor for the exhaust fan is wired in reverse? you will see the black wire on the +V connection. People are blowing up the board when they swap out their motors, this is second hand info as I have not verified this but beware. Also they have 2 control boards so we just don't know what all could be different on them? I don't know of any step by step instructions for the SCR improvements? The Github has pretty good instructions for the Arduino setup and basic settings for Artisan, people have been adding some Artisan setup files but if you don't understand what it's doing it's hard to understand what's happening to your roast or how to change it? https://github.co...kerRoaster Don't let this scare you and best of luck with what you want to do with your new toy!!! Edited by HarryDog on 04/07/2024 1:39 PM |
|
|
|
| hugojack |
Posted on 04/07/2024 1:40 PM
|
|
Newbie Posts: 4 Joined: April 07, 2024 |
Quote allenb wrote: hugojack, big welcome to HRO! The Skywalker roaster appears to be new enough to classify it as a work in progress with different mods giving different results. I don't think there has been enough time for there to be a consensus on a "best practice" mod yet. But, if you let everyone know your skill level with electronics tinkering and if you've previously worked with microcontrollers like the Arduino with TC4 or other sensor interface, our members can probably direct you in a direction that will improve the stock roaster. Thanks for the fast reply. I have zero skill in any of that but am a quick learner, and have a decent pc with windows. I am interested in using Artisan or whatever is recommended to track and chart roasts. I believe I also saw some people talking about the US version (115v) controller board getting hot to the point that it could catch fire or melt the board. I would def want to fix this! I will do whatever mods needed get this thing roasting even better. Today, I did Sweet Marias Moka Kadir Blend and took it to about 15 mins and dropped them at 203 degrees C. I *think* I heard first crack at 187 (which seemed high as I heard its between 170-190 C) and stopped around 195...and based on color of beans (and something I read about taking them out at 16-20 degrees C higher than first crack for dark roast) I took out at 203 C (187C First Crack + 16 C). I did have like 5 charred beans, but I think it turned out a decent Full City+ to French/Vienna roast. I did not use built in bean cooler because I felt that I could get better results with a fan/colander/wood spoon. Please see attached pics. Thanks in advance. **EDIT** It won't let me upload three images all around 2,200 KB each, in jpg form? Maybe because I am too new on this forum? Jack |
|
|
|
| hugojack |
Posted on 04/07/2024 2:07 PM
|
|
Newbie Posts: 4 Joined: April 07, 2024 |
Quote renatoa wrote: If you are in US, or your model is 115V, the first mandatory mod is the SCR heatsink cooling. There are at least three goods ways how to do this exposed back in this thread, I can't recommend any of them without knowing your tinkering or soldering skills. The second mandatory thing you must understand and learn, there is no mod to fix this, just good practice, is to not overuse the heater lamp without reason, as is the default preheat of this machine, using 100% power and no airflow. Always preheat in manual mode, under same conditions as during a roast: maximum 75% power and minimum 50% airflow. Charge funnel optimization? Optional. Do you have access to a 3D printer, or prefer a tin can solution ? I can learn...I have a soldering Iron...with very basic skill. Thanks for preheat info. No 3d printer but some ay I might just buy one! I would love a better charge funnel (bc current one sucks) but I find that I can pour them in using a spouted measuring cup and not spill/miss any beans. |
|
|
|
| hugojack |
Posted on 04/07/2024 2:10 PM
|
|
Newbie Posts: 4 Joined: April 07, 2024 |
Quote HarryDog wrote: Hello HugoJack, I want to point out that this roaster is made in China, you will find oddities in the wiring so I can point out two that I have seen. One is on the top power supply board the pins for 24v are reversed to the connector so you need to swap the leads in the fan connector if you want to power a fan from it. Second you can see in my picture of my last mod (Post #282), the motor for the exhaust fan is wired in reverse? you will see the black wire on the +V connection. People are blowing up the board when they swap out their motors, this is second hand info as I have not verified this but beware. Also they have 2 control boards so we just don't know what all could be different on them? I don't know of any step by step instructions for the SCR improvements? The Github has pretty good instructions for the Arduino setup and basic settings for Artisan, people have been adding some Artisan setup files but if you don't understand what it's doing it's hard to understand what's happening to your roast or how to change it? https://github.co...kerRoaster Don't let this scare you and best of luck with what you want to do with your new toy!!! Thank you for the Github link, I will check it out. I am not new to espresso (have had Breville BES870XL for about 8 years and was a barista at a much younger age at Starbucks) but I am very new to roasting coffee and this roaster, so I am a newbie you could say...But we were all NEWBs at one point, right? 
Edited by hugojack on 04/07/2024 2:17 PM |
|
|
|
| HarryDog |
Posted on 04/07/2024 3:50 PM
|
|
1/2 Pounder Posts: 349 Joined: July 20, 2022 |
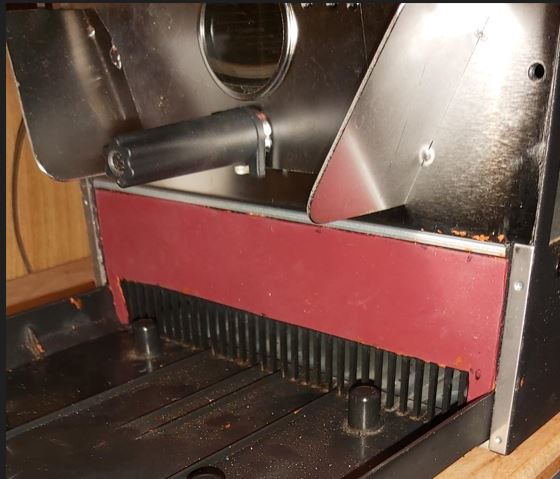
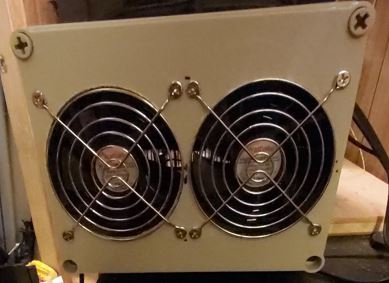
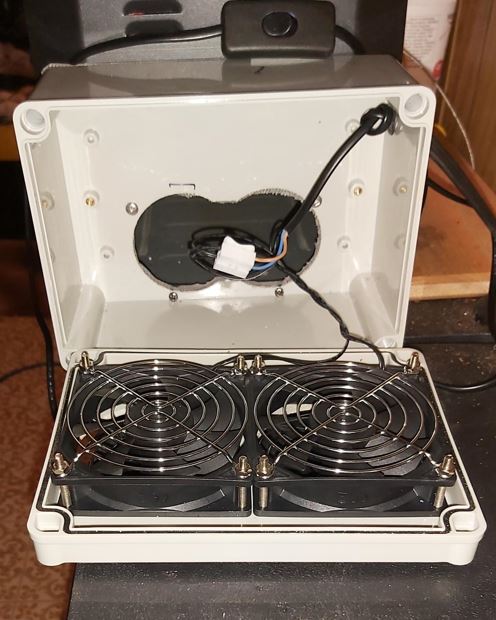
For the internal bean cooler I found it ok if you agitate the beans but it does need improvement. I have a stand alone bean cooler and the round basket will fit in the plastic tray, it measures 8 1/8 inch diameter and was sold as a 1.1 pound bean cooler I believe. I noticed the Stand alone cooler bottom is not as big so the metal basket is 7 5/8 inch in diameter so it fits in the plastic tray! I used a colander and fan outside and it was a step up to the stand alone cooler but I want to improve the internal unit and vent it out like I did with the original back cage. This in the works now, not tested yet... Now I do see that my metal basket does not sit tight in the plastic tray so I made a gasket for the front but it needs to be thicker for my unit or it will still allow air past it, not sure if this would be enough of an improvement just by itself? So two AC fans getting added now.
HarryDog attached the following images:
Edited by HarryDog on 04/07/2024 4:31 PM |
|
|
|
| The_Coffee_Rabbit_Hole |
Posted on 04/24/2024 10:52 AM
|
 Newbie Posts: 10 Joined: April 23, 2024 |
Hi mates ! I found your page lurking online ... I have a skywalker on order that shoud be ship on april 26th . it should be the ''last version'' according to the ITOP guy I talk with . what should be my main focus on it ? I absolutly want it on artisan (this is what Im using with my hottop right now) so I have the Leonardo board on order too , this mod doesnt seem too ruff for me .... anything else ? thanks for the work you are doing , I cant wait to participate |
|
|
|
| HarryDog |
Posted on 04/24/2024 11:12 AM
|
|
1/2 Pounder Posts: 349 Joined: July 20, 2022 |
Welcome, in the other thread you mentioned you are from Montreal so I would add a fan 24v to the heat sink on the controller board. I just seen a picture of a newer board that has a larger heat sink so I think a larger fan can be mounted on it. 40mmx10mm. Wired to the power board, note the wiring is backwards on mine so I popped the pins out of the connector and swapped them and that way it's a nice clean connection. You will need to verify voltage and connections as I have not touched a new board yet. The manufacturer might have a couple of different boards? Edited by HarryDog on 04/26/2024 11:22 PM |
|
|
|
| renatoa |
Posted on 04/24/2024 11:39 AM
|
|
Administrator Posts: 3104 Joined: September 30, 2016 |
It should be 3 times bigger the heatsink, and completely open air, to not require a fan, for the 110V units. If they used the same closed electronics enclosure, a heatink just slightly bigger is still a palliative. The best you could do is... hopes you ordered a 230V version, they are capable to be operated as they, for a single roast session, then wait to cool completely for the next session. No back to back long life even for 230V versions, if not modded. |
|
|
|
| The_Coffee_Rabbit_Hole |
Posted on 04/24/2024 4:56 PM
|
|
Newbie Posts: 10 Joined: April 23, 2024 |
Quote HarryDog wrote: Welcome, in the other thread you mentioned you are from Montreal so I would add a fan 24v to the heat sink on the controller board. I just seen a picture of a newer board that has a larger heat sink so I think a larger fan can be mounted on it. 40mmx20mm. Wired to the power board, note the wiring is backwards on mine so I popped the pins out of the connector and swapped them and that way it's a nice clean connection. You will need to verify voltage and connections as I have not touched a new board yet. The manufacturer might have a couple of different boards? Ok good , ill keep an eye on this Quote renatoa wrote: It should be 3 times bigger the heatsink, and completely open air, to not require a fan, for the 110V units. If they used the same closed electronics enclosure, a heatink just slightly bigger is still a palliative. The best you could do is... hopes you ordered a 230V version, they are capable to be operated as they, for a single roast session, then wait to cool completely for the next session. No back to back long life even for 230V versions, if not modded. Whatttt ??? You cannot roast batch back to back with the stock roaster ... this is scary , i just sold my hottop2k+ few minutes sgo :/ .... is the fan/heatsink fix that issue ? |
|
|
|
| HarryDog |
Posted on 04/24/2024 6:12 PM
|
|
1/2 Pounder Posts: 349 Joined: July 20, 2022 |
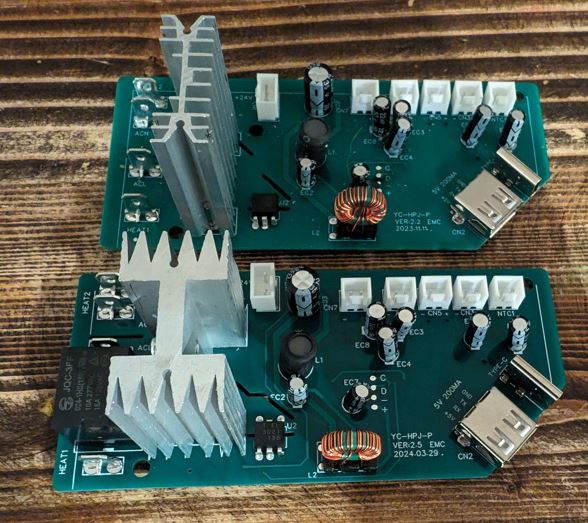
This is the mod we hope to keep the chip from over heating with using the fan. I don't think I have seen posts of the thermal run away after the mod? Note improving the air flow inside the box (Coffin) is a good idea as well. Moving the chip outside is more work but beneficial. Note the heatsink on the old board is hot electrically so the heatsink is live with 120v in north America. Suspect the new board is the same.
HarryDog attached the following image:
|
|
|
|
| The_Coffee_Rabbit_Hole |
Posted on 04/24/2024 8:40 PM
|
|
Newbie Posts: 10 Joined: April 23, 2024 |
Is this anyone of you ? Edited by renatoa on 04/25/2024 1:26 AM |
|
|
|
| The_Coffee_Rabbit_Hole |
Posted on 04/24/2024 9:23 PM
|
|
Newbie Posts: 10 Joined: April 23, 2024 |
Quote HarryDog wrote: This is the mod we hope to keep the chip from over heating with using the fan. I don't think I have seen posts of the thermal run away after the mod? Note improving the air flow inside the box (Coffin) is a good idea as well. Moving the chip outside is more work but beneficial. Note the heatsink on the old board is hot electrically so the heatsink is live with 120v in north America. Suspect the new board is the same. I asked the itop guy and he confirm that i will have the version with the large heat sink which shouldnt be overheating ... for what it worth . |
|
|
|

| Jump to Forum: |
Powered by PHP-Fusion Copyright © 2024 PHP-Fusion Inc
Released as free software without warranties under GNU Affero GPL v3
Designed with ♥ by NetriXHosted by skpacman