
Login

Shoutbox
You must login to post a message.
renatoa
07/26/2024 3:49 PM
Bill grubbe and Jk, 
allenb
07/26/2024 5:15 AM
Spiderkw Welcome to HRO!

renatoa
07/24/2024 8:31 AM
ramiroflores and John123,

 ?
?
?renatoa
07/21/2024 1:18 AM
 , Luislobo
renatoa
07/19/2024 11:28 AM
Koepea,
Forum Threads
Newest Threads
Skywalker roaster modsBackground Roast Iss...
Hello from Arkansas
TC4ESP
Green coffee reviews
Hottest Threads
| Skywalker roaster... | [375] |
| TC4ESP | [115] |
| War on Farmers by... | [47] |
| Adventures in flu... | [26] |
| Hello! (soon) Roa... | [17] |
In Memory Of Ginny

Donations
Latest Donations
dmccallum - 10.00
JackH - 25.00
snwcmpr - 10.00
Anonymous - 2.00
Anonymous - 5.00
dmccallum - 10.00
JackH - 25.00
snwcmpr - 10.00
Anonymous - 2.00
Anonymous - 5.00
Users Online
Guests Online: 5
Members Online: 1
Bill grubbe
Total Members: 8,393
Newest Member: Bill grubbe
Members Online: 1
Bill grubbe
Total Members: 8,393
Newest Member: Bill grubbe
View Thread
Who is here? 2 guest(s)
 Skywalker roaster mods
|
|
| Dan N |
Posted on 01/09/2024 8:29 AM
|
|
Newbie  Posts: 28 Joined: January 06, 2024 |
Quote Robotic Kitten wrote: @sloppyjosh I have a question about about this section of the codehttps://github.co...#L232-L236 Can an "unsigned long" be "negative"? Assuming, the "overflow", maybe do the following? The answer is no, an unsigned long can't be negative and the if statement will never be true. That makes the code unintentionally correct! It's not intuitive but because all variables are unsigned and the same size, the value of duration for this subtract is correct in all cases with no correction necessary (the if statement can be removed): Code Download source unsigned long duration = now - time; Edited by Dan N on 01/09/2024 8:38 AM |
|
|
|
| renatoa |
Posted on 01/09/2024 9:21 AM
|
|
Administrator Posts: 3104 Joined: September 30, 2016 |
Because actual moment (now) is always later than past (time)... The theory of relativity could disagree about this statement  |
|
|
|
| HarryDog |
Posted on 01/09/2024 10:14 AM
|
 1/2 Pounder  Posts: 349 Joined: July 20, 2022 |
Hello Guys, I want to follow along on this project at some time, I have a Leonardo on the way but do I need a Adruino Uno for this? If so which processor? Next I need to start with some basics, any good tutorials on the web I should look at. Any info would be a great help, Thanks. |
|
|
|
| renatoa |
Posted on 01/09/2024 11:41 AM
|
|
Administrator Posts: 3104 Joined: September 30, 2016 |
Uno is 328 only, no variants, afaik. For josh project Leonardo is fine, will work on Uno too, whatever you have around. Check greencardigan's TC4 thread for installing Arduino and loading a "sketch". So are called the running code on Arduino boards. The equivalent of apps on smartphones. |
|
|
|
| Robotic Kitten |
Posted on 01/09/2024 12:13 PM
|
|
Newbie Posts: 24 Joined: December 04, 2023 |
Quote Dan N wrote: The answer is no, an unsigned long can't be negative and the if statement will never be true. That makes the code unintentionally correct! It's not intuitive but because all variables are unsigned and the same size, the value of duration for this subtract is correct in all cases with no correction necessary (the if statement can be removed): Code Download source unsigned long duration = now - time; That is interesting, but you are correct. |
|
|
|
| ctjameson |
Posted on 01/09/2024 5:09 PM
|
 Newbie Posts: 31 Joined: January 09, 2024 |
Hey guys. I ordered my Skywalker from Merci chef Store on Jan 4 and it arrived yesterday, Jan 8th via DHL. Truly impressive shipping from that vendor. Got the Arduino connected, code loaded, and artisan communicating. Now the problem is I'm really new to the world of roasting as a whole. Can anyone give me any pointers on where to look for generic direction for how to roast specifically with Artisan? Great work here and I'm really stoked to get started roasting in this thing. TIA! |
|
|
|
| caesardad |
Posted on 01/10/2024 12:33 AM
|
|
Newbie Posts: 1 Joined: December 17, 2023 |
Quote sloppyjosh wrote: I put an acrylic front on the roaster and put 225, 340, and 455 grams of beans in to see where the probe would sit in relation to the bean mass... IMO, this may be the culprit for why the temps seem to read low. See what ya'll reckon.. I'll probably have the clear front on it a bit longer so if you want to see anything else that I didn't do in the video let me know and I'll try to do it. Hi Josh, Thanks for putting in all these work. From this video I see you can even control drum speed and I wonder if I could control it with the code @ https://github.com/jmoore52/SkywalkerRoaster? I'm not a coder so whatever being discussed is VERY foreign too me :-( |
|
|
|
| renatoa |
Posted on 01/10/2024 2:19 AM
|
|
Administrator Posts: 3104 Joined: September 30, 2016 |
Nope, with actual internal controller drum is only on-off. With a PWM DC dimmer placed on the motor circuit you could reduce the speed. To increase a motor change is required. Already discussed the pros-cons of motor speed change, check the past posts. |
|
|
|
| renatoa |
Posted on 01/10/2024 2:54 AM
|
|
Administrator Posts: 3104 Joined: September 30, 2016 |
Quote ctjameson wrote: Now the problem is I'm really new to the world of roasting as a whole. Can anyone give me any pointers on where to look for generic direction for how to roast specifically with Artisan? Great work here and I'm really stoked to get started roasting in this thing. TIA! Now the problem is that you should first learn about coffee roasting, as a whole. Artisan is just a tool to assist you, not an AI doing the roast for you. You are asking how to use a hammer without knowing what is a nail.  LE: Please also notice that the IR roasting technique used by this machine is a whole universe by itself, having very little in common with all the other roasters of the market. More on this here: https://homeroast...post_77699 Thus, even the generic "roasting coffee" learning, from classic roasting resources found on the internet, would be of relative help for this machine. I have a post on this subject here: https://homeroast...post_77806 Edited by renatoa on 01/10/2024 4:23 AM |
|
|
|
| Dan N |
Posted on 01/10/2024 9:28 AM
|
|
Newbie Posts: 28 Joined: January 06, 2024 |
I've got Artisan working with an Arduino Nano clone (ATmega328P processor, CH340G USB) running Josh's code, thanks Josh! I soldered the usb (standard cable) wires as follows: green to D2, white to D3, black to GND, red to 5V not Vin. I haven't done a controlled roast yet but I've tried all the controls and everything works as expected. I'd also be interested in any Artisan tips specific to this roaster (axes limits, temp range for dry, develop, etc.). Edited by Dan N on 01/12/2024 9:44 AM |
|
|
|
| renatoa |
Posted on 01/10/2024 9:56 AM
|
|
Administrator Posts: 3104 Joined: September 30, 2016 |
In my Skywalker control panel cable the red wire is NOT plus 5V, so beware ! I think they use a non standard usb cable, red wire is Rx, not +5V, and placed next in sequence near black (ground) wire, instead D+ wire in a standard USB, and not opposite site of the plug, as should be. There is no white wire in my Skywalker control panel cable, btw. Please specify if you used a standard usb cable, cut for this project purpose, or reused the original control panel cable. I would not connect at all the supposed plus wire that comes from skywalker to the Arduino, which is powered via usb from computer anyway... For tips please check the posts linked above, about IR roasting specifics, and also the roasts "recipes" posted in Skywalker roasts thread. Also, maybe it is obvious for those already using this interface, but not so obvious for newbies, when using Artisan instead control panel is YOUR task to start the drum, and filter fan, if using smoke filter. These can be done manually, using buttons defined in Artisan, or scripted in Events dialog. Same apply for cooling fans command, that can be sent on DROP event. Edited by renatoa on 01/10/2024 10:07 AM |
|
|
|
| Dan N |
Posted on 01/10/2024 10:18 AM
|
|
Newbie Posts: 28 Joined: January 06, 2024 |
Quote renatoa wrote: In my Skywalker control panel cable the red wire is NOT plus 5V, so beware ! I think they use a non standard usb cable, red wire is Rx, and placed next in sequence near black (ground) wire, instead D+ wire in a standard USB, and not opposite site of the plug, as should be. There is no white wire in my Skywalker control panel cable, btw. Please specify if you used a standard usb cable, cut for this project purpose, or reused the original control panel cable. I would not connect at all the supposed plus wire that comes from skywalker to the Arduino, which is powered via usb from computer anyway... I used a standard usb cable with standard wire colors. I measure 4.9V from the roaster. The Arduino boards are designed to handle power from USB and an external source at the same time so it won't hurt anything. You're right it's not necessary, but I have roaster power connected so that Josh's shutdown timeout will guarantee everything in the roaster is always off when the Arduino isn't connected to a PC. |
|
|
|
| ctjameson |
Posted on 01/10/2024 2:24 PM
|
|
Newbie Posts: 31 Joined: January 09, 2024 |
Quote renatoa wrote: Quote ctjameson wrote: Now the problem is I'm really new to the world of roasting as a whole. Can anyone give me any pointers on where to look for generic direction for how to roast specifically with Artisan? Great work here and I'm really stoked to get started roasting in this thing. TIA! Now the problem is that you should first learn about coffee roasting, as a whole. Artisan is just a tool to assist you, not an AI doing the roast for you. You are asking how to use a hammer without knowing what is a nail. LE: Please also notice that the IR roasting technique used by this machine is a whole universe by itself, having very little in common with all the other roasters of the market. More on this here: https://homeroast...post_77699 Thus, even the generic "roasting coffee" learning, from classic roasting resources found on the internet, would be of relative help for this machine. I have a post on this subject here: https://homeroast...post_77806 Yes I completely agree. I need to start at square one. I've only done a few roasts on auto settings in a behmor or on full blast on a sifter roaster. On the other hand, the tech guy in me couldn't leave it alone while I wait for more greens. I mapped out a bunch of buttons I felt like I'd find useful as well as mapped the sliders and such and compiled an artisan settings file I've attached. It should get a lot of folks here started once they get their arduino connected https://drive.goo...sp=sharing |
|
|
|
| Mike_Mathis |
Posted on 01/10/2024 9:46 PM
|
|
1/4 Pounder  Posts: 125 Joined: August 06, 2019 |
ctjameson, I loaded your settings and looked at them. Is the program Josh made going to be able to use those buttons to set the heater and fan to those set points? I realize they are redundant to the sliders, but if what you have is valid, one could use the sliders for 5% adjustments between the buttons. Does this make sense?
*Kaffelogic Nano 7
*Skywalker V1 *2023 BC-2 |
|
|
|
| ctjameson |
Posted on 01/10/2024 9:55 PM
|
|
Newbie Posts: 31 Joined: January 09, 2024 |
Quote Mike_Mathis wrote: ctjameson, I loaded your settings and looked at them. Is the program Josh made going to be able to use those buttons to set the heater and fan to those set points? I realize they are redundant to the sliders, but if what you have is valid, one could use the sliders for 5% adjustments between the buttons. Does this make sense? Correct on all counts. I’m using this config currently with his arduino firmware. I just added buttons for easier calling of different datapoints with the Alerts. You can modify, but this just gives a nice starting point for the newbs like me that are just getting into artisan with this roaster. You’ll need to select the right COM port when you get your arduino connected, but it’s a pretty much run ready config for roasting. I also had a small USB-C to USB-A pinout breakout board that I was able to leverage for a bit of a cleaner look. 3D printed a case and used duponts instead of soldering to the pins.
ctjameson attached the following image:
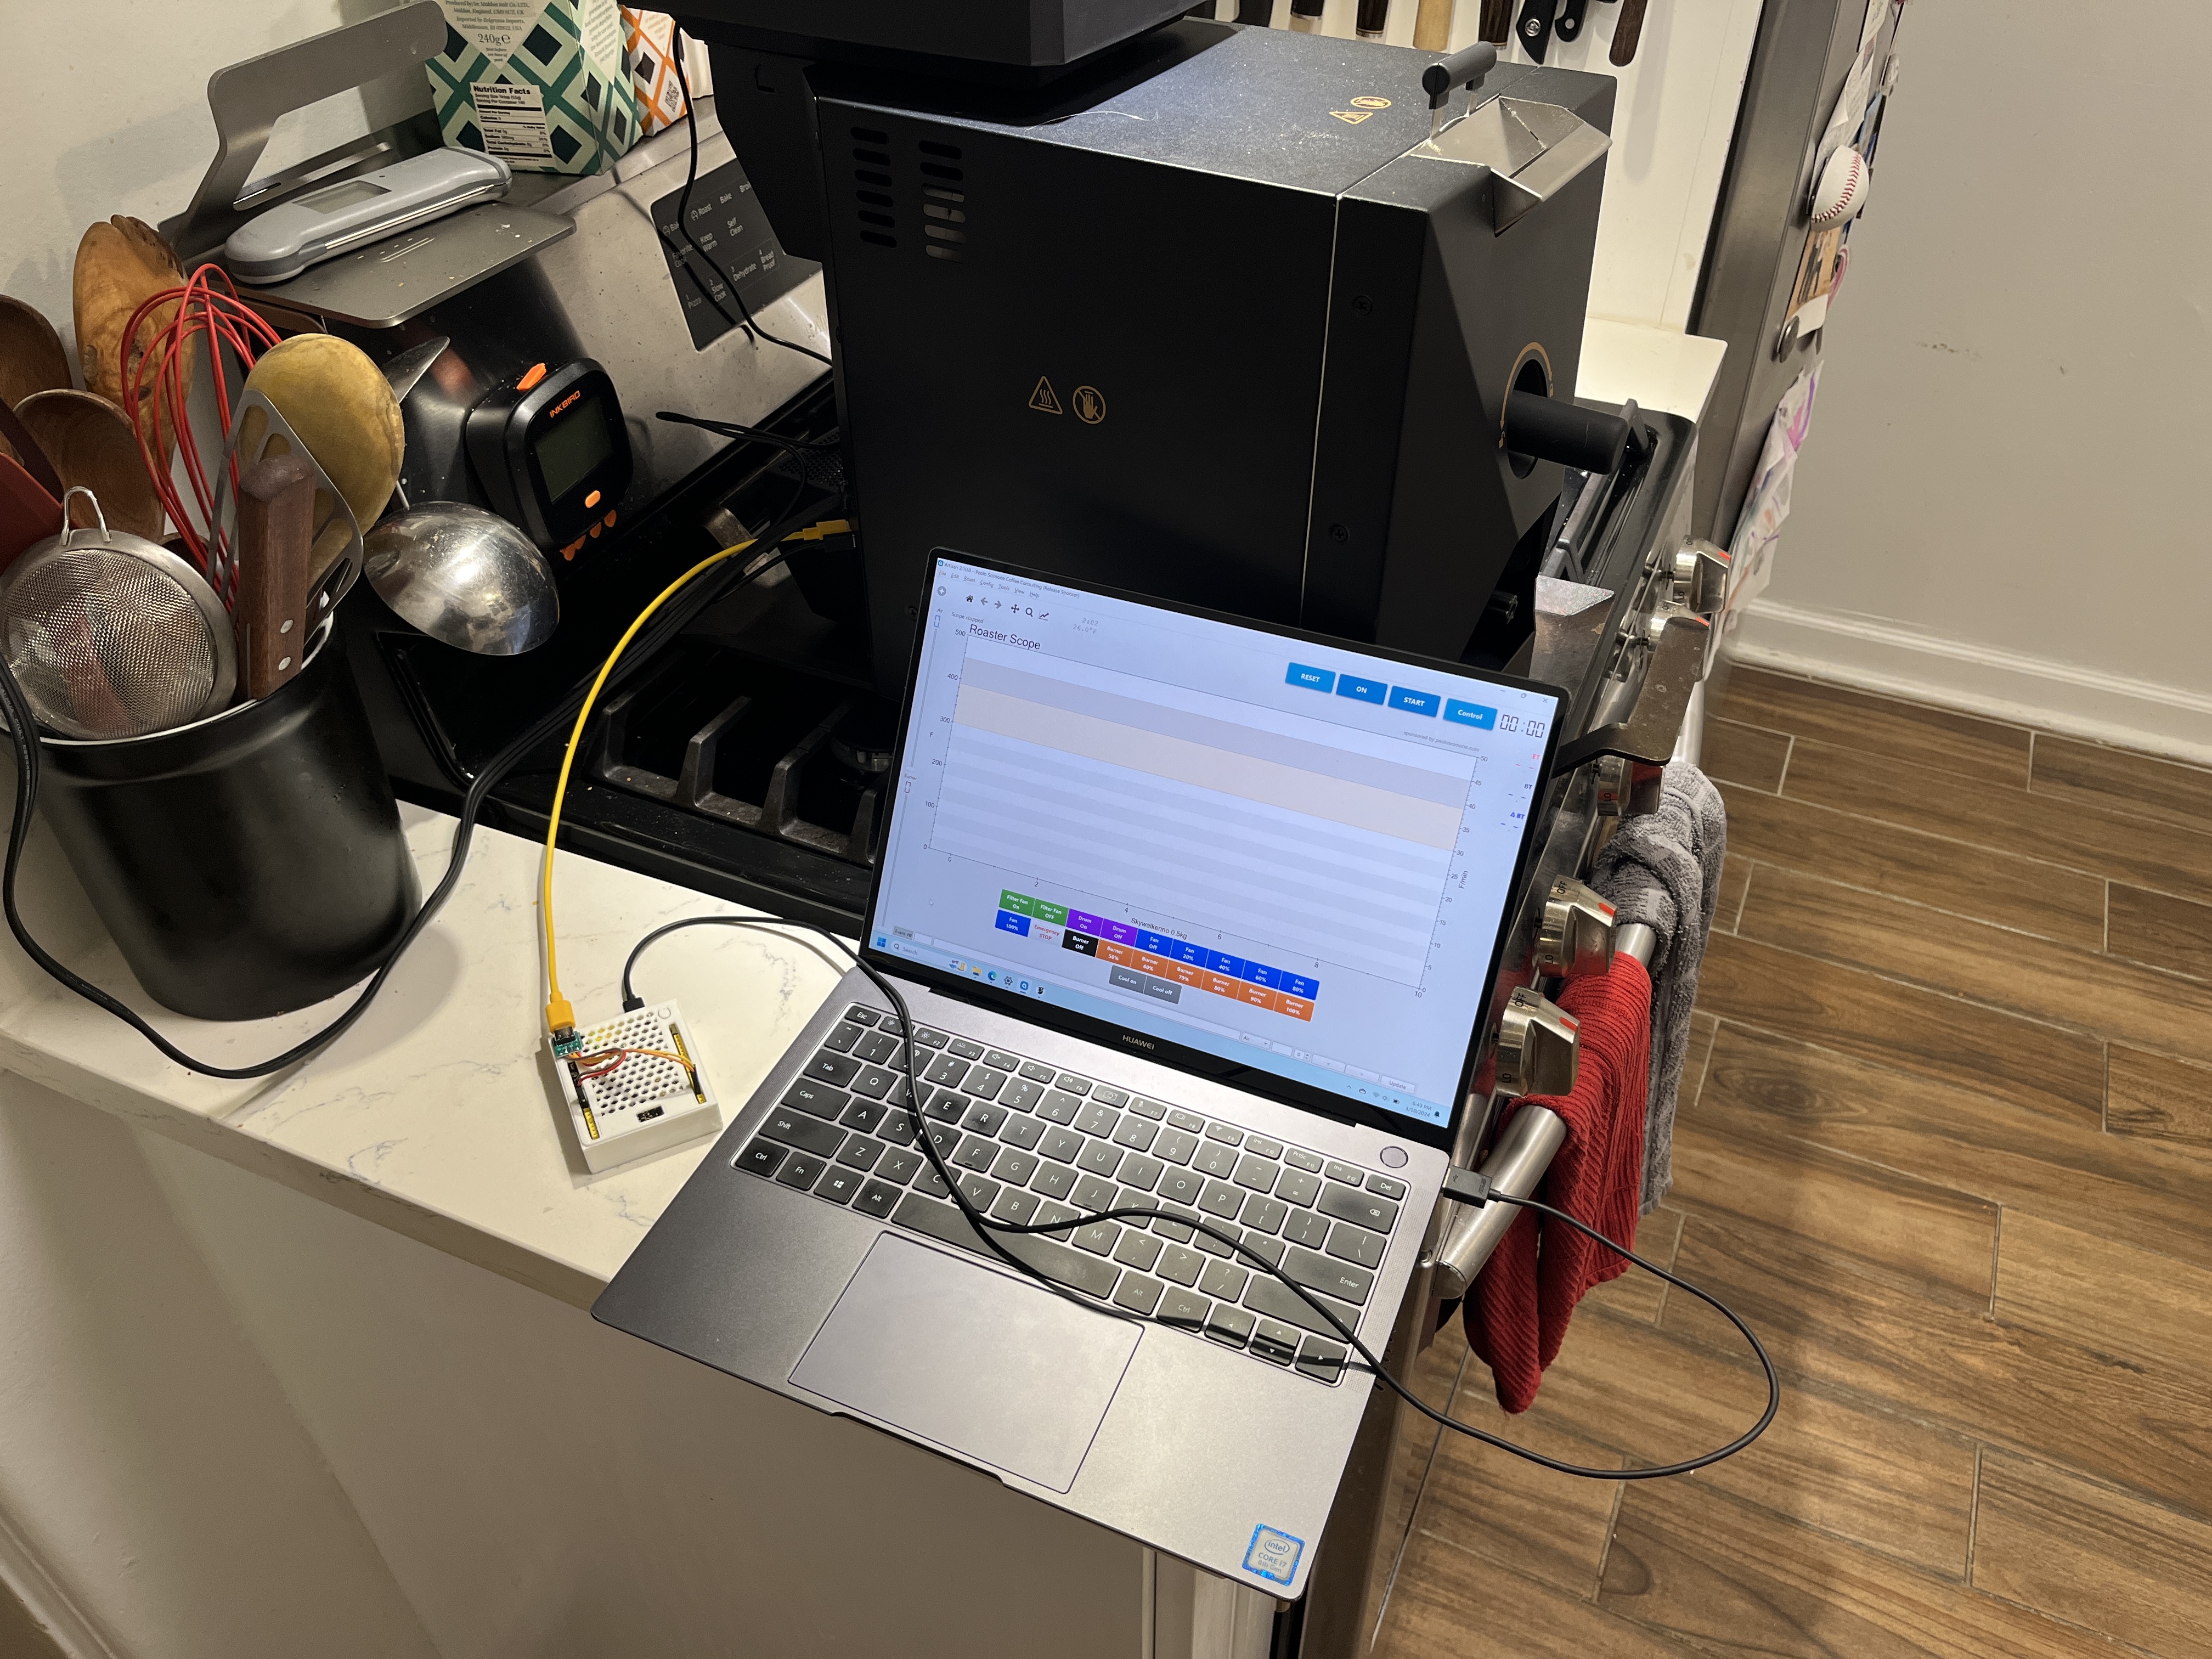
Skywalkerino - Arduino/artisan powered Ali Roaster
|
|
|
|
| Mike_Mathis |
Posted on 01/10/2024 10:50 PM
|
|
1/4 Pounder Posts: 125 Joined: August 06, 2019 |
Looking good. My Leonardo should be here maybe tomorrow. I have my USB cable ready. I guess I'm going to get a crash course in soldering little bitty wires. Did you connect the red wire to 5V as Dan did? I have to confess, I changed the button arrangement to 10 buttons per row to get all the fans on the same row. It will be interesting to say the least when I do the software sketch loading on the Arduino. I've never done this kind of thing before. Hopefully, I won't mess it up too badly. With what I am reading on YouTube, it is really interesting. *Kaffelogic Nano 7
*Skywalker V1 *2023 BC-2 |
|
|
|
| ctjameson |
Posted on 01/11/2024 12:26 AM
|
|
Newbie Posts: 31 Joined: January 09, 2024 |
Quote Mike_Mathis wrote: Looking good. My Leonardo should be here maybe tomorrow. I have my USB cable ready. I guess I'm going to get a crash course in soldering little bitty wires. Did you connect the red wire to 5V as Dan did? What I would recommend instead of soldering to the arduino itself would be to strip back some wire, tin it to that' it's one solid piece, then just push that down into the pin headers on the arduino. I had dupont jumpers laying around I could stand to canibalize, so that's what I did. You could easily replicate what I have here with two products and do zero soldering. That would be my main recommendation. Then you could use any USB-C to USB-A that has data wiring in it to connect from the arduino to the roaster. Plus it gives you the ability to reuse the arduino later for other things later. https://www.amazo...0CKN56SLN/ https://www.amazo...B01EV70C78 A bit of info on the flashing of the arduino. You may get errors, but that doesn't mean it wasn't a successful flash. Just test it and see if it works for you. Skywalkerino - Arduino/artisan powered Ali Roaster
|
|
|
|
| renatoa |
Posted on 01/11/2024 5:46 AM
|
|
Administrator Posts: 3104 Joined: September 30, 2016 |
I am glad we already have a hand of early adopters who reports this mod operating successful... but, I am still puzzled about the timing of the packets of this protocol. So the questions below are for josh or anyone having the mod in place, and spy abilities. What is the rate of the temperature packets? The length of the temp packet is about 200ms, but how often are they sent ? Are they absolutely unrelated (asynchronous) to the packets sent by control panel ? Or sent in response to some request, like TC4 reply packet is sent in response to Artisan READ command? Same about the other side, not sure about timing/rate/frequency, and also the content of control panel packets... is the last command sent over and over until a new command is issued? Seems so, according to the code... each loop the message buffer content is sent to the roaster. Or, do we have a special "ping" command, sent periodical to inform roaster that control panel is alive ? Thanks anyone clarifying me these ! |
|
|
|
| renatoa |
Posted on 01/11/2024 9:26 AM
|
|
Administrator Posts: 3104 Joined: September 30, 2016 |
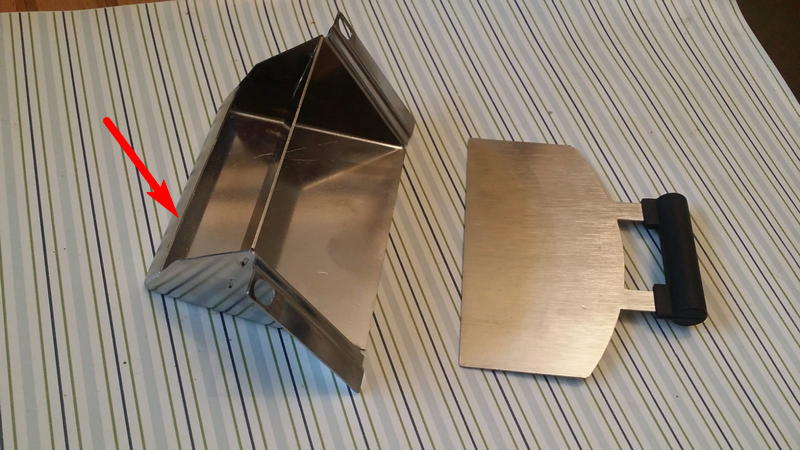
Another front of moding opens... the charge chute. For those who haven't removed the front panel yet, it's a separate, removable sheet metal assembly, that can be redesigned to suit anyone's vision of charging easy. Check pictures attached and share your ideas. Personally, the most annoying part is the the front turned-in edge, red arrow pointed ... I don't feel any need to have it there... will disappear from my cartoon prototype I am sketching atm.
renatoa attached the following image:
|
|
|
|
| HarryDog |
Posted on 01/11/2024 9:59 AM
|
|
1/2 Pounder Posts: 349 Joined: July 20, 2022 |
I have two luncheon meat cans and it will hold a full 500g, I can still use the sliding gate. But will take some time when spring hits to make a bean charge tray like the Kaleido only with the back facing front so turned 180 degrees to use the sliding gate. https://kaleidoro... Post 10 has a picture of the first stage, quick and functional. https://www.homer...rowstart=0 Edited by HarryDog on 01/11/2024 10:10 AM |
|
|
|
| ctjameson |
Posted on 01/11/2024 3:20 PM
|
|
Newbie Posts: 31 Joined: January 09, 2024 |
Quote renatoa wrote: Another front of moding opens... the charge chute. For those who haven't removed the front panel yet, it's a separate, removable sheet metal assembly, that can be redesigned to suit anyone's vision of charging easy. Check pictures attached and share your ideas. Personally, the most annoying part is the the front turned-in edge, red arrow pointed ... I don't feel any need to have it there... will disappear from my cartoon prototype I am sketching atm. I noticed it's removable as well, but I'm shooting for extreme user freindly-ness so I'm still working on the 3D printed funnel design to best fit the stock chute. I'm shooting for not modifying the roaster at all if at all possible. Current version: https://cad.onsha...42b090f520 Will be printing this afternoon and report back. I'm hoping I nailed the measurements on the angles and flares to retain the funnel without worry of it falling out. Skywalkerino - Arduino/artisan powered Ali Roaster
|
|
|
|
| renatoa |
Posted on 01/12/2024 2:51 AM
|
|
Administrator Posts: 3104 Joined: September 30, 2016 |
Printed from what ? are you aware that bottom of the funnel will be exposed to high temperatures, close to 200C ? |
|
|
|
| ctjameson |
Posted on 01/12/2024 10:08 AM
|
|
Newbie Posts: 31 Joined: January 09, 2024 |
Quote renatoa wrote: Printed from what ? are you aware that bottom of the funnel will be exposed to high temperatures, close to 200C ? No intentions to leave it in all the time. Just for charging. I’ve got a full test one printed from PLA currently for testing prior to printing in food safe PETG. Only problem is it gets kind of stuck with a full load in the funnel. Still working on smoothness of loading. But it works for now until I do some more designing.
ctjameson attached the following images:

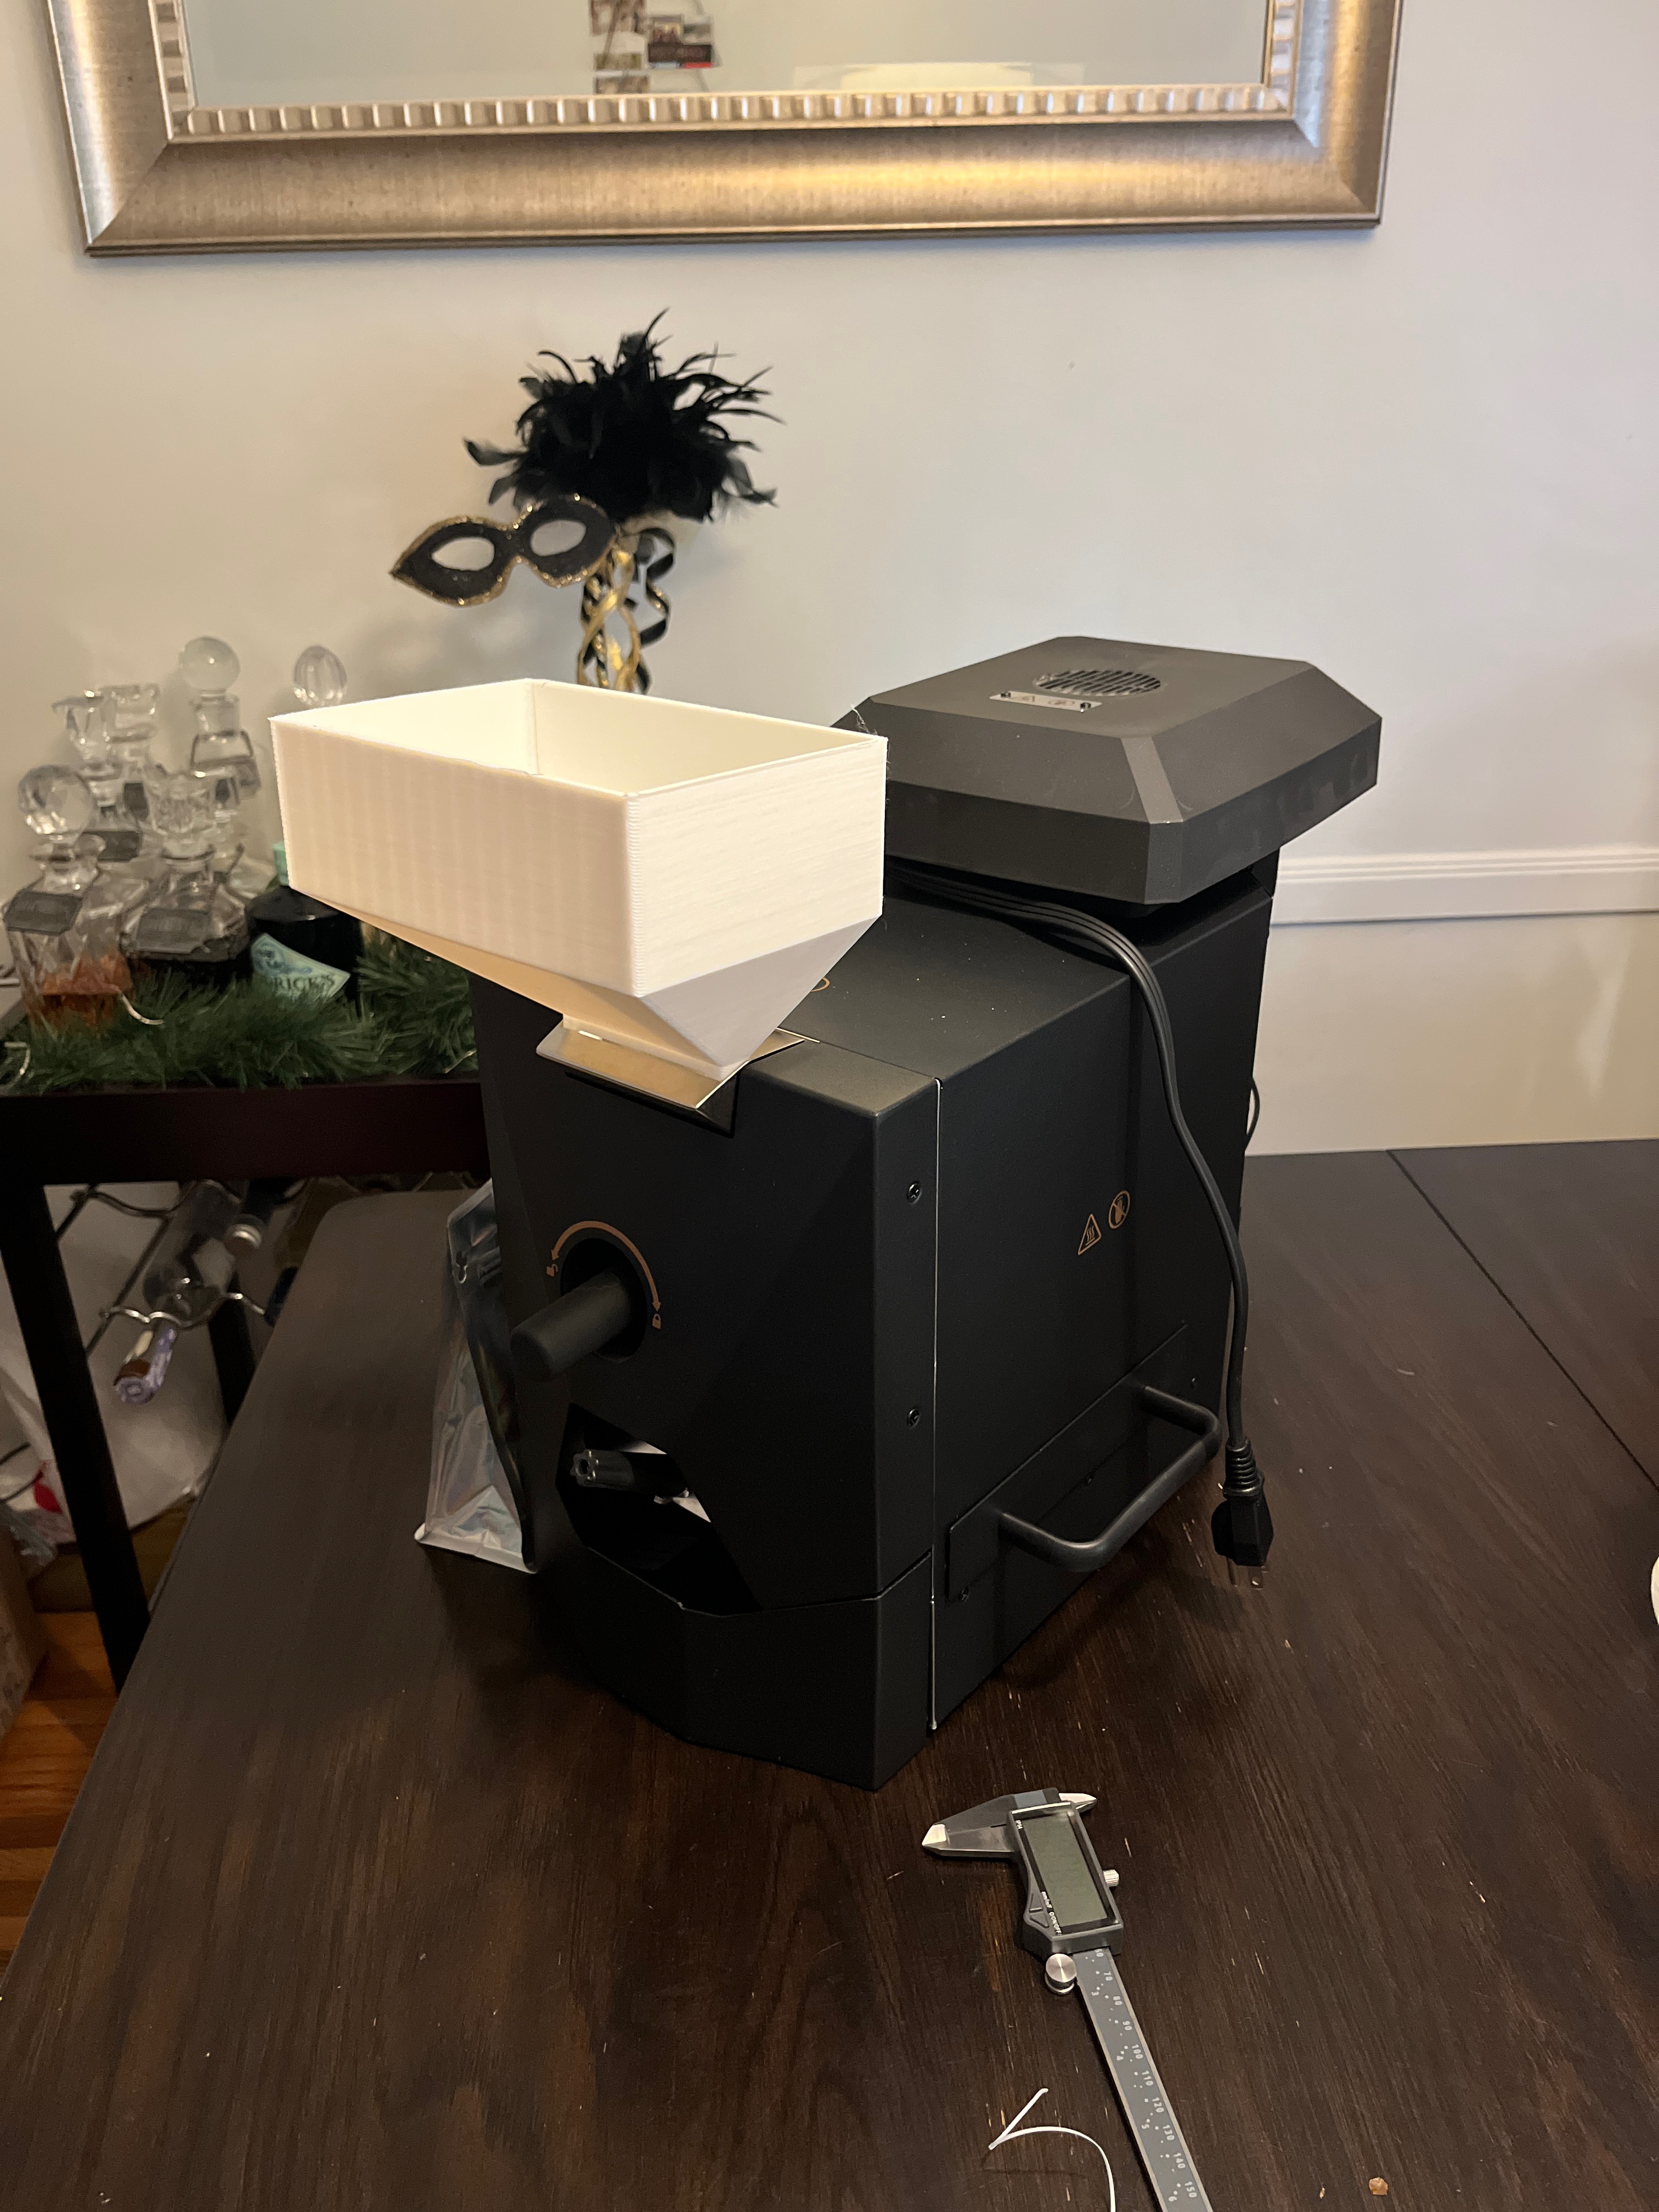
Skywalkerino - Arduino/artisan powered Ali Roaster
|
|
|
|
| ctjameson |
Posted on 01/12/2024 5:06 PM
|
|
Newbie Posts: 31 Joined: January 09, 2024 |
Once again, hated the design in the end and completely started from scratch to remove a hurdle I ran into re-designing the funnel. For the most part, it did exactly what I wanted, but the chute was just jamming really bad which is no bueno. I'm printing the new design with just the mouth portion right now and will report back on how well the newest version does. New version below: https://cad.onsha...1f170a593a Skywalkerino - Arduino/artisan powered Ali Roaster
|
|
|
|
| ctjameson |
Posted on 01/12/2024 10:38 PM
|
|
Newbie Posts: 31 Joined: January 09, 2024 |
Final design of the funnel entry solidified. Ready for a final full print prototype, then print in food grade PETG. Will post the final STL tomorrow if the print goes well tonight. It’s only 12 hours of printing. 🙃
Skywalkerino - Arduino/artisan powered Ali Roaster
|
|
|
|

| Jump to Forum: |
Powered by PHP-Fusion Copyright © 2024 PHP-Fusion Inc
Released as free software without warranties under GNU Affero GPL v3
Designed with ♥ by NetriXHosted by skpacman