
Login

Shoutbox
You must login to post a message.
renatoa
07/26/2024 3:49 PM
Bill grubbe and Jk, 
allenb
07/26/2024 5:15 AM
Spiderkw Welcome to HRO!

renatoa
07/24/2024 8:31 AM
ramiroflores and John123,

 ?
?
?renatoa
07/21/2024 1:18 AM
 , Luislobo
renatoa
07/19/2024 11:28 AM
Koepea,
Forum Threads
Newest Threads
Skywalker roaster modsBackground Roast Iss...
Hello from Arkansas
TC4ESP
Green coffee reviews
Hottest Threads
| Skywalker roaster... | [375] |
| TC4ESP | [115] |
| War on Farmers by... | [47] |
| Adventures in flu... | [26] |
| Hello! (soon) Roa... | [17] |
In Memory Of Ginny

Donations
Latest Donations
dmccallum - 10.00
JackH - 25.00
snwcmpr - 10.00
Anonymous - 2.00
Anonymous - 5.00
dmccallum - 10.00
JackH - 25.00
snwcmpr - 10.00
Anonymous - 2.00
Anonymous - 5.00
Users Online
Guests Online: 4
Members Online: 0
Total Members: 8,393
Newest Member: Bill grubbe
Members Online: 0
Total Members: 8,393
Newest Member: Bill grubbe
View Thread
Who is here? 1 guest(s)
 Skywalker roaster mods
|
|
| Beanz |
Posted on 01/21/2024 6:06 PM
|
|
Newbie  Posts: 5 Joined: June 15, 2023 |
Quote renatoa wrote: The datasheet from that link list models of NTC with a range up to 105C degrees only. The link was simply to list a Chinese source of NTC's such as Fenghua and show some mounting options. It was not intended as the specific data sheet for the device in the roaster. Apologies for the confusion |
|
|
|
| renatoa |
Posted on 01/22/2024 2:23 AM
|
|
Administrator Posts: 3104 Joined: September 30, 2016 |
Quote Robotic Kitten wrote: Quote renatoa wrote: Wondering what could be the purpose of ZCD, when the lamp is controlled using slow PWM with one second cycle, it's very visible. Maybe they are trying to play nice by not turning on the 1kW load during mid cycle? BTW, the heater is controlled by JT816HA which is an SCR??? Does it mean that the heating element is sized to work only at half of the AC wave? Interested finding... maybe there is a rectifier bridge hidden somewhere...  Using a triac, without rectifier bridge, would be cheaper though. As already stated, maybe it's a design borrowed from other appliance. |
|
|
|
| renatoa |
Posted on 01/23/2024 6:55 AM
|
|
Administrator Posts: 3104 Joined: September 30, 2016 |
My today post about an accident, in the roasts thread, should make think again those who plan massive changes, in order to drive this roaster in the usual way "as seen" from the internet tutorials. Short story, heater cut by accident premature in the development phase, but decided to let the first crack rolling, without dumping. Surprise: the temperature was rock stable for 30 seconds at 182C, without sinking even a single C degree. Fan already at 90%, not enough margin to use air as in a typical drum roaster. |
|
|
|
| Dan N |
Posted on 01/27/2024 10:07 AM
|
|
Newbie Posts: 28 Joined: January 06, 2024 |
Quote Dan N wrote: At some point I'll play with this on the Arduino and replace the polynomial formula with a table based on Steinhart-Hart. So I made a version of SkyCommand that uses a lookup table for the thermistor temperature conversion, did some testing and use it for my roasts. The summary is that it offers increased flexibility for future features, like precise calibration, but there is no current benefit for anyone else to switch from Josh's excellent original code. One thing I tested was the delay of the floating-point math polynomial conversion calculateTemp() to make sure it wasn't a bottleneck.. Turns out it is much faster than I expected, about 600us (Josh's original code with added Celsius conversion). I didn't realize that Arduino floating-point is always 32-bit on avr processors so double is identical to float. One surprise is that the memory use with lookup tables is very close to the original code size. My lookup tables have a 16-bit integer (fixed-point format) for every plausible ADC value and use 2.7k of flash. But by eliminating all floating-point calculations, and the related libraries, my code uses 28% of memory on a Nano (only 600 bytes more than the original). |
|
|
|
| renatoa |
Posted on 01/27/2024 10:36 AM
|
|
Administrator Posts: 3104 Joined: September 30, 2016 |
Regarding to the speed of execution... I am still trying to understand the message rate of the original machine protocol, and if the two streams are really totally asynchronous, not synced at all... How fast are sent the temperature messages? One per second, faster, slower ? Is the timing of this message perfectly even, at microsecond level ? Responding to these questions is useful to make josh code more solid. Just an example... in the loop function we have two calls ... Code Download source sendMessage(); ... each of them taking about 1-200ms to complete The serial commands dispatcher code runs only after these two functions above are executed, so a delay of some hundreds milliseconds occurs. For most commands this delay is not critical, but for READ, sent by Artisan to acquire data, the response should be sent back in 30 or 80msec, else timeout and Artisan cancels that sample time slot. So, if a READ request arrives during the execution of any skywalker comm function, we have a miss or hit problem. The answer will be sent too late, will travels to and buffered by the Artisan computer serial interface circuits, and delivered as a response to next READ, instead of fresh data. For this reason I feel the need to explore the possibility of syncing the skywalker comm functions with Artisan requests, in a smarter way than is done now. |
|
|
|
| Mike_Mathis |
Posted on 01/29/2024 10:17 PM
|
|
1/4 Pounder  Posts: 125 Joined: August 06, 2019 |
I have a question regarding Josh's code. When ready to drop beans and cool button is pressed, is the lamp supposed to auto shut off (like the SW controller)or does that task have to be performed manually?
Edited by Mike_Mathis on 02/26/2024 4:30 PM *Kaffelogic Nano 7
*Skywalker V1 *2023 BC-2 |
|
|
|
| renatoa |
Posted on 01/30/2024 2:05 AM
|
|
Administrator Posts: 3104 Joined: September 30, 2016 |
The code just send command "cool" to the roaster board. I guess it is only starting cooling fans, nothing else. Heater shutoff automating could be performed either in Josh code, either in Artisan, with a chain of commands on drop event: OT1;0 followed by COOL. |
|
|
|
| HarryDog |
Posted on 01/30/2024 9:28 AM
|
 1/2 Pounder  Posts: 349 Joined: July 20, 2022 |
I have been looking at Multiple Events function and found timing to be an issue, using the "sleep" option has corrected that. this is a clean factory reset as well. I have not been able to run multiple Serial Commands from the Artisan default buttons. Probably a format issue and or timing? Does it have a pause or sleep option as well? Been looking for ways to properly format this. |
|
|
|
| renatoa |
Posted on 01/30/2024 9:54 AM
|
|
Administrator Posts: 3104 Joined: September 30, 2016 |
Even if you figure this, the success of executing multiple commands depends how fast send Artisan the individual commands. When Josh code receive a command, the effective time of sending the packet to the roaster takes 100-200msec, depending on the 0/1 ratio. After sending a command there is a wait up to a second, to acquire the temperature sample... and only after all of these is done the check of serial line if there is a command waiting to be processed in the queue. As a result, commands could overlap each others, or get lost. |
|
|
|
| Dan N |
Posted on 01/31/2024 8:14 AM
|
|
Newbie Posts: 28 Joined: January 06, 2024 |
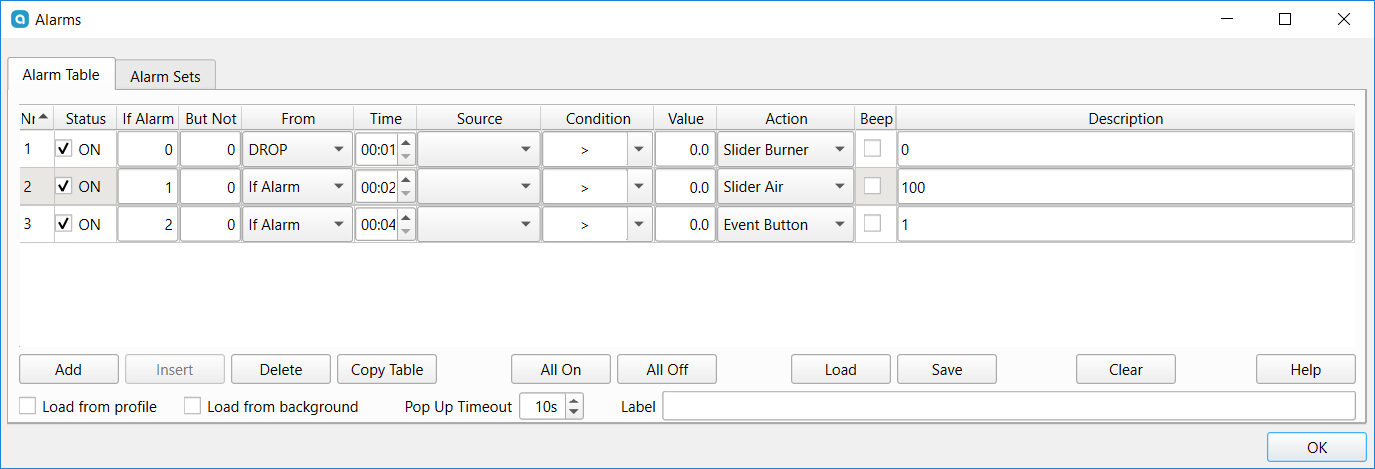
I've also been experimenting with sending multiple commands on DROP. I have seen cases where the roaster doesn't respond to one command in a group when they are sent too quickly. The Artisan Serial Log (Help menu) is very useful to see the delay between commands. Artisan seems to have a 2 second loop where it sends a CHAN command followed by a READ command. Any commands you send during that 2 second period will be grouped and sent together as fast as possible. To reliably send a group of commands you will have to tweak the timing to put each command in a different 2-second window. I did it with chained alarms (attached pic) but I also have it working with Multiple Event + sleep.
Dan N attached the following image:
|
|
|
|
| Littlenemo |
Posted on 02/01/2024 6:10 PM
|
|
Newbie Posts: 1 Joined: January 15, 2024 |
Hi all, just stopping by to thank you all for all the mods posted here. I've used my Skywalker roaster for about 2 weeks now (after 3 years on an SR540), roasted about 5 lbs so far and watched tons of videos (about roasting in general) and experimented different beans and roasts profiles. I'm enjoying it, and using Artisan with it is really fun! Cheers! |
|
|
|
| staralfur12 |
Posted on 02/01/2024 11:08 PM
|
 Newbie Posts: 4 Joined: December 31, 2023 |
Just did sloppyjosh's mod. It went well but there was some points of confusion: 1. You need to download TimerInterrupt library and copy paste the contents of the folder into the SkywalkerCommand folder https://www.arduino.cc/reference/en/libraries/timerinterrupt/ 2. Cut any USB wire, put: teal -> Digital 2 white -> Digital 3 red -> Vin black -> Ground 3. After the first config where you select TC4 and press Ok, Artisan will then prompt you with another dialogue box. Simply select your USB connected Arduino from the first dropdown menu. That's it. If you're not sure which it is you can disconnect your Arduino and reconnect and you should see the dropdown menu change. Anyway, great mod. It's easy to control the Skywalker using Artisan. Button presses on the Artisan are 1:1 to the roaster in that there's no delay; if you want the burner at 50% it will instantly change to 50%. I did my first roast with this and it went pretty smoothly.  |
|
|
|
| renatoa |
Posted on 02/02/2024 3:17 AM
|
|
Administrator Posts: 3104 Joined: September 30, 2016 |
Welcome ! Quote 1. You need to download TimerInterrupt library... Not mandatory, the simple way is to comment all lines related to timers, which aren't used, was just a tentative. Roasting with Artisan could be fun, but a warn is necessary... for absolute Artisan newbies it's easy to forget the machine with heater ON, after roasting finish, and quit... very dangerous. Wondering if the 250C maximum temperature protection is implemented in the roaster controller, thus active with Artisan too, or in the display panel... to be tested... If the second, I think is mandatory to have a safety measure added to josh code, to avoid such accidents. |
|
|
|
| staralfur12 |
Posted on 02/04/2024 7:44 PM
|
|
Newbie Posts: 4 Joined: December 31, 2023 |
Simple mod that greatly improves the bean chute opening. All I did was use a plier to pry off the little chute "slider" thing that makes it so hard to load the beans. The front panels are held together by some T15 Torx screws (you can use a hex key too) and phillips screws, easy enough to take apart. The slider is welded to the sides of the chute by small little beads of welding, and easily broken off by rocking it back and forth on the joint and doing a little bit of twisting. Be warned though, you might bend the sides with this method, I did a little bit and I just bent it back into shape. Pretty easy to do. I also filed down the edges overall and also filed down the edge where you put in the chute stopper into a wedge so the cute stopper has an easier time getting in (still hard to get in though tbh). Anyway, hugely improved the opening. Another bonus is it gives a top down window opening to view the chamber and burner too. update: did 2 roasts after this mod, zero issues and the modded chute worked amazingly well.     
Edited by staralfur12 on 02/05/2024 5:39 PM |
|
|
|
| renatoa |
Posted on 02/06/2024 3:48 AM
|
|
Administrator Posts: 3104 Joined: September 30, 2016 |
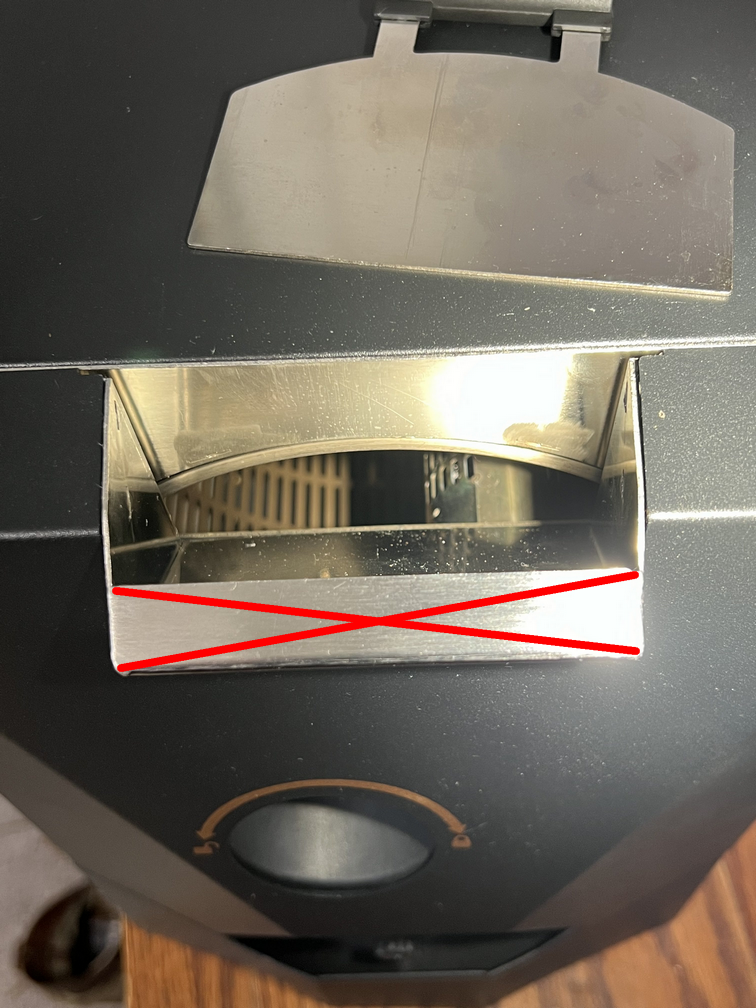
Good trick ! Probably it is there for structural integrity mainly... or to hide visually what happens inside the the belly of the monster  Or against potential popcorning... For me the other side is equally meaningless, I means the bent edge closer to the operator, red crossed in attach. But that part is much harder to remove, is not a welded separate piece, but part of the chute. Your removal is indeed much easier and bring probably the same plus in charge process. ~~~
renatoa attached the following image:
|
|
|
|
| staralfur12 |
Posted on 02/06/2024 6:21 PM
|
|
Newbie Posts: 4 Joined: December 31, 2023 |
Quote renatoa wrote: Good trick ! Probably it is there for structural integrity mainly... or to hide visually what happens inside the the belly of the monster Or against potential popcorning... For me the other side is equally meaningless, I means the bent edge closer to the operator, red crossed in attach. But that part is much harder to remove, is not a welded separate piece, but part of the chute. Your removal is indeed much easier and bring probably the same plus in charge process. ~~~ No loss of structural integrity whatsoever, nor popcorning (since the opening is fully closed regardless by the chute stopper), it's quite possibly the most useless thing in this roasting machine The lip thing is probably as useless as well, but removing it is a much bigger process so I didn't bother. Would involve using an angle grinder to cut it off. seems to me their slightly updated version is here https://www.aliba...77272.html did the same mod as me as well where you can see directly into the drum Edited by staralfur12 on 02/06/2024 11:54 PM |
|
|
|
| renatoa |
Posted on 02/10/2024 11:18 AM
|
|
Administrator Posts: 3104 Joined: September 30, 2016 |
Curious to find more about Skywalker protocol, I did these days a bit of forensic at next level, i.e. packets timing and protocol, and here are my findings... if anyone is interested to customize the actual packets sending of josh application. Seems there is no sync between the two directions. No packet is sent in response to other, or conditioned by the occurrence of other. Packets are sent at full speed, with only some milliseconds break at the end, over and over... Their rate is not fixed, being determined by the packets duration, which is determined by the info carried by each packet, i.e. the mix of 0/1 in the packet. For example at start, i.e. idle state, when the control packet is full of zeroes, thus the shortest packet size, the rate is about 87-88ms. The roaster packet in idle is 116-118ms, being one byte longer than control packet, 6 vs 7 bytes, and the contents encoding the ambient/idle temperature of the machine, so the mix of 0/1 in the packet is variable. At 50% heater 50% fan the control packet length increases to about 99-101ms, due to the longer 1 pulses that occur due to drum/heater/fan control. The length of temperature packet remains in the same ballpark, but larger values range and more random, due to the permanent temperature change, due to start of the preheat. Below is an approximate visual text representation of the way how the two lines packets interleaves during one second timeline, machine in idle state. First row of text is for the control packet, the second is timing of the temperature packet, from roaster. Numbers are milliseconds length. 87....88.....87...*88*...88....88.....87...*88*...88...87...88 ..116....118.....*117*.....117...118.....*116*.....121...118 So we have about 11 control packets and 8 temperature packets in a second, travelling in both directions, The values surrounded by ** are packets overlapping the preamble pulses so much that is impossible to receive both with an Arduino board capabilities. So someone trying to acquire as much data as possible must sacrifice one of them. |
|
|
|
| ctjameson |
Posted on 02/10/2024 12:36 PM
|
 Newbie Posts: 31 Joined: January 09, 2024 |
Something I�ve noticed is that if I give it too many commands at once, the burner will just stay on 100% and not turn off until I�ve fully unplugged the roaster from mains, removed the arduino, and let the element fully stop glowing. I haven�t had any time to look more into it, but obviously something with timing or overloading the board with commands is problematic. Skywalkerino - Arduino/artisan powered Ali Roaster
|
|
|
|
| renatoa |
Posted on 02/10/2024 2:19 PM
|
|
Administrator Posts: 3104 Joined: September 30, 2016 |
This evening I spent assisting a fellow to connect the Arduino dongle to a Mac... Very difficult and unreliable, hours of attempts... No commands, just ON mode on Artisan, looking at the screen... every 1-2 minutes there is a comm break. Below it's an excerpt from serial log: 499 15:35:44.740 ArduinoTC4: /dev/cu.usbserial-14210,115200,8,N,1,0.8 || Tx = READ || Rx = [''] || Ts= -1.00, -1.00, -1.00, -1.00, 0.00, 0.00 498 15:35:44.740 ArduinoTC4: Tx = READ || Rx = 497 15:35:42.148 ArduinoTC4: /dev/cu.usbserial-14210,115200,8,N,1,0.8 || Tx = READ || Rx = ['0.00', '0.00', '131.20', '50', '50', '0'] || Ts= 0.00, 131.20, -1.00, -1.00, 50.00, 50.00 496 15:35:42.148 ArduinoTC4: Tx = READ || Rx = 0.00,0.00,131.20,50,50,0 You can see the transition from a good READ followed by a valid answer, to a "communication breakdown" (Led Zep) If anyone has an idea... |
|
|
|
| HarryDog |
Posted on 02/10/2024 5:38 PM
|
|
1/2 Pounder Posts: 349 Joined: July 20, 2022 |
I saw this video about syncing a Hot Top roaster to Mac. So turn on the roaster, artisan is running then connect the USB. In Artisan Click the clock then control and it should sync. Have no idea if that might work. https://www.youtu...YbTgS-S3LI |
|
|
|
| renatoa |
Posted on 02/13/2024 11:16 AM
|
|
Administrator Posts: 3104 Joined: September 30, 2016 |
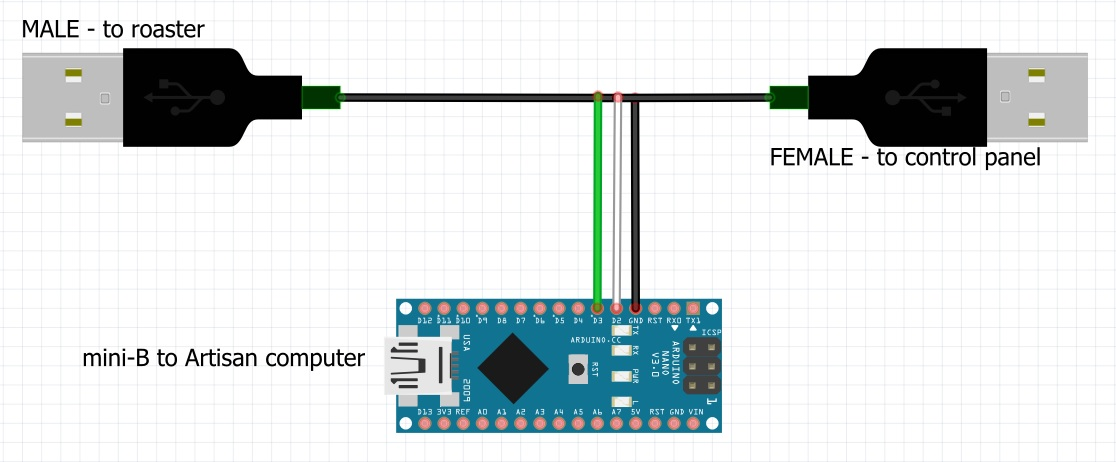
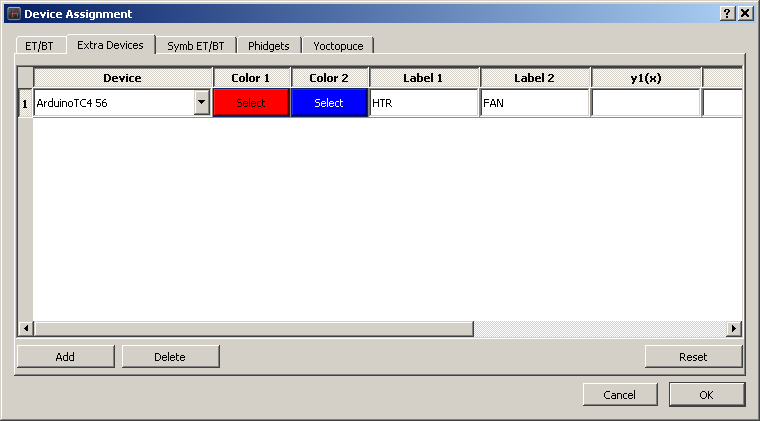
Quote darelleman wrote: Hi all, I just got this roaster about a week ago and did a few assisted roasts. Now I am onto incorporating sloppyjosh's Artisan mod. Wondering if there is a way to use the original touchscreen controller to operate the roaster while using the Arduino and Artisan just for logging the roast. Would something like a USB splitter work if I use it to connect both the Arduino and the controller to the roaster? I would rather not do any soldering on the Skywalker's components themselves but I could if necessary. Seems @darelleman was a visionary on this subject, because I arrived to the same conclusion... roast by roast First was just experiments, to spy the Skywalker protocol... then realized that... hey, I can used this setup for roast too ! Then, the more I used, the more I found this way suits me better than the actual mode discussed so far in this thread. There are two main reasons I turned to this alternate way of using the roaster: - first, we have a protocol that is not 100% well understood, and a machine the is quite sensitive to any hiccup of our attempt to emulate its language. Experienced myself, and others reported... lost commands, locks or unable to connect at all. Keeping the factory control panel active, either Artisan or connection can crash, but we can conclude the roast without trashing the beans. - second, is about the control ergonomics. You can call me an old fart, but industry is still on physical knobs, buttons, and other control methods that provide physical/sensorial feedback of using them with closed eyes... unlike mouses and touch screens. I know that so far the Skywalker control panel gathered only critics, and even a total failure report (at least one), but for me it works and I like using it more than clicking on the Artisan screen. Plus, the factory controller implements the preheat and cooling modes, that requires special attention to be done in Artisan, especially for newbies. Lets see how is this different than before. We start with a USB-A Extension cable, as in the link below, or attached image if the link expires. https://www.amazo...12O5I?th=1 With a sharp cutter, we make a slot somewhere in the middle, and tap/branch the ground and data wires, using any method that suits your skills. Left the red wire intact, untouched, unused. The three wires will be connected to any available Arduino board you have around. Used a Nano, because the form factor allowing be to wrap it together with the cable, like a ferrite bead/choke. The connection mode is sketched in the attached schematic. The Arduino runs a sketch derived from original josh SkywalkerSpy code, with some slightly changes, for minimal Artisan commands processing required for data acquisition. It is attached as well. On Artisan side there is no need for ANY setup... nothing, nada, zip ! You can start directly with factory settings straight after install, followed by the basic TC4 setup... A typical roast session looks like: - preheat, using roaster control panel, - start roast on Artisan, using Start button, let stabilize some seconds to see graphics start plotting - charge beans, double R press, try doing this as close to the Artisan charge detection, to have the timers synced as close possible - wait TP happens on Artisan, and start power control maneuvers, using roaster control panel - as roast progress, mark Dry End and FC start, in Artisan - finish the roast by opening the exhaust door, then long press R, then DROP on Artisan. The later is not critical to be done as fast as possible, because you can readjust the event in Artisan using the power drop moment recorded in the graphic. - set the cooling mode on roaster, using control panel. - save Artisan roast session log file. In order to have plotted and logged the heater/fan levels, as they are changed manually from the control panel, you have to add the virtual device Arduino TC4 56 to Extra Devices section, as in the attached screen shot. The purpose of this virtual device is to decode the HTR/FAN values from the TC4 packet sent by the spy adapter, making them available for plot and logging. That's all folks. @darelleman, I hope you are still reading here, and this is useful for you
renatoa attached the following file:
renatoa attached the following images:

Edited by renatoa on 05/03/2024 2:12 AM |
|
|
|
| HarryDog |
Posted on 02/13/2024 12:39 PM
|
|
1/2 Pounder Posts: 349 Joined: July 20, 2022 |
I for one have had some issues with the timing, when sending multiple events I would get differing results. It also seemed to cause some cascading effects like the loss of Alarms execution, a basic removing the Arduino and re connection of a different com port looked to correct the strange behavior, like a reset. I like using Artisan so I'm trying different timing on commands so not to overload with any requests. Right now 2 second sampling and using sleep(1) between Multiple events has been working well. I also try to keep the Default button commands from executing at the same time so Alarms that are timed to execute away from the default buttons like charge or FC. renatoa, do you think I should make any changes to the sampling rate or sleep option settings I'm currently using? |
|
|
|
| renatoa |
Posted on 02/13/2024 3:00 PM
|
|
Administrator Posts: 3104 Joined: September 30, 2016 |
For losing commands execution I think the culprit is here: Code Download source String input = Serial.readString(); https://github.co...d.ino#L282 If many commands from Artisan are accumulated in the serial line buffer, the line above reads them all, clearing the buffer, but only the first is executed, the others are lost. That line should be replaced by Code Download source String input = Serial.readStringUntil('\n');... which reads only the first command, until reaching end of line, without clearing the rest of the commands in buffer, if more... The command just read is executed, then next loop the second command in the buffer is fetched, and so on. You have nothing to lose to give it a try... |
|
|
|
| HarryDog |
Posted on 02/13/2024 3:18 PM
|
|
1/2 Pounder Posts: 349 Joined: July 20, 2022 |
I read Artisan does not have any settings to time the serial communications like the sleep option (Must have some internal code to time this), but this sounds like a perfectly good solution, thank you, I will definitely implement this. |
|
|
|
| HarryDog |
Posted on 02/14/2024 1:49 PM
|
|
1/2 Pounder Posts: 349 Joined: July 20, 2022 |
So I have tested this code change and I can set 5 event buttons in one Multiple event sequence with no sleep and all executed, Now I did see one oddity that if you are testing this with say 3 fan changes (35%, 50%, 100%) the first one I cannot detect visually on the slider that it executed but the second and third I can see on the slider. No one would do this anyway, it was just my first test. I do think it executed because if I add the sleep I see the change on the slider using 5 event buttons 3 are not fan changes, none are skipped in that test. I also tested with extra Event Buttons in between fan changes so I have the chance to see the change and that worked as well. Just in case anyone was wondering about this edit. |
|
|
|

| Jump to Forum: |
Powered by PHP-Fusion Copyright © 2024 PHP-Fusion Inc
Released as free software without warranties under GNU Affero GPL v3
Designed with ♥ by NetriXHosted by skpacman