
Login

Shoutbox
You must login to post a message.
renatoa
07/26/2024 3:49 PM
Bill grubbe and Jk, 
allenb
07/26/2024 5:15 AM
Spiderkw Welcome to HRO!

renatoa
07/24/2024 8:31 AM
ramiroflores and John123,

 ?
?
?renatoa
07/21/2024 1:18 AM
 , Luislobo
renatoa
07/19/2024 11:28 AM
Koepea,
Forum Threads
Newest Threads
Skywalker roaster modsBackground Roast Iss...
Hello from Arkansas
TC4ESP
Green coffee reviews
Hottest Threads
| Skywalker roaster... | [376] |
| TC4ESP | [115] |
| War on Farmers by... | [47] |
| Adventures in flu... | [26] |
| Hello! (soon) Roa... | [17] |
In Memory Of Ginny

Donations
Latest Donations
dmccallum - 10.00
JackH - 25.00
snwcmpr - 10.00
Anonymous - 2.00
Anonymous - 5.00
dmccallum - 10.00
JackH - 25.00
snwcmpr - 10.00
Anonymous - 2.00
Anonymous - 5.00
Users Online
Guests Online: 5
Members Online: 0
Total Members: 8,394
Newest Member: Bill grubbe
Members Online: 0
Total Members: 8,394
Newest Member: Bill grubbe
View Thread
Who is here? 1 guest(s)
 Jborks 2kg drum roaster build
|
|
| jborks |
Posted on 01/19/2024 11:38 AM
|
|
Newbie  Posts: 5 Joined: January 18, 2024 |
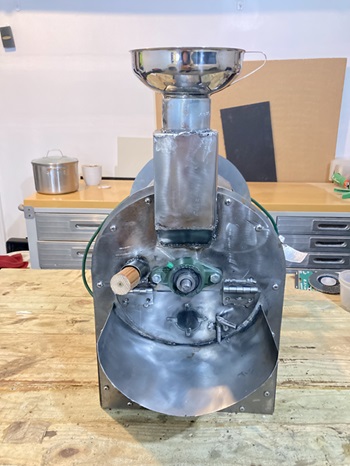
Goal: Build a 2kg drum roaster with basic tools, readily accessible materials, and at a low(ish) cost. Hi All! Long term reader of this forum and first time poster. I started off roasting coffee in a home-brew turbo oven design that was only able to roast half a pound of coffee. My goal was to build something that could roast >1kg of coffee and after reading this forum for a few years I settled on a drum roaster design. Specifically, one based on UmMerkur build located here: https://homeroasters.org/forum/viewthread.php?thread_id=6720 In general, I love tinkering with things and working with my hands. It is a good escape from my day job and instant gratification. Having said that, I didn�t want to buy fancy equipment or source expensive materials. This is a hobby after all��. My goal was to build a coffee roaster with parts available at Menards or homedepot and use tools that I had on hand. This ended up working for the most part, other than ordering a number of specialty items off amazon. A few caveats: First, I have zero previous welding experience and this made me nervous before starting. However, I found it easy to join metal. The hard part was making it look nice. Please go easy on me if you are a proficient welder! My welds are complete garbage, but functional. I settled on a flux core welder that was $100 off amazon � YESWELDER 135Amp. It worked great. Second, I was limited by sheet metal sizes and gauges available at a big box store. That impacted some of the design (specifically the drum liner) and made for interesting fabrication. General Design ------------ Drum ------------ -- Harbor Freight 5 gallon air tank -- Cut to 9� x 11� -- Volume = 11.47 liters -- 1/6 rule: 11.47 / 6 = 1.9KG pounds of coffee -- 5/8" drum shaft -- "shell" around the outside to deflect heat -- perforated back to allow air in ------------ Burner ------------ -- 60,000 BTU castiron burner -- https://www.amazo...ct_details -- The shape is not ideal but it�s the best I could find ------------ Motor ------------ -- 60RPM 120W 30:1 gear motor -- 20nm torque -- https://www.ebay....6621786710 ------------ Air Handler ------------ -- Harbor Freight Cyclone Dust Separator -- https://www.harbo...57194.html -- I'm really hoping plastic will be OK. -- There will be some distance for the air to cool as it reaches the cyclone. ------------ Control ------------ -- RaspberryPi -- Bean Mass thermocouple -- Air Temp thermocouple -- homebrew python logging script Main Tools: -- YESWELDER 135Amp flux welder -- Angle Grinder with cutoff wheel and Flap Disc -- Bench clamp -- Tin Snips � cutting 22G metal -- Hand Drill � various bits -- Jig Saw with metal cutting blades TO DO: -- attach thermocouplers -- Connect burner -- Connect motor -- Cooling Tray -- configure Cyclone Filter -- Outer shell with insulation Attached are a few images of the progress so far. I'll be including the build process in additional posts. Comments are welcome and appreciated. Thanks for looking!
jborks attached the following images:


Edited by renatoa on 01/19/2024 11:54 AM |
|
|
|
| jborks |
Posted on 01/19/2024 12:29 PM
|
|
Newbie Posts: 5 Joined: January 18, 2024 |
Frame Construction The frame was pretty straight forward. It needs to be long and wide enough to for the drum plus ~2" in the back for air flow into the perforated drum back. I also allowed ~2" around the top and sides to allow for insulation. Here is a picture of the mock-up
jborks attached the following image:

|
|
|
|
| jborks |
Posted on 01/19/2024 12:35 PM
|
|
Newbie Posts: 5 Joined: January 18, 2024 |
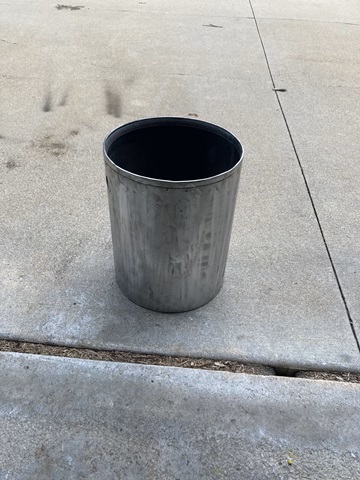
Drum First I cut the harbor freight air tank to size and used a flap disk to sand off the paint. I then proceeded to weld on small tabs which would allow a small gap between the drum and the shell. The shell is intended to deflect heat and scolding of the beans. Unfortunately, the big box store did not have a long enough piece so I had to weld two sections together around the drum. It wasnt pretty... bit I think it should work.
jborks attached the following images:

|
|
|
|
| jborks |
Posted on 01/19/2024 12:44 PM
|
|
Newbie Posts: 5 Joined: January 18, 2024 |
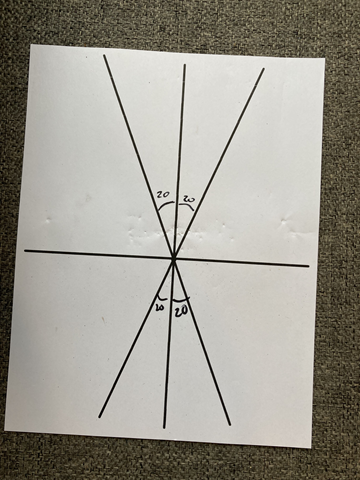
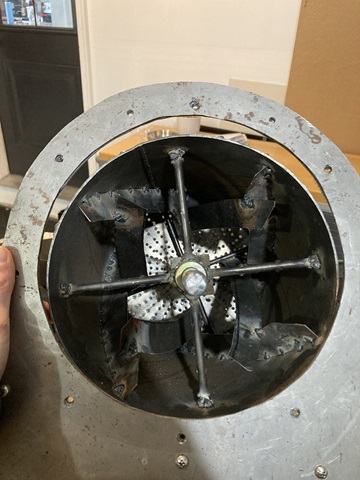
Drum Vanes This was probably the most difficult part. I settled on a 20 degree angle after reading numerous threads. The hard part was tracing that angle onto the drum and cutting vanes to match the curvature. Imagine a half pipe and cutting a vane to fit the curvature; then add a perpendicular twist at 20 degrees. Rather than use fancy math I simply created a 20 degree template and used a laser to trace it into the drum. Then I painstakingly cut a vane template until it fit properly and duplicated that shape 8 times. 4 - pushing vanes 4 - returning vanes 1.5" in height
jborks attached the following images:


Edited by jborks on 01/19/2024 12:50 PM |
|
|
|
| jborks |
Posted on 01/19/2024 3:48 PM
|
|
Newbie Posts: 5 Joined: January 18, 2024 |
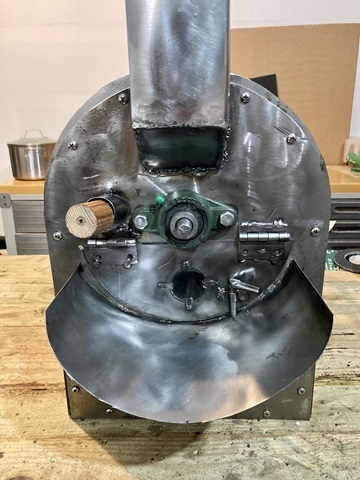
Next up was fabricating the front plate and the various add-ons. Specifically, -- Eyesight from a 20W Halogen light bulb -- Bean Sampler with wooden handle -- Door locking mechanism. I opted against the typical Ball lever approach. -- Bean hopper and Exhaust Exit manifold That is all I have been able to complete to date. Its been months and months of work. I'm hoping to finish things off in the next month and get a test batch running. I'll keep this thread posted!
jborks attached the following images:

|
|
|
|
| allenb |
Posted on 01/20/2024 12:15 PM
|
 Administrator Posts: 3869 Joined: February 23, 2010 |
Hi and welcome to HRO! Looks like you have been bitten by the roaster build bug! Looking good. I think you will have a nice functional roaster soon and it's great that you have acquired the tools and skills to bring it all together. Keep us posted and have fun! 
1/2 lb and 1 lb drum, Siemens Sirocco fluidbed, presspot, chemex, cajun biggin brewer from the backwoods of Louisiana
|
|
|
|

| Jump to Forum: |
Powered by PHP-Fusion Copyright © 2024 PHP-Fusion Inc
Released as free software without warranties under GNU Affero GPL v3
Designed with ♥ by NetriXHosted by skpacman