
Login

Shoutbox
You must login to post a message.
renatoa
07/26/2024 3:49 PM
Bill grubbe and Jk, 
allenb
07/26/2024 5:15 AM
Spiderkw Welcome to HRO!

renatoa
07/24/2024 8:31 AM
ramiroflores and John123,

 ?
?
?renatoa
07/21/2024 1:18 AM
 , Luislobo
renatoa
07/19/2024 11:28 AM
Koepea,
Forum Threads
Newest Threads
Background Roast Iss...Skywalker roaster mods
Hello from Arkansas
TC4ESP
Green coffee reviews
Hottest Threads
| Skywalker roaster... | [374] |
| TC4ESP | [115] |
| War on Farmers by... | [47] |
| Adventures in flu... | [26] |
| Hello! (soon) Roa... | [17] |
In Memory Of Ginny

Donations
Latest Donations
dmccallum - 10.00
JackH - 25.00
snwcmpr - 10.00
Anonymous - 2.00
Anonymous - 5.00
dmccallum - 10.00
JackH - 25.00
snwcmpr - 10.00
Anonymous - 2.00
Anonymous - 5.00
Users Online
Guests Online: 6
Members Online: 1
Bill grubbe
Total Members: 8,393
Newest Member: Bill grubbe
Members Online: 1
Bill grubbe
Total Members: 8,393
Newest Member: Bill grubbe
View Thread
Who is here? 1 guest(s)
Page 1 of 2: 12
|
 The well tempered roaster
|
|
| pisanoal |
Posted on 10/24/2019 9:50 AM
|
|
1/4 Pounder  Posts: 97 Joined: October 11, 2019 |
Quote 8675309 wrote: I drilled a hole in my Chaff collector on my SR500 and use a probe to measure temp with very interesting results and a much better quality roast time and time again. I monitor the temp and adjust settings accordingly and was quite surprised that the 'low' heat setting on the SR500 moved into the 400 range basically to FC and beyond and then I'd set to 'med' heat setting to prevent stalling finding 2C occurring around the 500 mark. I get good consistent roasts now and love it. Did you have insight into temp before? If not I would imagine any temp measurement would help |
|
|
|
| renatoa |
Posted on 10/24/2019 10:00 AM
|
|
Administrator Posts: 3104 Joined: September 30, 2016 |
Is important to have a good reading of real ET maximum, to avoid the 270-280 C limit, where the cellulose matrix of beans is destroyed.  |
|
|
|
| Elfmaze |
Posted on 02/10/2020 11:52 AM
|
|
Newbie  Posts: 11 Joined: January 30, 2020 |
interesting simplicity, I wonder how it would translate to my fluid bed machine... In theory temp is temp, But I know its not that simple... I usually manually "chase" the desired curve holding the ET 40 or so degrees above my next mins target temperature... Would be a whole lot simpler to set 400* and sit back and enjoy the aromas. This would roast my beans a whole lot faster since it starts out so high. I'll give it a whirl next roast in a week or so and see how it does |
|
|
|
| renatoa |
Posted on 02/10/2020 1:36 PM
|
|
Administrator Posts: 3104 Joined: September 30, 2016 |
Indeed, not so simple... You need at least two steps, because beans don't like to be thrown directly into an environment hotter than 200 C. So, try to reproduce what wise men wrote in the first post. |
|
|
|
| Tavake12 |
Posted on 02/12/2020 6:26 PM
|
|
Newbie Posts: 23 Joined: January 19, 2020 |
Okay, I also think this is an intriguing concept, the idea of controlling the roast by ET which becomes the independent variable, and allowing the BT to be the dependent variable. If you hold the independent variable constant, then the character of the bean basically defines the roast. The terminology is unfamiliar to me, especially ?start temperature.? I am going to assume that this is the charge temperature. So, the problem with all of this is that my Hottop *never* gets to 450F. I am roasting only 150 grams of beans, and I start the roast at 350, then charge. The ET drops down to like 285 and then slowly creeps up. By the time it gets to 405, my beans are at first crack. I gather from this that with any beans at all in my Hottop, it simply can?t get to 450 ET. So, either we Hottop guys are extremely lucky that we never have to worry about the ET going beyond the safety point, or, we Hottop guys are so unlucky that our roaster simply cannot get hot enough to do a decent roast, so all our efforts are producing crap. Or, perhaps there is something funny about that 450F number? Perhaps the Thermocouple needs calibrating? But it?s funny, the BT thermocouple seems to be pretty much dead on as far as first crack temp. I have heard of some techy geeks out there plugging into a variac and upping the voltage on their Hottop element to get more heat out of it. I don?t think that is what the manufacturer intended. Can you say, ?how do I dramatically shorten the life of my heating element?? So, what are we to do? Is it just possible that the Hottop style of drum roaster is different from a hot air heated roaster? Maybe the radiant heat has an affect on the beans that doesn?t show up as temperature? Or the combination of radiant heat and conductive heat transfer from the drum makes the 450F number just wrong for the Hottop? Just FYI, I have done a number of roasts, and passed out the results to some of my more (and less) discriminating friends. I have converted several die-hard French roast users to my City+ roasts?they told me they had no idea coffee could taste that good. My Hottop gets to first crack just about as fast as most of the other roasters I am reading about here, although folks are notorious about not being consistent with their terminology. I think if the roaster can get the beans to first crack at the 6 minute mark and can get a good rolling crack, it is unlikely that there is something wrong with the roaster, even if it?s thermocouple never reads 450F. So, in future, if I try this again, I am going to substitute 300 for 350, and 400 for 450. It looks to me like the 450 is just wrong for my roaster. Edited by Tavake12 on 02/12/2020 7:47 PM |
|
|
|
| renatoa |
Posted on 02/13/2020 1:37 AM
|
|
Administrator Posts: 3104 Joined: September 30, 2016 |
The last paragraph in JS quote sounds as a disclaimer covering cases as yours Quote This ET part is basic roasting chemistry, and the same for all roasters and coffees. But the heat inputs required moment by moment to achieve this ET curve is based on the roaster's thermal characteristics, and is different for every roaster design. Maybe your ET probe measure hot air in a niche where air circulation lacks and heat losses led to the behaviour you described. Basically the ET from theory means the temperature of air where beans are immersed, so as close to beans but without contact to them. Since this thread start I studied a lot and you can be confident, the opening quote is right, is the hot air that do the roast and nothing else. Contact and radiant transfer are simply BS, unless you have a truly FIR radiant element in the setup. And yes, I have a lot of roasts monitoring ET only, for machines I built myself, because BT simply can't be measured for those setups. More than this, for a Gene, using a reverse logic, computed a virtual BT based on intake hot air temperature, and got FC exactly in the ballpark of 200 C for this virtual BT reading. So really things works as in theory... You can read a bit of additional physics on this subject (reverse computation of BT) here: https://forum.hom...post_65535 Edited by renatoa on 02/13/2020 1:43 AM |
|
|
|
| pisanoal |
Posted on 05/21/2020 10:28 AM
|
|
1/4 Pounder Posts: 97 Joined: October 11, 2019 |
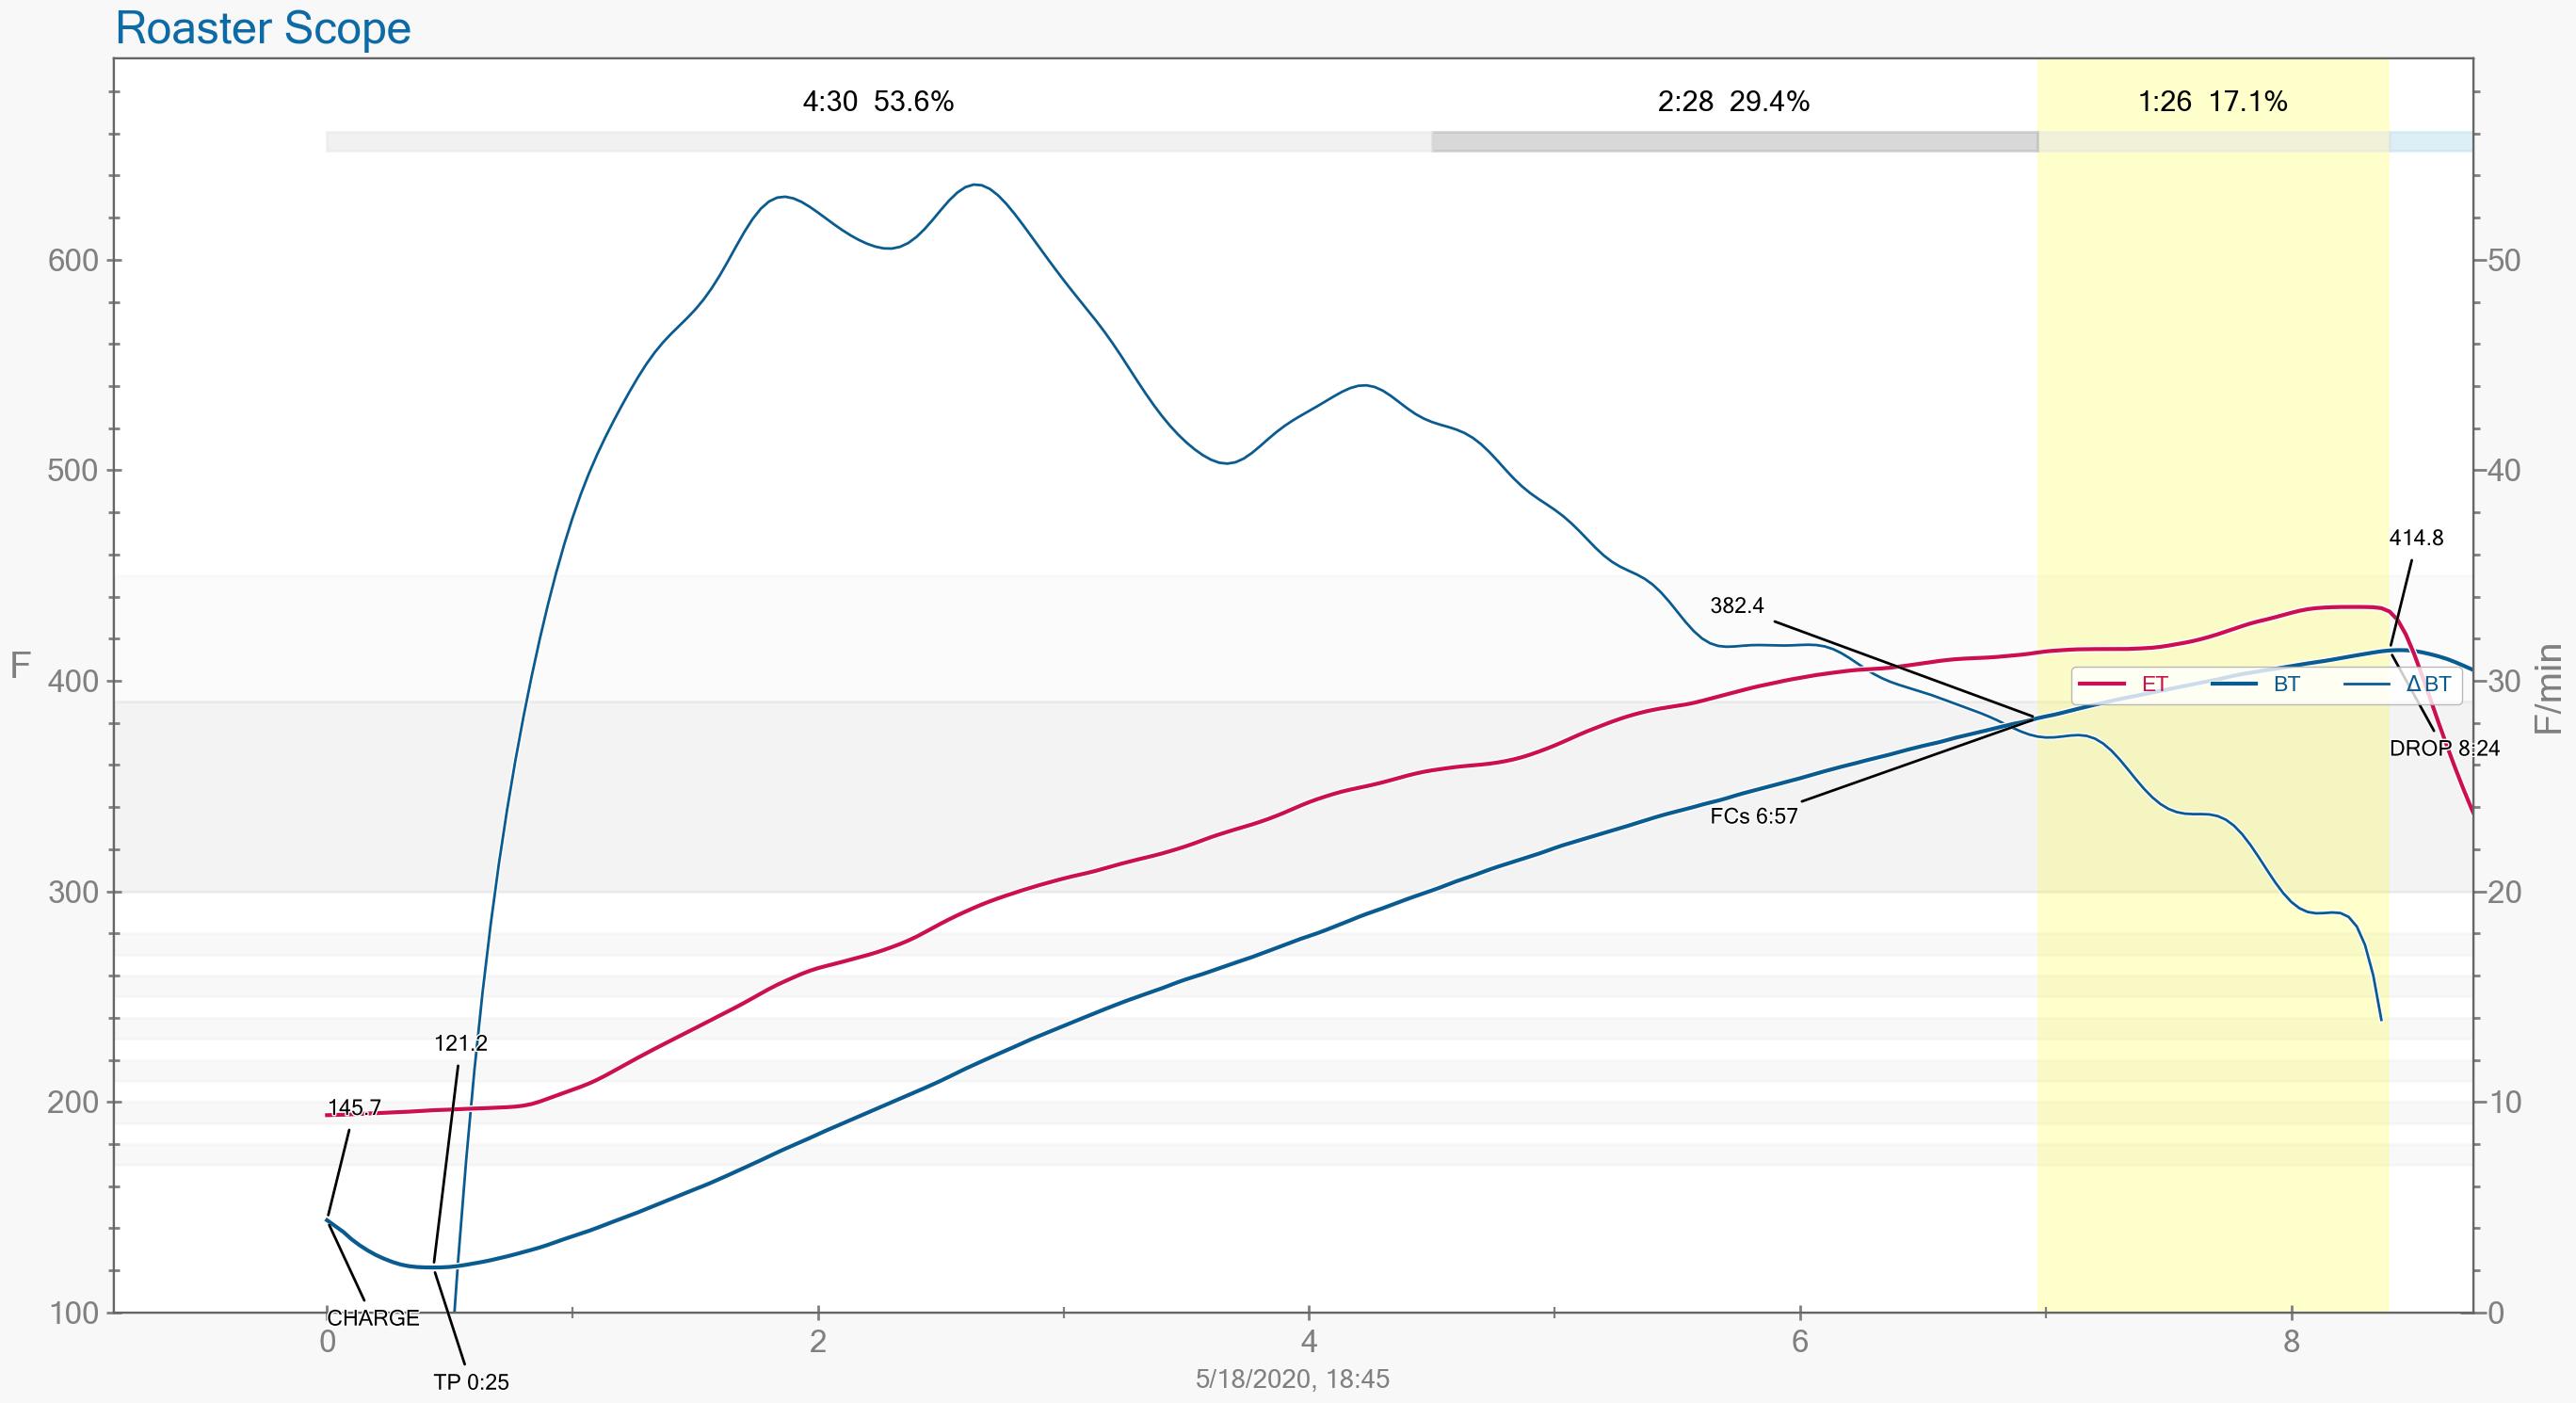
Revisiting this thread with my new roaster, I'm wondering what you would say (renatoa) about my ET, ROR and roast timing on the attached roast profile. ET probe is placed in the air stream just prior to going through perf plate. I'm curious to hear your feedback on my curve based on your experiences. I forgot to turn artisan on until right after I dropped the beans, but you still see the relevant data. Drop Temp was around 180F. Peak ET was measured at 435F. My goal for roasting lately has been the Scott Rao philosophy of constantly falling ROR. No Stalls, no increases, consistent downward slope for the ROR curve. Side note: obviously I was not super successful in "constantly falling" in this roast, but I've found good success as long as those kind of "mistakes" happen early. This particular roast did not turn out great but I would describe it as pretty good. I've got pretty high standards and the reason I am not thrilled with this roast is it does not have the depth of flavor I would expect from this bean, but it has very pleasant notes. Basically, I would say it could use some improvement, but it was not unsuccessful.
pisanoal attached the following image:
|
|
|
|
| renatoa |
Posted on 05/22/2020 6:57 AM
|
|
Administrator Posts: 3104 Joined: September 30, 2016 |
You didn't specified your control/approach/strategy in order to accomplish this roast... Had any milestones for DE and FC when you started? Manual heater control or followed any existing profile? If manual, how? what you watch and what was your goal during roast? We need more opinions if we want debate and learn, so I would have preferred not to be aimed so directly that an answer is expected explicitly from me. That's why I let a little time pass before answering, hoping for other opinions to chime in here. |
|
|
|
| renatoa |
Posted on 05/22/2020 10:01 AM
|
|
Administrator Posts: 3104 Joined: September 30, 2016 |
Ok, here is my take, regardless what you answer to the above post... We have two separate discussions here: roast/profile analysis, and how could be approached in the context of current thread subject. Will start with the second. Maybe the first part deserve a separate thread. Experimenting a lot in the last years with various roast and measurement methods, the most certain conclusion I have reached is that a roast can't be driven/controlled in real time based on feedback of current status ! The inertia of the machine, the significant changes of beans thermal capacity, during dry especially, the measurement noise of the beans hitting the probe, all of these are factors so hard to anticipate, that I abandoned completely the idea of roasting following a planned curve. Please note that the experiences I wrote above are not on fluid bed machines ! Well, than what would be in this case the approach to do a good roast ? For many people the main goal, that became almost a religion, is to maintain that constantly declining RoR, that is unfairly attributed as a discovery of mr. Rao, while it is nothing else than the result of a physics law. As already told in other posts, the temperature of a body immersed in a hotter environment is an exponential function ( BT = ET * (1 - EXP(-t/k)) ) , and the rate of rise is a mirrored curve derived from same function. In the formula above ET is the environment temperature, t is time, k is a constant describing the whole machine thermal behaviour. Draw these functions for various ET and k values and you will obtain profiles that could make anyone envy green (as a bean ) So, to obtain that holy declining RoR, all you need is to drop the beans in a constant heat environment and... wait This is a bit idealised, of course, because the real beans will not be so happy to suffer the same thermal torture from start to end, and also beans changes and water that is lost during dry are components that influence that k constant. But, even so, if we join this equation with the statement of mr. Schulman at the starting post of this thread, we might have a clue... if we start the roast from a temperature low enough for the beans to be happy, and slowly increase it up to a given value, the result could be much closer to a good roast that our attempts to drive the undrivable, having the eyes crossed in the Artisan curves. Is this approach capable to cover all types of roasts, naturals and washed, hard beans from high altitude and other varietals of coffee that exists ? No idea... possible... if we look at the range of start temperature, ramp duration, and end temperature, I guess I can draw any imaginable profile from 6 to 20 minutes long. If such profile does not cover your particular beans needs, this is still to be seen. So what is my practical approach to roast this way? First, depending on beans origin and processing, I will decide the two landmarks defining the profile curve: dry end and first crack. Let's assume they are at minute 5 and 150 C for DE, then minute 9 and 200 C for FC. Will preheat machine for the charging temperature, charge, wait turning point to occur, then start slowly increasing heat having an eye on the Artisan dotted prediction trending lines, the goal being to aim reaching the dry end temperature at the imposed milestone, of 150 C at minute 5. Please note that for my particular machine, a turbo oven based setup, I am doing this operation by always increasing power, slowly, percent by percent, and this is valid for fluid bed too, hot guns and other hot air based machines, with moderate/low thermal inertia. On heavier, big inertia machines, built as heat exchangers, as are the solid drum roasters, the heat is dosed in much bigger steps, at least 10%. Please also notice the detail to never decrease heat during the dry phase. You risk a crash as in your curve, at minute 4. If the trending line comes above the desired dry end landmark, i,e, dry period becomes too short, no problem, all you have to do is wait, with constant heat, sooner it will decrease, and you will be back in a reasonable time window near the imposed dry end landmark. Once the dry end was been reached, then is the start of the really hard part of the roast (for me), that constant declining RoR. Why I say this... because the decline must be kept under control, to have a slope within some limits, not too slow, nor too fast. Let's crunch some numbers... please be aware these are pure examples, don't take them as the "perfect" roast, nor good/bad, nor try to reproduce them thinking they are the holy roasting recipe ! Take them just as example to have an idea what are numbers I am trying to watch and follow during a roast. So, assume that ET temperature ramp, from 180 C at charge, up to 240 C, where decides to stop, ends somewhere about minute 4, so one minute before dry ends. At those moments of dry, in the minute 3-4 ballpark, RoR will have the summit of increase, then it will start to decrease, because so say the equation I wrote above. No more pushing heat, the natural machine curve decrease comes into play. Let's say this summit was about 16 C / minute. Now, the problem we have is that, for most machines I know, this decrease of RoR is too slow. This happens because, in order to reach dry end in a reasonable time frame, you pumped a given heat energy quantity into the machine, that accumulates and is too big to drive the roast to the first crack landmark on the right RoR slope. For this reason you need to lower the heat, and this is the main challenge I have every roast, how much power and when decrease power, in order to reach FC with the right momentum to minimise the maybe overestimated fear flick and crash. Again, as example numbers, from my recent roasts notes, at dry end heater is at 80%, starting decrease about one minute after dry ends, by 1% every 30 seconds, to reach some 72-75% in the moment of FC, about minute 9-10. Other machines obviously would have other heat management dynamics, but I thing the goal is the same for all, to reach FC with RoR in the 6-8 C / minute ballpark. You could wonder... what if we would stop the ET increase ramp at a lower temperature, say 235 C instead 240... there will be less heat accumulated, and maybe we have a natural decreasing RoR within gold limits, without any power change. For example at 77% for the whole second half of roast... This is a good point, and probably for some roasters is the perfect recipe hunting, to find the beans quantity and power level that led to one button touch roast, just watch and enjoy. But I never had enough time and greens in the bag to try such quest Regarding the other half of reply to your post, the right profile look, I think should be the subject of other post/discussion, or maybe even thread. To be continued... PS: because this was a long post, please forgive me for the inerent mistakes I did, as a non-native English speaker Edited by renatoa on 05/22/2020 10:09 AM |
|
|
|
| pisanoal |
Posted on 05/22/2020 11:41 AM
|
|
1/4 Pounder Posts: 97 Joined: October 11, 2019 |
I want to say I apologize if my post read that I was targeting you. That was not my intent. I asked for your specific opinion because of your original post and wanted to know your thoughts on my profile regarding the ET guidelines/rules you shared. I am wondering if I am missing out on quality/flavors by not adhering to the ETs you posted. I'm not at all saying I think you are wrong, and singling you out as such. So I am very sorry for the misunderstanding. As far as answering your other questions. I didn't originally post them because I was only aiming to understand ET targets in regards to roasting. I understand that maybe doesn't give a complete picture to address my question. control/approach/strategy in order to accomplish this roast - my only real strategy is to keep a constantly falling ROR until drop. Within that are smaller strategies, such as keep max ROR below about 60F/min (somewhat arbitrary, I find that if initial ROR is too high, the ROR curve crashes and its hard to keep a constant slope through 1C), and drop times between about 9:30 and 11:30 minutes. I usually drop between 1.5 to 2.5 minutes after onset of rolling 1C Had any milestones for DE and FC when you started? No for DE. I don't have this well defined. I have found consistent results with my above strategy. I seem to screw up a lot of roasts if I try to shoot for something specific (like a 3-4-3 type guideline for a profile). FC I like to have happen around 8:00 to 9:00 minute mark with this roaster. Rao doesn't think this is a big deal as long as there is sufficient time to develop to roast before hand (not too short to FC). What's more important is the ratio of time after 1C to drop compared to the rest of the roast according to him. I have no opinion on whether my experience concurs, I also have not paid much attention to it except maybe post roast to see where my "dev time" was. Manual heater control or followed any existing profile? manual heater control. I attempt to steadily increase ET through the roast, maintaining a delta in ET and BT that gives me the "constantly falling ROR". ET is better then going by BT for this as you say, because it is easier to consistently measure. If manual, how? what you watch and what was your goal during roast? I think I answered this above? But if not adequate, let me know. |
|
|
|
| pisanoal |
Posted on 05/22/2020 12:08 PM
|
|
1/4 Pounder Posts: 97 Joined: October 11, 2019 |
Quote Basically, this magic profile is a starting temperature of around 325F to 400F (163-204C), and a ramp up to around 450F to 480F(232-250C) in around 6 to 8 minutes, and holding it steady there to the end of the roast, whenever that may occur. This ET part is basic roasting chemistry, and the same for all roasters and coffees. But the heat inputs required moment by moment to achieve this ET curve is based on the roaster's thermal characteristics, and is different for every roaster design. " From the original post. I think this is what I am hung up on and maybe the source of the original confusion. Is this a "hard and fast rule?" As in are those specific target ETs? I assumed that is one of the things you were saying in your original post, citing Schulman. If those are hard and fast ET targets for optimal roasting for any roaster, what does that say about my profiles I've been roasting as I definitely don't start anywhere close to 325F (drop at 180F) and barely get into the 450F at finish. To your most recent novel , there is so much good information to discuss there. Thank you for taking the time to write all of that. It probably is deserving of a separate thread. I have some thoughts I'd like to bounce off the community and discuss, but I'll need some time to digest and respond... haha.
Edited by pisanoal on 05/22/2020 4:18 PM |
|
|
|
| JackH |
Posted on 05/22/2020 3:30 PM
|
 Administrator Posts: 1809 Joined: May 10, 2011 |
Quote renatoa wrote: PS: because this was a long post, please forgive me for the inerent mistakes I did, as a non-native English speaker No need to apologize, great information! Sometimes I think most of the stuff is artisan mixed with science and magic. Edited by JackH on 05/22/2020 3:40 PM ---Jack
KKTO Roaster. |
|
|
|
| renatoa |
Posted on 05/23/2020 2:35 AM
|
|
Administrator Posts: 3104 Joined: September 30, 2016 |
Artisan or any other measurement method capable to compute and display an accurate RoR, and predict the DE and FC moments, based on current slope trend. For me these are embedded in TC4, roasting not tethered. "... and magic", as in the human senses, smell and the others ? |
|
|
|
| renatoa |
Posted on 05/23/2020 3:55 AM
|
|
Administrator Posts: 3104 Joined: September 30, 2016 |
Quote The ETs are just recommended ranges that probably cover 90% of coffees he experienced. Or what the contractor is roasting, because these conclusions are the result of a study paid by Nestle. For me specific is when I say: "for this Ethiopia, you should charge at 175, ramp by minute 2 to 240 C, then one minute later to 250, then ..." Is what we call a profile, using other words. Quote pisanoal wrote: If those are hard and fast ET targets for optimal roasting for any roaster, what does that say about my profiles I've been roasting as I definitely don't start anywhere close to 325F (drop at 180F) and barely get into the 450F at finish. Well this should be the first part of discussion... analysing your roast. Before trying this analyse, please read again the last paragraph from mr. Schulman quote, "This ET part is basic roasting chemistry..." sounds this phrasing as hard enough ? You are not starting with preheat... well, you should. There are two reasons to do this: you need that energy for a fast start, to perform the drying in a given time, and also, to allow beans develop some kind of "armor", a process that is too intimate and not fully understood, as it was explained by profesional roasters, and never found any source to backup it on the Internet. Could be part of that "magic" JackH wrote above Back to drying time... how we appreciate this? We have two drying landmarks: one is again very obscure, but the source is known, mr.Rao courses, and quoted in several posts in HB forum: you shall be near 100 C at 1/4 of total roasting time. Obscure and debatable... how are you estimating this rule if the machine has very high inertia, and TP is in the 110 C and 2:30 minutes ballpark ? Looking at your graph, if total time is 8:24, then at 2:06 I read something in the 180F = 82C ballpark, so well below 100C, thus... (too) slow start. This 100 C moment is nothing to worry would influence the final taste, but it's a sign you started the roast well, for your intended roast time. It's just a flag that tell you to push more heat, or warn to charge lower next time, and prepare for a shorter roast than planned. As I already wrote I don't lower the heat in drying phase, so if hitting 100 C in shorter time than planned I simply let power as is and focus on next landmark. The second landmark of drying phase is from Artisan code, a section labelled as "#Flavor defect estimation chart for each leg". According to that rule, drying phase should be somewhere between 26 and 40% of total roast time. Your is 53.6%... hmmm... According to these two rules, your drying is definitely too long, and probably the main reason is the start with no machine preheat, or too low power dosing at start. Or, read next... For the second phase, i.e. browning/Maillard there aren't guidelines expressed as %, but a hard time interval, as minimum minutes required to have the right sugars transformation inside the bean: you need at least 4-5 minutes for this period if you want some sweetness to develop. About this rule, already questioned myself and others, if it is still valid for FB machines, known as short roast times... no reply so far. But still, with 2:28 and less than 30% of total roast time, your roast seems to be on the acidic side of the spectre, I dare to say even underdeveloped. Putting them both together, I would say that the dry phase interval itself, as value of 4:30, has nothing wrong, is spot on in the middle of 3-6 minutes interval recommended by Artisan code. It's the browning phase that is too short, related to this dry interval. If you could manage to extend it to at least 4 minutes, you should get better flavors, even without preheat. About last phase, development, I have nothing to say good or bad... it seems withing acceptable limits, me too I am sometimes that short, but with lower RoR at FC. Again a sample of nordic roast approach, only there I seen RoR speed at FC over 10C/min, and so short development times, under 1:30, goal being, again, favor acid notes. Extending the browning phase should fix this fast RoR at FC too. Not the last... we should be aware this study was been conducted most probably on production roasters, and very likely the study didn't included a FB machine. But I still believe the ET ranges recommended are valid, for small machines too, because they match the temperatures I seen on other non-FB hot air machines, as various hotgun based setups, with mechanical agitation. Why is your particular finish temperature so low temperature... no idea... you need a confirmation from other probe or measurement system that what you read near the plate is right. A later note about the end of the roast... the final, almost vertical, apparently "crash" of BT. I think is not a real crash, but the effect of the drop. The fact it seems to happen before the drop, but this is an Artisan issue I noticed, when selecting optimal smoothing, which I recommend to UN-check, then the BT curve is shifted by some seconds... sometimes too many, that could led to false judgment of the roast evolution. Edited by renatoa on 05/24/2020 2:13 AM |
|
|
|
| renatoa |
Posted on 05/23/2020 4:05 AM
|
|
Administrator Posts: 3104 Joined: September 30, 2016 |
Again, I like to see more opinions here, especially contradicting what I gathered so far, if backed with good arguments. |
|
|
|
| pisanoal |
Posted on 05/25/2020 8:33 PM
|
|
1/4 Pounder Posts: 97 Joined: October 11, 2019 |
Thanks for the super in-depth analysis of my roast curve! I have a few comments. "You are not starting with preheat... well, you should." I am starting with preheat, but I think you are suggesting not enough? This is my main concern with the ET targets as presented. More on this later. You talk about having enough heat to "harden" the exterior of the bean. This is an interesting point, and sounds like it may be a reason for the higher start ET that you quoted from Schulman. For my fluidbeds, this is almost always been a struggle, as if I charge that high, my ROR would be enormously high at the beginning. The larger roaster I built a few months back charged around 280F with a 5 lb load. Your notes on the browning phase are the most interesting to me because I think if I extend that phase a bit to match up with your 4-5 minute recommendation, then the drying phase % would also fall in line it seems? Which also implies my preheat would have been "appropriate" given the roast times being targeted (ignoring the minimum ET target discussion for the moment). I would say this roast is not lacking sweetness in particular, and does not have characteristic underdeveloped notes in response to your comments around that. BUT, that's not to say it is the cause of what I would consider as this roast to be less complex then I would expect from an Ethiopian. Also, maybe if I am successful in applying your recommendations, it might bring out way more sweetness then what it currently has. So back on to the discussion of minimum ET range. Is it possibly a sign that my roaster is loaded too lightly and I should charge with more greens? I think I could manipulate airflows some and push the ET a little higher without pushing the roast too fast, but I'm pretty limited there. Maybe its as simple as add more greens until I'm charging closer to 325 and still completing roasts in 10-12ish minutes. I think two steps for me would be... 1.) apply your recommendations at current greens load 2.) increase greens load and correspondingly increase ET to try to get to the 325 charge target and complete roast within recommended times. Also for the record (in response to your comment on TC accuracy), these probes have been checked against other TCs and are within a few degrees of each other. Definitely not off by more then 10F to attribute TC error to too low of ET. Again, thanks for the excellent information. I'll post back with comments on my next roasts as I try the steps I listed above. |
|
|
|
| allenb |
Posted on 05/26/2020 7:45 AM
|
 Administrator Posts: 3869 Joined: February 23, 2010 |
It's good that discussions are taking place in regards to fluidbed profiles as fluidbeds do present certain challenges not encountered in drum roasters. When roasting with a 1 1/2 bag Sivetz a few years back, it was always the case that the first roast of the day, with no preheating, cupped better than all the rest. That isn't to say that we weren't giving the coffee sufficient heat at the start of the roast but for some reason the coffee preferred starting at a lower ambient temperature and quickly ramping up to somewhere around 300F ET for the first couple of minutes and then moving up from there through the drying phase. When preheating and starting with too high of an ET, controlling ROR low enough to hit the sweet spot for EOD is difficult for certain roasters depending on rate of conduction of heat to the entire bed. As long as the fluidbed roaster has optimal bean circulation and the load isn't so small that channeling occurs, and the heat source can be controlled to a low enough output, you shouldn't need to increase batch size in order to obtain the desired profile curve but there is definitely a difference in the cup when roasting larger versus smaller batch size in a given roaster. This is of course without exceeding recommended ET maximum temps. I've never heard any discussions as to why this is the case. Edited by allenb on 05/26/2020 7:50 AM 1/2 lb and 1 lb drum, Siemens Sirocco fluidbed, presspot, chemex, cajun biggin brewer from the backwoods of Louisiana
|
|
|
|
| CharcoalRoaster |
Posted on 05/26/2020 8:35 AM
|
 1 1/2 Pounder  Posts: 640 Joined: April 13, 2012 |
Quote allenb wrote: It's good that discussions are taking place in regards to fluidbed profiles as fluidbeds do present certain challenges not encountered in drum roasters. When roasting with a 1 1/2 bag Sivetz a few years back, it was always the case that the first roast of the day, with no preheating, cupped better than all the rest. That isn't to say that we weren't giving the coffee sufficient heat at the start of the roast but for some reason the coffee preferred starting at a lower ambient temperature and quickly ramping up to somewhere around 300F ET for the first couple of minutes and then moving up from there through the drying phase. When preheating and starting with too high of an ET, controlling ROR low enough to hit the sweet spot for EOD is difficult for certain roasters depending on rate of conduction of heat to the entire bed. So interesting you brought this up Allen -- considering this has been my experience with my own 500g FB Roaster! When I start "cold" basically I'm able to achieve a very consistent ROR and uniform roast. I leave the heat on and control blower speed to manage the roast. However, when I load into a charged RC I end up with wildly melanged roasts and it's very difficult to control with having to manually switch on/off heater as well as speed of blower. This exact problem is why I'm building a larger capacity roaster because I simply can't do back-back roasts with my current roaster. I'm very curious to test out a higher charge temp as discussed above but worried about having the same difficulty controlling the roast as well as the outcome of some beans barely making it to 1C while others are practically Vienna. I only control my roaster with variable speed on the blower and constant heat from beginning to end. On the new roaster I would like to use Artisan and track roast profiles but all this math/science/code talk has this theologian's head spinning  Thanks to Renatoa for the great info and all participants in this thread. Really insightful  |
|
|
|
| allenb |
Posted on 05/30/2020 6:39 PM
|
|
Administrator Posts: 3869 Joined: February 23, 2010 |
In order to fine tune roasts and come up with optimum rate of rise curves in a fluidbed, as with drum roasters, one needs to reduce variables to an absolute minimum so as to not be chasing more than one of them down various rabbit holes between roasts. For a fluidbed, one needs to maintain a consistent bean spouting/agitation level from roast to roast that varies as little as possible and only utilize heat input as the variable to eventually find optimum profiles. This requires being able to manually control the heat throughout the roast or being able to set varying output levels during the various stages via automation which ultimately requires monitoring and controlling rate of rise. Getting control of rate of rise and maintaining a consistent heat transfer coefficient via agitation rate is not just a nice to have but is an absolute necessity for anyone ever hoping to achieve repeatable outcomes. Without achieving this, one can stumble upon great roasts from time to time but will be a roll of the dice.
1/2 lb and 1 lb drum, Siemens Sirocco fluidbed, presspot, chemex, cajun biggin brewer from the backwoods of Louisiana
|
|
|
|
| CharcoalRoaster |
Posted on 05/30/2020 7:49 PM
|
|
1 1/2 Pounder Posts: 640 Joined: April 13, 2012 |
I think I understand what you're saying Allen but if I recall, OldGearHead made a point many years ago when I embarked on my FB roasting career... in the garage hahaha... that constant heat will achieve a nice ROR if spouting bed/fluidization of the bean mass can be controlled and is effectively controlled. I turn the heat on and don't adjust. However, I do adjust incoming ambient air as well as blower speed to control the bean mass from either spouting out of control or becoming stagnant resulting in scorching and/or irregular roast outcomes. If I hear you then I'm just reducing my variable to blower control instead of heat control...  |
|
|
|
| allenb |
Posted on 05/31/2020 8:20 PM
|
|
Administrator Posts: 3869 Joined: February 23, 2010 |
My point was that one should avoid large changes in air flow that result in slow minimal spouting at one point in the roast and towards the end, blasting them towards the top of the roast chamber in order to keep ET low enough to keep rate of rise in check. Most fluidbed designs force one to go to these extremes in air flow if maintaining a constant heat input but if you're able to get through a roast without this occurring then all should be good. All of the ones I've built or used required extreme variation if heat input was fixed.
1/2 lb and 1 lb drum, Siemens Sirocco fluidbed, presspot, chemex, cajun biggin brewer from the backwoods of Louisiana
|
|
|
|
| georgemvg |
Posted on 02/08/2022 1:35 PM
|
|
Newbie Posts: 2 Joined: January 26, 2021 |
I am frustrated. I found the topic interesting, though I do not know if my question is related. I am very familiar with controlling water temperature with a pid. Though, coffee roasting with a fluidbed roaster, has two "items", one is the air and the other are the beans. As you rise the ET, them the BT comes along and follows the ET, with an offset that tends to become zero, as roasting cycle comes to end. What is the point of a pid, except from a preheating cycle? You cannot set a stable desired ET and leave the beans to roast. I have no roasting experience, but I am trying to understand the machine fundamentals to build my own roaster. If you have two identical BT graphs, with identical bean density and moisture, wouldn't the roasted result be the same? |
|
|
|
| renatoa |
Posted on 02/08/2022 2:09 PM
|
|
Administrator Posts: 3104 Joined: September 30, 2016 |
Quote georgemvg wrote: ... 1. Though, coffee roasting with a fluidbed roaster, has two "items", one is the air and the other are the beans. 2. As you rise the ET, them the BT comes along and follows the ET, with an offset that tends to become zero, as roasting cycle comes to end. 3. What is the point of a pid, except from a preheating cycle? 4. You cannot set a stable desired ET and leave the beans to roast. ... 5. If you have two identical BT graphs, with identical bean density and moisture, wouldn't the roasted result be the same? 1. Not always both are variables... there are various approaches. Some people could perform a roast keeping airflow constant the whole cycle, others the opposite, set a fixed power and drive the roast from airflow only. And both succeed. 2. Never the offset will be zero, even close... for a FB. To have an average of 5C degrees RoR for BT through the dev phase, ET have to be at least 10-20 C degrees higher than BT. 3. Even the preheating can be done without PID... finding by experiments the power level for your preheat target. You start with 100%, then lower to say 40% for 180 C, when you are at 170 C. And wait stabilize. Could be faster than a an out of tune PID. But many people roast with FB without any preheat, there is no need for such big power focused in such small volume. The 100 grams machines can reach 200C in a minute starting from ambient with less than 50%, if airflow is right. 4. This thread subject establish that you have at least 2 temperatures of interest during a roast. Starting directly with the higher level could be too much for the beans. Conversely, the lower level could be not enough to drive them to FC. 5. Yes, this is the point of profile following, but so far the people seems mesmerized by the BT profiles, requiring very precise beans measurement. Very few ventures into mastering roasting based on ET profiles, and even less into power profiles. Especially the last is the most recommended approach for a FB machine, imo. For this purpose a new "PID" type was been introduced, called him "proportional on setpoint", that obtain heater power directly from BT profile data, without measuring anything, and no error estimating. And it works pretty accurate... |
|
|
|
| georgemvg |
Posted on 02/08/2022 2:31 PM
|
|
Newbie Posts: 2 Joined: January 26, 2021 |
Quote renatoa wrote: Quote georgemvg wrote: ... 1. Though, coffee roasting with a fluidbed roaster, has two "items", one is the air and the other are the beans. 2. As you rise the ET, them the BT comes along and follows the ET, with an offset that tends to become zero, as roasting cycle comes to end. 3. What is the point of a pid, except from a preheating cycle? 4. You cannot set a stable desired ET and leave the beans to roast. ... 5. If you have two identical BT graphs, with identical bean density and moisture, wouldn't the roasted result be the same? 1. Not always both are variables... there are various approaches. Some people could perform a roast keeping airflow constant the whole cycle, others the opposite, set a fixed power and drive the roast from airflow only. And both succeed. 2. Never the offset will be zero, even close... for a FB. To have an average of 5C degrees RoR for BT through the dev phase, ET have to be at least 10-20 C degrees higher than BT. 3. Even the preheating can be done without PID... finding by experiments the power level for your preheat target. You start with 100%, then lower to say 40% for 180 C, when you are at 170 C. And wait stabilize. Could be faster than a an out of tune PID. But many people roast with FB without any preheat, there is no need for such big power focused in such small volume. The 100 grams machines can reach 200C in a minute starting from ambient with less than 50%, if airflow is right. 4. This thread subject establish that you have at least 2 temperatures of interest during a roast. Starting directly with the higher level could be too much for the beans. Conversely, the lower level could be not enough to drive them to FC. 5. Yes, this is the point of profile following, but so far the people seems mesmerized by the BT profiles, requiring very precise beans measurement. Very few ventures into mastering roasting based on ET profiles, and even less into power profiles. Especially the last is the most recommended approach for a FB machine, imo. For this purpose a new "PID" type was been introduced, called him "proportional on setpoint", that obtain heater power directly from BT profile data, without measuring anything, and no error estimating. And it works pretty accurate... 3. ?y main question is about pid. What is the point of all these poppers pid upgrades I see, if you cannot set a desired temperature, and you manually control airflow and power? For the initial sampling roasting? When you set the power, either by a knob or by computer, lets say at 60 percent, the power is at 60 percent. No changes from pid there... A common temperature graph of a pid control, is the effort of the pid to maintain as best as possible a temperature that is given to it. 5. Can you elaborate on that? |
|
|
|
| renatoa |
Posted on 02/09/2022 2:47 AM
|
|
Administrator Posts: 3104 Joined: September 30, 2016 |
As I wrote, the pid is necessary for the "follow the profile" dominant mantra. Ask them why they don't limit the upgrades to the bare necessities required for a right roast... maybe the temptation of big boys complicate toys... obsession of control the more the knobs, the happier I am... My perception is that not all the guys are jumping right to the most complicate update especially for the pid reason... if you mean the TC4, most popular upgrade solution, it's only a coincidence, the pid is there as a bonus, not as main attraction... only some of the sketches done for TC4 are featuring a pid, and a lot of people is not using it... imo. If you mean the plastic black boxes, known as pid temperature controllers, they aren't used in FB roasters, they are too slow. Their realm is rather in boilers, or big machines, with 30 seconds response time. If you mean elaborate on proportional on setpoint control, please check the attached graph. This roast is done with such control method. Basically the lower red graph line, the heater power, is derived directly from the desired BT graph, using a single proportionality factor, and not related with any actual temperature at all. There are no integrative, nor derivative corrections, so this approach can't be called a PID. Sure, there was a measurement in that machine, as you can see, but is just for the record, not for control. And to check how close was the real roast to the background profile (the graphs with pale colors). Using other wording, the power graph is a scaled down version of the BT graph, with a constant factor for the whole roast. The formula of this control is below: HTR% = MIN% + (BT-AT)/kP, where MIN% is a minimum power at start, in this case 25%, visible on graphic too BT is the desired beans temp value at a moment of roast AT is ambient kP is the process proportionality factor, value = 5 for this roast For example, the power level at dry end, 150 C degrees, according to the formula above should be: 25% + (150-25)/5 = 50% ... and you can check from the graph it is exactly as this. How I find the values of these two factors I wrote above, that controls the whole roast? The proportionality factor can be very close approximate from the heater level where your machine stabilize empty at 200 C value, which was 48% for the machine use for the graph. The minimum starting value is more empirical... I am using as starting point half of the power level for 200 C I wrote above. It depends a lot of ambient temperature, the colder outside, the higher the MIN% If you preheat the machine, then you can start with a much lower value, but not zero. Obviously these values depends on your machine power and load... the above were for a 2000W machine and 100 grams load. But if you find yours following the same logic, and you start a test roast this way, there are great chances to obtain a good roast, with DE/FC in reasonable time windows, i.e. 3-4 minutes for DE and 6-8 minutes for FC. From there you can play easily with "profiles" taking into account that about 3-4% power percent changes shift the roast duration by about a minute.
renatoa attached the following image:

Edited by renatoa on 02/09/2022 8:48 AM |
|
|
|

Page 1 of 2: 12
| Jump to Forum: |
Powered by PHP-Fusion Copyright © 2024 PHP-Fusion Inc
Released as free software without warranties under GNU Affero GPL v3
Designed with ♥ by NetriXHosted by skpacman