
Login

Shoutbox
You must login to post a message.
renatoa
07/26/2024 3:49 PM
Bill grubbe and Jk, 
allenb
07/26/2024 5:15 AM
Spiderkw Welcome to HRO!

renatoa
07/24/2024 8:31 AM
ramiroflores and John123,

 ?
?
?renatoa
07/21/2024 1:18 AM
 , Luislobo
renatoa
07/19/2024 11:28 AM
Koepea,
Forum Threads
Newest Threads
Skywalker roaster modsBackground Roast Iss...
Hello from Arkansas
TC4ESP
Green coffee reviews
Hottest Threads
| Skywalker roaster... | [375] |
| TC4ESP | [115] |
| War on Farmers by... | [47] |
| Adventures in flu... | [26] |
| Hello! (soon) Roa... | [17] |
In Memory Of Ginny

Donations
Latest Donations
dmccallum - 10.00
JackH - 25.00
snwcmpr - 10.00
Anonymous - 2.00
Anonymous - 5.00
dmccallum - 10.00
JackH - 25.00
snwcmpr - 10.00
Anonymous - 2.00
Anonymous - 5.00
Users Online
Guests Online: 3
Members Online: 0
Total Members: 8,393
Newest Member: Bill grubbe
Members Online: 0
Total Members: 8,393
Newest Member: Bill grubbe
View Thread
Who is here? 2 guest(s)
Page 1 of 2: 12
|
 "Well tempered roaster" more feedback
|
|
| allenb |
Posted on 07/25/2021 3:25 PM
|
 Administrator Posts: 3869 Joined: February 23, 2010 |
Renatoa posted back in 2017 a roasting method suggested by Jim Schulman of Coffeecuppers.com https://homeroast...ad_id=5300 using a fairly simple ET based time/temp regimen where one starts the roast with an air temperature of around 175c (350F) for the first few minutes and then go up to a higher temperature for the main part of the roast which can be anywhere from 250c (480F) (recommended safe temp) to 265c (510F) or so depending on efficiency of heat transfer., I have thought for a while that this simplistic approach couldn't possibly produce great coffee and that great coffee would always need a carefully crafted profile based on BT but after roasting on a small hot air roaster I got from snwcmpr recently and controlling it with my Fuji PXR4 with ramp/soak controls set to control ET, I have totally reversed my thinking. I had previously roasted a Kenya from Happy Mug called Jungle in my gas fired drum roaster using my preferred profile with a 5:30 to dry and finish around 12 minutes and the coffee was excellent and I thought that one would have a hard time beating the cup quality. After reading Renatoa's thread again, I decided to give the method a try to see once and for all how it would do with a known quantity. I set the Fuji on the hot air roaster to run ET at 160c (320F) for 4 min and then go to 265c (510F) for the remainder of the roast with the Kenya from Happy Mug. It hit first crack at 7:37 and I killed the heat at 8:50 with 1C still having some popping action. I did a presspot this morning and I'll have to say that I haven't had a coffee explode with flavor like this in a few years. This totally eclipsed the cup quality of the drum roast by a huge margin which was totally unexpected. With this development, I am going to be trying all of my current green stash with this setup to see if I find similar results. Edited by allenb on 07/25/2021 3:33 PM 1/2 lb and 1 lb drum, Siemens Sirocco fluidbed, presspot, chemex, cajun biggin brewer from the backwoods of Louisiana
|
|
|
|
| renatoa |
Posted on 07/26/2021 1:55 AM
|
|
Administrator Posts: 3104 Joined: September 30, 2016 |
Thank you, Allen, to endorse with your personal results the way I am using for roast the last years. One more thing should be emphasized though: this way is for roasting methods where we know very well the hot air temperature, the main heating force that is performing the roast. Knowing very well means hot air measurement as close as possible to beans, but no into beans  ET should be read as Environment, not Exhaust ! So, machines like solid drum, with ET probes placed on exhaust tube, aren't good candidates for this theory. Also, the same apply for machines using a significant quota of IR for roasting. On more reading on this subject, this time even more heresy... no temperature at all, ma ! https://www.rkdru...mperature/ ... in this case their method looks like coming from a lot of practice, not attending Jim Schulman lectures at Nestle If anyone is interested about the maths/physics that stay behind this way of roasting, I can elaborate more on this subject. The theory was for me as much as interesting as the roasting results, and the studies done these years helped me much find explanations that shows roasting concepts, as is the declining RoR, as natural phenomenons, and not a necessity to follow. And obviously, as for many real world processes that have a known math background, this is now carved in code, as an automatic roasting algorithm. Edited by renatoa on 08/29/2021 4:13 AM |
|
|
|
| allenb |
Posted on 07/27/2021 2:17 PM
|
|
Administrator Posts: 3869 Joined: February 23, 2010 |
Glad you clarified the terminology regarding ET as it is typically tossed around too much without any qualifications so it could mean almost anything. I really wish we could eliminate the word from roaster lexicons entirely as it is useless. Yes, we're talking about roasting based on control of the hot air temperature that is entering the roast chamber and immediately contacting the beans and is the only source of heat the beans are affected by. Environment Temperature is too vague as it can mean, as you stated, the air temperature surrounding the beans as in a drum roaster which is not what we're talking about. In regards to BBQ drum roasting. My guess is the average gas fired BBQ grill roaster most likely allows the coffee to follow a fairly nice curve just by it's thermal characteristics and therefore only requires one to control the BTU input at start and will typically follow a declining curve throughout the roast. In defense of Scott Rao, his claim, in short, was that the best cupping results reported by numerous roasters, came from roasts (mostly or only drum roasters) that showed a smooth constantly declining rate of rise versus profiles where, for what ever reason, the curve was kept flat or was showing irregular swings up and down. To my knowledge, no one else had ever published any articles showing a connection between declining RoR and better cupping scores. Since roasting the Kenya Jungle using the ET based simple control in the hot air roaster, I have now also roasted and cupped my Papua New Guinea and Uganda Bugisu in the hot air roaster and both of these cupped better than the longer roast in my drum roaster. I've now got to rethink my roasting methods and see if I get as good of a cup by trying a similar two stage simple profile and reduced roast time using my drum roaster. Lessens learned with this development is no one should get comfortable with a roasting method and/or profile that they think is unable to be improved upon. Always make a point to experiment and be open to ideas that may seem to have no merit. 1/2 lb and 1 lb drum, Siemens Sirocco fluidbed, presspot, chemex, cajun biggin brewer from the backwoods of Louisiana
|
|
|
|
| CharcoalRoaster |
Posted on 07/29/2021 2:09 PM
|
 1 1/2 Pounder  Posts: 640 Joined: April 13, 2012 |
Quote allenb wrote: ... one starts the roast with an air temperature of around 175c (350F) for the first few minutes and then go up to a higher temperature for the main part of the roast which can be anywhere from 250c (480F) (recommended safe temp) to 265c (510F) or so depending on efficiency of heat transfer... This intrigues me and I would like to try it on my own air roaster. I do have one question though about the temps though. What happens if your roaster isn't capable of hitting the temps on the high side? On my FB roaster I track temps in between the heating element and roast chamber but never ever come close to temps as high as 480F+. Maybe it's my temp probes or the distance between the element and the actual RC (10-12") that messes up the reading. I usually have a constant RoR profile with a finish time at FC around 10-12min depending on ambient temperature |
|
|
|
| allenb |
Posted on 07/29/2021 2:22 PM
|
|
Administrator Posts: 3869 Joined: February 23, 2010 |
Are you controlling your air temperature to allow hitting the constant RoR and 1C at 10-12 minutes or is this profile happening with the element maxed out?
1/2 lb and 1 lb drum, Siemens Sirocco fluidbed, presspot, chemex, cajun biggin brewer from the backwoods of Louisiana
|
|
|
|
| renatoa |
Posted on 07/29/2021 2:34 PM
|
|
Administrator Posts: 3104 Joined: September 30, 2016 |
The roast will be longer, if temperature is lower than the maximum above. My typical roast FC happens around 234 C hot air temperature, in the minute 10 ballpark. Temperature is measured about 3 cm above the beans bed, in a TO setup. Re-reading again the original post linked by allen at the beginning of thread, please notice this part of mr. Schulman recipe: Quote But the heat inputs required moment by moment to achieve this ET curve is based on the roaster's thermal characteristics, and is different for every roaster design. Actually, the whole recipe is important, not only numbers. Remove any part and you lack some meaning. So, whatever your probe reads, if you have FC around minute 10 this means two things: your machine is not overloaded, and the the beans were immersed the second half of roast time in hot air having 240-250C. Otherwise you wouldn't have gotten there. Is a simple thermodynamics equation that drive all the things we call profile. And it is precise enough to calculate a virtual BT for machines like Gene, more relevant than the exhaust air temperature on display. |
|
|
|
| CharcoalRoaster |
Posted on 07/29/2021 6:11 PM
|
|
1 1/2 Pounder Posts: 640 Joined: April 13, 2012 |
Quote allenb wrote: Are you controlling your air temperature to allow hitting the constant RoR and 1C at 10-12 minutes or is this profile happening with the element maxed out? I have my element running at about 50% with manual control over blower speed to keep a steady fluidized bed in the attempt for a 9-12min roast length. If I run my heater at 100% I can complete FC within 7min. I know this would seem to say that I'm obviously running hotter temps but my thermocouple (where currently located) reads but in either scenario I still finish FC around the same temp (340*). I've always known this can't be right considering the temps needed to get beans to FC but just assumed it was because of bad thermocouple placement or some other defect. I mostly have been using that thermocouple just to make sure temps are rising and my element hasn't shorted or blown  |
|
|
|
| CharcoalRoaster |
Posted on 07/29/2021 6:31 PM
|
|
1 1/2 Pounder Posts: 640 Joined: April 13, 2012 |
Quote does it matter if the temp probe is in the RC above the bean bed or directly below air input into RC? I'm just thinking that a temp probe in a FB setup that is 3cm above the beginning of the bean bed will be thoroughly immersed by the bean mass halfway through the roast... |
|
|
|
| renatoa |
Posted on 07/30/2021 1:50 AM
|
|
Administrator Posts: 3104 Joined: September 30, 2016 |
Air input is a very vague concept in a cyclonic turbo oven, check attached image. In such setup the beans doesn't float, nor bubble, the airflow is lower than in a FB, but higher than in a drum machine. Beans are spread and roll in a perforated pan, so 3 cm above bean bed means a lot, no chance for the beans influence measurement. Probably under the roasting pan is the equivalent of your hot air input, but never thought of measuring temperature there
renatoa attached the following image:

|
|
|
|
| renatoa |
Posted on 07/30/2021 2:01 AM
|
|
Administrator Posts: 3104 Joined: September 30, 2016 |
An example how looks for me the power dosing and hot air temperature in a typical roast. Again, the events temperatures are for hot air, not beans. Notice the constant power input from minute 5 onward. For those intrigued about the fact that hot air temperature is not constant in the second half... a TO machine of this kind is not the best example for this thread, because it has an important IR quota in the roasting energy mix, coming from the halogen lid. And this quota increase in the browning phase, because beans are more and more dark, absorbing more and more IR energy. So my reasoning was to keep power constant, instead trying to reach a maximum value at minute 4-6, and keep steady from there, as stated by JS. ~~~
renatoa attached the following image:

Edited by renatoa on 07/30/2021 10:12 AM |
|
|
|
| allenb |
Posted on 07/30/2021 3:24 PM
|
|
Administrator Posts: 3869 Joined: February 23, 2010 |
CharcoalRoaster wrote: Quote does it matter if the temp probe is in the RC above the bean bed or directly below air input into RC? I'm just thinking that a temp probe in a FB setup that is 3cm above the beginning of the bean bed will be thoroughly immersed by the bean mass halfway through the roast... renatoa was only commenting on probe placement in regards to a turbo oven setup. Had nothing to do with the previous conversation we were having related to your roaster's hot air temp not being read accurately. With that said, you can still experiment with what Jim Schulman was describing even though you are not able to use the actual hot air discharge temperature numbers he mentioned. My advice in order to approximate the method would be to find a heat level at start of roast that allow beans hitting very pale green and maybe just getting to the yellow/gold stage by minute 4, then find a higher heat level that when held constant will get you to first crack by minute 7 or 8, then you can back off on heat level by a small % from beginning of first crack till you end the roast or just continue through first crack at the same heat level till roast end. Once you establish your hot air temps that work for this, you can try enhancing the procedure by making a few steps in power increase between the beginning power level and final power level which allows a more gradual ramp through the middle phase of the roast. My advice, if you want to see if your results match what I described in my first post, keep it a simple two temperature roast ending in no more than 8 1/2 minutes from start of roast and cup your coffees. Then try a more refined heat input by ramping up power levels in between change to yellow and first crack instead of just the two heat levels which may allow an improved cup or may not. 1/2 lb and 1 lb drum, Siemens Sirocco fluidbed, presspot, chemex, cajun biggin brewer from the backwoods of Louisiana
|
|
|
|
| renatoa |
Posted on 07/31/2021 2:30 AM
|
|
Administrator Posts: 3104 Joined: September 30, 2016 |
Yep, the key to success is continuous heat increase, as smooth as you can, up to the level that give you FC in the desired ballpark. Forget all the airflow/power trickeries your read are used for drum machines, does not apply for FB machines, or other setups with massive airflow. The whole theory that make me so confident in JS statements is exposed in the #29 post of well tempered roaster thread, here: https://homeroast...post_71563 In addition of that post, let's give you an instrument to play with numbers to obtain... well, profiles If you go at this address: https://www.symbo...calculator, and input this equation: 25 + (245-25) * (1-exp(-t * 0.003)) in the upper left text panel... ... you will see drawing the most perfect profile you can dream to achieve. The 200 C line, where is the typical FC, will be crossed at 8:50 (530 seconds), and from there the profile will continue with a nice 7 C / minute increase rate. The equation above is the one from the theory post, thermodynamic law of a body heat absorption when immersed in a hot environment. How should we read the parameters: 25 (C) is the ambient, 245 (C) is the hot air temperature, the infamous ET , t is time, and 0.003 = k, is a constant embedding all the physical characteristics of the process: machine, beans, moisture, everything.You can use this tool to "reverse engineer" a past roast, in order to guess a future roast parameters. As allen wrote, try a random pair of temperatures, and write down the final power percent, and FC time. With this info in hand, after the roast finishes, heat the empty machine to the power percent you note above, and let it stabilize. Use the stable temperature as ET in the equation drawing tool, then play with k factor (beware, veeery small steps), to find a profile that crosses the 200C line at your recorded FC time. This new found k value, let's say 0.0032, describe your machine profile, for those specific beans, and that load. Using this new k factor, you can find what ET temperature you need to dial for a shorter or longer future roast. Having this ET you can also guesstimate the power percent needed, counting about 3 C degrees for 1% of power change. As in 80% for 240 C... 81% for 243 , etc. Good luck ! Edited by renatoa on 08/29/2021 4:21 AM |
|
|
|
| CharcoalRoaster |
Posted on 08/01/2021 7:30 AM
|
|
1 1/2 Pounder Posts: 640 Joined: April 13, 2012 |
So I gave this method a shot and perhaps my little roaster has more heating power than the thermocouple is leading me on to believe. Started a little hot at yellowed at 3:30 then turned up the heat from 55% power to 75% power and had to dial it back quickly so I didn't hit first crack by 6min! I finished the roast around 7:30 just before the conclusion of FC. It'll hit the brewer tomorrow morning. I may have to try again today now that I was paying a bit more attention to effects of power increase based on a profile like the ones you guys suggested. cheers! |
|
|
|
| allenb |
Posted on 08/01/2021 7:21 PM
|
|
Administrator Posts: 3869 Joined: February 23, 2010 |
It looks like you have ample power to spare. A little experimentation and you can have things dialed in.
1/2 lb and 1 lb drum, Siemens Sirocco fluidbed, presspot, chemex, cajun biggin brewer from the backwoods of Louisiana
|
|
|
|
| renatoa |
Posted on 08/02/2021 5:14 AM
|
|
Administrator Posts: 3104 Joined: September 30, 2016 |
This approach is not about a radical change in your roasting workflow, but how to obtain good roast without being obsessed about accurate BT readings and RoR declining. If you have a good roast on a hot air machine, then the power levels to get the same good roast without head banging about BT should be very close, in a 5% band I estimate. So, any experiment you are doing, try to preserve the power levels you have from a previous good known roast. Don't hesitate to compute your ultimate gain parameter of your machine, it's an useful number to figure how to dial the power to get next time the desired evolution of the roast. Let's assume CharcoalRoaster dialed back quickly the power to... 64%, just an example. This means his machine ultimate gain is 240 / 64 = 3.75. 240 C is a hot air temperature where FC surely must happen for an average roaster and bean. This means every power percent led to hot air temperature change by 3.75 C degrees. Having this info, we can compute the next roast starting power, in order to have 175C the load temperature, as 175 / 3.75 = 47% Also, from the heat absorption equation in the post above, we can learn/compute, that every 5C degrees shift in ET move FC by about 30 seconds. With this info in hand you can compute the power level to get a FC in the desired ballpark, starting from a known (bad or good) roast. |
|
|
|
| renatoa |
Posted on 10/12/2021 2:01 PM
|
|
Administrator Posts: 3104 Joined: September 30, 2016 |
Another good lecture on this subject, basically duplicating the above in a crash course format probably easier to understand for roasters. https://www.ikawa...mperature/ |
|
|
|
| TheHobo |
Posted on 10/14/2021 12:48 AM
|
|
Newbie  Posts: 16 Joined: September 14, 2021 |
So I just tried this on my Corretto/HGBM roaster and keen to get your thoughts. I use a heatgun with digital display - I set the temp to 180C and waited for the system to reach some level of equilibrium which took about 5 minutes. Once that occurred, I proceeded to put 300g of indian elephant hills beans in. As you can see, the RoR appears to have dropped too much at the start, and at ~4 minutes when I bumped the temp up to 270C, it has jumped up again. There are some ups and downs which I believe may be due to thermocouple placement or noise or something else? Not quite sure as I didn't touch the controls again. Things I think I need to do next. * Thermal blanket around bread pan to reduce heat loss * Incorporate some sort of funnel so I can drop the beans in without lifting the entire lid and thus losing heat. I'm hoping this will turn out to be an ok batch still - time will tell I guess!  Picture of my setup:  |
|
|
|
| TheHobo |
Posted on 10/14/2021 12:53 AM
|
|
Newbie Posts: 16 Joined: September 14, 2021 |
Quote renatoa wrote: An example how looks for me the power dosing and hot air temperature in a typical roast. Again, the events temperatures are for hot air, not beans. Notice the constant power input from minute 5 onward. For those intrigued about the fact that hot air temperature is not constant in the second half... a TO machine of this kind is not the best example for this thread, because it has an important IR quota in the roasting energy mix, coming from the halogen lid. And this quota increase in the browning phase, because beans are more and more dark, absorbing more and more IR energy. So my reasoning was to keep power constant, instead trying to reach a maximum value at minute 4-6, and keep steady from there, as stated by JS. ~~~ Would it be fair to say that you've slowly increased the "HTR" or heat from about the 30 second mark up to four minutes in small increments? |
|
|
|
| renatoa |
Posted on 10/14/2021 4:05 AM
|
|
Administrator Posts: 3104 Joined: September 30, 2016 |
Yes, the bottom red line is power level, from 44% at charge, to about 75% the final level I kept to the end. Your machine is very close as thermal model to my TO, so I think the same approach should work for your too: charge keeping the same heat level as you have used for preheat, then after TP, start ramping temperature on HG display, in order to reach 270C at the end of drying, about minute 4-5. This equates to about 25-30 C degrees per minute ramp: (270-180)/3-4, if we assume TP at minute 1. Adjust this increase according to your HG dialing capabilities... for example if you can adjust only in 10 degrees increments, one step every 20-30 seconds. This way the bump of RoR at minute 4 should be removed. If you roast tethered to a computer, then the approach would be more simple: check the trending line, and the DE estimator, and increase temperature a step each moment when trending line reach a maximum, and start stalling. Do not wait the trending line pass the maximum and start drop to horizontal ! Edited by renatoa on 10/14/2021 4:19 AM |
|
|
|
| TheHobo |
Posted on 10/14/2021 4:37 AM
|
|
Newbie Posts: 16 Joined: September 14, 2021 |
Thanks very much - makes complete sense. I now have a LOT of roasted coffee to get through though, so looks like i'll be waiting at least a week before I try again. Are there any pictures of your setup? I haven't seen a Turbo Oven controlled by PC before. |
|
|
|
| renatoa |
Posted on 10/14/2021 6:26 AM
|
|
Administrator Posts: 3104 Joined: September 30, 2016 |
Is not controlled by PC, but a TC4 on st-ESP-roids This way there is no more need for computer, the extensions added to original TC4 software give me all the info I need to get rid of Artisan. |
|
|
|
| alnt |
Posted on 11/21/2021 6:17 PM
|
|
Newbie Posts: 4 Joined: February 22, 2020 |
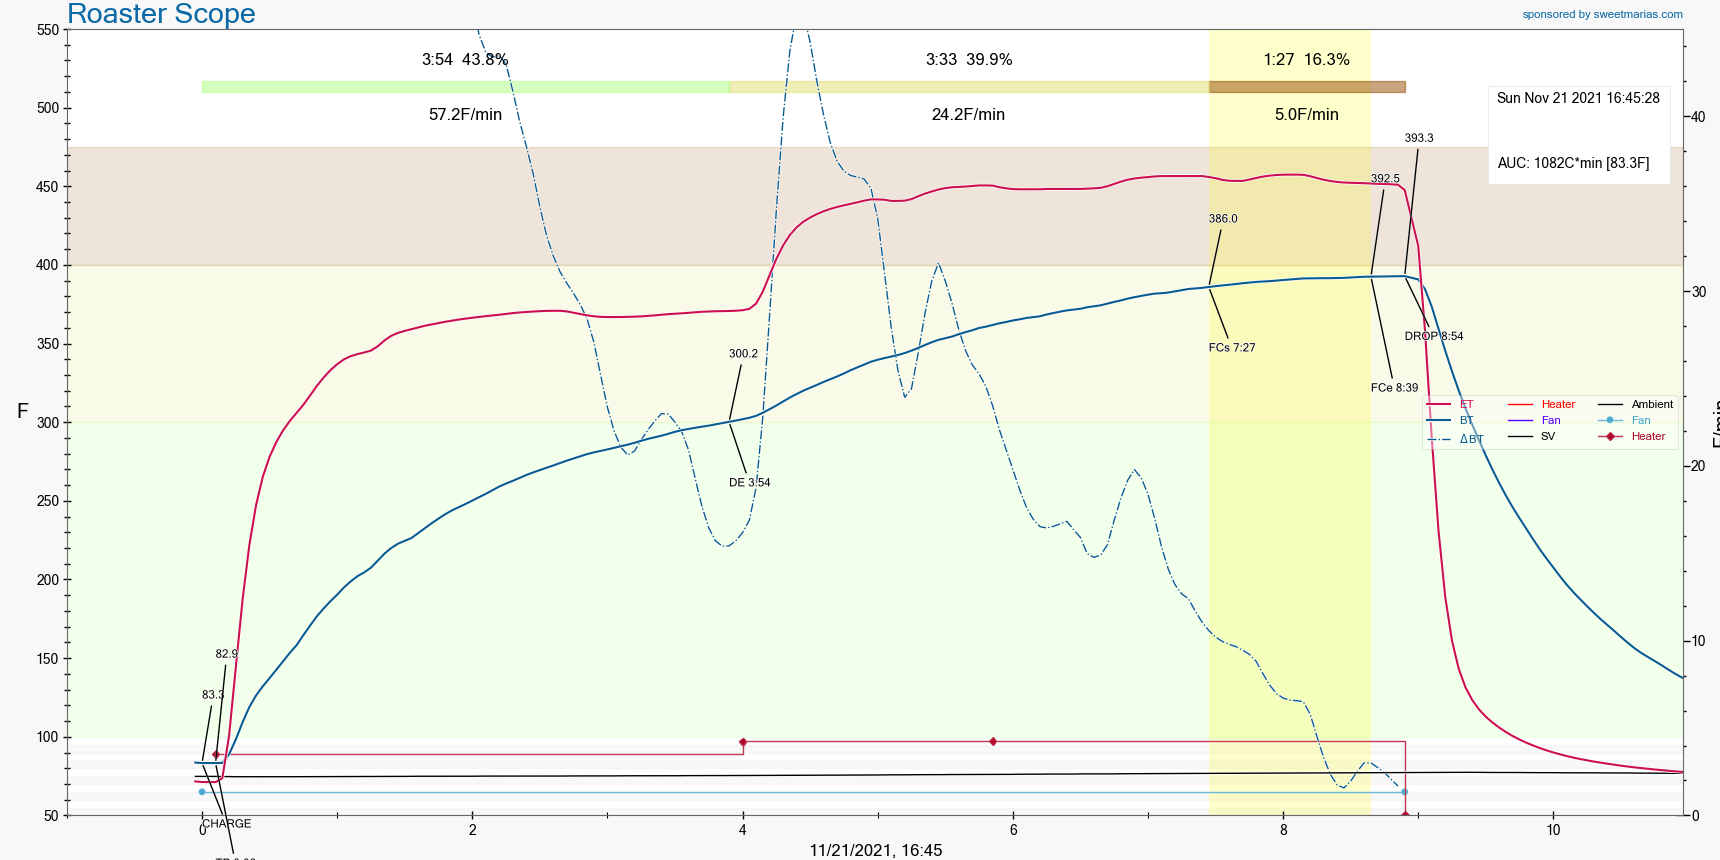
Hi all, Inspired by allenb's and renatoa's comments I gave the two step process a go. After some trial and error I was able to achieve the following roast using a peru wet processed bean from sweet maria's. This seems to be in line with several of the suggestions of dry end about 4 min, then 3+ min to first crack and then shutting off just after first crack (one or two pops still going on). I have not tasted this yet, but how does this look?
alnt attached the following image:
|
|
|
|
| renatoa |
Posted on 11/22/2021 1:52 AM
|
|
Administrator Posts: 3104 Joined: September 30, 2016 |
The most important interval in your graph, after minute 5, looks very well ! Drying is not so critical. Well done ! First step should be around minute 2. The sign who show us is the flattening of ET under 200 C / 400 F, first checkpoint after load is to reach ET 200 C within 1-2 minutes. An Ikawa lecturer recommends even 218C / 424F as target of ET through dry phase. Next hint is the corresponding RoR drop due to ET flattening. Is optimal try keeping RoR average around 40F/20C during dry phase. I would increase power immediately when I see Ror dropping under 50 and heading to 40, in your graph. Two steps is not a mantra. You can try three, even four smaller steps, if you are able to achieve a smoother RoR decline. Edited by renatoa on 11/22/2021 6:48 AM |
|
|
|
| alnt |
Posted on 11/23/2021 7:27 PM
|
|
Newbie Posts: 4 Joined: February 22, 2020 |
Thanks for the tips. I�m traveling over the holiday so I won�t be able to try them out for a while, but I�ll post results when I have them. |
|
|
|
| alnt |
Posted on 11/28/2021 10:00 AM
|
|
Newbie Posts: 4 Joined: February 22, 2020 |
I brewed the coffee from the profile shown above in an immersion cone after the coffee sat for about 1 week in a sealed jar, and it had more acidity and sweetness than previous roasts of this coffee. I don't have a refined enough pallet to pick out fruit flavors (if there are any), but I did notice a hint of tea-like flavor as the coffee cooled. When I roast again I'll try renatoa's hints and see what impact those have. It's getting relatively cold here, so my batch size will probably shrink from ~150g to 130g to give the same level of control over the roast - more opportunities for experimentation! |
|
|
|

Page 1 of 2: 12
| Jump to Forum: |
Powered by PHP-Fusion Copyright © 2024 PHP-Fusion Inc
Released as free software without warranties under GNU Affero GPL v3
Designed with ♥ by NetriXHosted by skpacman